set clock KIA RIO HATCHBACK 2017 User Guide
[x] Cancel search | Manufacturer: KIA, Model Year: 2017, Model line: RIO HATCHBACK, Model: KIA RIO HATCHBACK 2017Pages: 532, PDF Size: 12.04 MB
Page 239 of 532
Features of your vehicle
4169
Bluetooth®Wireless
Technology Setting
The Bluetooth®word mark and logos
are registered trademarks owned by
Bluetooth SIG, Inc. and any use of
such marks by Kia is under license.
Other trademarks and trade names
are those of their respective owners.
A Bluetooth
®enabled cell phone is
required to use
Bluetooth®Wireless
Technology.
Pairing a New Device
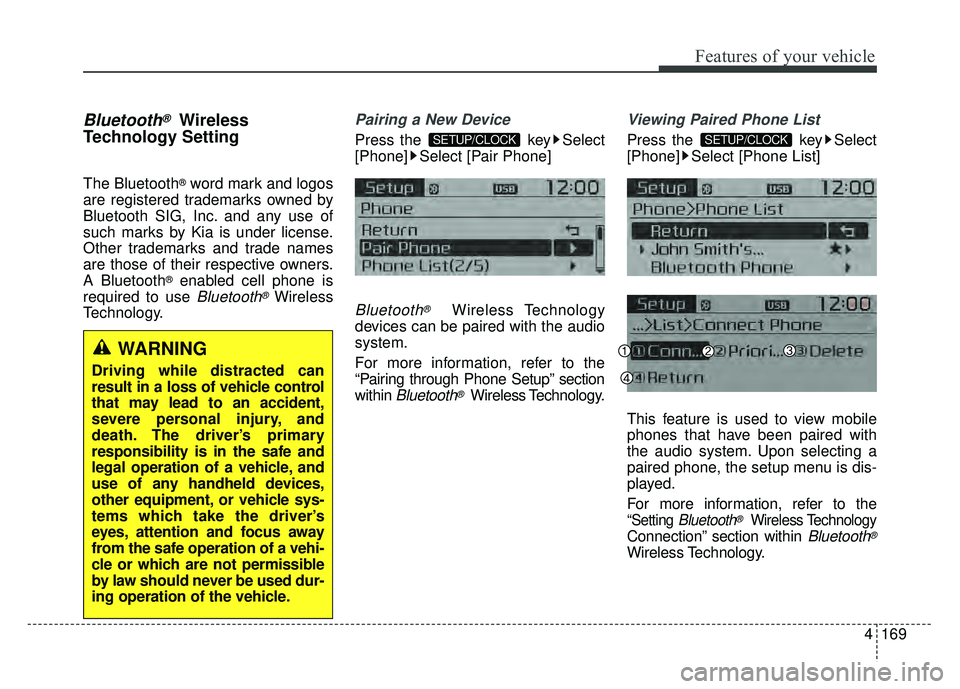
Press the key Select
[Phone] Select [Pair Phone]
Bluetooth®Wireless Technology
devices can be paired with the audio
system.
For more information, refer to the
“Pairing through Phone Setup” section
within
Bluetooth®Wireless Technology.
Viewing Paired Phone List
Press the key Select
[Phone] Select [Phone List]
This feature is used to view mobile
phones that have been paired with
the audio system. Upon selecting a
paired phone, the setup menu is dis-
played.
For more information, refer to the
“Setting Bluetooth®Wireless Technology
Connection” section within Bluetooth®
Wireless Technology.
SETUP/CLOCKSETUP/CLOCK
WARNING
Driving while distracted can
result in a loss of vehicle control
that may lead to an accident,
severe personal injury, and
death. The driver’s primary
responsibility is in the safe and
legal operation of a vehicle, and
use of any handheld devices,
other equipment, or vehicle sys-
tems which take the driver’s
eyes, attention and focus away
from the safe operation of a vehi-
cle or which are not permissible
by law should never be used dur-
ing operation of the vehicle.
Page 240 of 532
Features of your vehicle
170
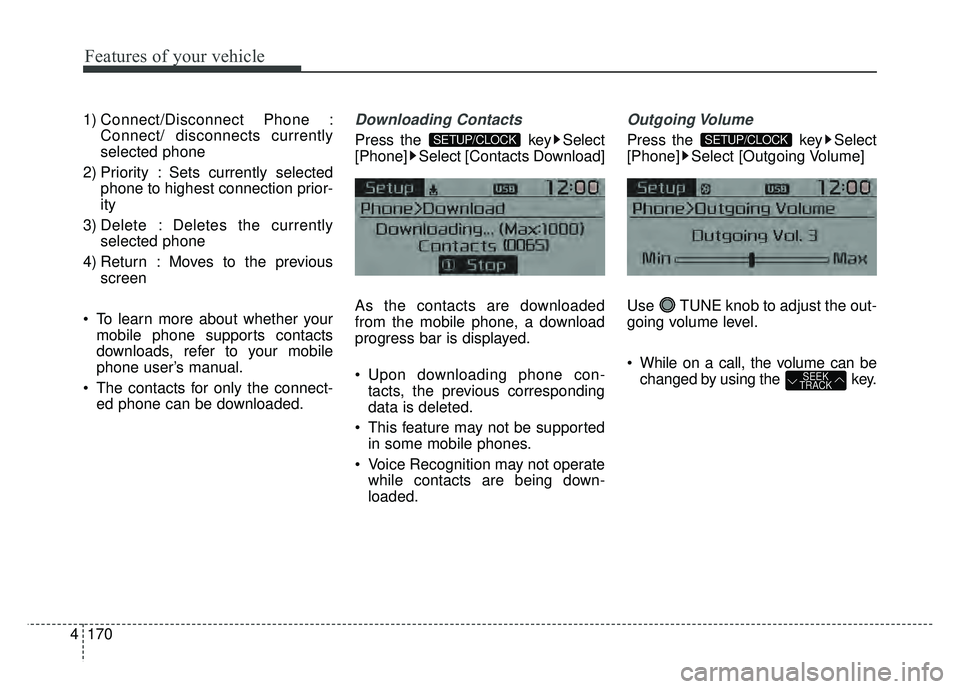
4 1) Connect/Disconnect Phone :
Connect/ disconnects currently
selected phone
2) Priority : Sets currently selected phone to highest connection prior-
ity
3) Delete : Deletes the currently selected phone
4) Return : Moves to the previous screen
To learn more about whether your mobile phone supports contacts
downloads, refer to your mobile
phone user’s manual.
The contacts for only the connect- ed phone can be downloaded.
Downloading Contacts
Press the key Select
[Phone] Select [Contacts Download]
As the contacts are downloaded
from the mobile phone, a download
progress bar is displayed.
Upon downloading phone con- tacts, the previous corresponding
data is deleted.
This feature may not be supported in some mobile phones.
Voice Recognition may not operate while contacts are being down-
loaded.
Outgoing Volume
Press the key Select
[Phone] Select [Outgoing Volume]
Use TUNE knob to adjust the out-
going volume level.
While on a call, the volume can be changed by using the key.
SEEK
TRACK
SETUP/CLOCKSETUP/CLOCK
Page 241 of 532
![KIA RIO HATCHBACK 2017 User Guide Features of your vehicle
4171
Turning Bluetooth System Off
Press the key Select
[Phone] Select [Bluetooth System
Off]
Once
Bluetooth®Wireless Technology
is turned off,
Bluetooth®Wireless
Technolog KIA RIO HATCHBACK 2017 User Guide Features of your vehicle
4171
Turning Bluetooth System Off
Press the key Select
[Phone] Select [Bluetooth System
Off]
Once
Bluetooth®Wireless Technology
is turned off,
Bluetooth®Wireless
Technolog](/img/2/57977/w960_57977-240.png)
Features of your vehicle
4171
Turning Bluetooth System Off
Press the key Select
[Phone] Select [Bluetooth System
Off]
Once
Bluetooth®Wireless Technology
is turned off,
Bluetooth®Wireless
Technology related features will not be
supported within the audio system.
To turn
Bluetooth®Wireless Technology
back on, go to [Phone]
and select “Yes”.
SETUP/CLOCK
SETUP/CLOCK
Page 242 of 532
![KIA RIO HATCHBACK 2017 User Guide Features of your vehicle
172
4
VOICE RECOGNITION
Using Voice Recognition
Starting Voice Recognition
Shortly press the key on the
steering wheel. Say a command.
If prompt feedback is in [ON], then
t KIA RIO HATCHBACK 2017 User Guide Features of your vehicle
172
4
VOICE RECOGNITION
Using Voice Recognition
Starting Voice Recognition
Shortly press the key on the
steering wheel. Say a command.
If prompt feedback is in [ON], then
t](/img/2/57977/w960_57977-241.png)
Features of your vehicle
172
4
VOICE RECOGNITION
Using Voice Recognition
Starting Voice Recognition
Shortly press the key on the
steering wheel. Say a command.
If prompt feedback is in [ON], then
the system will say “Please say a
command after the beep (BEEP)”
If prompt feedback is in [OFF]
mode, then the system will only
say “(BEEP)”
To change Prompt Feedback [On]/[Off], go to
[System] [Prompt Feedback]
For proper recognition, say the command after the voice instruc-
tion and beep tone.
Contact List Best Practices
1) Use full names vs. short or single- syllable names (“John Smith” vs.
“Dad”, “Smith Residence” vs.
“Home”)
2) Avoid using special characters or hyphens (@, &, #, /, -, *, +, etc.)
3) Avoid using acronyms (“In Case Emergency” vs. “ICE”)
4) Spell words completely, no abbre- viations (“Doctor Goodman” vs.
“Dr. Goodman”)
Skipping Prompt Messages
While prompt message is being stat-
ed Shortly press the key on the
steering remote controller
The prompt message is immediately
ended and the beep tone will sound.
After the “beep”, say the voice com-
mand.
Re-starting Voice Recognition
While system waits for a command
Shortly press the key on the
steering remote controller
The command wait state is immedi-
ately ended and the beep tone will
sound. After the “beep”, say the voice
command.
SETUP/CLOCK
Page 253 of 532
4183
Features of your vehicle
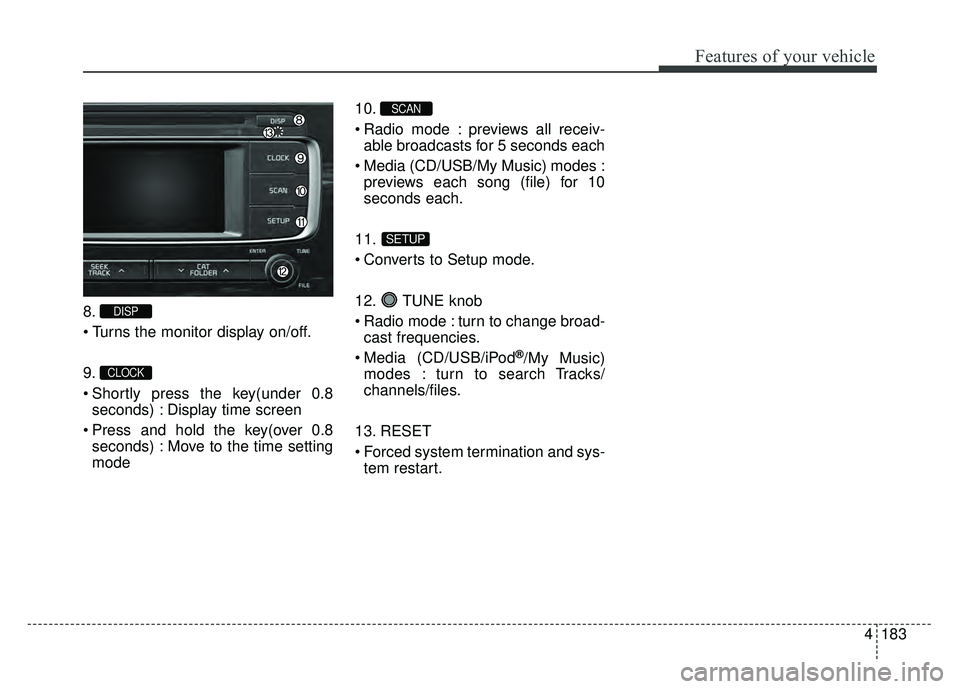
8.
9.
Shortly press the key(under 0.8seconds) : Display time screen
Press and hold the key(over 0.8 seconds) : Move to the time setting
mode 10.
Radio mode : previews all receiv-
able broadcasts for 5 seconds each
Media (CD/USB/My Music) modes : previews each song (file) for 10
seconds each.
11.
Converts to Setup mode.
12. TUNE knob
Radio mode : turn to change broad- cast frequencies.
Media (CD/USB/iPod
®/My Music)
modes : turn to search Tracks/
channels/files.
13. RESET
Forced system termination and sys- tem restart.
SETUP
SCAN
CLOCK
DISP
Page 304 of 532
Features of your vehicle
234
4
SETUP
Starting Mode
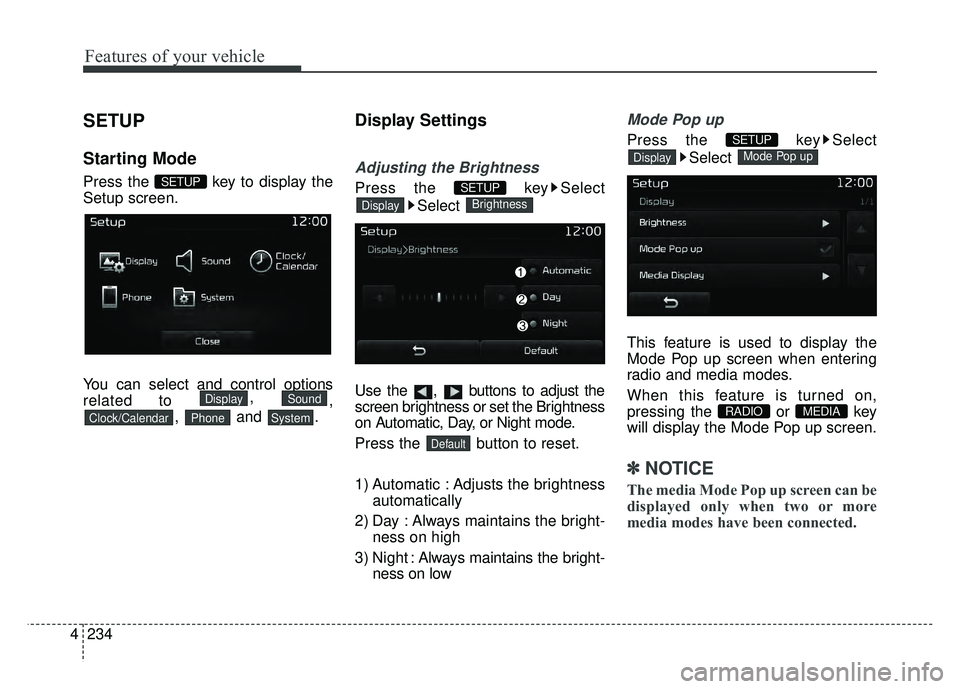
Press the key to display the
Setup screen.
You can select and control options
related to ,
,
, and .
Display Settings
Adjusting the Brightness
Press the key Select
Select
Use the , buttons to adjust the
screen brightness or set the Brightness
on Automatic, Day, or Night mode.
Press the button to reset.
1) Automatic : Adjusts the brightness automatically
2) Day : Always maintains the bright- ness on high
3) Night : Always maintains the bright-
ness on low
Mode Pop up
Press the key Select
Select
This feature is used to display the
Mode Pop up screen when entering
radio and media modes.
When this feature is turned on,
pressing the or key
will display the Mode Pop up screen.
✽ ✽ NOTICE
The media Mode Pop up screen can be
displayed only when two or more
media modes have been connected.
MEDIA RADIO
Mode Pop upDisplay
SETUP
Default
BrightnessDisplay
SETUP
SystemPhoneClock/Calendar
SoundDisplay
SETUP
Page 306 of 532
Features of your vehicle
236
4
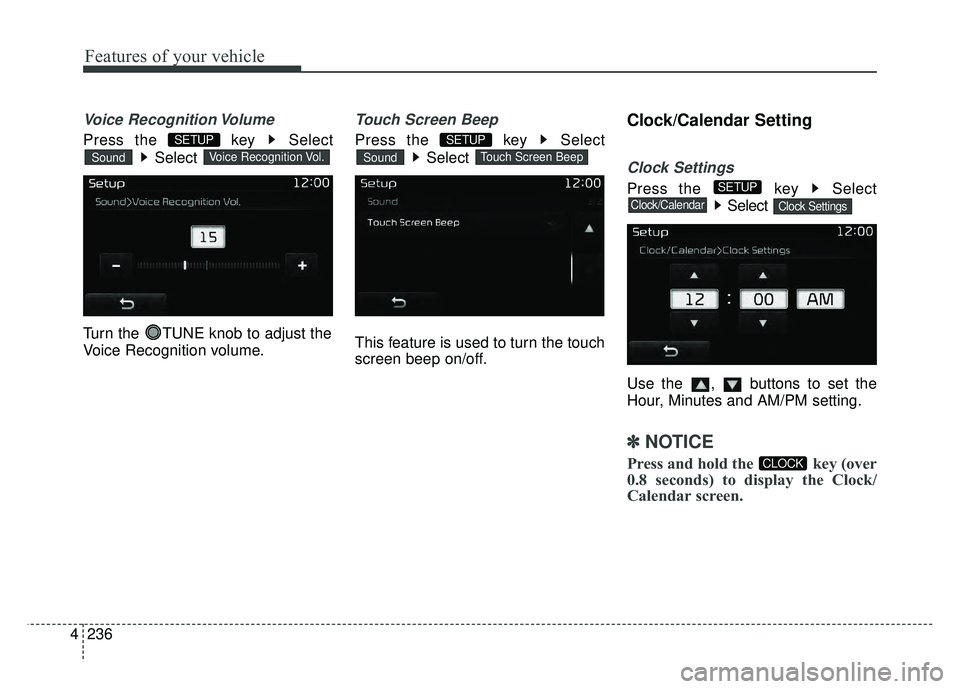
Voice Recognition Volume
Press the key Select
Select
Turn the TUNE knob to adjust the
Voice Recognition volume.
Touch Screen Beep
Press the key Select Select
This feature is used to turn the touch
screen beep on/off.
Clock/Calendar Setting
Clock Settings
Press the key Select Select
Use the , buttons to set the
Hour, Minutes and AM/PM setting.
✽ ✽ NOTICE
Press and hold the key (over
0.8 seconds) to display the Clock/
Calendar screen.CLOCK
Clock SettingsClock/Calendar
SETUP
Touch Screen BeepSound
SETUP
Voice Recognition Vol.Sound
SETUP
Page 307 of 532
4237
Features of your vehicle
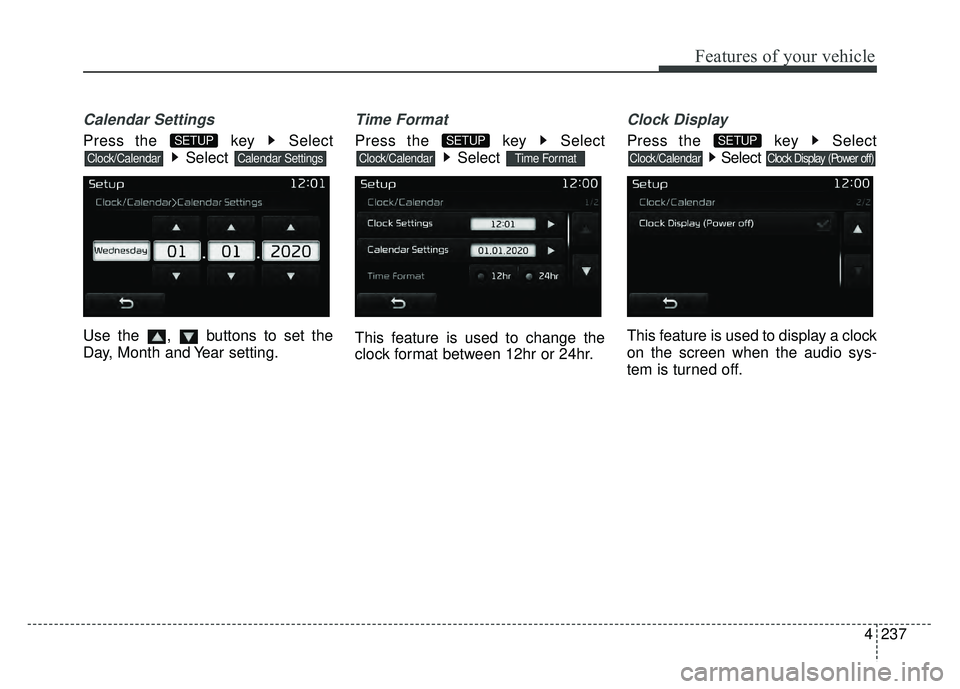
Calendar Settings
Press the key SelectSelect
Use the , buttons to set the
Day, Month and Year setting.
Time Format
Press the key Select Select
This feature is used to change the
clock format between 12hr or 24hr.
Clock Display
Press the key Select Select
This feature is used to display a clock
on the screen when the audio sys-
tem is turned off.
Clock Display (Power off)Clock/Calendar
SETUP
Time FormatClock/Calendar
SETUP
Calendar SettingsClock/Calendar
SETUP
Page 389 of 532
What to do in an emergency
16
6
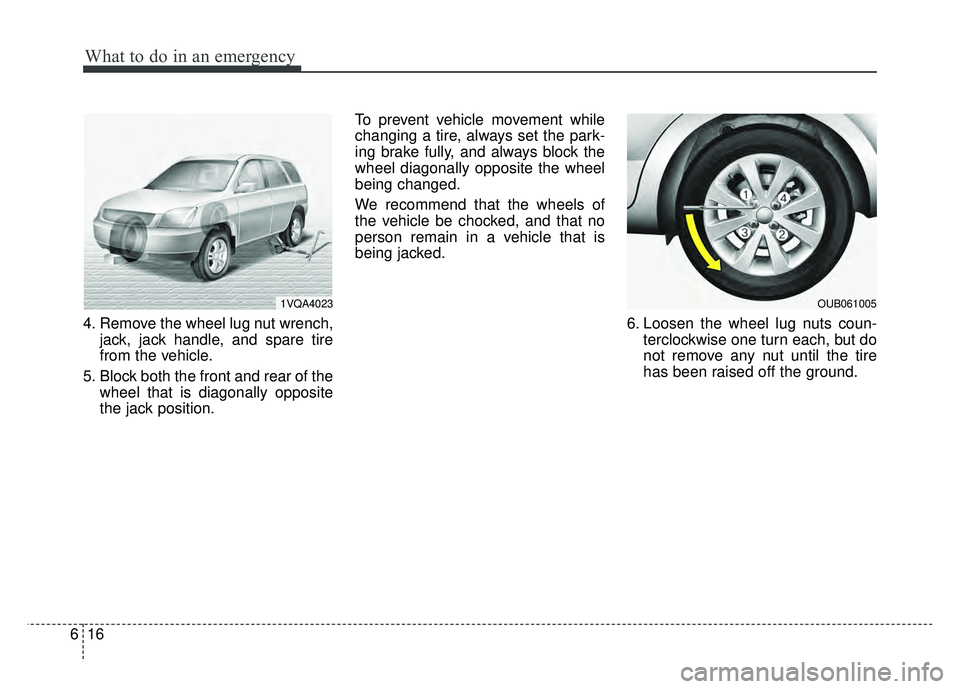
4. Remove the wheel lug nut wrench,
jack, jack handle, and spare tire
from the vehicle.
5. Block both the front and rear of the wheel that is diagonally opposite
the jack position. To prevent vehicle movement while
changing a tire, always set the park-
ing brake fully, and always block the
wheel diagonally opposite the wheel
being changed.
We recommend that the wheels of
the vehicle be chocked, and that no
person remain in a vehicle that is
being jacked.
6. Loosen the wheel lug nuts coun-terclockwise one turn each, but do
not remove any nut until the tire
has been raised off the ground.
1VQA4023OUB061005
Page 403 of 532
What to do in an emergency
30
6
When towing your vehicle in an
emergency without wheel dollies :
1. Set the ignition switch in the ACC
position.
2. Place the transaxle shift lever in N (Neutral).
3. Release the parking brake.
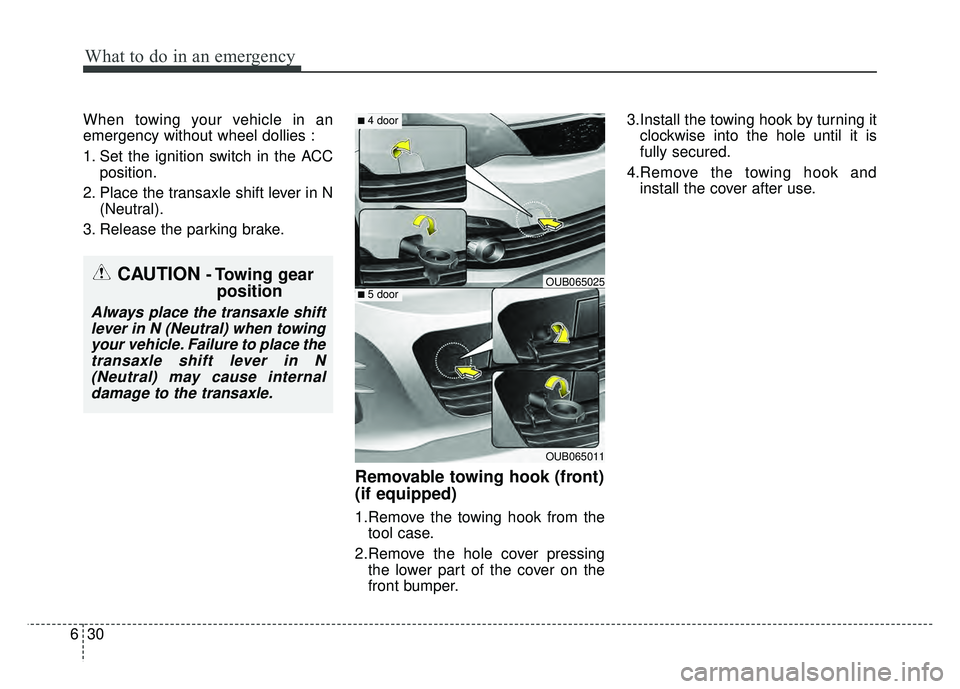
Removable towing hook (front)
(if equipped)
1.Remove the towing hook from the tool case.
2.Remove the hole cover pressing the lower part of the cover on the
front bumper. 3.Install the towing hook by turning it
clockwise into the hole until it is
fully secured.
4.Remove the towing hook and install the cover after use.
CAUTION - Towing gear position
Always place the transaxle shift
lever in N (Neutral) when towingyour vehicle. Failure to place thetransaxle shift lever in N(Neutral) may cause internaldamage to the transaxle.
OUB065011
■ 4 door
■ 5 doorOUB065025