check engine light KIA RIO HATCHBACK 2017 Owner's Manual
[x] Cancel search | Manufacturer: KIA, Model Year: 2017, Model line: RIO HATCHBACK, Model: KIA RIO HATCHBACK 2017Pages: 532, PDF Size: 12.04 MB
Page 367 of 532
555
Driving your vehicle
To keep locks from freezing
To keep the locks from freezing,
squirt an approved de-icer fluid or
glycerine into the key opening. If a
lock is covered with ice, squirt it with
an approved de-icing fluid to remove
the ice. If the lock is frozen internally,
you may be able to thaw it out by
using a heated key. Handle the heat-
ed key with care to avoid injury.
Use approved window washer
anti-freeze in system
To keep the water in the window
washer system from freezing, add an
approved window washer anti-freeze
solution in accordance with instruc-
tions on the container. Window wash-
er anti-freeze is available from an
authorized Kia dealer and most auto
parts outlets. Do not use engine
coolant or other types of anti-freeze
as these may damage the paint fin-
ish.
Don't let your parking brake
freeze
Under some conditions your parking
brake can freeze in the engaged
position. This is most likely to hap-
pen when there is an accumulation
of snow or ice around or near the
rear brakes or if the brakes are wet.
If there is a risk the parking brake
may freeze, apply it only temporarily
while you put the shift lever in P
(automatic transaxle) or in first or
reverse gear (manual transaxle) and
block the rear wheels so the vehicle
cannot roll. Then release the parking
brake.
Don't let ice and snow accu-
mulate underneath
Under some conditions, snow and
ice can build up under the fenders
and interfere with the steering. When
driving in severe winter conditions
where this may happen, you should
periodically check underneath the
car to be sure the movement of the
front wheels and the steering com-
ponents is not obstructed.
Carry emergency equipment
Depending on the severity of the
weather you should carry appropri-
ate emergency equipment. Some of
the items you may want to carry
include tire chains, tow straps or
chains, flashlight, emergency flares,
sand, a shovel, jumper cables, a win-
dow scraper, gloves, ground cloth,
coveralls, a blanket, etc.
TRAILER TOWING
We do not recommend using this
vehicle for trailer towing.
Page 377 of 532
What to do in an emergency
46
IF THE ENGINE WILL NOT START
If the engine doesn't turn over
or turns over slowly
1. If your vehicle has an automatictransaxle, be sure the shift lever is
in N (Neutral) or P (Park) and the
emergency brake is set.
2. Check the battery connections to be sure they are clean and tight.
3. Turn on the interior light. If the light dims or goes out when you oper-
ate the starter, the battery is dis-
charged.
4. Check the starter connections to be sure they are securely tight-
ened.
5. Do not push or pull the vehicle to start it. See instructions for "Jump
starting".
If engine turns over normally
but does not start
1. Check fuel level.
2. With the ignition switch in theLOCK position, check all connec-
tors at the ignition coil and spark
plugs. Reconnect any that may be
disconnected or loose.
3. Check the fuel line in the engine compartment.
4. If the engine still does not start, call an authorized Kia dealer or
seek other qualified assistance.
WARNING - Push/pullstart
Do not push or pull the vehicle
to start it. Push or pull starting
may cause the catalytic con-
verter to overload and create a
fire hazard.
Page 411 of 532
Maintenance
67
OWNER MAINTENANCE
The following lists are vehicle checks
and inspections that should be per-
formed by the owner or an author-
ized Kia dealer at the frequencies
indicated to help ensure safe,
dependable operation of your vehi-
cle.
Any adverse conditions should be
brought to the attention of your deal-
er as soon as possible.
These Owner Maintenance Checks
are generally not covered by war-
ranties and you may be charged for
labor, parts and lubricants used.Owner maintenance schedule
When you stop for fuel:
Check the engine oil level.
Check the coolant level in coolantreservoir.
Check the windshield washer fluid level.
Look for low or under-inflated tires.
While operating your vehicle:
Note any changes in the sound of the exhaust or any smell of
exhaust fumes in the vehicle.
Check for vibrations in the steering wheel. Notice any increased steer-
ing effort or looseness in the steer-
ing wheel, or change in the
straight-ahead position.
Notice if your vehicle constantly turns slightly or “pulls” to one side
when traveling on smooth, level
road.
When stopping, listen and check for unusual sounds, pulling to one
side, increased brake pedal travel
or “hard-to-push” brake pedal.
If any slipping or changes in the operation of your transaxle occurs,
check the transaxle fluid level.
Check the automatic transaxle P (Park) function.
Check the parking brake.
Check for fluid leaks under your vehicle (water dripping from the air
conditioning system during or after
use is normal).
WARNING - Hot coolant
Be careful when checking your
engine coolant level when the
engine is hot. Scalding hot
coolant and steam may blow
out under pressure.
Page 412 of 532
77
Maintenance
At least monthly:
Check the coolant level in theengine coolant reservoir.
Check the operation of all exterior lights, including the stoplights, turn
signals and hazard warning flash-
ers.
Check the inflation pressures of all tires including the spare.
At least twice a year
(i.e., every Spring and Fall) :
Check the radiator, heater and air conditioning hoses for leaks or
damage.
Check the windshield washer spray and wiper operation. Clean
the wiper blades with clean cloth
dampened with washer fluid.
Check the headlight alignment.
Check the muffler, exhaust pipes, shields and clamps.
Check the lap/shoulder belts for wear and function.
Check for worn tires and loose wheel lug nuts.
At least once a year :
Clean the body and door drainholes.
Lubricate the door hinges and checks, and hood hinges.
Lubricate the door and hood locks and latches.
Lubricate the door rubber weather- strips.
Check the air conditioning system.
Check the power steering fluid level.
Inspect and lubricate automatic transaxle linkage and controls.
Clean the battery and terminals.
Check the brake/clutch fluid level.
Page 455 of 532
Maintenance
50
7
Battery recharging
Your vehicle has a maintenance-free,
calcium-based battery.
If the battery becomes discharged
in a short time (because, for exam-
ple, the headlights or interior lights
were left on while the vehicle was
not in use), recharge it by slow
charging (trickle) for 10 hours.
If the battery gradually discharges because of high electric load while
the vehicle is being used, recharge
it at no more than 20-30A for two
hours. When recharging the battery,
observe the following precautions:
The battery must be removed from
the vehicle and placed in an area
with good ventilation.
Watch the battery during charging, and stop or reduce the charging
rate if the battery cells begin
gassing (boiling) violently or if the
temperature of the electrolyte of
any cell exceeds 120°F (49°C).
Wear eye protection when check- ing the battery during charging.
Disconnect the battery charger in the following order.
1. Turn off the battery charger main switch.
2. Unhook the negative clamp from the negative battery terminal.
3. Unhook the positive clamp from the positive battery terminal.
Before performing maintenance or recharging the battery, turn off all
accessories and stop the engine.
The negative battery cable must be removed first and installed last
when the battery is disconnected.
Reset items
Items should be reset after the bat-
tery has been discharged or the bat-
tery has been disconnected.
Auto down window (See section 4)
Sunroof (See section 4)
Trip computer (See section 4)
Climate control system (See section 4)
Clock (See section 4)
Audio (See section 4)
Page 470 of 532
765
Maintenance
FUSES
A vehicle’s electrical system is pro-
tected from electrical overload dam-
age by fuses.This vehicle has 2 fuse panels, one
located in the driver’s side panel bol-
ster, the other in the engine compart-
ment near the battery.
If any of your vehicle’s lights, acces-
sories, or controls do not work, check
the appropriate circuit fuse. If a fuse
has blown, the element inside the
fuse will melt.
If the electrical system does not
work, first check the driver’s side
fuse panel.
Before replacing a blown fuse, move
to safe place, turn off the engine and
all electric devices, and then discon-
nect the negative battery cable.
Always replace a blown fuse with
one of the same rating.
If the replacement fuse blows, this
indicates an electrical problem. Avoid
using the system involved and imme-
diately consult an authorized Kia
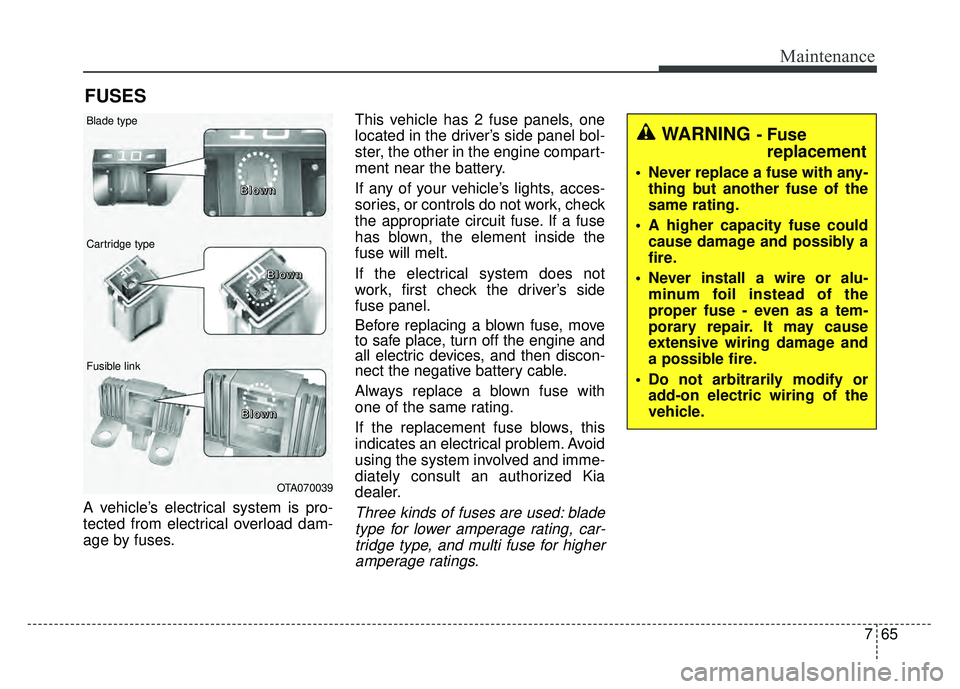
dealer.Three kinds of fuses are used: blade
type for lower amperage rating, car-tridge type, and multi fuse for higheramperage ratings.
WARNING - Fuse replacement
Never replace a fuse with any-
thing but another fuse of the
same rating.
A higher capacity fuse could cause damage and possibly a
fire.
Never install a wire or alu- minum foil instead of the
proper fuse - even as a tem-
porary repair. It may cause
extensive wiring damage and
a possible fire.
Do not arbitrarily modify or add-on electric wiring of the
vehicle.
OTA070039
Blade type
Cartridge type
Fusible link B B
B
B
l
l
l
l
o
o
o
o
w
w
w
w
n
n
n
n
B
B
B
B
l
l
l
l
o
o
o
o
w
w
w
w
n
n
n
n
B
B
B
B
l
l
l
l
o
o
o
o
w
w
w
w
n
n
n
n
Page 472 of 532
767
Maintenance
If you do not have a spare, use afuse of the same rating from a circuityou may not need for operating thevehicle, such as the cigar lighterfuse.
If the headlights or other electrical
components do not work and the
fuses are OK, check the fuse block in
the engine compartment. If a fuse is
blown, it must be replaced.
Memory fuse
Your vehicle is equipped with the
memory fuse to prevent battery dis-
charge if your vehicle is parked with-
out being operated for prolonged
periods. Use the following proce-
dures before parking the vehicle for
prolonged periods.
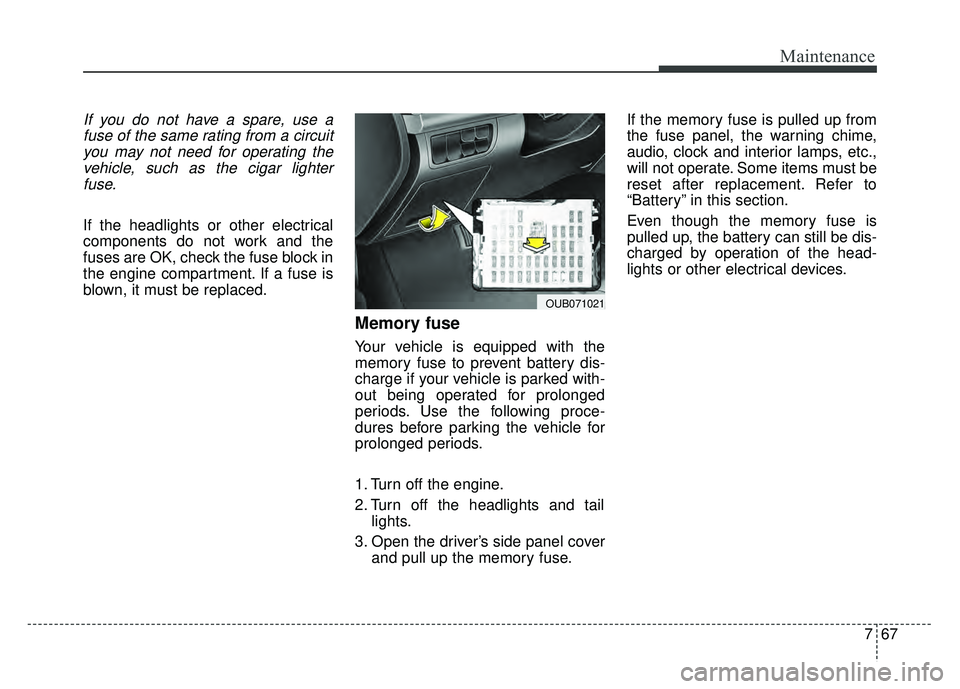
1. Turn off the engine.
2. Turn off the headlights and tail lights.
3. Open the driver’s side panel cover and pull up the memory fuse. If the memory fuse is pulled up from
the fuse panel, the warning chime,
audio, clock and interior lamps, etc.,
will not operate. Some items must be
reset after replacement. Refer to
“Battery” in this section.
Even though the memory fuse is
pulled up, the battery can still be dis-
charged by operation of the head-
lights or other electrical devices.
OUB071021
Page 524 of 532
I3
Index
Calendar ··················\
··················\
··················\
·················4-12\
2
Capacities (Lubricants) ··················\
··················\
················8-6
CareExterior care ··················\
··················\
··················\
··········7-91
Interior care ··················\
··················\
··················\
···········7-96
Tire care ··················\
··················\
··················\
·················7-51\
Cargo capacity ··················\
··················\
··················\
·········5-57
Cargo weight ··················\
··················\
··················\
············5-61
Center console storage ··················\
··················\
·············4-114
Central door lock switch··················\
··················\
············4-19
Certification label ··················\
··················\
···············5-59, 8-9
Chains Tire chains ··················\
··················\
··················\
·············5-53
Changing tires ··················\
··················\
··················\
··········6-15
Checking tire inflation pressure··················\
··················\
·7-52
Child restraint system ··················\
··················\
················3-23 Automatic locking mode ··················\
··················\
·········3-25
Lower anchor ··················\
··················\
··················\
·········3-29
Tether anchor system ··················\
··················\
···············3-28
Child-protector rear door lock ··················\
··················\
···4-20
Cigarette lighter ··················\
··················\
··················\
·····4-118
Climate control air filter··················\
··············4-96/107, 7-43
Clock (Digital) ··················\
··················\
··················\
·······4-122
Clothes hanger ··················\
··················\
··················\
·······4-123 Combined instrument, see instrument cluster ···············4-46
Compact spare tire ··················\
··················\
··················\
···6-20
Compact spare tire replacement ··················\
··················\
7-55
Coolant ··················\
··················\
··················\
··················\
···7-36
Cooling fluid, see engine coolant ··················\
················7-36
Crankcase emission control system ··················\
·············7-98
Cruise control system ··················\
··················\
················5-35
Cup holder ··················\
··················\
··················\
·············4-119
Curtain air bag ··················\
··················\
··················\
·········3-46
Dashboard illumination, see instrument panel
illumination··················\
··················\
··················\
············4-47
Dashboard, see instrument cluster ··················\
···············4-46
Defogging (Windshield) ··················\
··················\
··········4-109
Defogging logic (Windshield) ··················\
··················\
·4-111
Defroster (Rear window) ··················\
··················\
···········4-87
Defrosting (Windshield) ··················\
··················\
··········4-109
Digital clock··················\
··················\
··················\
···········4-122
Dimensions ··················\
··················\
··················\
················8-2
Display illumination, see instrument panel illumination··················\
··················\
··················\
············4-47
Displays, see instrument cluster ··················\
··················\
4-46
Door locks··················\
··················\
··················\
················4-17 Central door lock switch ··················\
··················\
·········4-19
Child-protector rear door lock ··················\
··················\
·4-20
D
C