fog light bulb KIA RIO HATCHBACK 2017 Owners Manual
[x] Cancel search | Manufacturer: KIA, Model Year: 2017, Model line: RIO HATCHBACK, Model: KIA RIO HATCHBACK 2017Pages: 532, PDF Size: 12.04 MB
Page 150 of 532
Features of your vehicle
80
4
Turn signals and lane change
signals
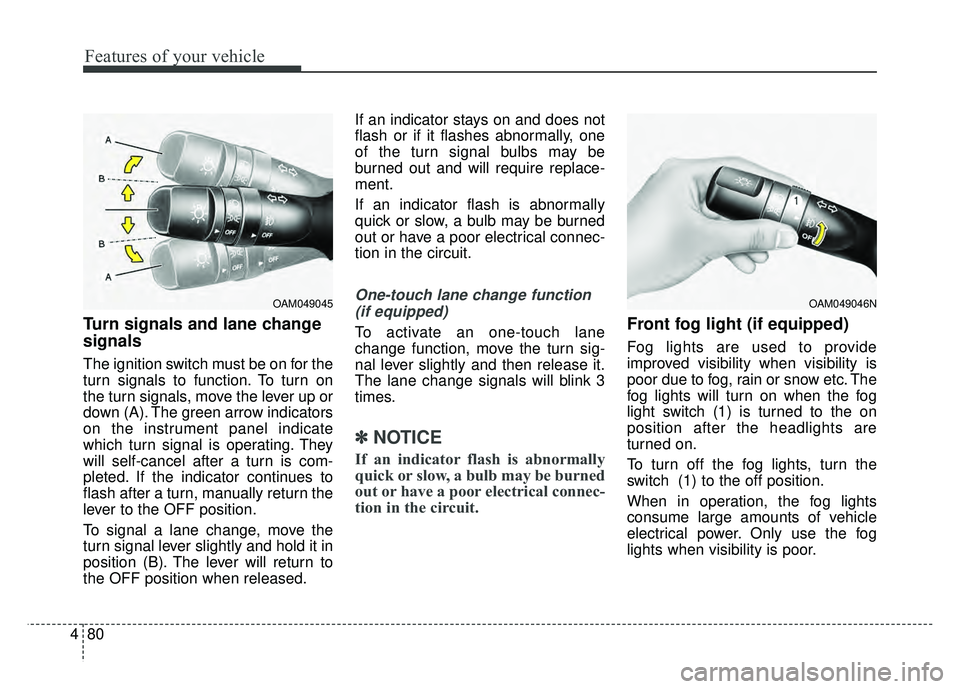
The ignition switch must be on for the
turn signals to function. To turn on
the turn signals, move the lever up or
down (A). The green arrow indicators
on the instrument panel indicate
which turn signal is operating. They
will self-cancel after a turn is com-
pleted. If the indicator continues to
flash after a turn, manually return the
lever to the OFF position.
To signal a lane change, move the
turn signal lever slightly and hold it in
position (B). The lever will return to
the OFF position when released. If an indicator stays on and does not
flash or if it flashes abnormally, one
of the turn signal bulbs may be
burned out and will require replace-
ment.
If an indicator flash is abnormally
quick or slow, a bulb may be burned
out or have a poor electrical connec-
tion in the circuit.
One-touch lane change function
(if equipped)
To activate an one-touch lane
change function, move the turn sig-
nal lever slightly and then release it.
The lane change signals will blink 3
times.
✽ ✽
NOTICE
If an indicator flash is abnormally
quick or slow, a bulb may be burned
out or have a poor electrical connec-
tion in the circuit.
Front fog light (if equipped)
Fog lights are used to provide
improved visibility when visibility is
poor due to fog, rain or snow etc. The
fog lights will turn on when the fog
light switch (1) is turned to the on
position after the headlights are
turned on.
To turn off the fog lights, turn the
switch (1) to the off position.
When in operation, the fog lights
consume large amounts of vehicle
electrical power. Only use the fog
lights when visibility is poor.
OAM049046NOAM049045
Page 407 of 532
Light bulbs . . . . . . . . . . . . . . . . . . . . . . . . . . . . . . . 7-77
position light, turn signal light,front fog light bulb replacement . . . . . . . . . . . . . . . 7-78
. . . . . . . . . . . . 7-82
. . . . . . . . 7-83
. . . . . . . . . . . . 7-88
. . . . . . . . . . . . . 7-89
. . . . . . . . . . . . . . . . . 7-90
Appearance care . . . . . . . . . . . . . . . . . . . . . . . . . . . 7-91
. . . . . . . . . . . . . . . . . . . . . . . . . . . . . . . . 7-91
. . . . . . . . . . . . . . . . . . . . . . . . . . . . . . . . . 7-96
Emission control system . . . . . . . . . . . . . . . . . . . . 7-98
California perchlorate notice . . . . . . . . . . . . . . . 7-101
7
Page 483 of 532
Maintenance
78
7
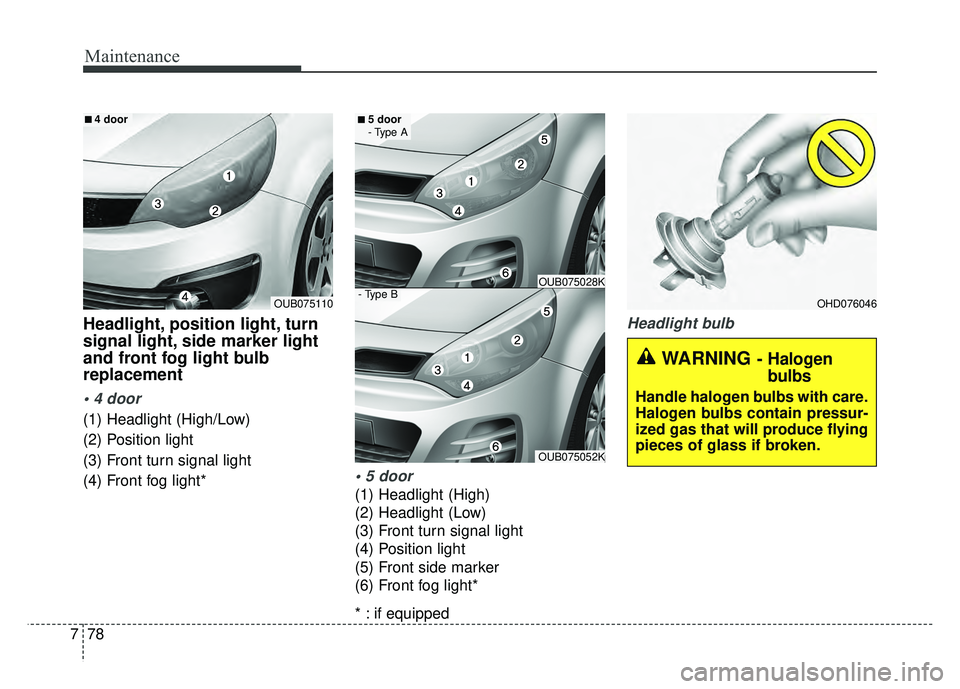
Headlight, position light, turn
signal light, side marker light
and front fog light bulb
replacement
(1) Headlight (High/Low)
(2) Position light
(3) Front turn signal light
(4) Front fog light*
(1) Headlight (High)
(2) Headlight (Low)
(3) Front turn signal light
(4) Position light
(5) Front side marker
(6) Front fog light*
* : if equipped
Headlight bulb
OHD076046
WARNING- Halogen
bulbs
Handle halogen bulbs with care.
Halogen bulbs contain pressur-
ized gas that will produce flying
pieces of glass if broken.
OUB075110
■
■4 door
OUB075052K
■
■5 door
- Type A
- Type BOUB075028K
Page 487 of 532
Maintenance
82
7
Front fog light bulbs (if equipped)
1.Remove the under cover by rotat-
ing the screws.
2.Reach your hand into the back of the front bumper.
3.Disconnect the power connector from the socket.
4.Remove the bulb-socket from the housing by turning the socket
counter clockwise until the tabs on
the socket align with the slots on
the housing.
5.Install the new bulb-socket into the housing by aligning the tabs on the
socket with the slots in the hous-
ing. Push the socket into the hous-
ing and turn the socket clockwise.
6 Connect the power connector to the socket.
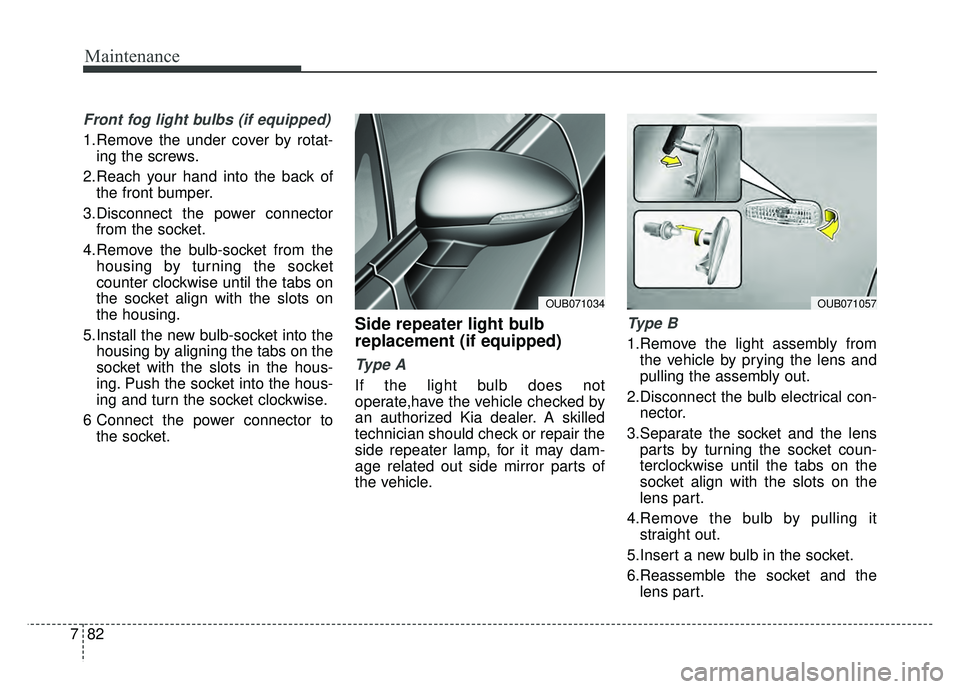
Side repeater light bulb
replacement (if equipped)
Type A
If the light bulb does not
operate,have the vehicle checked by
an authorized Kia dealer. A skilled
technician should check or repair the
side repeater lamp, for it may dam-
age related out side mirror parts of
the vehicle.
Ty p e B
1.Remove the light assembly fromthe vehicle by prying the lens and
pulling the assembly out.
2.Disconnect the bulb electrical con- nector.
3.Separate the socket and the lens parts by turning the socket coun-
terclockwise until the tabs on the
socket align with the slots on the
lens part.
4.Remove the bulb by pulling it straight out.
5.Insert a new bulb in the socket.
6.Reassemble the socket and the lens part.
OUB071034OUB071057
Page 509 of 532
83
Specifications, Consumer information, Reporting safety defects
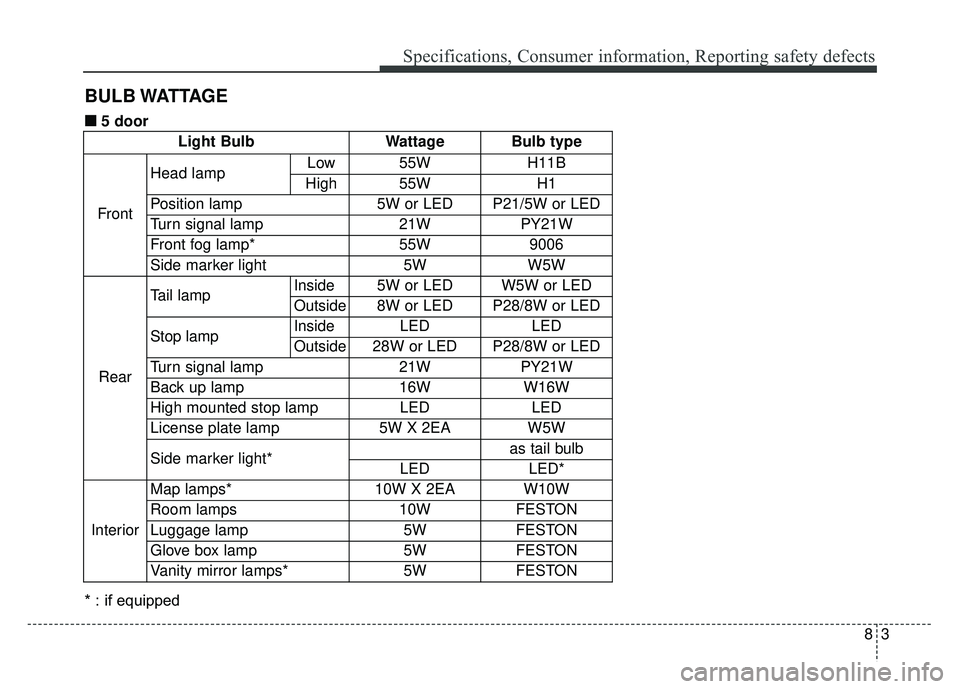
BULB WATTAGE
Light BulbWattageBulb type
Front
Head lamp Low55WH11B
High55WH1
Position lamp5W or LEDP21/5W or LED
Turn signal lamp21WPY21W
Front fog lamp*55W9006
Side marker light5WW5W
Rear
Tail lampInside5W or LEDW5W or LED
Outside8W or LEDP28/8W or LED
Stop lampInsideLEDLED
Outside28W or LEDP28/8W or LED
Turn signal lamp21WPY21W
Back up lamp16WW16W
High mounted stop lampLEDLED
License plate lamp5W X 2EAW5W
Side marker light*as tail bulb
LEDLED*
Interior
Map lamps*10W X 2EAW10W
Room lamps10WFESTON
Luggage lamp5WFESTON
Glove box lamp5WFESTON
Vanity mirror lamps*5WFESTON
* : if equipped■
■
5 door
Page 510 of 532
Specifications, Consumer information, Reporting safety defects
48
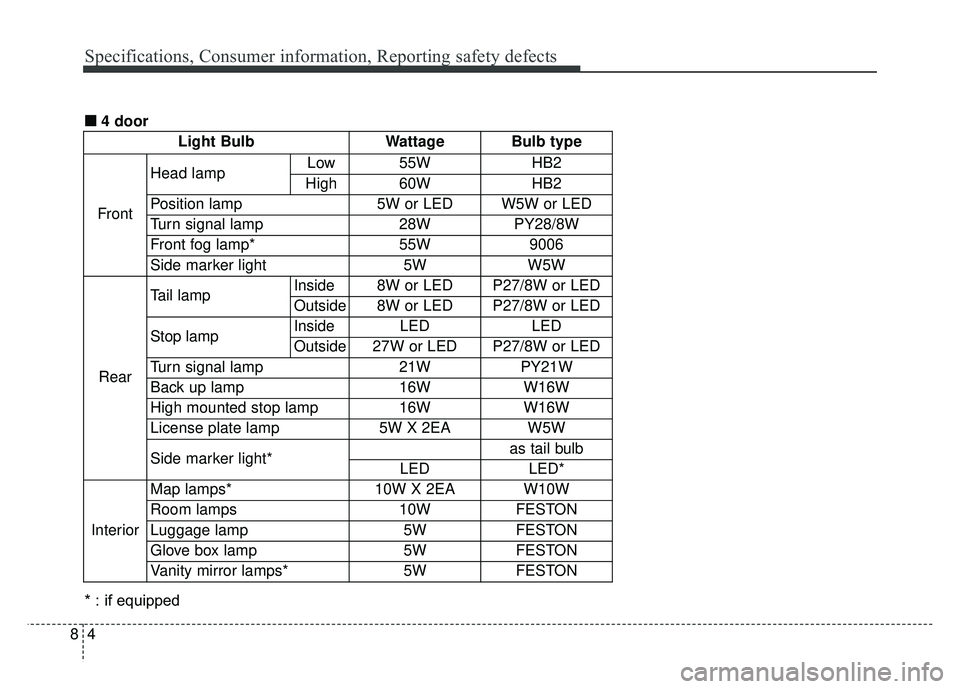
Light BulbWattageBulb type
Front
Head lamp Low55WHB2
High60WHB2
Position lamp5W or LEDW5W or LED
Turn signal lamp28WPY28/8W
Front fog lamp*55W9006
Side marker light5WW5W
Rear
Tail lampInside8W or LEDP27/8W or LED
Outside8W or LEDP27/8W or LED
Stop lampInsideLEDLED
Outside27W or LEDP27/8W or LED
Turn signal lamp21WPY21W
Back up lamp16WW16W
High mounted stop lamp16WW16W
License plate lamp5W X 2EAW5W
Side marker light*as tail bulb
LEDLED*
Interior
Map lamps*10W X 2EAW10W
Room lamps10WFESTON
Luggage lamp5WFESTON
Glove box lamp5WFESTON
Vanity mirror lamps*5WFESTON
* : if equipped■
■
4 door