lock KIA RIO HATCHBACK 2017 Owners Manual
[x] Cancel search | Manufacturer: KIA, Model Year: 2017, Model line: RIO HATCHBACK, Model: KIA RIO HATCHBACK 2017Pages: 532, PDF Size: 12.04 MB
Page 4 of 532
ii
1
2
3
4
5
6
7
8I
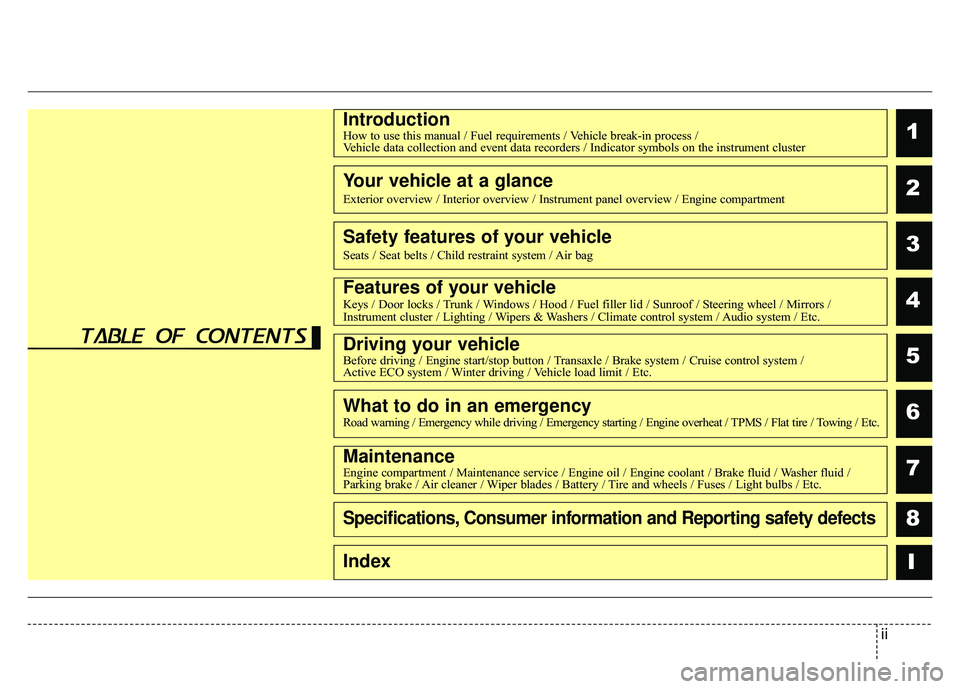
IntroductionHow to use this manual / Fuel requirements / Vehicle break-in process / Vehicle data collection and event data recorders / Indicator symbols on t\
he instrument cluster
Your vehicle at a glance
Exterior overview / Interior overview / Instrument panel overview / Engi\
ne compartment
Safety features of your vehicle
Seats / Seat belts / Child restraint system / Air bag
Features of your vehicleKeys / Door locks / Trunk / Windows / Hood / Fuel filler lid / Sunroof / Steering wheel / Mirrors /
Instrument cluster / Lighting / Wipers & Washers / Climate control system / Audio system / Etc.
Driving your vehicleBefore driving / Engine start/stop button / Transaxle / Brake system / Cruise control system /
Active ECO system / Winter driving / Vehicle load limit / Etc.
What to do in an emergencyRoad warning / Emergency while driving / Emergency starting / Engine overheat / TPMS / Flat tire / Towing / Etc.
MaintenanceEngine compartment / Maintenance service / Engine oil / Engine coolant /\
Brake fluid / Washer fluid /
Parking brake / Air cleaner / Wiper blades / Battery / Tire and wheels / Fuses / Light bulbs / Etc.
Specifications, Consumer information and Reporting safety defects
Index
table of contents
Page 14 of 532
Your vehicle at a glance
42
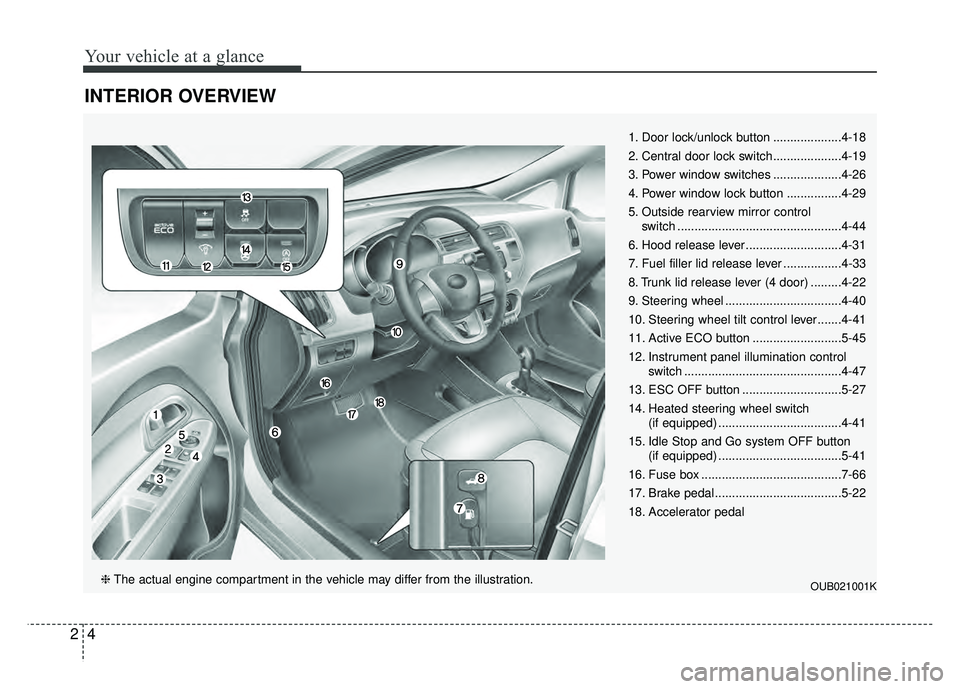
INTERIOR OVERVIEW
OUB021001K
1. Door lock/unlock button ....................4-18
2. Central door lock switch....................4-19
3. Power window switches ....................4-26
4. Power window lock button ................4-29
5. Outside rearview mirror control switch ................................................4-44
6. Hood release lever ............................4-31
7. Fuel filler lid release lever .................4-33
8. Trunk lid release lever (4 door) .........4-22
9. Steering wheel ..................................4-40
10. Steering wheel tilt control lever.......4-41
11. Active ECO button ..........................5-45
12. Instrument panel illumination control switch ..............................................4-47
13. ESC OFF button .............................5-27
14. Heated steering wheel switch (if equipped) ....................................4-41
15. Idle Stop and Go system OFF button (if equipped) ....................................5-41
16. Fuse box .........................................7-66
17. Brake pedal .....................................5-22
18. Accelerator pedal
❈ The actual engine compartment in the vehicle may differ from the illustration.
Page 17 of 532
Safety features of your vehicle
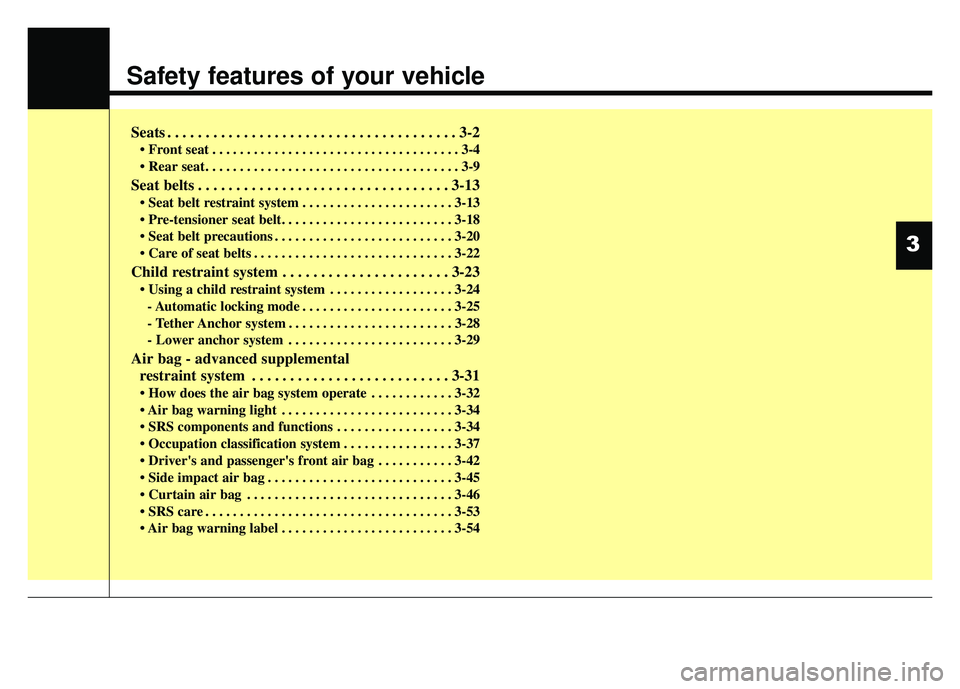
Seats . . . . . . . . . . . . . . . . . . . . . . . . . . . . . . . . . . . . \
. . 3-2
• Front seat . . . . . . . . . . . . . . . . . . . . . . . . . . . . . . . . . . . . \
3-4
. . . . . . . . . . . . . . . . . . . . . . . . . . . . . . . . . . . . \
. 3-9
Seat belts . . . . . . . . . . . . . . . . . . . . . . . . . . . . . . . . . 3-13
. . . . . . . . . . . . . . . . . . . . . . 3-13
. . . . . . . . . . . . . . . . . . . . . . . . . . 3-20
. . . . . . . . . . . . . . . . . . . . . . . . . . . . . 3-22
Child restraint system . . . . . . . . . . . . . . . . . . . . . . 3-23
. . . . . . . . . . . . . . . . . . 3-24- Automatic locking mode . . . . . . . . . . . . . . . . . . . . . . 3-25
- Tether Anchor system . . . . . . . . . . . . . . . . . . . . . . . . 3-28
- Lower anchor system . . . . . . . . . . . . . . . . . . . . . . . . 3-29
Air bag - advanced supplementalrestraint system . . . . . . . . . . . . . . . . . . . . . . . . . . 3-31
. . . . . . . . . . . . 3-32
. . . . . . . . . . . . . . . . . . . . . . . . . 3-34
. . . . . . . . . . . . . . . . . 3-34
. . . . . . . . . . . . . . . . 3-37
. . . . . . . . . . . 3-42
. . . . . . . . . . . . . . . . . . . . . . . . . . . 3-45
. . . . . . . . . . . . . . . . . . . . . . . . . . . . . . 3-46
. . . . . . . . . . . . . . . . . . . . . . . . . . . . . . . . . . . . \
3-53
. . . . . . . . . . . . . . . . . . . . . . . . . 3-54
3
Page 20 of 532

Safety features of your vehicle
43
Front seat adjustment
Forward and backward
To move the seat forward or back-
ward:
1. Pull the seat slide adjustmentlever up and hold it.
2. Slide the seat to the position you desire.
3. Release the lever and make sure the seat is locked in place.
Adjust the seat before driving, and
make sure the seat is locked secure-
ly by trying to move forward and
backward without using the lever. If
the seat moves, it is not locked prop-
erly.
OUB031002
WARNING- Seat adjustment
Do not adjust the seat while
wearing seat belts. Moving the
seat forward will cause strong
pressure on the abdomen.
Do not place your hand near the seat bottom or seat track
while adjusting the seat. Your
hand could get caught in the
seat mechanism.
WARNING- SmallObjects
Use extreme caution when pick-
ing small objects trapped under
the seats or between the seat
and the center console. Your
hands might be cut or injured
by the sharp edges of the seats
mechanism.
WARNING- Unexpected
seat movement
After adjusting a manual seat,
always check that it is locked by
shifting your weight to the front
and back. Sudden or unexpect-
ed movement of the driver's
seat could cause you to lose
control of the vehicle.
Page 21 of 532
35
Safety features of your vehicle
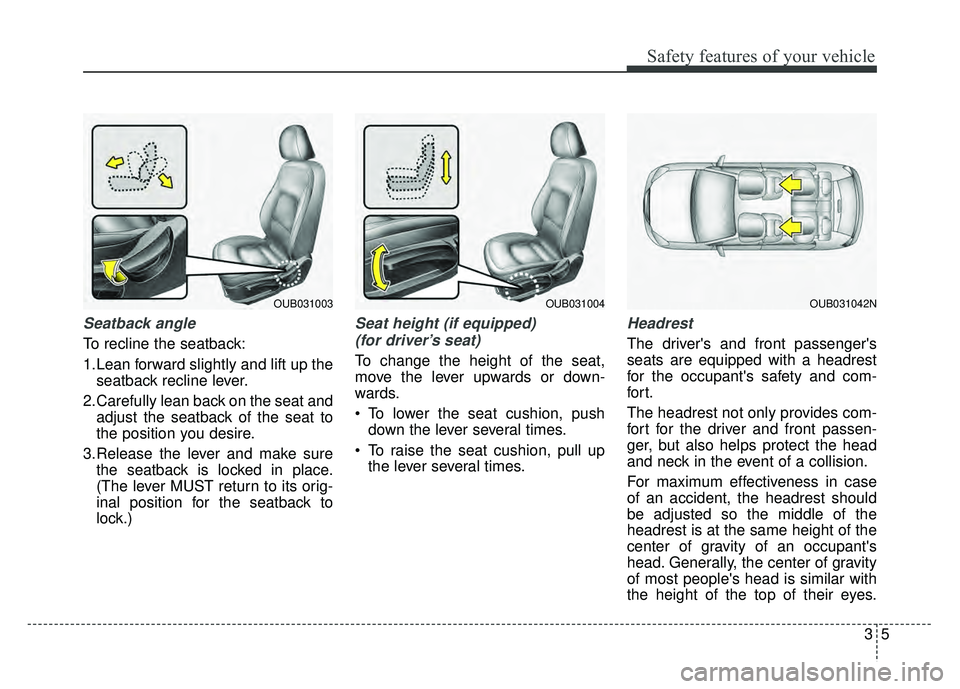
Seatback angle
To recline the seatback:
1.Lean forward slightly and lift up theseatback recline lever.
2.Carefully lean back on the seat and adjust the seatback of the seat to
the position you desire.
3.Release the lever and make sure the seatback is locked in place.
(The lever MUST return to its orig-
inal position for the seatback to
lock.)
Seat height (if equipped)
(for driver’s seat)
To change the height of the seat,
move the lever upwards or down-
wards.
• To lower the seat cushion, push down the lever several times.
To raise the seat cushion, pull up the lever several times.
Headrest
The driver's and front passenger's
seats are equipped with a headrest
for the occupant's safety and com-
for t.
The headrest not only provides com-
fort for the driver and front passen-
ger, but also helps protect the head
and neck in the event of a collision.
For maximum effectiveness in case
of an accident, the headrest should
be adjusted so the middle of the
headrest is at the same height of the
center of gravity of an occupant's
head. Generally, the center of gravity
of most people's head is similar with
the height of the top of their eyes.
OUB031003OUB031004OUB031042N
Page 23 of 532
37
Safety features of your vehicle
✽
✽
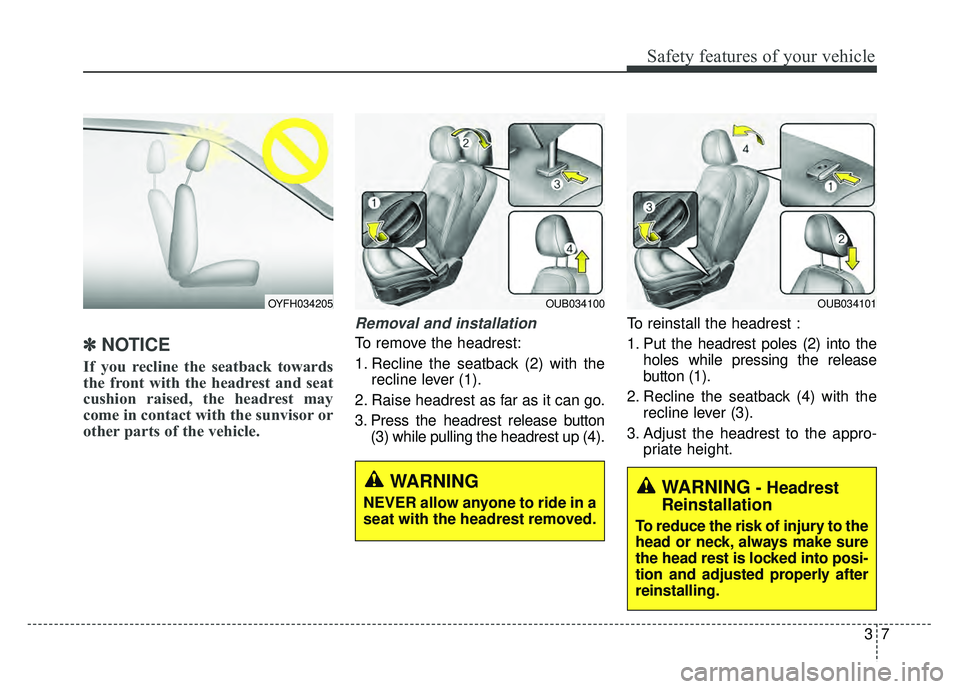
NOTICE
If you recline the seatback towards
the front with the headrest and seat
cushion raised, the headrest may
come in contact with the sunvisor or
other parts of the vehicle.
Removal and installation
To remove the headrest:
1. Recline the seatback (2) with the
recline lever (1).
2. Raise headrest as far as it can go.
3. Press the headrest release button (3) while pulling the headrest up (4). To reinstall the headrest :
1. Put the headrest poles (2) into the
holes while pressing the release
button (1).
2. Recline the seatback (4) with the recline lever (3).
3. Adjust the headrest to the appro- priate height.
WARNING- Headrest
Reinstallation
To reduce the risk of injury to the
head or neck, always make sure
the head rest is locked into posi-
tion and adjusted properly after
reinstalling.
WARNING
NEVER allow anyone to ride in a
seat with the headrest removed.
OUB034100OUB034101OYFH034205
Page 26 of 532
Safety features of your vehicle
10
3
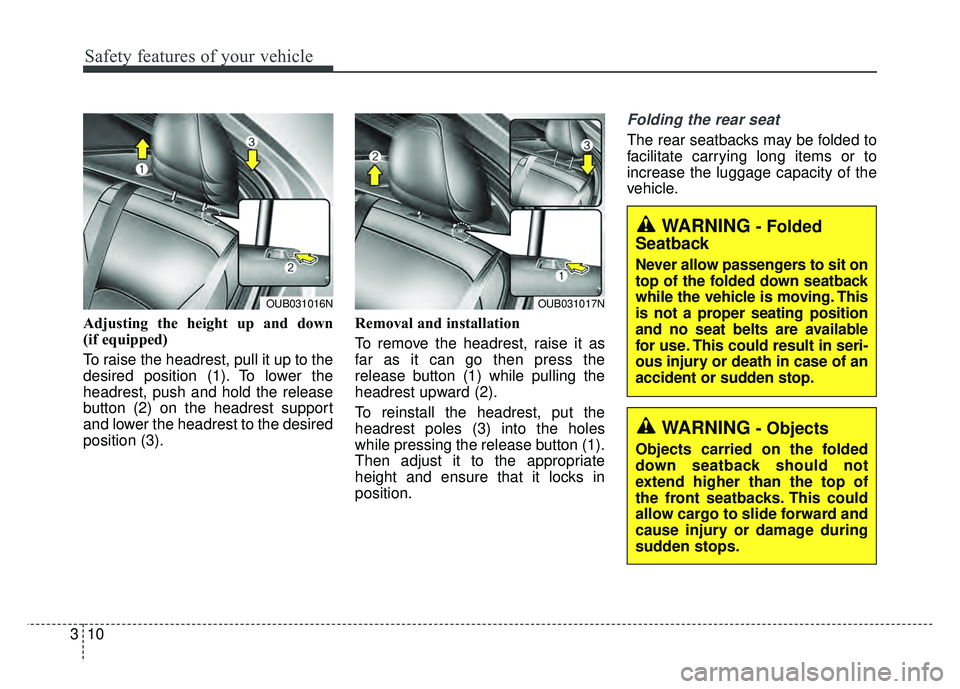
Adjusting the height up and down
(if equipped)
To raise the headrest, pull it up to the
desired position (1). To lower the
headrest, push and hold the release
button (2) on the headrest support
and lower the headrest to the desired
position (3). Removal and installation
To remove the headrest, raise it as
far as it can go then press the
release button (1) while pulling the
headrest upward (2).
To reinstall the headrest, put the
headrest poles (3) into the holes
while pressing the release button (1).
Then adjust it to the appropriate
height and ensure that it locks in
position.
Folding the rear seat
The rear seatbacks may be folded to
facilitate carrying long items or to
increase the luggage capacity of the
vehicle.
OUB031017N
WARNING- Folded
Seatback
Never allow passengers to sit on
top of the folded down seatback
while the vehicle is moving. This
is not a proper seating position
and no seat belts are available
for use. This could result in seri-
ous injury or death in case of an
accident or sudden stop.
WARNING- Objects
Objects carried on the folded
down seatback should not
extend higher than the top of
the front seatbacks. This could
allow cargo to slide forward and
cause injury or damage during
sudden stops.
OUB031016N
Page 27 of 532
311
Safety features of your vehicle
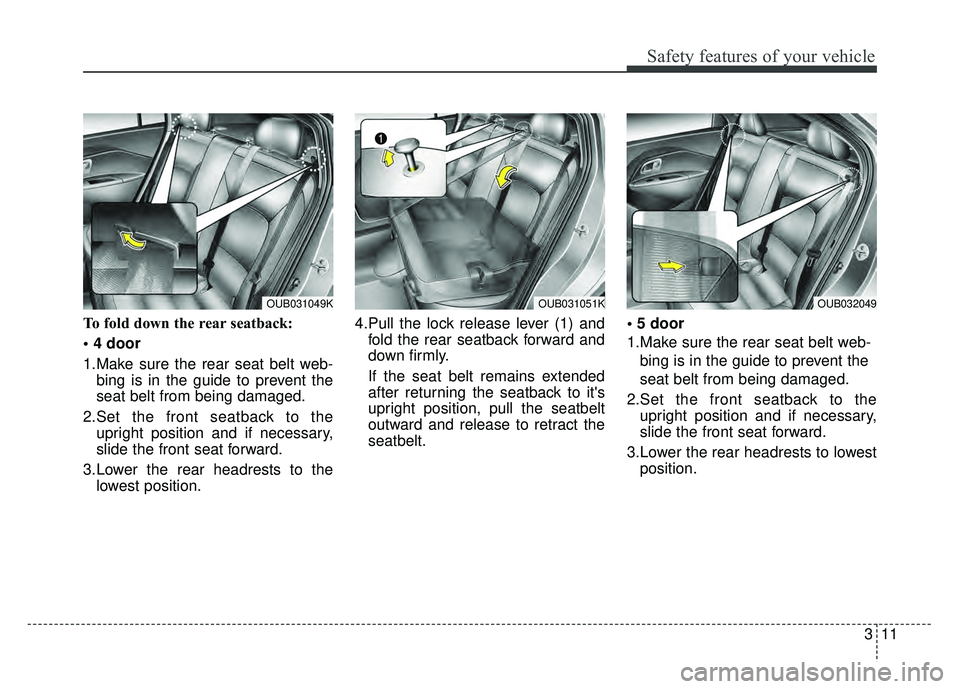
To fold down the rear seatback:
1.Make sure the rear seat belt web-bing is in the guide to prevent the
seat belt from being damaged.
2.Set the front seatback to the upright position and if necessary,
slide the front seat forward.
3.Lower the rear headrests to the lowest position. 4.Pull the lock release lever (1) and
fold the rear seatback forward and
down firmly.
If the seat belt remains extended
after returning the seatback to it's
upright position, pull the seatbelt
outward and release to retract the
seatbelt.
1.Make sure the rear seat belt web-
bing is in the guide to prevent the
seat belt from being damaged.
2.Set the front seatback to the upright position and if necessary,
slide the front seat forward.
3.Lower the rear headrests to lowest position.
OUB031049KOUB031051KOUB032049
Page 28 of 532
Safety features of your vehicle
12
3
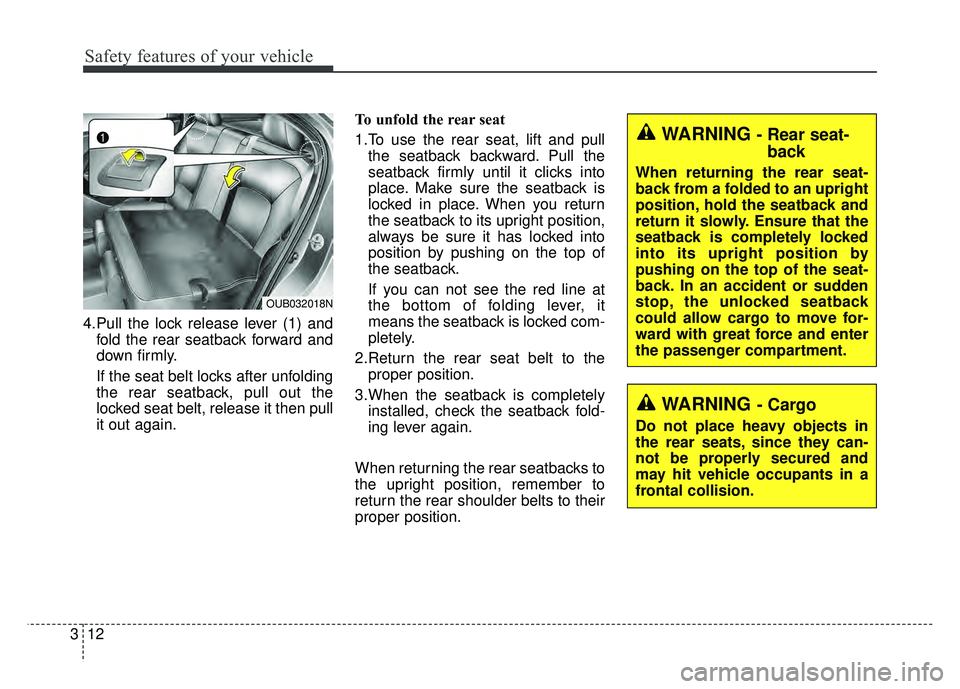
4.Pull the lock release lever (1) and
fold the rear seatback forward and
down firmly.
If the seat belt locks after unfolding
the rear seatback, pull out the
locked seat belt, release it then pull
it out again. To unfold the rear seat
1.To use the rear seat, lift and pull
the seatback backward. Pull the
seatback firmly until it clicks into
place. Make sure the seatback is
locked in place. When you return
the seatback to its upright position,
always be sure it has locked into
position by pushing on the top of
the seatback.
If you can not see the red line at
the bottom of folding lever, it
means the seatback is locked com-
pletely.
2.Return the rear seat belt to the proper position.
3.When the seatback is completely installed, check the seatback fold-
ing lever again.
When returning the rear seatbacks to
the upright position, remember to
return the rear shoulder belts to their
proper position.
WARNING- Cargo
Do not place heavy objects in
the rear seats, since they can-
not be properly secured and
may hit vehicle occupants in a
frontal collision.
WARNING - Rear seat- back
When returning the rear seat-
back from a folded to an upright
position, hold the seatback and
return it slowly. Ensure that the
seatback is completely locked
into its upright position by
pushing on the top of the seat-
back. In an accident or sudden
stop, the unlocked seatback
could allow cargo to move for-
ward with great force and enter
the passenger compartment.
OUB032018N
Page 31 of 532
315
Safety features of your vehicle
*1The seat belt warning light will go
off if the vehicle speed decreases
below 3 mph (5 km/h). If the vehi-
cle speed increases above 3 mph
(5 km/h), the warning light will blink
again. You can find the front passenger's
seat belt warning light on the cen-
ter fascia panel.
Although the front passenger seat is not occupied, the seat belt warn-
ing light will blink for 6 seconds.
The seat belt warning light can blink when a briefcase or purse is
placed on the front passenger
seat.
Riding in an improper position
adversely affects the front passen-
ger's seat belt warning system. It is
important for the driver to instruct the
passenger as to the proper seating
instructions as contained in this
manual.Seat belt - Driver's 3-point system with emergency locking retractor
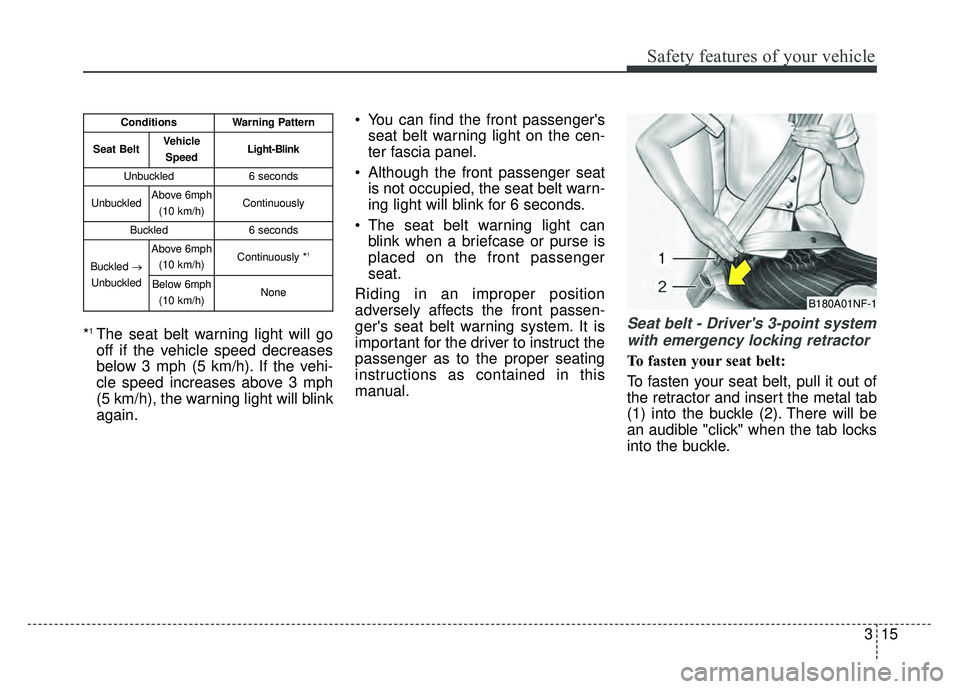
To fasten your seat belt:
To fasten your seat belt, pull it out of
the retractor and insert the metal tab
(1) into the buckle (2). There will be
an audible "click" when the tab locks
into the buckle.
ConditionsWarning Pattern
Seat BeltVehicle
SpeedLight-Blink
Unbuckled6 seconds
UnbuckledAbove 6mph (10 km/h)Continuously
Buckled6 seconds
Buckled →
Unbuckled
Above 6mph (10 km/h)Continuously *1
Below 6mph(10 km/h)NoneB180A01NF-1