ESP KIA RIO HATCHBACK 2018 User Guide
[x] Cancel search | Manufacturer: KIA, Model Year: 2018, Model line: RIO HATCHBACK, Model: KIA RIO HATCHBACK 2018Pages: 492, PDF Size: 10.36 MB
Page 94 of 492
Features of your vehicle
22
4
Emergency trunk safety release
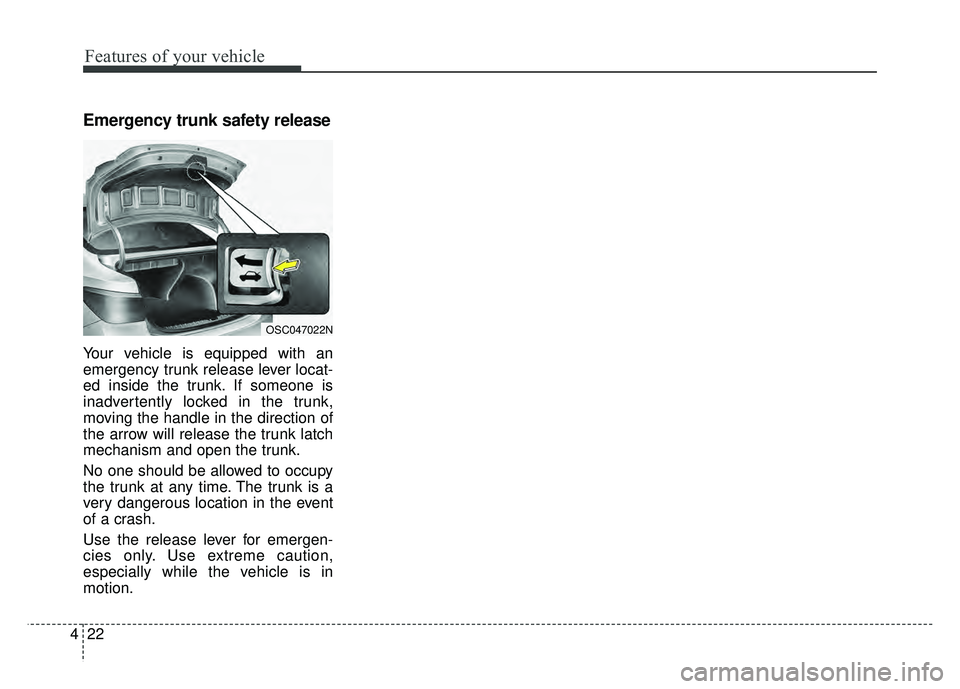
Your vehicle is equipped with an
emergency trunk release lever locat-
ed inside the trunk. If someone is
inadvertently locked in the trunk,
moving the handle in the direction of
the arrow will release the trunk latch
mechanism and open the trunk.
No one should be allowed to occupy
the trunk at any time. The trunk is a
very dangerous location in the event
of a crash.
Use the release lever for emergen-
cies only. Use extreme caution,
especially while the vehicle is in
motion.
OSC047022N
Page 101 of 492
429
Features of your vehicle
You and your children should be fully
aware of the location of the emer-
gency tailgate safety release lever
and how to open the tailgate in case
you are accidently locked inside the
luggage compartment.
✽ ✽NOTICE
Use the release lever for emergencies
only. Use with extreme caution,
especially while the vehicle is in
motion.
Page 103 of 492
431
Features of your vehicle
Power windows (if equipped)
The ignition switch must be in the ON
position for power windows to oper-
ate. Each door has a power window
switch that controls the door’s win-
dow. The driver has a power window
lock switch which can block the oper-
ation of rear passenger windows.
The power windows can be operated
for approximately 30 seconds after the
ignition key is removed or turned to the
ACC or LOCK position. However, if the
front doors are opened, the power
windows cannot be operated even
within the 30 second period.
If the window cannot be close
because it is blocked by objects,
remove the objects and close the
window.
✽ ✽NOTICE
While driving with the rear windows
down or with the sunroof (if
equipped) in an open (or partially
open) position, your vehicle may
demonstrate a wind buffeting or
pulsation noise. This noise is a nor-
mal occurrence and can be reduced
or eliminated by taking the follow-
ing actions. If the noise occurs with
one or both of the rear windows
down, partially lower both front
windows approximately one inch. If
you experience the noise with the
sunroof open, slightly reduce the
size of the sunroof opening.
Window opening and closing
(if equipped)
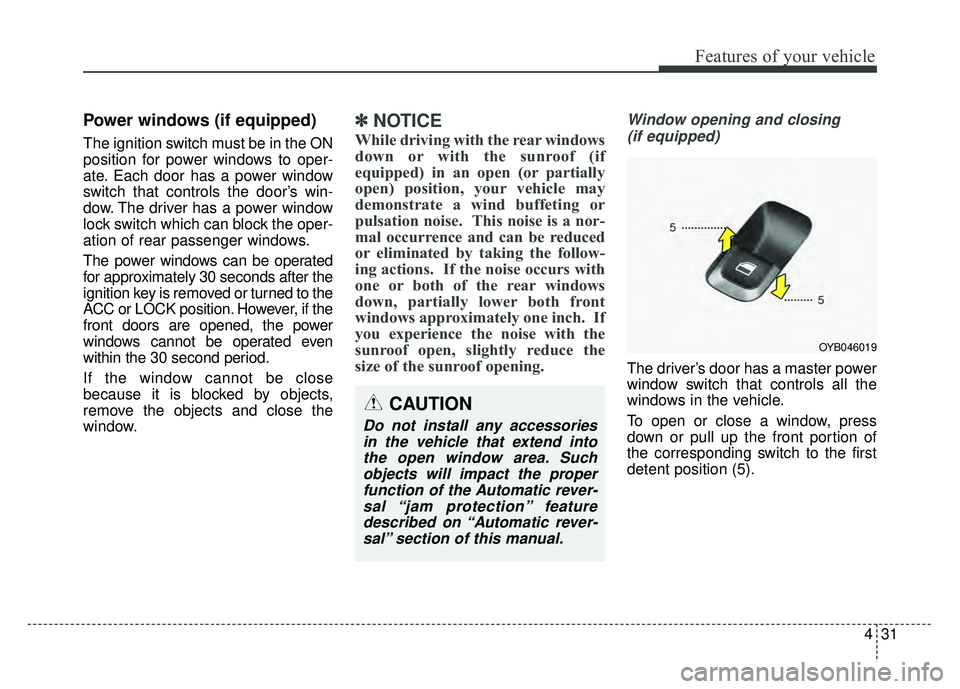
The driver’s door has a master power
window switch that controls all the
windows in the vehicle.
To open or close a window, press
down or pull up the front portion of
the corresponding switch to the first
detent position (5).
OYB046019
CAUTION
Do not install any accessoriesin the vehicle that extend intothe open window area. Suchobjects will impact the properfunction of the Automatic rever-sal “jam protection” featuredescribed on “Automatic rever-sal” section of this manual.
Page 112 of 492
Features of your vehicle
40
4
Make sure to refuel your vehicle
according to the “Fuel requirements”
suggested in chapter 1.
If the fuel filler cap requires replace-
ment, use only a genuine Kia cap or
the equivalent specified for your vehi-
cle. An incorrect fuel filler cap can
result in a serious malfunction of the
fuel system or emission control sys-
tem.
CAUTION- Exterior paint
Do not spill fuel on the exterior
surfaces of the vehicle. Anytype of fuel spilled on paintedsurfaces may damage the paint.
WARNING - Refueling&
Vehicle fires
When refueling, always shut the
engine off. Sparks produced by
electrical components related
to the engine can ignite fuel
vapors causing a fire. Once
refueling is complete, check to
make sure the filler cap and
filler door are securely closed,
before starting the engine.
WARNING - Smoking
DO NOT use matches or a lighter
and DO NOT SMOKE or leave a
lit cigarette in your vehicle while
at a gas station especially during
refueling. Automotive fuel is
highly flammable and can, when
ignited, result in fire.
Page 120 of 492
Features of your vehicle
48
4
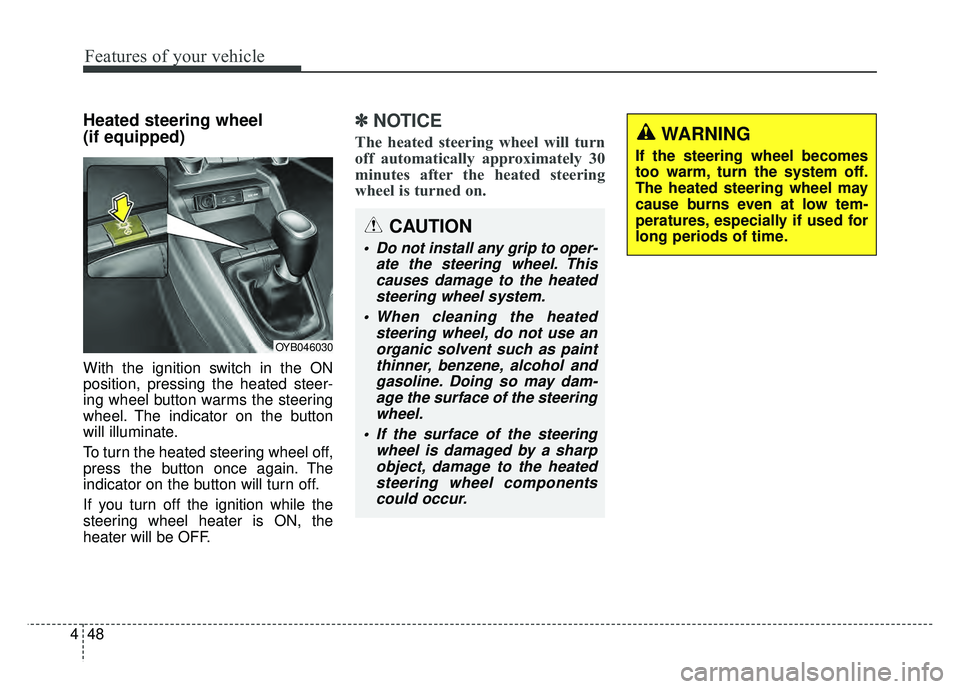
Heated steering wheel
(if equipped)
With the ignition switch in the ON
position, pressing the heated steer-
ing wheel button warms the steering
wheel. The indicator on the button
will illuminate.
To turn the heated steering wheel off,
press the button once again. The
indicator on the button will turn off.
If you turn off the ignition while the
steering wheel heater is ON, the
heater will be OFF.
✽ ✽
NOTICE
The heated steering wheel will turn
off automatically approximately 30
minutes after the heated steering
wheel is turned on.
CAUTION
Do not install any grip to oper-
ate the steering wheel. Thiscauses damage to the heatedsteering wheel system.
When cleaning the heated steering wheel, do not use anorganic solvent such as paintthinner, benzene, alcohol andgasoline. Doing so may dam-age the surface of the steeringwheel.
If the surface of the steering wheel is damaged by a sharpobject, damage to the heatedsteering wheel componentscould occur.
OYB046030
WARNING
If the steering wheel becomes
too warm, turn the system off.
The heated steering wheel may
cause burns even at low tem-
peratures, especially if used for
long periods of time.
Page 122 of 492
Features of your vehicle
50
4
Remote control
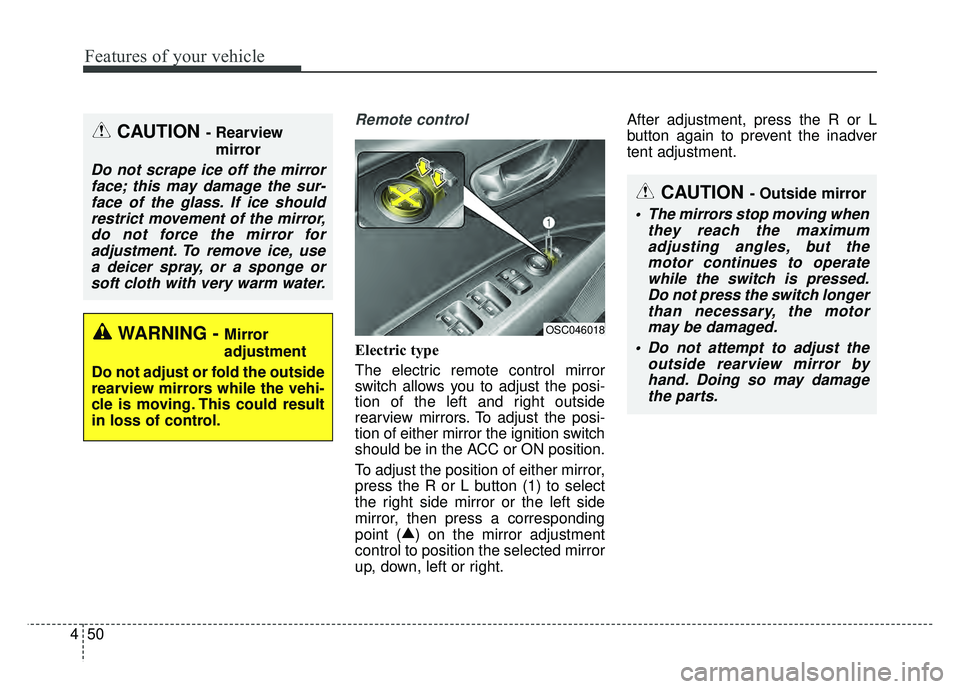
Electric type
The electric remote control mirror
switch allows you to adjust the posi-
tion of the left and right outside
rearview mirrors. To adjust the posi-
tion of either mirror the ignition switch
should be in the ACC or ON position.
To adjust the position of either mirror,
press the R or L button (1) to select
the right side mirror or the left side
mirror, then press a corresponding
point ( ▲
) on the mirror adjustment
control to position the selected mirror
up, down, left or right. After adjustment, press the R or L
button again to prevent the inadver
tent adjustment.
CAUTION - Rearview
mirror
Do not scrape ice off the mirrorface; this may damage the sur-face of the glass. If ice shouldrestrict movement of the mirror,do not force the mirror foradjustment. To remove ice, usea deicer spray, or a sponge orsoft cloth with very warm water.
WARNING - Mirror
adjustment
Do not adjust or fold the outside
rearview mirrors while the vehi-
cle is moving. This could result
in loss of control.OSC046018
CAUTION - Outside mirror
The mirrors stop moving when they reach the maximumadjusting angles, but themotor continues to operatewhile the switch is pressed.Do not press the switch longerthan necessary, the motormay be damaged.
Do not attempt to adjust the outside rearview mirror byhand. Doing so may damagethe parts.
Page 158 of 492
Features of your vehicle
86
4
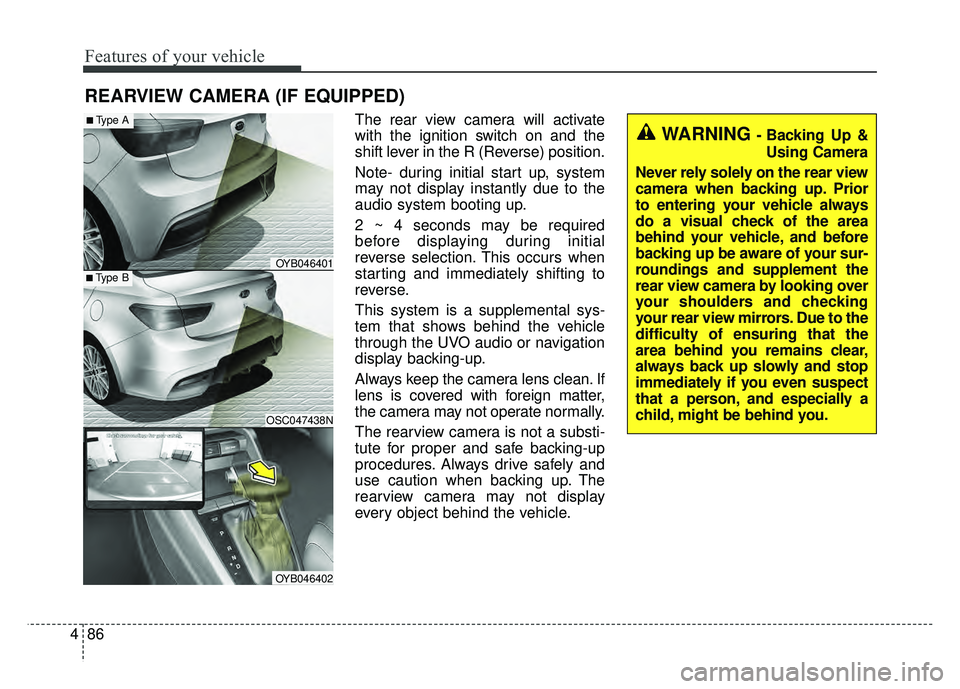
The rear view camera will activate
with the ignition switch on and the
shift lever in the R (Reverse) position.
Note- during initial start up, system
may not display instantly due to the
audio system booting up.
2 ~ 4 seconds may be required
before displaying during initial
reverse selection. This occurs when
starting and immediately shifting to
reverse.
This system is a supplemental sys-
tem that shows behind the vehicle
through the UVO audio or navigation
display backing-up.
Always keep the camera lens clean. If
lens is covered with foreign matter,
the camera may not operate normally.
The rearview camera is not a substi-
tute for proper and safe backing-up
procedures. Always drive safely and
use caution when backing up. The
rearview camera may not display
every object behind the vehicle.
REARVIEW CAMERA (IF EQUIPPED)
WARNING - Backing Up &
Using Camera
Never rely solely on the rear view
camera when backing up. Prior
to entering your vehicle always
do a visual check of the area
behind your vehicle, and before
backing up be aware of your sur-
roundings and supplement the
rear view camera by looking over
your shoulders and checking
your rear view mirrors. Due to the
difficulty of ensuring that the
area behind you remains clear,
always back up slowly and stop
immediately if you even suspect
that a person, and especially a
child, might be behind you.
■Type B
■Type A
OSC047438N
OYB046401
OYB046402
Page 195 of 492
4123
Features of your vehicle
WINDSHIELD DEFROSTING AND DEFOGGING
For maximum defrosting, set thetemperature control to the extreme
right/hot position and the fan speed
control to the highest speed.
If warm air to the floor is desired while defrosting or defogging, set the
mode to the floor-defrost position.
Before driving, clear all snow and ice from the windshield, rear win-
dow, outside rear view mirrors, and
all side windows.
Clear all snow and ice from the hood and air inlet in the cowl grill to
improve heater and defroster effi-
ciency and to reduce the probabili-
ty of fogging up the inside of the
windshield.Manual climate control system
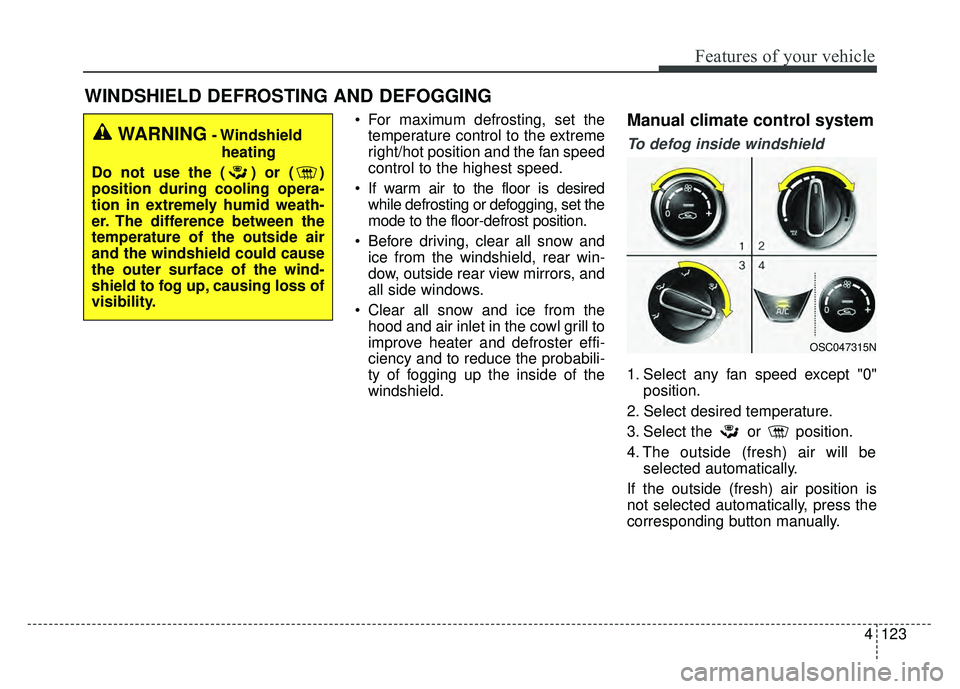
To defog inside windshield
1. Select any fan speed except "0" position.
2. Select desired temperature.
3. Select the or position.
4. The outside (fresh) air will be selected automatically.
If the outside (fresh) air position is
not selected automatically, press the
corresponding button manually.
WARNING- Windshield heating
Do not use the ( ) or ( )
position during cooling opera-
tion in extremely humid weath-
er. The difference between the
temperature of the outside air
and the windshield could cause
the outer surface of the wind-
shield to fog up, causing loss of
visibility.
OSC047315N
Page 196 of 492
Features of your vehicle
124
4
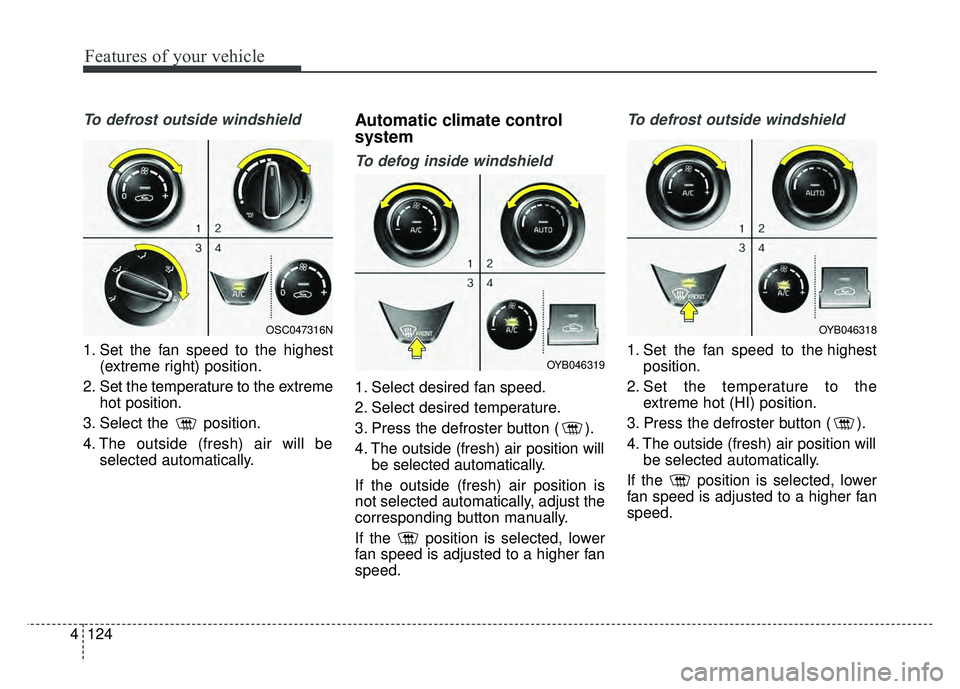
To defrost outside windshield
1. Set the fan speed to the highest
(extreme right) position.
2. Set the temperature to the extreme hot position.
3. Select the position.
4. The outside (fresh) air will be selected automatically.
Automatic climate control
system
To defog inside windshield
1. Select desired fan speed.
2. Select desired temperature.
3. Press the defroster button ( ).
4. The outside (fresh) air position willbe selected automatically.
If the outside (fresh) air position is
not selected automatically, adjust the
corresponding button manually.
If the position is selected, lower
fan speed is adjusted to a higher fan
speed.
To defrost outside windshield
1. Set the fan speed to the highest position.
2. Set the temperature to the extreme hot (HI) position.
3. Press the defroster button ( ).
4. The outside (fresh) air position will be selected automatically.
If the position is selected, lower
fan speed is adjusted to a higher fan
speed.
OSC047316N
OYB046319
OYB046318
Page 205 of 492

4133
Features of your vehicle
Power outlet (if equipped)
The power outlet is designed to pro-
vide power for mobile telephones or
other devices designed to operate
with vehicle electrical systems. The
devices should draw less than 12V,
15A with the engine running.
Use the power outlet only when the
engine is running and remove the
accessory plug after use. Using the
accessory plug for prolonged periods
of time with the engine off could
cause the battery to discharge.
Only use 12V electric accessories
which are less than 15A in electric
capacity.
CAUTION - Seat damage
When cleaning the seats, donot use an organic solventsuch as thinner, benzene,alcohol and gasoline. Doingso may damage the surface ofthe heater or seats.
To prevent overheating the seat warmer, do not place any-thing on the seats that insu-lates against heat, such asblankets, cushions or seatcovers while the seat warmeris in operation.
Do not place heavy or sharp objects on seats equippedwith seat warmers. Damage tothe seat warming componentscould occur.
WARNING - Seat warmer
burns
The seat warmer may cause
burns even at low temperatures,
especially if used for long peri-
ods of time. The occupants
must be able to feel if the seat is
becoming too warm and to turn
the seat warmer off.
In particular, the driver must
exercise extreme care for the
following types of passengers:
1. Infants, children, elderly or disabled persons, or hospital
outpatients
2. Persons with sensitive skin or those that burn easily
3. Fatigued individuals
4. Intoxicated individuals
5. Individuals taking medication that can cause drowsiness or
sleepiness (sleeping pills,
cold tablets, etc.)
OSC047442N