door lock KIA RIO HATCHBACK 2018 Owners Manual
[x] Cancel search | Manufacturer: KIA, Model Year: 2018, Model line: RIO HATCHBACK, Model: KIA RIO HATCHBACK 2018Pages: 492, PDF Size: 10.36 MB
Page 13 of 492
23
Your vehicle at a glance
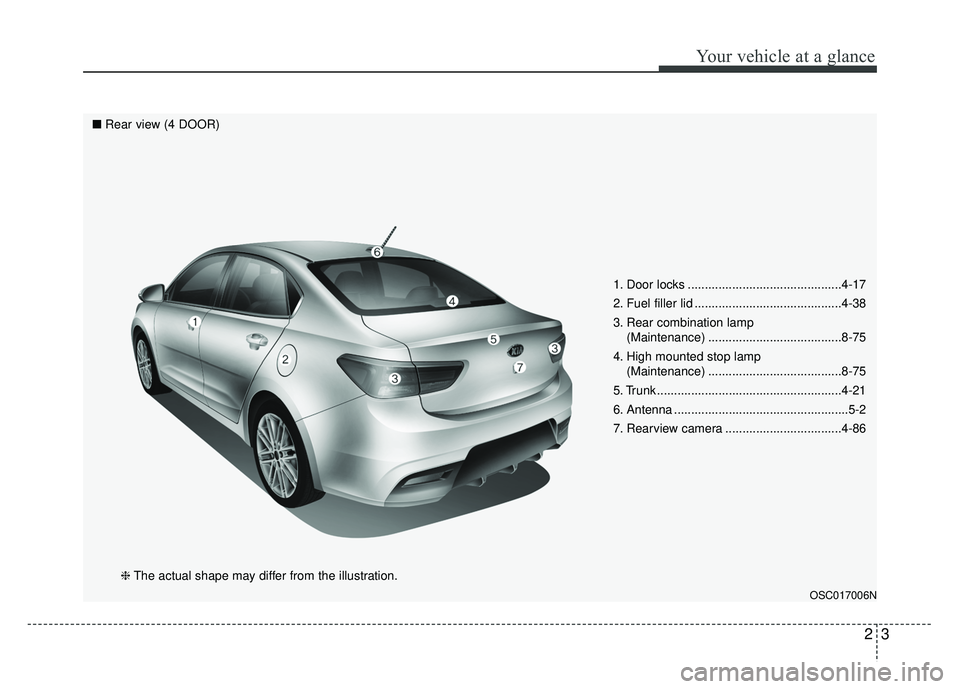
1. Door locks .............................................4-17
2. Fuel filler lid ...........................................4-38
3. Rear combination lamp (Maintenance) .......................................8-75
4. High mounted stop lamp (Maintenance) .......................................8-75
5. Trunk ......................................................4-21
6. Antenna ...................................................5-2
7. Rearview camera ..................................4-86
OSC017006N
■ Rear view (4 DOOR)
❈The actual shape may differ from the illustration.
Page 14 of 492
Your vehicle at a glance
42
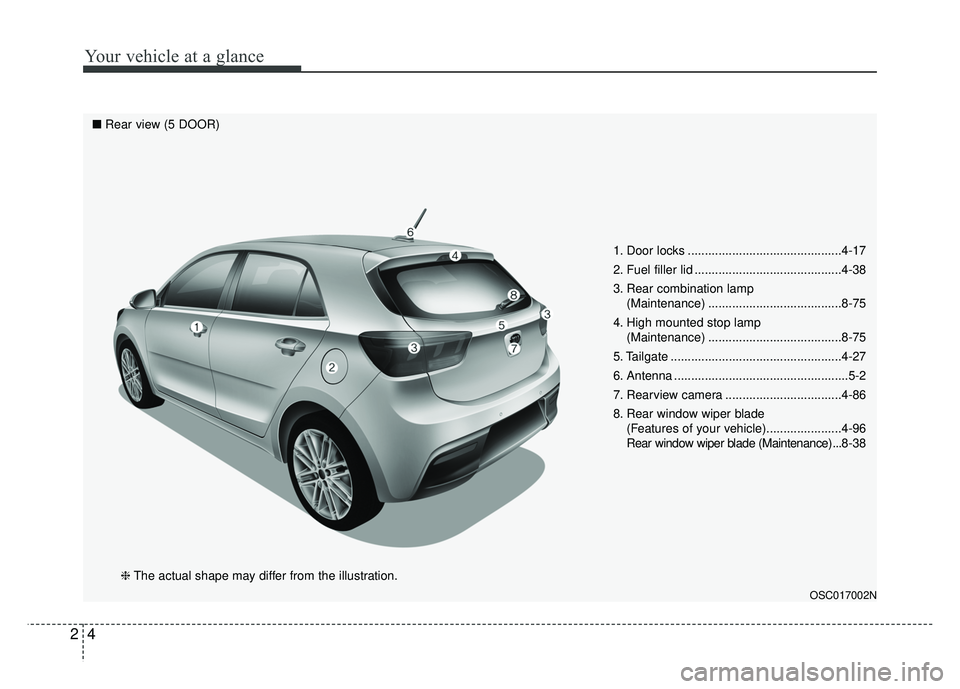
1. Door locks .............................................4-17
2. Fuel filler lid ...........................................4-38
3. Rear combination lamp (Maintenance) .......................................8-75
4. High mounted stop lamp (Maintenance) .......................................8-75
5. Tailgate ..................................................4-27
6. Antenna ...................................................5-2
7. Rearview camera ..................................4-86
8. Rear window wiper blade (Features of your vehicle)......................4-96
Rear window wiper blade (Maintenance) ...8-38
OSC017002N
■Rear view (5 DOOR)
❈The actual shape may differ from the illustration.
Page 15 of 492
25
Your vehicle at a glance
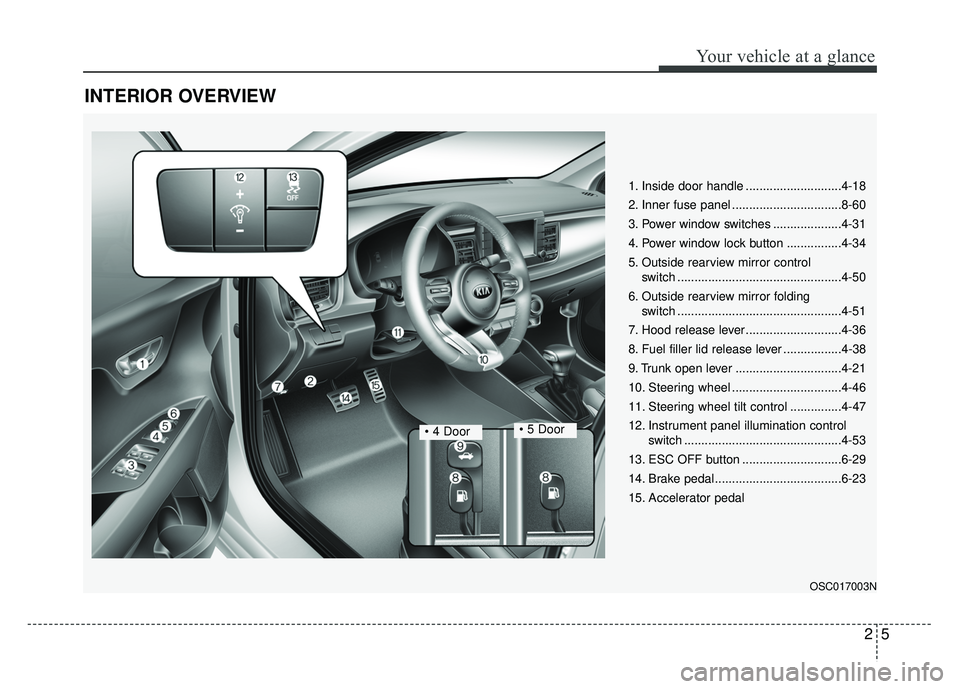
INTERIOR OVERVIEW
1. Inside door handle ............................4-18
2. Inner fuse panel ................................8-60
3. Power window switches ....................4-31
4. Power window lock button ................4-34
5. Outside rearview mirror control switch ................................................4-50
6. Outside rearview mirror folding switch ................................................4-51
7. Hood release lever ............................4-36
8. Fuel filler lid release lever .................4-38
9. Trunk open lever ...............................4-21
10. Steering wheel ................................4-46
11. Steering wheel tilt control ...............4-47
12. Instrument panel illumination control switch ..............................................4-53
13. ESC OFF button .............................6-29
14. Brake pedal .....................................6-23
15. Accelerator pedal
OSC017003N
• 4 Door
Page 16 of 492
Your vehicle at a glance
62
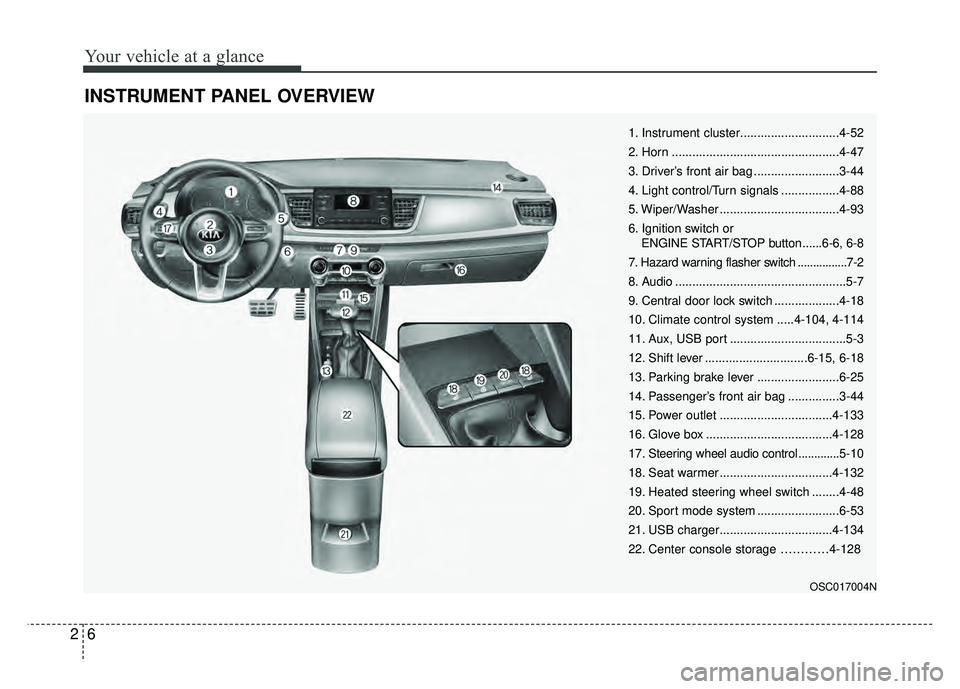
INSTRUMENT PANEL OVERVIEW
OSC017004N
1. Instrument cluster.............................4-52
2. Horn .................................................4-47
3. Driver’s front air bag .........................3-44
4. Light control/Turn signals .................4-88
5. Wiper/Washer ...................................4-93
6. Ignition switch or ENGINE START/STOP button......6-6, 6-8
7. Hazard warning flasher switch ................7-2
8. Audio ..................................................5-7
9. Central door lock switch ...................4-18
10. Climate control system .....4-104, 4-114
11. Aux, USB port ..................................5-3
12. Shift lever ..............................6-15, 6-18
13. Parking brake lever ........................6-25
14. Passenger’s front air bag ...............3-44
15. Power outlet .................................4-133
16. Glove box .....................................4-128
17. Steering wheel audio control ............. 5-10
18. Seat warmer .................................4-132
19. Heated steering wheel switch ........4-48
20. Sport mode system ........................6-53
21. USB charger.................................4-134
22. Center console storage …………4-128
Page 31 of 492

Safety features of your vehicle
14
3
The seat belt automatically adjusts to
the proper length only after the lap
belt portion is adjusted manually so
that it fits snugly around your hips. If
you lean forward in a slow, easy
motion, the belt will extend and let
you move around. If there is a sud-
den stop or impact, however, the belt
will lock into position. It will also lock
if you try to lean forward too quickly.
If you are unable to pull out the seat
belt from the retractor, firmly pull the
belt out and release it. Then you will
be able to pull the belt out smoothly. Height adjustment
You can adjust the height of the shoul-
der belt anchor to one of the 3 posi-
tions for maximum comfort and safety.
The height of the adjusting seat belt
should not be too close to your neck.
The shoulder portion should be
adjusted so that it lies across your
chest and midway over your shoulder
nearest the door and not your neck.
To adjust the height of the seat belt
anchor, lower or raise the height
adjuster into an appropriate position.To raise the height adjuster, pull it up
(1). To lower it, push it down (3) while
pressing the height adjuster button (2).
Release the button to lock the anchor
into position. Try sliding the height
adjuster to make sure that it has
locked into position. Never position the
shoulder belt across your neck or face.
WARNING- Seat belt
replacement
Replace your seat belts after
being in an accident. Failure to
replace seat belts after an acci-
dent could leave you with dam-
aged seat belts that will not pro-
vide protection in the event of
another collision. Improperly
positioned seat belts can cause
serious injuries in an accident.
WARNING- Shoulder belt positioning
Never position the shoulder belt
across your neck or face.
OMG035038
Page 33 of 492

Safety features of your vehicle
16
3
The seat belt should be locked into
the buckle on each seat cushion to
be properly fastened. ❈
A : Rear right seat belt fastening
buckle
B : Rear center seat belt fastening buckle
C : Rear left seat belt fastening buckle
When using the rear center seat belt,
the buckle with the “CENTER” mark
must be used.
OSC037028
OSC037025
■5 Door
■4 Door
OUB037020N
OSC037026
■4 Door
Page 44 of 492
327
Safety features of your vehicle
The lap/shoulder belt automatically
returns to the “emergency lock
mode” whenever the belt is allowed
to retract fully.
Therefore, the preceding seven
steps must be followed each time a
child restraint is installed.
To remove the child restraint, press
the release button on the buckle and
then pull the lap/shoulder belt out of
the restraint and allow the seat belt
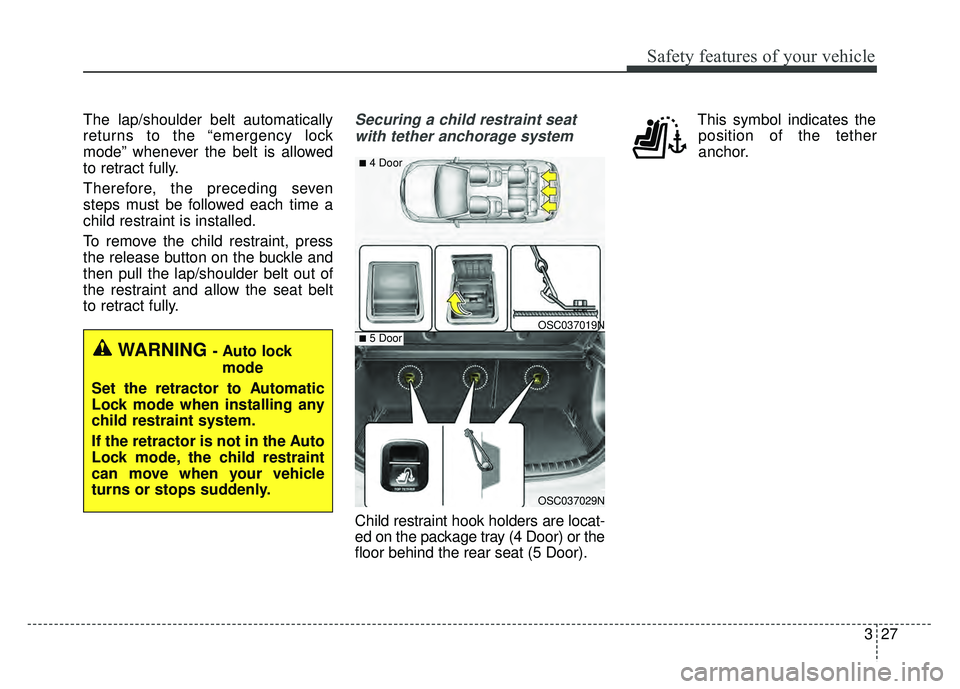
to retract fully.Securing a child restraint seatwith tether anchorage system
Child restraint hook holders are locat-
ed on the package tray (4 Door) or the
floor behind the rear seat (5 Door). This symbol indicates the
position of the tether
anchor.
WARNING - Auto lock
mode
Set the retractor to Automatic
Lock mode when installing any
child restraint system.
If the retractor is not in the Auto
Lock mode, the child restraint
can move when your vehicle
turns or stops suddenly.
OSC037019N
OSC037029N
■4 Door
■5 Door
Page 73 of 492
Features of your vehicle
Keys . . . . . . . . . . . . . . . . . . . . . . . . . . . . . . . . . . . . \
. . 4-4
• Record your key number . . . . . . . . . . . . . . . . . . . . . . . 4-4
. . . . . . . . . . . . . . . . . . . . . . . . . . . . . . . . 4-4
Smart key . . . . . . . . . . . . . . . . . . . . . . . . . . . . . . . . . 4-6
. . . . . . . . . . . . . . . . . . . . . . . . . . . 4-6
. . . . . . . . . . . . . . . . . . . . . . . . . 4-7
Remote keyless entry . . . . . . . . . . . . . . . . . . . . . . . . 4-9
. . . . . . . . . . . 4-9
. . . . . . . . . . . . . . . . . . . . . . . 4-10
. . . . . . . . . . . . . . . . . . . . . . . . . . 4-11
. . . . . . . . . . . . . . . . . . . . . . . . . . . 4-12
Theft-alarm system . . . . . . . . . . . . . . . . . . . . . . . . 4-14
. . . . . . . . . . . . . . . . . . . . . . . . . . . . . . . . . 4-14
. . . . . . . . . . . . . . . . . . . . . . . . . . . . 4-15
Door locks . . . . . . . . . . . . . . . . . . . . . . . . . . . . . . . . 4-17
. . . . 4-17
. . . . . . 4-18
. . . . . . . . . . . . . . 4-19
. . . . . . . . . . . . . . . . . . 4-19
. . . . . . . . . . . . . . . . . 4-20
. . . . . . . . . . . . . . . . . 4-20
Trunk (4 door) . . . . . . . . . . . . . . . . . . . . . . . . . . . . 4-21
. . . . . . . . . . . . . . . . . . . . . . . . . . . . 4-21
. . . . . . . . . . . . . . . . . . . . . . . . . . . . . 4-21
. . . . . . . . . . . . . . . . . 4-22
Smart trunk (for 4 door) . . . . . . . . . . . . . . . . . . . . 4-23
Tailgate (5 door) . . . . . . . . . . . . . . . . . . . . . . . . . . . 4-27
. . . . . . . . . . . . . . . . . . . . . . . . . . 4-27
. . . . . . . . . . . . . . . . . . . . . . . . . . . 4-27
. . . . . . . . . . . . . . . 4-28
Windows . . . . . . . . . . . . . . . . . . . . . . . . . . . . . . . . . 4-30
. . . . . . . . . . . . . . . . . . . . . . . . . . . . . . 4-31
. . . . . . . . . . . . . . . . . . . . . . . . . . . . . 4-35
Hood. . . . . . . . . . . . . . . . . . . . . . . . . . . . . . . . . . . . \
. 4-36
. . . . . . . . . . . . . . . . . . . . . . . . . . . . 4-36
. . . . . . . . . . . . . . . . . . . . . . . . . . . . . 4-37
. . . . . . . . . . . . . . . . . . . . . . . . . . . 4-37
Fuel filler lid . . . . . . . . . . . . . . . . . . . . . . . . . . . . . . 4-38
. . . . . . . . . . . . . . . . . . . . . . 4-38
. . . . . . . . . . . . . . . . . . . . . . . 4-38
Sunroof . . . . . . . . . . . . . . . . . . . . . . . . . . . . . . . . . . 4-41\
. . . . . . . . . . . . . . . . . . . . . . . . . . . 4-42
. . . . . . . . . . . . . . . . . . . . . . . . . . . . 4-44
4
Page 78 of 492
Features of your vehicle
64
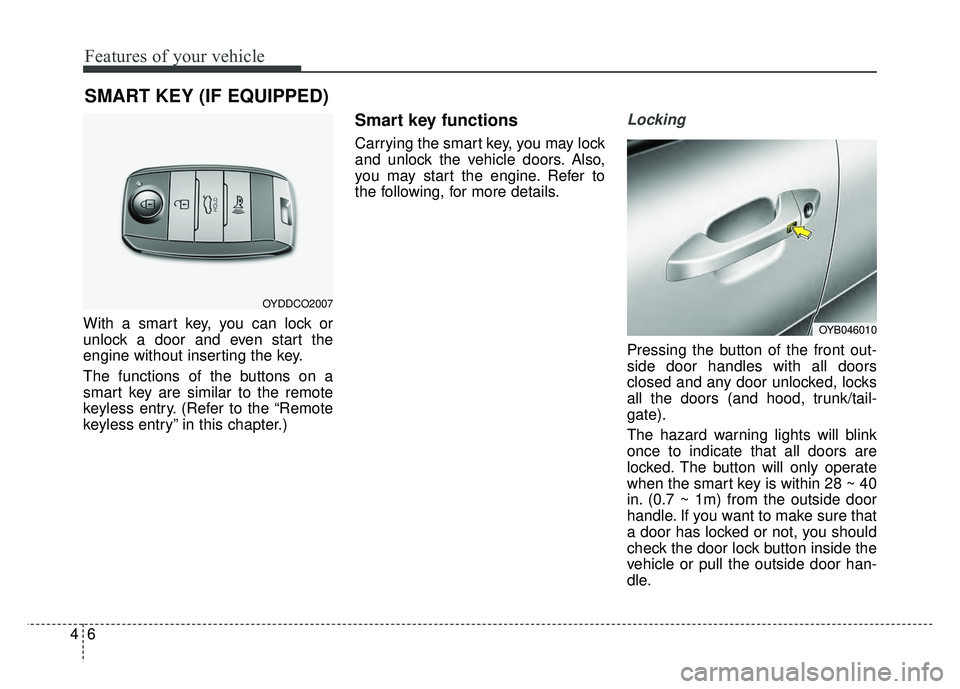
With a smart key, you can lock or
unlock a door and even start the
engine without inserting the key.
The functions of the buttons on a
smart key are similar to the remote
keyless entry. (Refer to the “Remote
keyless entry” in this chapter.)
Smart key functions
Carrying the smart key, you may lock
and unlock the vehicle doors. Also,
you may start the engine. Refer to
the following, for more details.
Locking
Pressing the button of the front out-
side door handles with all doors
closed and any door unlocked, locks
all the doors (and hood, trunk/tail-
gate).
The hazard warning lights will blink
once to indicate that all doors are
locked. The button will only operate
when the smart key is within 28 ~ 40
in. (0.7 ~ 1m) from the outside door
handle. If you want to make sure that
a door has locked or not, you should
check the door lock button inside the
vehicle or pull the outside door han-
dle.
SMART KEY (IF EQUIPPED)
OYDDCO2007
OYB046010
Page 79 of 492

47
Features of your vehicle
Even though you press the button,
the doors will not lock and the chime
will sound for 3 seconds if any of the
following occurs:
The smart key is in the vehicle.
The ignition switch is in the ACC orON position.
Any door except the trunk/tailgate is opened.Unlocking
Pressing the button of the driver's
outside door handle with all doors
closed and locked, unlocks the dri-
ver's door. The hazard warning lights
will blink and the chime will sound
twice to indicate that the driver's door
is unlocked.
Pressing the button in the front pas-
senger's outside door handle with all
doors closed and locked, unlocks all
the doors. The hazard warning lights
will blink and the chime will sound
twice to indicate that all doors are
unlocked. The button will only oper-
ate when the smart key is within
28~40 in. (0.7~1 m) from the outside
door handle.
Start-up
You can start the engine without
inserting the key. For detailed infor-
mation refer to “Starting the engine
with a smart key” in chapter 6.
Smart key precautions
If you lose your smart key, you willnot be able to start the engine. Tow
the vehicle, if necessary, and con-
tact an authorized Kia dealer.
A maximum of 2 smart keys can be registered to a single vehicle. If
you lose a smart key, you should
immediately take the vehicle and
key to your authorized Kia dealer
to protect it from potential theft.
The smart key will not work if any of following occurs:
- The smart key is close to a radiotransmitter such as a radio sta-
tion or an airport which can inter-
fere with normal operation of the
smart key.
- The smart key near a mobile two- way radio system or a cellular
phone.
- Another vehicle’s smart key is being operated close to your vehicle.
When the smart key does not work
correctly, open and close the door
with the mechanical key. If you
have a problem with the smart key,
contact an authorized Kia dealer.