seat adjustment KIA RIO HATCHBACK 2018 Owners Manual
[x] Cancel search | Manufacturer: KIA, Model Year: 2018, Model line: RIO HATCHBACK, Model: KIA RIO HATCHBACK 2018Pages: 492, PDF Size: 10.36 MB
Page 20 of 492

33
Safety features of your vehicle
WARNING - Uprightingseat
Do not press the release lever
on a manual seatback without
holding and controlling the
seatback. The seatback will
spring upright possibly impact-
ing you or other passengers.
WARNING- Loose objects
Do not place anything in the dri-
ver's foot well or under the front
seats. Loose objects in the dri-
ver's foot area could interfere with
the operation of the foot pedals.WARNING
- Driver responsibility for passengers
The driver must advise the pas-
senger to keep the seatback in
an upright position whenever
the vehicle is in motion. If a seat
is reclined during an accident,
the restraint system's ability to
restrain will be greatly reduced.
1KMN3661
WARNING - Seat cushion
Occupants should never sit on
aftermarket seat cushions or sit-
ting cushions. The passenger's
hips may slide under the lap por-
tion of the seat belt during an
accident or a sudden stop.
WARNING- Driver’s seat
Never attempt to adjust the seat while the vehicle is mov-
ing. This could result in loss
of control of your vehicle.
(Continued)
(Continued)
Do not allow anything to inter-fere with the normal position
of the seatback and seatback
adjustment.
Sit as far back as possible from the steering wheel while
still maintaining comfortable
control of your vehicle. A dis-
tance of at least 10" from your
chest to the steering wheel is
recommended. Failure to do
so could result in air bag infla-
tion injuries to the driver.
WARNING- Seat
adjustment
Do not adjust the seat while wearing seat belts. Moving the
seat forward will cause strong
pressure on the abdomen.
Do not place your hand near the seat bottom or seat track
while adjusting the seat. Your
hand could get caught in the
seat mechanism.
Page 21 of 492
Safety features of your vehicle
43
Feature of Seat Leather
• Leather is made from the outerskin of an animal, which goes
through a special process to be
available for use. Since it is a nat-
ural substance, each part differs in
thickness or density.
Wrinkles may appear as a natural
result of stretching and shrinking
depending on the temperature and
humidity.
The seat is made of stretchable fabric to improve comfort.
The parts contacting the body are curved and the side supporting
area is high which provides driving
comfort and stability. Wrinkles may appear naturally
from usage. It is not a fault of the
product.
✽ ✽ NOTICE
Wrinkles or abrasions which appear
naturally from usage are not cov-
ered by warranty.
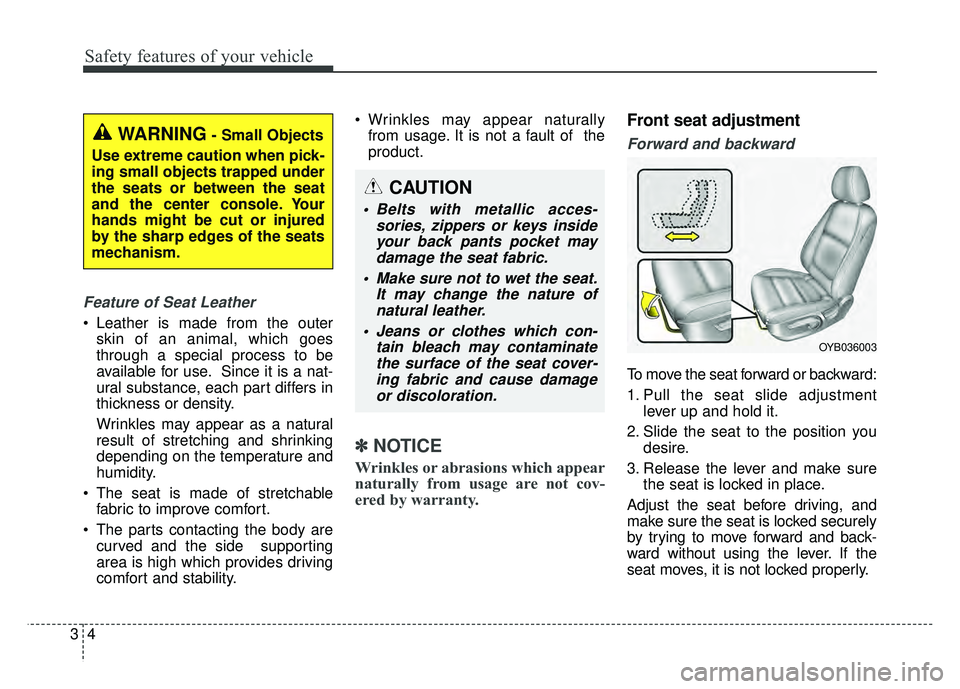
Front seat adjustment
Forward and backward
To move the seat forward or backward:
1. Pull the seat slide adjustment
lever up and hold it.
2. Slide the seat to the position you desire.
3. Release the lever and make sure the seat is locked in place.
Adjust the seat before driving, and
make sure the seat is locked securely
by trying to move forward and back-
ward without using the lever. If the
seat moves, it is not locked properly.
WARNING- Small Objects
Use extreme caution when pick-
ing small objects trapped under
the seats or between the seat
and the center console. Your
hands might be cut or injured
by the sharp edges of the seats
mechanism.
CAUTION
Belts with metallic acces- sories, zippers or keys insideyour back pants pocket maydamage the seat fabric.
Make sure not to wet the seat. It may change the nature ofnatural leather.
Jeans or clothes which con- tain bleach may contaminatethe surface of the seat cover-ing fabric and cause damageor discoloration.
OYB036003
Page 23 of 492

Safety features of your vehicle
63
Headrest (for front seat)
The driver's and front passenger's
seats are equipped with a headrest
for the occupant's safety and comfort.
The headrest not only provides com-
fort for the driver and front passen-
ger, but also helps protect the head
and neck in the event of a collision.For maximum effectiveness in case
of an accident, the headrest should
be adjusted so the middle of the
headrest is at the same height of the
center of gravity of an occupant's
head. Generally, the center of gravity
of most people's head is similar with
the height of the top of their eyes.
Also, adjust the headrest as close to
your head as possible.
For this reason, the use of a cushion
that holds the body away from the
seatback is not recommended.
Adjusting the height up and down
To raise the headrest, pull it up to the
desired position (1). To lower the
headrest, push and hold the release
button (2) on the headrest support
and lower the headrest to the desired
position (3).
WARNING- Headrest
removal/adjustment
Do not operate the vehicle with the headrests removed.
Headrests can provide critical
neck and head support in a
crash.
Do not adjust the headrest height while the vehicle is in
motion. Driver may lose con-
trol of the vehicle.
OSC037014NOYB036006
Page 26 of 492

39
Safety features of your vehicle
Rear seat adjustment
Headrest (for rear seat)
The rear seat is equipped with head-
rests in left and right side seating
positions for the occupant's safety
and comfort.
The headrest not only provides com-
fort for passengers, but also helps
protect the head and neck in the
event of a collision.For maximum effectiveness in case
of an accident, the headrest should
be adjusted so the middle of the
headrest is at the same height of the
center of gravity of an occupant's
head. Generally, the center of gravity
of most people's head is similar with
the height as the top of their eyes.
Also adjust the headrest as close to
your head as possible. For this rea-
son, the use of a cushion that holds
the body away from the seatback is
not recommended.
Adjusting the height up and down
(if equipped)
To raise the headrest, pull it up to the
desired position (1). To lower the
headrest, push and hold the release
button (2) on the headrest support
and lower the headrest to the desired
position (3).
OSC037015N
OSC037022N
Page 31 of 492

Safety features of your vehicle
14
3
The seat belt automatically adjusts to
the proper length only after the lap
belt portion is adjusted manually so
that it fits snugly around your hips. If
you lean forward in a slow, easy
motion, the belt will extend and let
you move around. If there is a sud-
den stop or impact, however, the belt
will lock into position. It will also lock
if you try to lean forward too quickly.
If you are unable to pull out the seat
belt from the retractor, firmly pull the
belt out and release it. Then you will
be able to pull the belt out smoothly. Height adjustment
You can adjust the height of the shoul-
der belt anchor to one of the 3 posi-
tions for maximum comfort and safety.
The height of the adjusting seat belt
should not be too close to your neck.
The shoulder portion should be
adjusted so that it lies across your
chest and midway over your shoulder
nearest the door and not your neck.
To adjust the height of the seat belt
anchor, lower or raise the height
adjuster into an appropriate position.To raise the height adjuster, pull it up
(1). To lower it, push it down (3) while
pressing the height adjuster button (2).
Release the button to lock the anchor
into position. Try sliding the height
adjuster to make sure that it has
locked into position. Never position the
shoulder belt across your neck or face.
WARNING- Seat belt
replacement
Replace your seat belts after
being in an accident. Failure to
replace seat belts after an acci-
dent could leave you with dam-
aged seat belts that will not pro-
vide protection in the event of
another collision. Improperly
positioned seat belts can cause
serious injuries in an accident.
WARNING- Shoulder belt positioning
Never position the shoulder belt
across your neck or face.
OMG035038
Page 121 of 492
449
Features of your vehicle
Inside rearview mirror
Adjust the rearview mirror so that the
center view through the rear window
is seen. Make this adjustment before
you start driving.
Do not place objects in the rear seat
which would interfere with your vision
through the rear window.
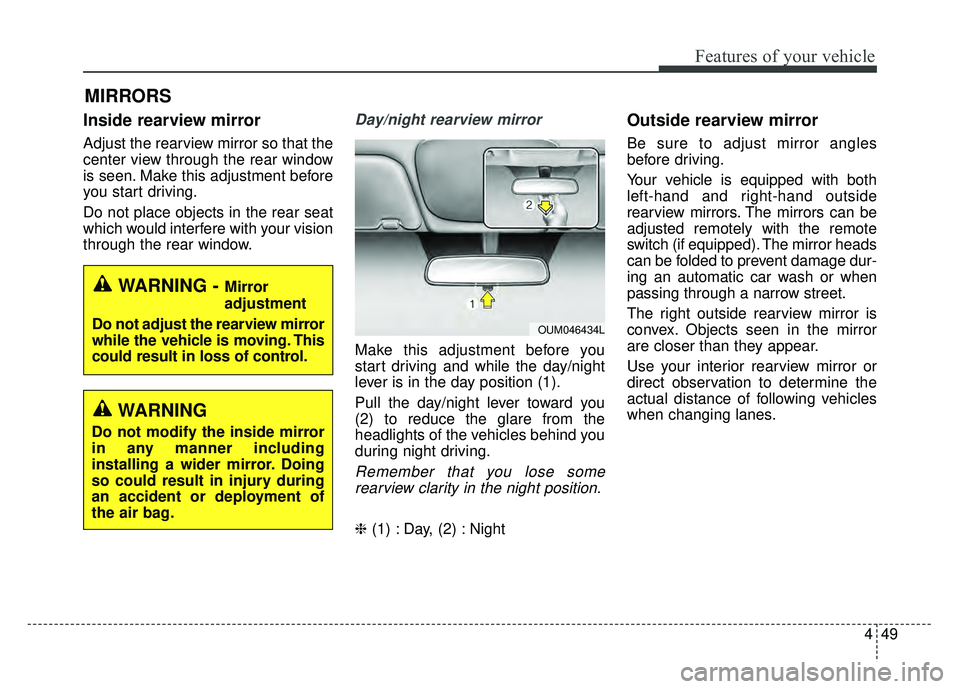
Day/night rearview mirror
Make this adjustment before you
start driving and while the day/night
lever is in the day position (1).
Pull the day/night lever toward you
(2) to reduce the glare from the
headlights of the vehicles behind you
during night driving.
Remember that you lose somerearview clarity in the night position.
❈ (1) : Day, (2) : Night
Outside rearview mirror
Be sure to adjust mirror angles
before driving.
Your vehicle is equipped with both
left-hand and right-hand outside
rearview mirrors. The mirrors can be
adjusted remotely with the remote
switch (if equipped). The mirror heads
can be folded to prevent damage dur-
ing an automatic car wash or when
passing through a narrow street.
The right outside rearview mirror is
convex. Objects seen in the mirror
are closer than they appear.
Use your interior rearview mirror or
direct observation to determine the
actual distance of following vehicles
when changing lanes.
MIRRORS
WARNING - Mirror
adjustment
Do not adjust the rearview mirror
while the vehicle is moving. This
could result in loss of control.
OUM046434L
WARNING
Do not modify the inside mirror
in any manner including
installing a wider mirror. Doing
so could result in injury during
an accident or deployment of
the air bag.
Page 462 of 492
Your vehicle is equipped with a cat-
alytic converter emission control
device.
Therefore, the following precautions
must be observed:
Use only UNLEADED FUEL forgasoline engines.
Do not operate the vehicle when there are signs of engine malfunc-
tion, such as misfire or a noticeable
loss of performance.
Do not misuse or abuse the engine. Examples of misuse are
coasting with the ignition off and
descending steep grades in gear
with the ignition off.
Do not operate the engine at high idle speed for extended periods (5
minutes or more).
Do not modify or tamper with any part of the engine or emission con-
trol system. All inspections and
adjustments must be made by an
authorized Kia dealer.
Avoid driving with an extremely low fuel level. Running out of fuel could
cause the engine to misfire, dam-
aging the catalytic converter. Failure to observe these precautions
could result in damage to the catalyt-
ic converter and to your vehicle.
Additionally, such actions could void
your warranties.
Perchlorate Material-special handling
may apply, See www.dtsc.ca.gov/haz-
ardouswaste/ perchlorate.
Notice to California Vehicle Dismantlers:
Perchlorate containing materials,
such as air bag inflators, seatbelt
pretensioners and keyless remote
entry batteries, must be disposed of
according to Title 22 California Code
of Regulations Chapter 67384.10
(a).
CALIFORNIA
PERCHLORATE NOTICE
8112
Maintenance
Page 483 of 492
I5
Index
Engine overheats ..............................................................7-6
Engine start/stop button ..................................................6-8Illuminated engine start/stop button ............................6-8
Engine start/stop button position ..................................6-8
Engine start/stop button illumination ..............................6-8
Engine start/stop button position ....................................6-8
Engine will not start ........................................................7-4
Evaporative emission control (including ORVR: Onboard Refueling Vapor Recovery) system ............8-109
Exhaust emission control system ................................8-110
Explanation of scheduled maintenance items ..............8-21 Engine oil and filter ....................................................8-21
Drive belts ..................................................................8-21
Fuel filter (for gasoline) ..............................................8-21
Fuel lines, fuel hoses and connections ......................8-21
Vapor hose and fuel filler cap ....................................8-21
Vacuum crankcase ventilation hoses ..........................8-22
Air cleaner filter ..........................................................8-22
Spark plugs ................................................................8-22
Valve clearance ..........................................................8-22
Cooling system ..........................................................8-22
Coolant ........................................................................\
8-22
Manual transaxle fluid ................................................8-22
Automatic transaxle fluid............................................8-2\
2
Brake hoses and lines..................................................8-23
Brake/clutch fluid........................................................8-24
Parking brake ..............................................................8-24
Brake discs, pads, calipers and rotors ........................8-24 Exhaust pipe and muffler ............................................8-24
Suspension mounting bolts ........................................8-24
Steering gear box, linkage & boots/lower arm ball joint ....................................................................8-24\
Drive shafts and boots ................................................8-24
Air conditioning refrigerant ........................................8-24
Exterior care ................................................................8-101
Flat tire ........................................................................\
..7-18 Jack and tools ..............................................................7-18
Removing and storing the spare tire ..........................7-19
Changing tires ............................................................7-20
Floor mat anchor(s) ....................................................4-136
Fluid Brake/clutch fluid........................................................8-31
Washer fluid ................................................................8-32
Folding the outside rearview mirror ..............................4-51
Front fog lamp bulb replacement ..................................8-84
Front fog light ................................................................4-92
Front seat adjustment ......................................................3-4
Front turn signal lamp bulb replacement (Headlamp Type A) ....................................................8-81
Front turn signal lamp bulb replacement (Headlamp Type B) ....................................................8-83
F
Page 488 of 492
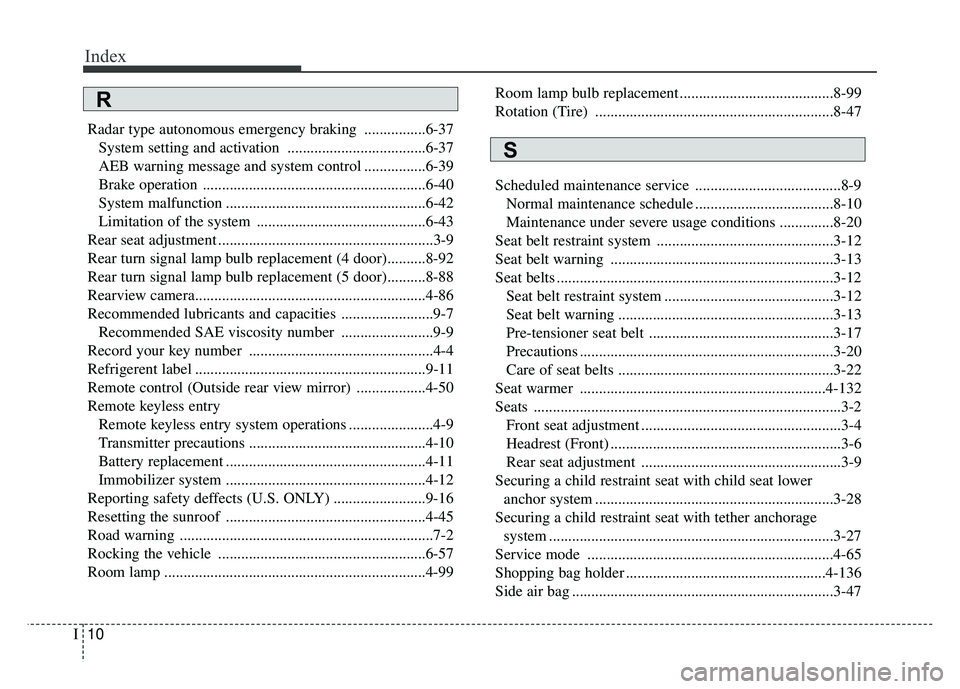
Index
10I
Radar type autonomous emergency braking ................6-37System setting and activation ....................................6-37
AEB warning message and system control ................6-39
Brake operation ..........................................................6-40
System malfunction ....................................................6-42
Limitation of the system ............................................6-43
Rear seat adjustment ........................................................3-9
Rear turn signal lamp bulb replacement (4 door)..........8-92
Rear turn signal lamp bulb replacement (5 door)..........8-88
Rearview camera............................................................4-86
Recommended lubricants and capacities ........................9-7 Recommended SAE viscosity number ........................9-9
Record your key number ................................................4-4
Refrigerent label ............................................................9-11
Remote control (Outside rear view mirror) ..................4-50
Remote keyless entry Remote keyless entry system operations ......................4-9
Transmitter precautions ..............................................4-10
Battery replacement ....................................................4-11
Immobilizer system ....................................................4-12
Reporting safety deffects (U.S. ONLY) ........................9-16
Resetting the sunroof ....................................................4-45
Road warning ..................................................................7-2
Rocking the vehicle ......................................................6-57
Room lamp ....................................................................4-99\
Room lamp bulb replacement ........................................8-99
Rotation (Tire) ..............................................................8-47
Scheduled maintenance service ......................................8-9
Normal maintenance schedule ....................................8-10
Maintenance under severe usage conditions ..............8-20
Seat belt restraint system ..............................................3-12
Seat belt warning ..........................................................3-13
Seat belts ........................................................................\
3-12 Seat belt restraint system ............................................3-12
Seat belt warning ........................................................3-13
Pre-tensioner seat belt ................................................3-17
Precautions ..................................................................3-20
Care of seat belts ........................................................3-22
Seat warmer ................................................................4-132
Seats ........................................................................\
........3-2 Front seat adjustment ....................................................3-4
Headrest (Front) ............................................................3-6
Rear seat adjustment ....................................................3-9
Securing a child restraint seat with child seat lower anchor system ..............................................................3-28
Securing a child restraint seat with tether anchorage system ........................................................................\
..3-27
Service mode ................................................................4-65
Shopping bag holder ....................................................4-136
Side air bag ....................................................................3-47\
S
R