stop start KIA RIO HATCHBACK 2018 Owners Manual
[x] Cancel search | Manufacturer: KIA, Model Year: 2018, Model line: RIO HATCHBACK, Model: KIA RIO HATCHBACK 2018Pages: 492, PDF Size: 10.36 MB
Page 9 of 492
15
Introduction
Fuel Additives
Kia recommends that you use good
quality gasolines treated with deter-
gent additives such as TOP TIER
Detergent Gasoline, which help pre-
vent deposit formation in the engine.
These gasolines will help the engine
run cleaner and enhance performance
of the Emission Control System. For
more information on TOP TIER
Detergent Gasoline, please go to the
website (www.toptiergas.com)
For customers who do not use TOP
TIER Detergent Gasoline regularly,
and have problems starting or the
engine does not run smoothly, addi-
tives that you can buy separately may
be added to the gasoline.
If TOP TIER Detergent Gasoline is not
available, one bottle of additive should
be added to the fuel tank at every
7,500miles or every engine oil change
is recommended. Additives are avail-
able from your authorized Kia dealer
along with information on how to use
them. Do not mix other additives.
Operation in foreign countries
If you are going to drive your vehicle
in another country, be sure to:
Observe all regulations regardingregistration and insurance.
Determine that acceptable fuel is available. No special break-in period is need-
ed. By following a few simple precau-
tions for the first 600 miles (1,000
km) you may add to the perform-
ance, economy and life of your vehi-
cle.
Do not race the engine.
While driving, keep your engine
speed (rpm, or revolutions per
minute) between 2,000 rpm and
4,000 rpm.
Do not maintain a single speed for long periods of time, either fast or
slow. Varying engine speed is
needed to properly break-in the
engine.
Avoid hard stops, except in emer- gencies, to allow the brakes to seat
properly.
Don't tow a trailer during the first 1,200 miles (2,000 km) of opera-
tion.
VEHICLE BREAK-IN
PROCESS
Page 16 of 492
Your vehicle at a glance
62
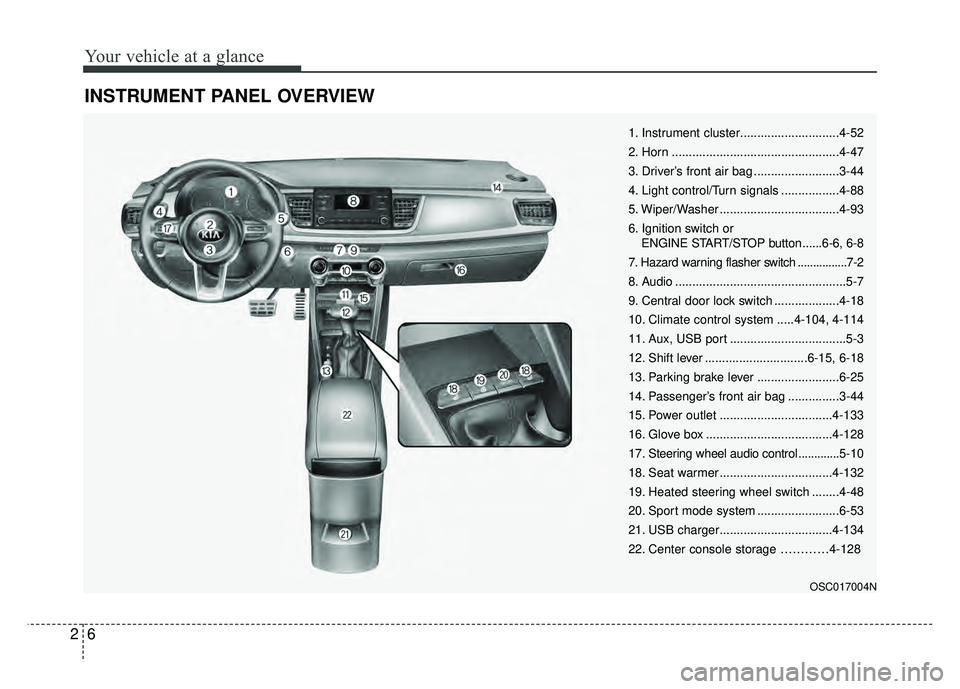
INSTRUMENT PANEL OVERVIEW
OSC017004N
1. Instrument cluster.............................4-52
2. Horn .................................................4-47
3. Driver’s front air bag .........................3-44
4. Light control/Turn signals .................4-88
5. Wiper/Washer ...................................4-93
6. Ignition switch or ENGINE START/STOP button......6-6, 6-8
7. Hazard warning flasher switch ................7-2
8. Audio ..................................................5-7
9. Central door lock switch ...................4-18
10. Climate control system .....4-104, 4-114
11. Aux, USB port ..................................5-3
12. Shift lever ..............................6-15, 6-18
13. Parking brake lever ........................6-25
14. Passenger’s front air bag ...............3-44
15. Power outlet .................................4-133
16. Glove box .....................................4-128
17. Steering wheel audio control ............. 5-10
18. Seat warmer .................................4-132
19. Heated steering wheel switch ........4-48
20. Sport mode system ........................6-53
21. USB charger.................................4-134
22. Center console storage …………4-128
Page 92 of 492
Features of your vehicle
20
4
Speed sensing door lock sys-
tem (if equipped)
All doors will be automatically locked
after the vehicle speed exceeds 9
mph. And all doors will be automati-
cally unlocked when you turn the
engine off or when you remove the
ignition key. (if equipped)
An authorized Kia dealer can acti-
vate or deactivate some auto door
lock/ unlock features as follows;
Auto door unlock by using the dri-
ver's door lock button
Auto door lock/unlock by shifting the transaxle shift lever out of P
(Park) or into P (Park)
Auto door unlock when the ignition key is removed from the ignition
switch (for smart key, when the
ENGINE START/STOP button is
turned to the OFF position)
If you want to activate or deactivate
some door lock/unlock feature, con-
sult an authorized Kia dealer.
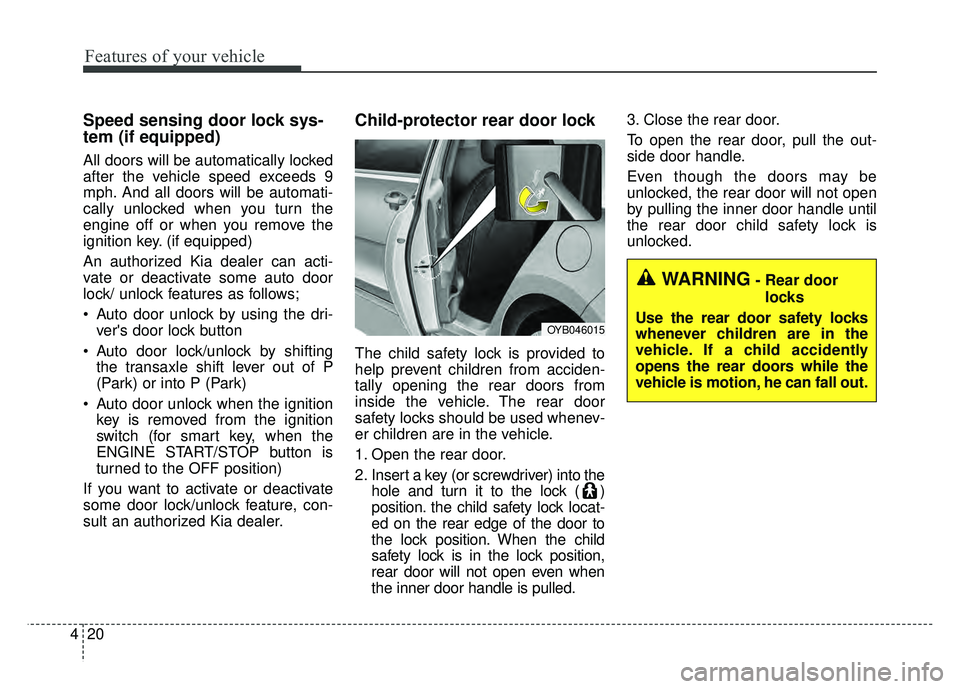
Child-protector rear door lock
The child safety lock is provided to
help prevent children from acciden-
tally opening the rear doors from
inside the vehicle. The rear door
safety locks should be used whenev-
er children are in the vehicle.
1. Open the rear door.
2. Insert a key (or screwdriver) into the hole and turn it to the lock ( )
position. the child safety lock locat-
ed on the rear edge of the door to
the lock position. When the child
safety lock is in the lock position,
rear door will not open even when
the inner door handle is pulled. 3. Close the rear door.
To open the rear door, pull the out-
side door handle.
Even though the doors may be
unlocked, the rear door will not open
by pulling the inner door handle until
the rear door child safety lock is
unlocked.
OYB046015
WARNING- Rear door
locks
Use the rear door safety locks
whenever children are in the
vehicle. If a child accidently
opens the rear doors while the
vehicle is motion, he can fall out.
Page 133 of 492
461
Features of your vehicle
Average Fuel Economy (2)
The average fuel economy is cal-culated by the total driving dis-
tance and fuel consumption since
the last average fuel economy
reset.
- Fuel economy range: 0.0 ~ 99.9MPG or L/100 km, km/L
The average fuel economy can be reset both manually and automati-
cally.
Manual reset
To clear the average fuel economy
manually, press the RESET (for Type
A cluster), OK ( for Type B cluster)
(reset) on the steering wheel for
more than 1 second when the aver-
age fuel economy is displayed. Automatic reset (for type B cluster)
To make the average fuel economy
be reset automatically whenever refu-
eling, select the “Fuel economy auto
reset” mode in User Setting menu of
the LCD window (Refer to “LCD win-
dow”).
OFF - You may set to default manu-
ally by using the trip switch reset but-
ton.
After ignition - The vehicle will auto- matically set to default once 4 hours
pass after the Ignition is in OFF.
After refueling - After refueling more than 1.6 gallons (6 liters) and driving
over 1 mph (1 km/h), the vehicle will
reset to default automatically.
✽ ✽ NOTICE
The average fuel economy is not dis-
played for more accurate calculation
if the vehicle does not drive more
than 10 seconds or 0.03 miles (50
meters) since the ignition switch or
Engine Start/Stop button is turned
to ON.
Instant Fuel Economy (3)
This mode displays the instant fuel
economy during the last few sec-
onds when the vehicle speed is
more than 6.2MPH(10km/h).
- Fuel economy range:
30.0 L/100 km or 0.0 ~ 50.0 MPG
Page 134 of 492
Features of your vehicle
62
4
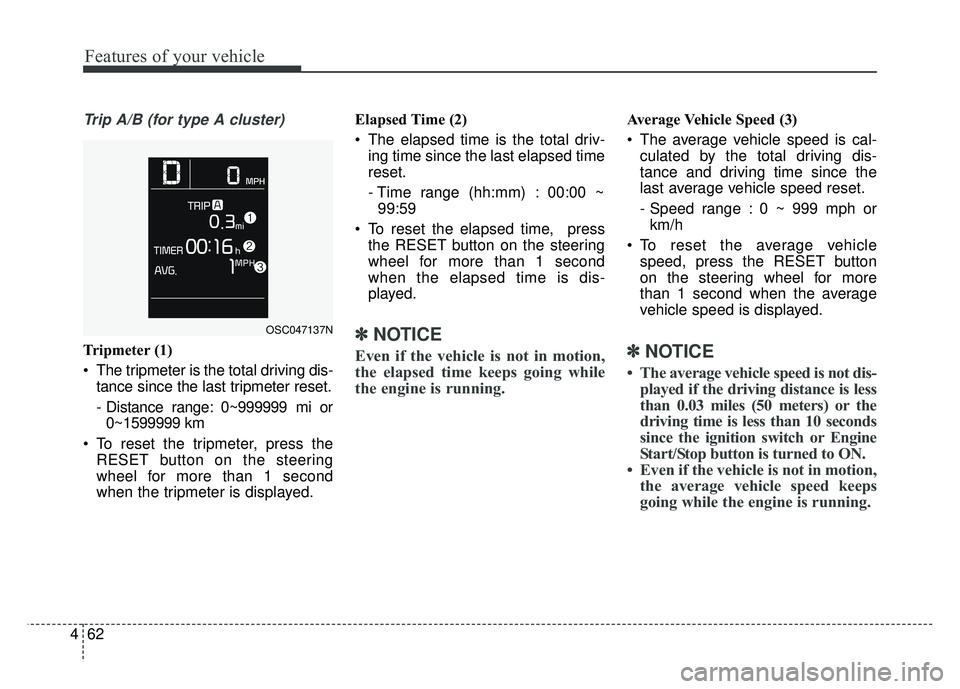
Trip A/B (for type A cluster)
Tripmeter (1)
The tripmeter is the total driving dis-
tance since the last tripmeter reset.
- Distance range: 0~999999 mi or0~1599999 km
To reset the tripmeter, press the RESET button on the steering
wheel for more than 1 second
when the tripmeter is displayed. Elapsed Time (2)
The elapsed time is the total driv-
ing time since the last elapsed time
reset.
- Time range (hh:mm) : 00:00 ~99:59
To reset the elapsed time, press the RESET button on the steering
wheel for more than 1 second
when the elapsed time is dis-
played.✽ ✽ NOTICE
Even if the vehicle is not in motion,
the elapsed time keeps going while
the engine is running.
Average Vehicle Speed (3)
The average vehicle speed is cal-
culated by the total driving dis-
tance and driving time since the
last average vehicle speed reset.
- Speed range : 0 ~ 999 mph orkm/h
To reset the average vehicle speed, press the RESET button
on the steering wheel for more
than 1 second when the average
vehicle speed is displayed.
✽ ✽ NOTICE
• The average vehicle speed is not dis-
played if the driving distance is less
than 0.03 miles (50 meters) or the
driving time is less than 10 seconds
since the ignition switch or Engine
Start/Stop button is turned to ON.
• Even if the vehicle is not in motion, the average vehicle speed keeps
going while the engine is running.
OSC047137N
Page 137 of 492
465
Features of your vehicle
Service Mode
Service in
It calculates and displays when you
need a scheduled maintenance
service (mileage or days).
If the remaining mileage or time
reaches 900 mi. (1,500 km) or 30
days, “Service in” message is dis-
played for several seconds each time
you set the ignition switch or Engine
Start/Stop Button to the ON position.
Service required
If you do not have your vehicle serv-
iced according to the already inputted
service interval, “Service required”
message is displayed for several sec-
onds each time you set the ignition
switch or Engine Start/Stop Button to
the ON position.
To reset the service interval to the
mileage and days you inputted before:
Press the RESET button for morethan 1 second. (for Type A cluster)
Press the OK button (Reset) for more than 1 second. (for Type B
cluster)
✽ ✽ NOTICE
If any of the following conditions
occurs, the mileage and days may be
incorrect.
- The battery cable is disconnected.
- The fuse switch is turned off.
- The battery is discharged.
User Settings Mode
(for type B cluster)
On this mode, you can change set-
ting of the doors, lamps, and so on.
WARNING
Do not adjust the User Setting
while driving. You may lose your
steering control and cause
severe personal injury or acci-
dents.
Page 142 of 492
Features of your vehicle
70
4
Engine has overheated
This warning message illuminates
when the engine coolant tempera-
ture is above 248°F (120°C). This
means that the engine is overheated
and may be damaged.
❈ If your vehicle is overheated, refer
to “Overheating” in chapter 7.
Shift to P (for smart key system and
automatic transaxle)
This warning message illuminates if you try to turn off the engine without
the shift lever in P (Park) position.
At this time, the Engine Start/Stop Button turns to the ACC position (If
you press the Engine Start/Stop
Button once more, it will turn to the
ON position). Low Key Battery
(for smart key system)
This warning message illuminates
if the battery of the smart key is
discharged when the Engine
Start/Stop Button changes to the
OFF position.
Press START button while turn steer-
ing (for smart key system)
This warning message illuminates if the steering wheel does not
unlock normally when the Engine
Start/Stop Button is pressed.
It means that you should press the Engine Start/Stop Button while
turning the steering wheel right
and left. Steering wheel unlocked
(for smart key system)
This warning message illuminates
if the steering wheel does not lock
when the Engine Start/Stop Button
changes to the OFF position.
Check Steering Wheel Lock System
(for smart key system)
This warning message illuminates if the steering wheel does not lock
normally when the Engine
Start/Stop Button changes to the
OFF position.
Page 143 of 492
471
Features of your vehicle
Press brake pedal to start engine
(for smart key system and automatic
transaxle)
This warning message illuminatesif the Engine Start/Stop Button
changes to the ACC position twice
by pressing the button repeatedly
without depressing the brake pedal.
It means that you should depress the brake pedal to start the engine.
Press clutch pedal to start engine (for
smart key system and manual transaxle)
This warning message illuminates if the Engine Start/Stop Button
changes to the ACC position twice
by pressing the button repeatedly
without depressing the clutch pedal.
It means that you should depress the clutch pedal to start the engine. Key not in vehicle (for smart key system)
This warning message illuminates
if the smart key is not in the vehicle
when you press the Engine
Start/Stop Button.
It means that you should always have the smart key with you.
Key not detected (for smart key system)
This warning message illuminates if the smart key is not detected
when you press the Engine
Start/Stop Button. Press START button again
(for smart key system)
This warning message illuminates
if you can not operate the Engine
Start/Stop Button when there is a
problem with the Engine Start/Stop
Button system.
It means that you could start the engine by pressing the Engine
Start/ Stop Button once more.
If the warning illuminates each time you press the Engine
Start/Stop Button, have your vehi-
cle inspected by an authorized Kia
dealer.
Page 144 of 492
Features of your vehicle
72
4
Press START button with smart key
(for smart key system)
This warning message illuminates
if you press the Engine Start/Stop
Button while the warning message
“Key not detected” is illuminating.
At this time, the immobilizer indica- tor light blinks.
Check fuse “BRAKE SWITCH”
(for smart key system and automatic
transaxle/transmission)
This warning message illuminates if the brake switch fuse is discon-
nected.
It means that you should replace the fuse with a new one. If that is
not possible, you can start the
engine by pressing the Engine
Start/Stop Button for 10 seconds in
the ACC position. Shift to P or N to start engine
(for smart key system and automatic
transaxle)
This warning message illuminates
if you try to start the engine with
the shift lever not in the P (Park) or
N (Neutral) position.
✽ ✽ NOTICE
You can start the engine with the
shift lever in the N (Neutral) position.
But, for your safety, we recommend
that you start the engine with the
shift lever in the P (Park) position.
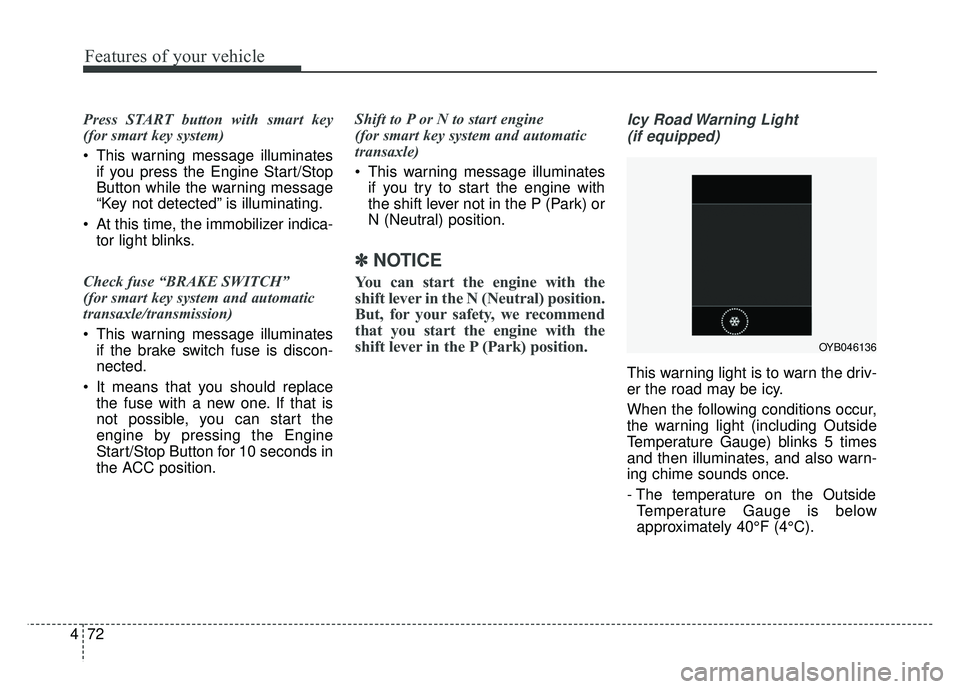
Icy Road Warning Light
(if equipped)
This warning light is to warn the driv-
er the road may be icy.
When the following conditions occur,
the warning light (including Outside
Temperature Gauge) blinks 5 times
and then illuminates, and also warn-
ing chime sounds once.
- The temperature on the Outside Temperature Gauge is below
approximately 40°F (4°C).
OYB046136
Page 146 of 492
Features of your vehicle
74
4
Warning lights
✽
✽
NOTICE - Warning lights
Make sure that all warning lights
are OFF after starting the engine. If
any light is still ON, this indicates a
situation that needs attention.
Air bag Warning Light
This warning light illuminates:
Once you set the ignition switch or
Engine Start/Stop Button to the ON
position.
- It illuminates for approximately 6seconds and then goes off.
When there is a malfunction with the SRS.
In this case, have your vehicle
inspected by an authorized Kia
dealer.
Seat Belt Warning Light
This warning light informs the driver
that the seat belt is not fastened.
❈ For more details, refer to the “Seat
Belts” in chapter 3.
WARNING AND INDICATOR LIGHTS