key KIA Rondo 2008 2.G Owner's Guide
[x] Cancel search | Manufacturer: KIA, Model Year: 2008, Model line: Rondo, Model: KIA Rondo 2008 2.GPages: 341, PDF Size: 6.23 MB
Page 130 of 341
451
Features of your vehicle
D190100AUNBattery saver function The purpose of this feature is to pre-
vent the battery from being dis-
charged. The system automatically
turns off the exterior lights when the
driver removes the ignition key and
opens the driver-side door.
With this feature, the parking lights will
be turned off automatically if the driver
parks on the side of road at night.
If necessary, to keep the lights on
when the ignition key is removed, per-
form the following:
1) Open the driver-side door.
2) Turn the parking lights OFF and ON
again using the light switch on the
steering column.
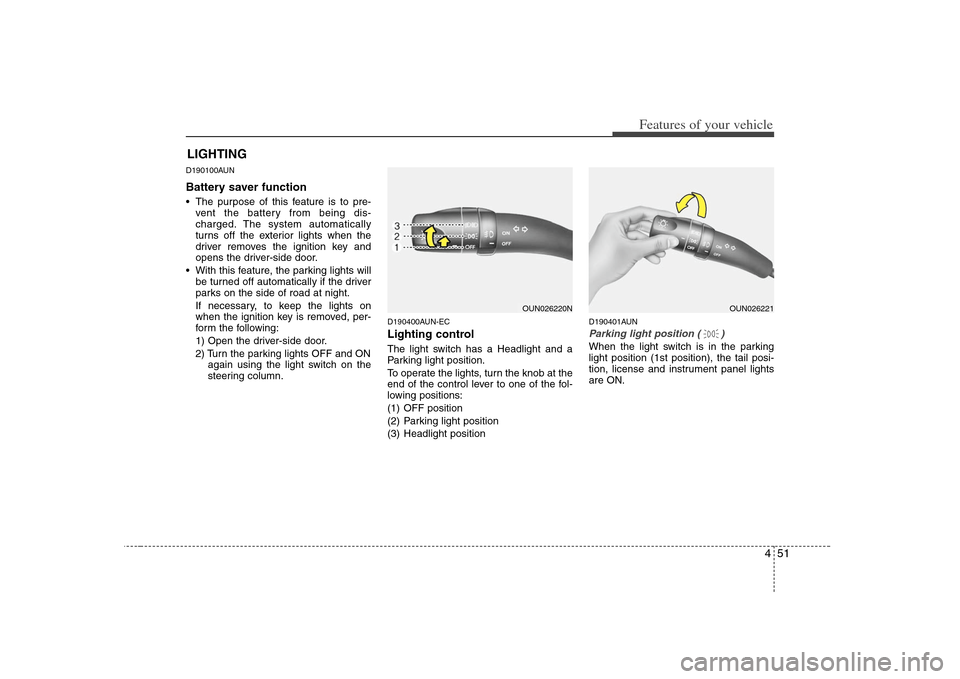
D190400AUN-ECLighting controlThe light switch has a Headlight and a
Parking light position.
To operate the lights, turn the knob at the
end of the control lever to one of the fol-
lowing positions:
(1) OFF position
(2) Parking light position
(3) Headlight position
D190401AUNParking light position ( )When the light switch is in the parking
light position (1st position), the tail posi-
tion, license and instrument panel lights
are ON.
LIGHTING
OUN026220N
OUN026221
Page 178 of 341
499
Features of your vehicle
1. POWER ON-OFF Control Knob The radio unit may be operated when
the ignition key is in the “ACC”or “ON”
position. Press the knob to switch the
power on. The LCD shows the radio
frequency in radio mode, and displays
the CD track in CD mode. To switch the
power off, press the knob again.
Push the FM/AM or CD to turn on that
function without pushing the Power
ON-OFF control knob.
VOLUME Control
Rotate the knob clockwise to increase
the volume and turn the knob counter-
clockwise to reduce the volume.2. BAND SelectorFM Selection Button
Pressing the FM button changes the
FM1 and FM2 bands.
AM(MW, LW) Selection Button
Pressing the AM button selects the AM
band. AM mode is displayed on the LCD.
3. TUNE Select/AUDIO Control KnobRotate the knob clockwise to increase
the frequency and turn the knob counter-
clockwise to reduce the frequency.
Mode Select Knob
Pressing the MODE knob changes the
BASS, MID-RANGE, TREBLE, FADER
and BALANCE mode.
The mode selected is shown on the dis-
play.
After selecting the each mode, rotate the
mode select knob clockwise or counter-
clockwise.
BASS Control
To increase the BASS, rotate the knob
clockwise, while to decrease the BASS,
rotate the knob counterclockwise.
MID-RANGE Control
To increase the MID-RANGE, rotate the
knob clockwise, while to decrease the
MID-RANGE, rotate the knob counter-
clockwise.
TREBLE Control
To increase the TREBLE, rotate the knob
clockwise, while to decrease the TRE-
BLE, rotate the knob counterclockwise.FADER Control
Rotate the control knob clockwise to
emphasize rear speaker sound (front
speaker sound will be attenuated). When
the control knob is turned counterclock-
wise, front speaker sound will be empha-
sized (rear speaker sound will be attenu-
ated).
BALANCE Control
Rotate the knob clockwise to emphasize
right speaker sound (left speaker sound
will be attenuated). When the control
knob is turned counterclockwise, left
speaker sound will be emphasized (right
speaker sound will be attenuated).
4. AUTO SEEK Select Button
(Automatic Channel Selection)Press the AUTO SEEK select button.
When the side is pressed, the unit
will automatically tune to the next higher
frequency and when the side is
pressed, it will automatically tune to the
next lower frequency.
Page 193 of 341
Features of your vehicle114 41. POWER ON-OFF Control Knob The radio unit may be operated when
the ignition key is in the "ACC" or “ON”
position. Press the knob to switch the
power on. The LCD shows the radio
frequency in the radio mode or
CD/MP3 track in the CD/MP3 mode or
CD AUTO CHANGER mode. To switch
the power off, press the knob again.
Push the FM/AM or CD/MP3 to turn on
that function without pushing Power
ON-OFF control knob.
VOLUME Control
Rotate the knob clockwise to increase
the volume and turn the knob counter-
clockwise to reduce the volume.2. BAND Select ButtonPressing the FM, AM button changes the
AM, FM1 and FM2 bands. The mode
selected is shown on the display.
3. AUTO SEEK Select Button
(Automatic Channel Selection)Press the AUTO SEEK select button.
When the side is pressed, the unit
will automatically tune to the next higher
frequency and when the side is
pressed, it will automatically tune to the
next lower frequency.4. RADIO SCAN ButtonWhen you press the button, frequency is
changed and the next channel is
received automatically.
To stay on a station, press the SCAN but-
ton again.5. EQ ButtonPress the EQ button to select the CLAS-
SIC, POP, ROCK, JAZZ and OFF MODE
for the desired tone quality. Each press of
the button changes the display as fol-
lows;6. PRESET STATION Select ButtonsSix stations for AM, FM1 and FM2
respectively can be preset in the elec-
tronic memory circuit.HOW TO PRESET STATIONS
Six AM and twelve FM stations may be
programmed into the memory of the
radio. Then, by simply pressing the AM/
FM band select button and/or one of the
six station select buttons, you may recall
any of these stations instantly. To pro-
gram the stations, follow these steps:
Press AM/FM selector to set the band
for AM, FM1 and FM2.
Select the desired station to be stored
by seek or manual tuning.
Determine the preset station select
button you wish to use to access that
station.
Press and hold the station select but-
ton for more than 0.8 seconds. A select
button indicator will show in the display
indicating which select button you have
depressed. The frequency display will
flash after it has been stored into the
memory. You should then release the
button, and proceed to program the
next desired station. A total of 18 sta-
tions can be programmed by selecting
one AM and two FM station per button.
When completed, any preset station
may be recalled by selecting AM, FM1
or FM2 band and the appropriate sta-
tion button.
CLASSIC➟POP➟ROCK➟JAZZ➟OFF
Page 201 of 341
5
Before driving / 5-3
Key positions / 5-4
Starting the engine / 5-6
Automatic transaxle / 5-7
Brake system / 5-14
Cruise control system / 5-24
Economical operation / 5-28
Special driving conditions / 5-30
Winter driving / 5-34
Trailer towing / 5-37
Vehicle load limit / 5-44
Vehicle weight / 5-49
Driving your vehicle
Page 204 of 341
Driving your vehicle4 5
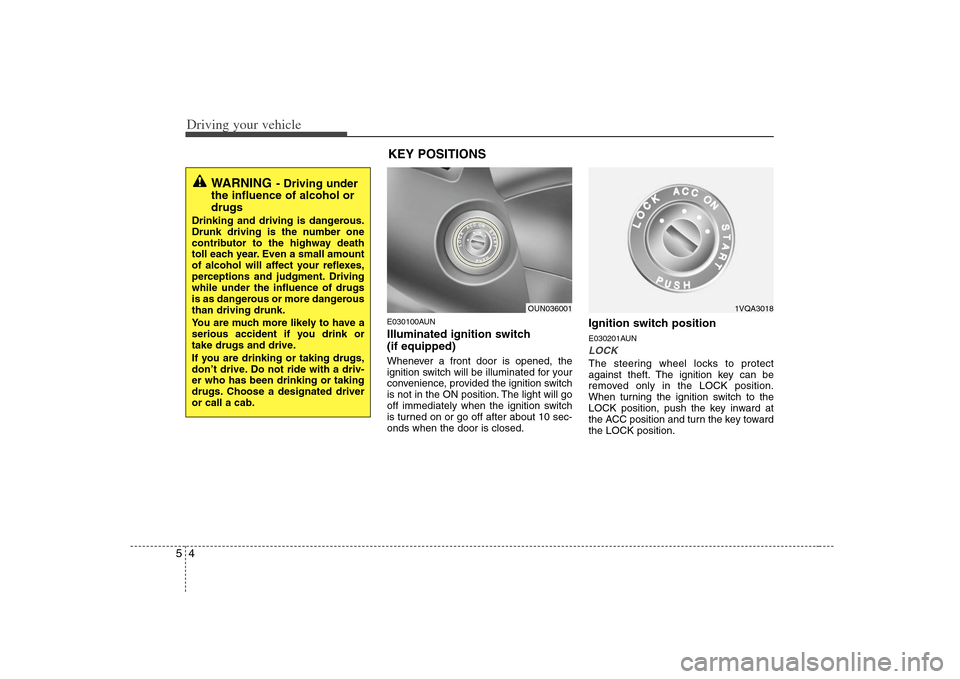
E030100AUNIlluminated ignition switch
(if equipped) Whenever a front door is opened, the
ignition switch will be illuminated for your
convenience, provided the ignition switch
is not in the ON position. The light will go
off immediately when the ignition switch
is turned on or go off after about 10 sec-
onds when the door is closed.
Ignition switch positionE030201AUNLOCKThe steering wheel locks to protect
against theft. The ignition key can be
removed only in the LOCK position.
When turning the ignition switch to the
LOCK position, push the key inward at
the ACC position and turn the key toward
the LOCK position.
WARNING
- Driving under
the influence of alcohol or
drugs
Drinking and driving is dangerous.
Drunk driving is the number one
contributor to the highway death
toll each year. Even a small amount
of alcohol will affect your reflexes,
perceptions and judgment. Driving
while under the influence of drugs
is as dangerous or more dangerous
than driving drunk.
You are much more likely to have a
serious accident if you drink or
take drugs and drive.
If you are drinking or taking drugs,
don’t drive. Do not ride with a driv-
er who has been drinking or taking
drugs. Choose a designated driver
or call a cab.
OUN036001
1VQA3018
KEY POSITIONS
Page 205 of 341
55
Driving your vehicle
E030202AUNACC (Accessory)The steering wheel is unlocked and elec-
trical accessories are operative.✽ ✽
NOTICEIf difficulty is experienced in turning the
ignition switch to the ACC position, turn
the steering wheel right and left to
release the tension and then turn the
key.E030203AUNONThe warning lights can be checked
before the engine is started. This is the
normal running position after the engine
is started.Do not leave the ignition switch ON if the
engine is not running to prevent battery
discharge.
E030204AUNSTARTTurn the ignition switch to the START
position to start the engine. The engine
will crank until you release the key; then
it returns to the ON position. The brake
warning lamp can be checked in this
position.
WARNING -
Ignition
switch
Never turn the ignition switch to
LOCK or ACC while the vehicle is
moving. This would result in loss
of directional control and braking
function, which could cause an
accident.
The anti-theft steering column lock
is not a substitute for the parking
brake. Before leaving the driver’s
seat, always make sure the shift
lever is engaged in P (Park) for the
automatic transaxle and set the
parking brake fully and shut the
engine off. Unexpected and sud-
den vehicle movement may occur
if these precautions are not taken.
Never reach for the ignition switch,
or any other controls through the
steering wheel while the vehicle is
in motion. The presence of your
hand or arm in this area could
cause a loss of vehicle control, an
accident and serious bodily injury
or death.
Do not place any movable objects
around the driver’s seat as they
may move while driving, interfere
with the driver and lead to an acci-
dent.
Page 206 of 341
Driving your vehicle6 5E040000AUN-EU E040100AUN-EU
1. Make sure the parking brake is
applied.
2. Place the transaxle shift lever in P
(Park). Depress the brake pedal fully.You can also start the engine when the
shift lever is in the N (Neutral) position.3. Turn the ignition switch to START and
hold it there until the engine starts (a
maximum of 10 seconds), then
release the key.
4. In extremely cold weather (below
-18°C / 0°F) or after the vehicle has
not been operated for several days, let
the engine warm up without depress-
ing the accelerator.Whether the engine is cold or warm, it
should be started without depressing
the accelerator.
STARTING THE ENGINE
WARNING
Always wear appropriate shoes
when operating your vehicle.
Unsuitable shoes (high heels, ski
boots,etc.) may interfere with your
ability to use the brake and acceler-
ator pedal.
CAUTION
If the engine stalls while you are in
motion, do not attempt to move the
shift lever to the P (Park) position. If
traffic and road conditions permit,
you may put the shift lever in the N
(Neutral) position while the vehicle
is still moving and turn the ignition
switch to the START position in an
attempt to restart the engine.
CAUTION
Do not engage the starter for more
than 10 seconds. If the engine stalls
or fails to start, wait 5 to 10 seconds
before re-engaging the starter.
Improper use of the starter may
damage it.
Page 209 of 341
59
Driving your vehicle
R (Reverse)
Use this position to drive the vehicle
backward.
N (Neutral)
The wheels and transaxle are not locked.
The vehicle will roll freely even on the
slightest incline unless the parking brake
or service brakes are applied.D (Drive)
This is the normal forward driving posi-
tion. The transaxle will automatically shift
through a 4 (or 5)-gear sequence, pro-
viding the best fuel economy and power.
For extra power when passing another
vehicle or climbing grades, depress the
accelerator fully, at which time the
transaxle will automatically downshift to
the next lower gear.
✽ ✽
NOTICEAlways come to a complete stop before
shifting into D (Driving).
(Continued)
Before leaving the driver’s seat,
always make sure the shift lever
is in the P (Park) position. Set the
parking brake fully, shut the
engine off and take the key with
you. Unexpected and sudden
vehicle movement can occur if
you do not follow these precau-
tions in the order specified.
Never leave a child unattended in
a vehicle.
CAUTION
The transaxle may be damaged if
you shift into P (Park) while the
vehicle is in motion.
CAUTION
Always come to a complete stop
before shifting into or out of R
(Reverse); you may damage the
transaxle if you shift into R while
the vehicle is in motion, except as
explained in “Rocking the vehicle”
in this section.
Page 211 of 341
511
Driving your vehicle
E060102AUNShift lock systemFor your safety, the automatic transaxle
has a shift lock system which prevents
shifting the transaxle from P (Park) or N
(Neutral) into R (Reverse) unless the
brake pedal is depressed.
To shift the transaxle from P (Park) or N
(Neutral) into R (Reverse):
1. Depress and hold the brake pedal.
2. Start the engine or turn the ignition
switch to the ON position.
3. Move the shift lever.
If the brake pedal is repeatedly
depressed and released with the shift
lever in the P (Park) position, a chattering
noise near the shift lever may be heard.
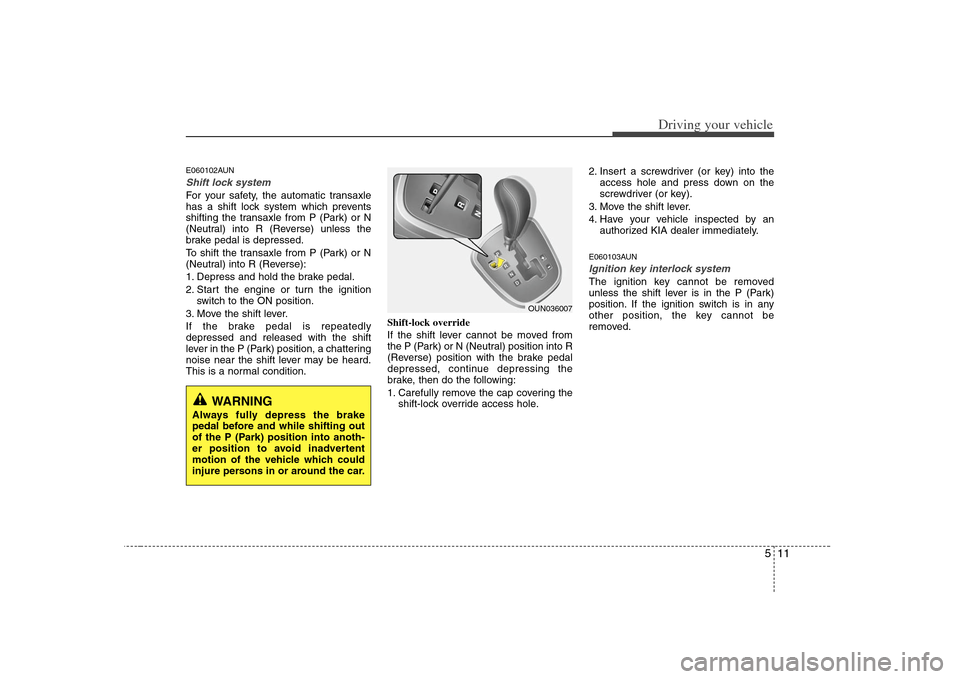
This is a normal condition.Shift-lock override
If the shift lever cannot be moved from
the P (Park) or N (Neutral) position into R
(Reverse) position with the brake pedal
depressed, continue depressing the
brake, then do the following:
1. Carefully remove the cap covering the
shift-lock override access hole.2. Insert a screwdriver (or key) into the
access hole and press down on the
screwdriver (or key).
3. Move the shift lever.
4. Have your vehicle inspected by an
authorized KIA dealer immediately.
E060103AUNIgnition key interlock system The ignition key cannot be removed
unless the shift lever is in the P (Park)
position. If the ignition switch is in any
other position, the key cannot be
removed.
WARNING
Always fully depress the brake
pedal before and while shifting out
of the P (Park) position into anoth-
er position to avoid inadvertent
motion of the vehicle which could
injure persons in or around the car.
OUN036007
Page 235 of 341
535
Driving your vehicle
E120200AUNUse high quality ethylene glycol
coolantYour vehicle is delivered with high quality
ethylene glycol coolant in the cooling
system. It is the only type of coolant that
should be used because it helps prevent
corrosion in the cooling system, lubri-
cates the water pump and prevents
freezing. Be sure to replace or replenish
your coolant in accordance with the
maintenance schedule in section 7.
Before winter, have your coolant tested to
assure that its freezing point is sufficient
for the temperatures anticipated during
the winter.E120300AUNCheck battery and cablesWinter puts additional burdens on the
battery system. Visually inspect the bat-
tery and cables as described in section
7. The level of charge in your battery can
be checked by an authorized KIA dealer
or a service station.
E120400AUNChange to "winter weight" oil if
necessaryIn some climates it is recommended that
a lower viscosity "winter weight" oil be
used during cold weather. See section 9
for recommendations. If you aren't sure
what weight oil you should use, consult
an authorized KIA dealer.E120500AUNCheck spark plugs and ignition
systemInspect your spark plugs as described in
section 7 and replace them if necessary.
Also check all ignition wiring and compo-
nents to be sure they are not cracked,
worn or damaged in any way.
E120600AUNTo keep locks from freezingTo keep the locks from freezing, squirt an
approved de-icer fluid or glycerine into
the key opening. If a lock is covered with
ice, squirt it with an approved de-icing
fluid to remove the ice. If the lock is
frozen internally, you may be able to thaw
it out by using a heated key. Handle the
heated key with care to avoid injury.E120700AUNUse approved window washer
anti-freeze in systemTo keep the water in the window washer
system from freezing, add an approved
window washer anti-freeze solution in
accordance with instructions on the con-
tainer. Window washer anti-freeze is
available from an authorized KIA dealer
and most auto parts outlets. Do not use
engine coolant or other types of anti-
freeze as these may damage the paint
finish.