display KIA Rondo 2011 2.G User Guide
[x] Cancel search | Manufacturer: KIA, Model Year: 2011, Model line: Rondo, Model: KIA Rondo 2011 2.GPages: 338, PDF Size: 6.51 MB
Page 154 of 338
475
Features of your vehicle
Temperature conversion
If the battery has been discharged or dis-
connected, the temperature mode dis-
play will reset to Fahrenheit.
This is a normal condition. You can switch
the temperature mode between
Fahrenheit to Centigrade as follows;
While depressing the AUTO button,
depress the OFF button for 3 seconds or
more. The display will change from
Fahrenheit to Centigrade, or from
Centigrade to Fahrenheit.
D240203AUN-EU
Air intake control
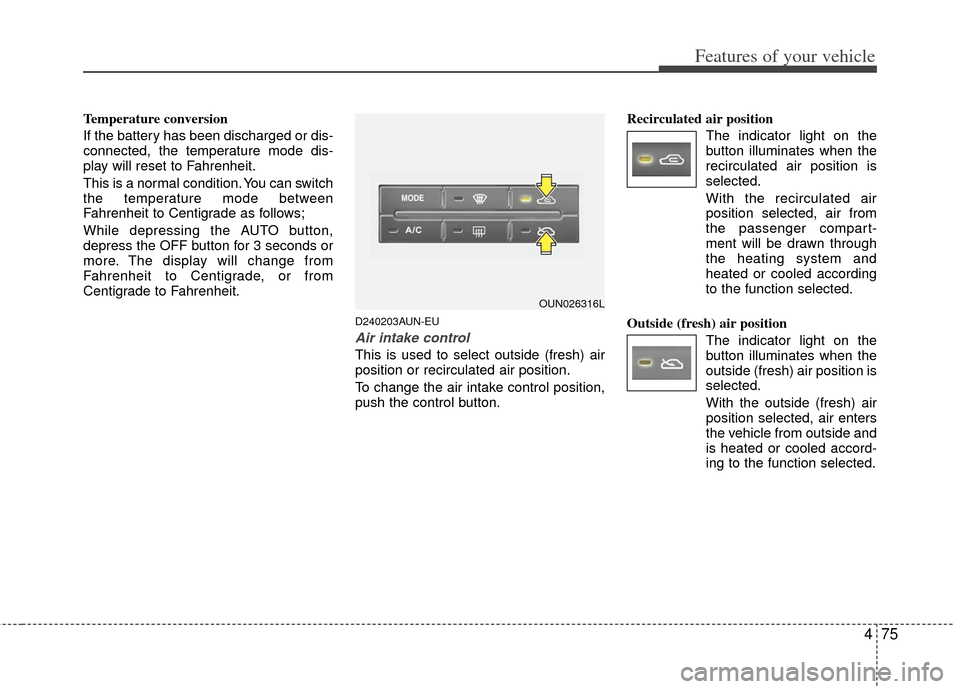
This is used to select outside (fresh) air
position or recirculated air position.
To change the air intake control position,
push the control button.Recirculated air position
The indicator light on the
button illuminates when the
recirculated air position is
selected.
With the recirculated air position selected, air from
the passenger compart-
ment will be drawn through
the heating system and
heated or cooled according
to the function selected.
Outside (fresh) air position The indicator light on the
button illuminates when the
outside (fresh) air position is
selected.
With the outside (fresh) air
position selected, air enters
the vehicle from outside and
is heated or cooled accord-
ing to the function selected.
OUN026316L
Page 159 of 338
Features of your vehicle
80
4
D250300AUN-EU
Defogging logic
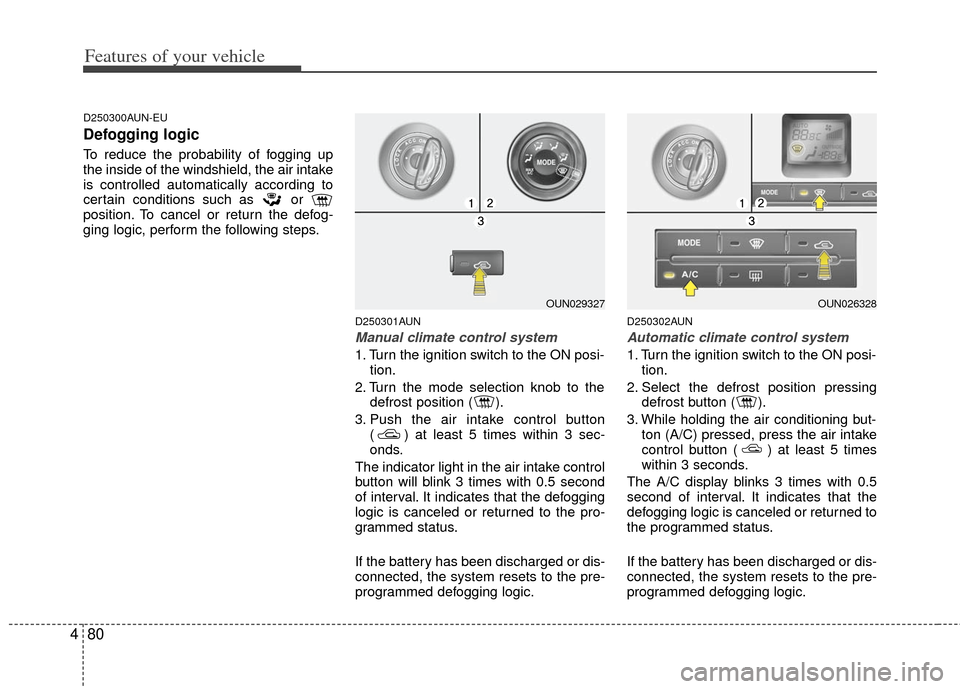
To reduce the probability of fogging up
the inside of the windshield, the air intake
is controlled automatically according to
certain conditions such as or
position. To cancel or return the defog-
ging logic, perform the following steps.
D250301AUN
Manual climate control system
1. Turn the ignition switch to the ON posi-
tion.
2. Turn the mode selection knob to the defrost position ( ).
3. Push the air intake control button ( ) at least 5 times within 3 sec-
onds.
The indicator light in the air intake control
button will blink 3 times with 0.5 second
of interval. It indicates that the defogging
logic is canceled or returned to the pro-
grammed status.
If the battery has been discharged or dis-
connected, the system resets to the pre-
programmed defogging logic.
D250302AUN
Automatic climate control system
1. Turn the ignition switch to the ON posi- tion.
2. Select the defrost position pressing defrost button ( ).
3. While holding the air conditioning but- ton (A/C) pressed, press the air intake
control button ( ) at least 5 times
within 3 seconds.
The A/C display blinks 3 times with 0.5
second of interval. It indicates that the
defogging logic is canceled or returned to
the programmed status.
If the battery has been discharged or dis-
connected, the system resets to the pre-
programmed defogging logic.
OUN029327OUN026328
Page 166 of 338
487
Features of your vehicle
D280600AUN
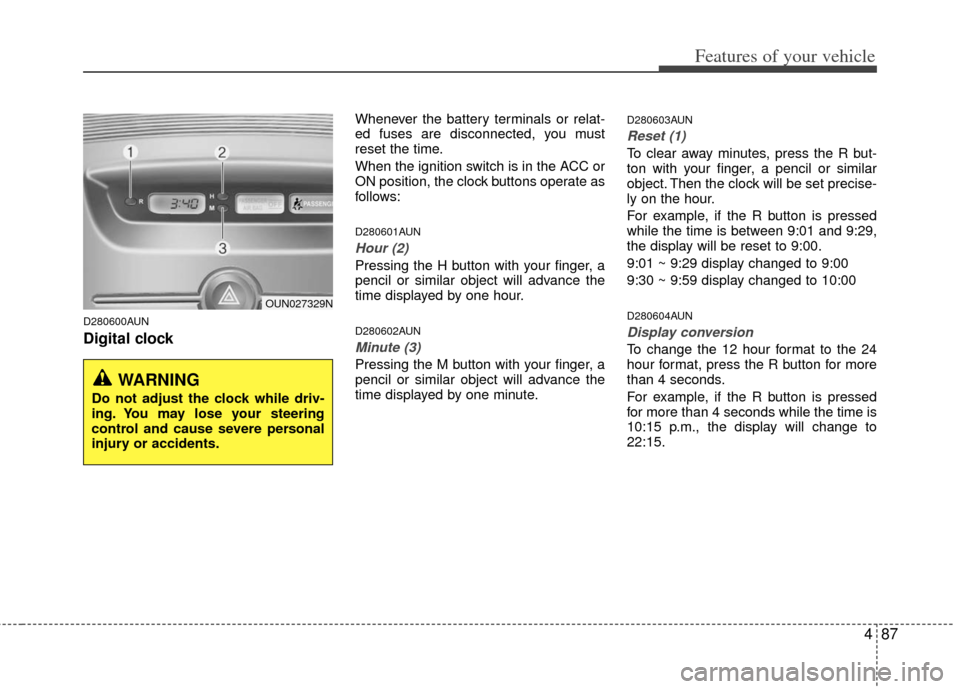
Digital clock
Whenever the battery terminals or relat-
ed fuses are disconnected, you must
reset the time.
When the ignition switch is in the ACC or
ON position, the clock buttons operate as
follows:
D280601AUN
Hour (2)
Pressing the H button with your finger, a
pencil or similar object will advance the
time displayed by one hour.
D280602AUN
Minute (3)
Pressing the M button with your finger, a
pencil or similar object will advance the
time displayed by one minute.
D280603AUN
Reset (1)
To clear away minutes, press the R but-
ton with your finger, a pencil or similar
object. Then the clock will be set precise-
ly on the hour.
For example, if the R button is pressed
while the time is between 9:01 and 9:29,
the display will be reset to 9:00.
9:01 ~ 9:29 display changed to 9:00
9:30 ~ 9:59 display changed to 10:00
D280604AUN
Display conversion
To change the 12 hour format to the 24
hour format, press the R button for more
than 4 seconds.
For example, if the R button is pressed
for more than 4 seconds while the time is
10:15 p.m., the display will change to
22:15.
WARNING
Do not adjust the clock while driv-
ing. You may lose your steering
control and cause severe personal
injury or accidents.
OUN027329N
Page 179 of 338
Features of your vehicle
100
4
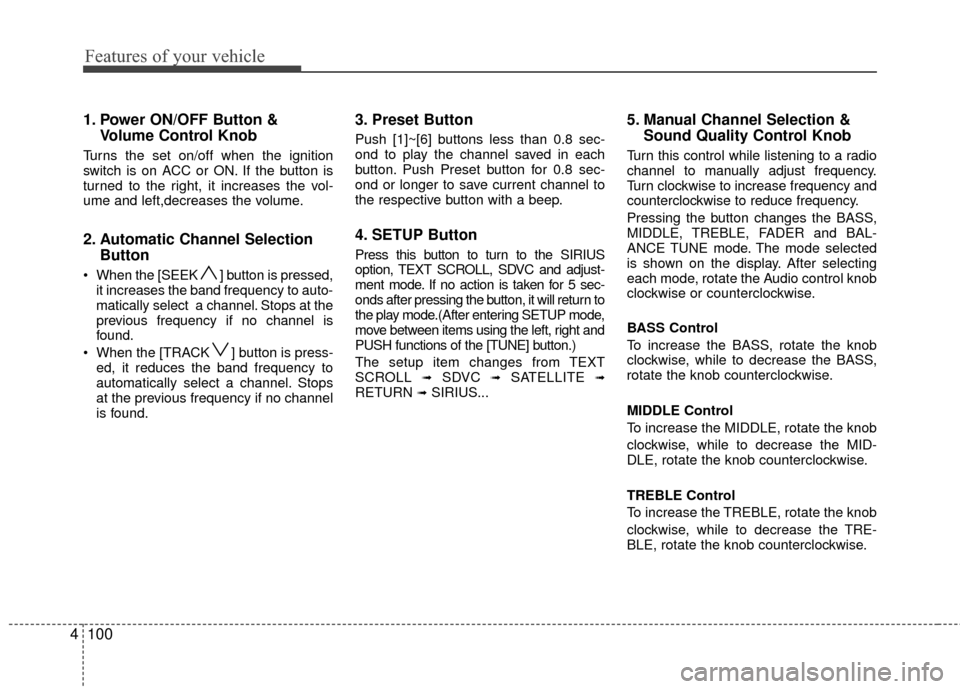
1. Power ON/OFF Button &
Volume Control Knob
Turns the set on/off when the ignition
switch is on ACC or ON. If the button is
turned to the right, it increases the vol-
ume and left,decreases the volume.
2. Automatic Channel SelectionButton
When the [SEEK ] button is pressed,
it increases the band frequency to auto-
matically select a channel. Stops at the
previous frequency if no channel is
found.
When the [TRACK ] button is press- ed, it reduces the band frequency to
automatically select a channel. Stops
at the previous frequency if no channel
is found.
3. Preset Button
Push [1]~[6] buttons less than 0.8 sec-
ond to play the channel saved in each
button. Push Preset button for 0.8 sec-
ond or longer to save current channel to
the respective button with a beep.
4. SETUP Button
Press this button to turn to the SIRIUS
option, TEXT SCROLL, SDVC and adjust-
ment mode. If no action is taken for 5 sec-
onds after pressing the button, it will return to
the play mode.(After entering SETUP mode,
move between items using the left, right and
PUSH functions of the [TUNE] button.)
The setup item changes from TEXT
SCROLL
➟SDVC ➟SATELLITE ➟RETURN ➟SIRIUS...
5. Manual Channel Selection & Sound Quality Control Knob
Turn this control while listening to a radio
channel to manually adjust frequency.
Turn clockwise to increase frequency and
counterclockwise to reduce frequency.
Pressing the button changes the BASS,
MIDDLE, TREBLE, FADER and BAL-
ANCE TUNE mode. The mode selected
is shown on the display. After selecting
each mode, rotate the Audio control knob
clockwise or counterclockwise.
BASS Control
To increase the BASS, rotate the knob
clockwise, while to decrease the BASS,
rotate the knob counterclockwise.
MIDDLE Control
To increase the MIDDLE, rotate the knob
clockwise, while to decrease the MID-
DLE, rotate the knob counterclockwise.
TREBLE Control
To increase the TREBLE, rotate the knob
clockwise, while to decrease the TRE-
BLE, rotate the knob counterclockwise.
Page 183 of 338
Features of your vehicle
104
4
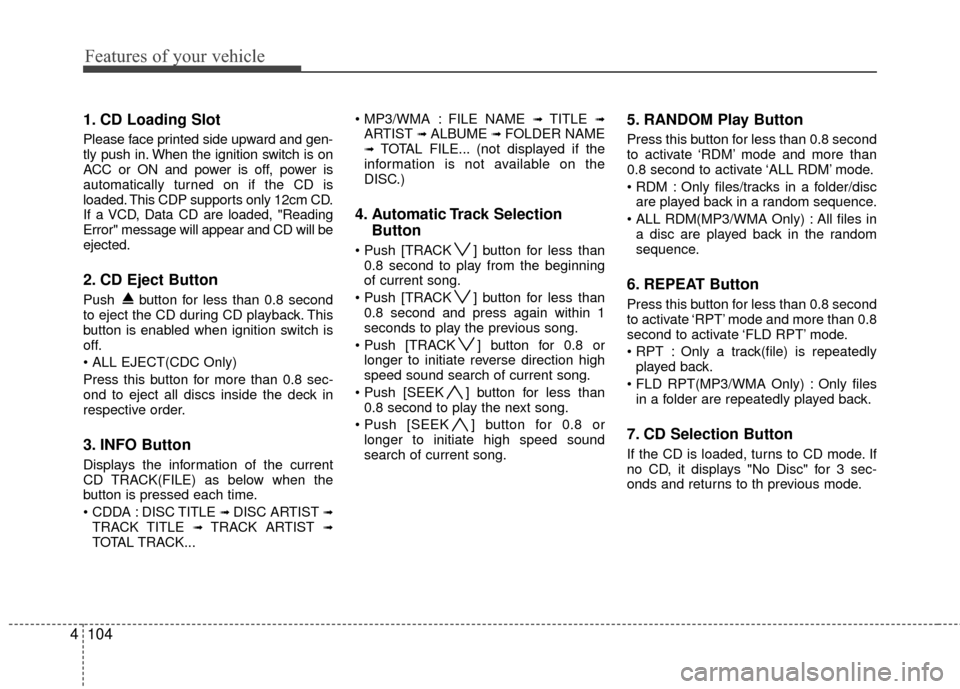
1. CD Loading Slot
Please face printed side upward and gen-
tly push in. When the ignition switch is on
ACC or ON and power is off, power is
automatically turned on if the CD is
loaded. This CDP supports only 12cm CD.
If a VCD, Data CD are loaded, "Reading
Error" message will appear and CD will be
ejected.
2. CD Eject Button
Push button for less than 0.8 second
to eject the CD during CD playback. This
button is enabled when ignition switch is
off.
Press this button for more than 0.8 sec-
ond to eject all discs inside the deck in
respective order.
3. INFO Button
Displays the information of the current
CD TRACK(FILE) as below when the
button is pressed each time.
DISC TITLE
➟ DISC ARTIST ➟TRACK TITLE ➟ TRACK ARTIST ➟TOTAL TRACK... FILE NAME
➟ TITLE ➟ARTIST ➟ ALBUME ➟ FOLDER NAME➟TOTAL FILE... (not displayed if the
information is not available on the
DISC.)
4. Automatic Track Selection Button
] button for less than
0.8 second to play from the beginning
of current song.
] button for less than 0.8 second and press again within 1
seconds to play the previous song.
] button for 0.8 or longer to initiate reverse direction high
speed sound search of current song.
] button for less than 0.8 second to play the next song.
] button for 0.8 or longer to initiate high speed sound
search of current song.
5. RANDOM Play Button
Press this button for less than 0.8 second
to activate ‘RDM’ mode and more than
0.8 second to activate ‘ALL RDM’ mode.
Only files/tracks in a folder/discare played back in a random sequence.
All files in a disc are played back in the random
sequence.
6. REPEAT Button
Press this button for less than 0.8 second
to activate ‘RPT’ mode and more than 0.8
second to activate ‘FLD RPT’ mode.
Only a track(file) is repeatedlyplayed back.
Only files in a folder are repeatedly played back.
7. CD Selection Button
If the CD is loaded, turns to CD mode. If
no CD, it displays "No Disc" for 3 sec-
onds and returns to th previous mode.
Page 184 of 338
4105
Features of your vehicle
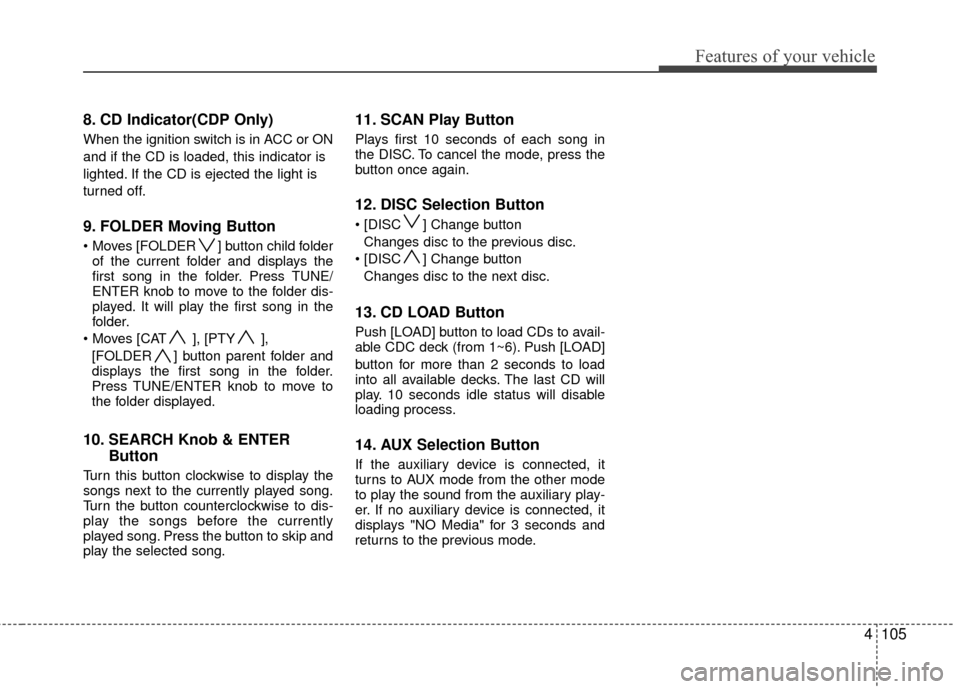
8. CD Indicator(CDP Only)
When the ignition switch is in ACC or ON
and if the CD is loaded, this indicator is
lighted. If the CD is ejected the light is
turned off.
9. FOLDER Moving Button
] button child folderof the current folder and displays the
first song in the folder. Press TUNE/
ENTER knob to move to the folder dis-
played. It will play the first song in the
folder.
], [PTY ], [FOLDER ] button parent folder and
displays the first song in the folder.
Press TUNE/ENTER knob to move to
the folder displayed.
10. SEARCH Knob & ENTER Button
Turn this button clockwise to display the
songs next to the currently played song.
Turn the button counterclockwise to dis-
play the songs before the currently
played song. Press the button to skip and
play the selected song.
11. SCAN Play Button
Plays first 10 seconds of each song in
the DISC. To cancel the mode, press the
button once again.
12. DISC Selection Button
] Change button
Changes disc to the previous disc.
] Change button Changes disc to the next disc.
13. CD LOAD Button
Push [LOAD] button to load CDs to avail-
able CDC deck (from 1~6). Push [LOAD]
button for more than 2 seconds to load
into all available decks. The last CD will
play. 10 seconds idle status will disable
loading process.
14. AUX Selection Button
If the auxiliary device is connected, it
turns to AUX mode from the other mode
to play the sound from the auxiliary play-
er. If no auxiliary device is connected, it
displays "NO Media" for 3 seconds and
returns to the previous mode.
Page 189 of 338
Features of your vehicle
110
4
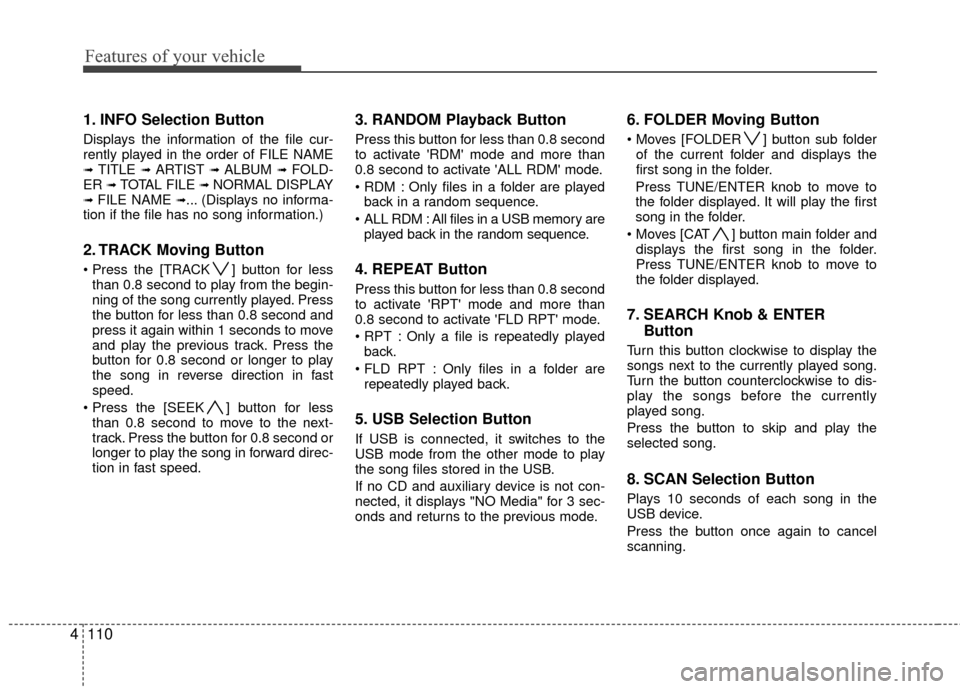
1. INFO Selection Button
Displays the information of the file cur-
rently played in the order of FILE NAME
➟ TITLE ➟ ARTIST ➟ ALBUM ➟ FOLD-
ER ➟ TOTAL FILE ➟ NORMAL DISPLAY➟ FILE NAME ➟... (Displays no informa-
tion if the file has no song information.)
2. TRACK Moving Button
] button for less than 0.8 second to play from the begin-
ning of the song currently played. Press
the button for less than 0.8 second and
press it again within 1 seconds to move
and play the previous track. Press the
button for 0.8 second or longer to play
the song in reverse direction in fast
speed.
] button for less than 0.8 second to move to the next-
track. Press the button for 0.8 second or
longer to play the song in forward direc-
tion in fast speed.
3. RANDOM Playback Button
Press this button for less than 0.8 second
to activate 'RDM' mode and more than
0.8 second to activate 'ALL RDM' mode.
Only files in a folder are playedback in a random sequence.
ALL RDM : All files in a USB memory are played back in the random sequence.
4. REPEAT Button
Press this button for less than 0.8 second
to activate 'RPT' mode and more than
0.8 second to activate 'FLD RPT' mode.
Only a file is repeatedly playedback.
Only files in a folder are repeatedly played back.
5. USB Selection Button
If USB is connected, it switches to the
USB mode from the other mode to play
the song files stored in the USB.
If no CD and auxiliary device is not con-
nected, it displays "NO Media" for 3 sec-
onds and returns to the previous mode.
6. FOLDER Moving Button
] button sub folderof the current folder and displays the
first song in the folder.
Press TUNE/ENTER knob to move to
the folder displayed. It will play the first
song in the folder.
] button main folder and displays the first song in the folder.
Press TUNE/ENTER knob to move to
the folder displayed.
7. SEARCH Knob & ENTER Button
Turn this button clockwise to display the
songs next to the currently played song.
Turn the button counterclockwise to dis-
play the songs before the currently
played song.
Press the button to skip and play the
selected song.
8. SCAN Selection Button
Plays 10 seconds of each song in the
USB device.
Press the button once again to cancel
scanning.
Page 192 of 338
4113
Features of your vehicle
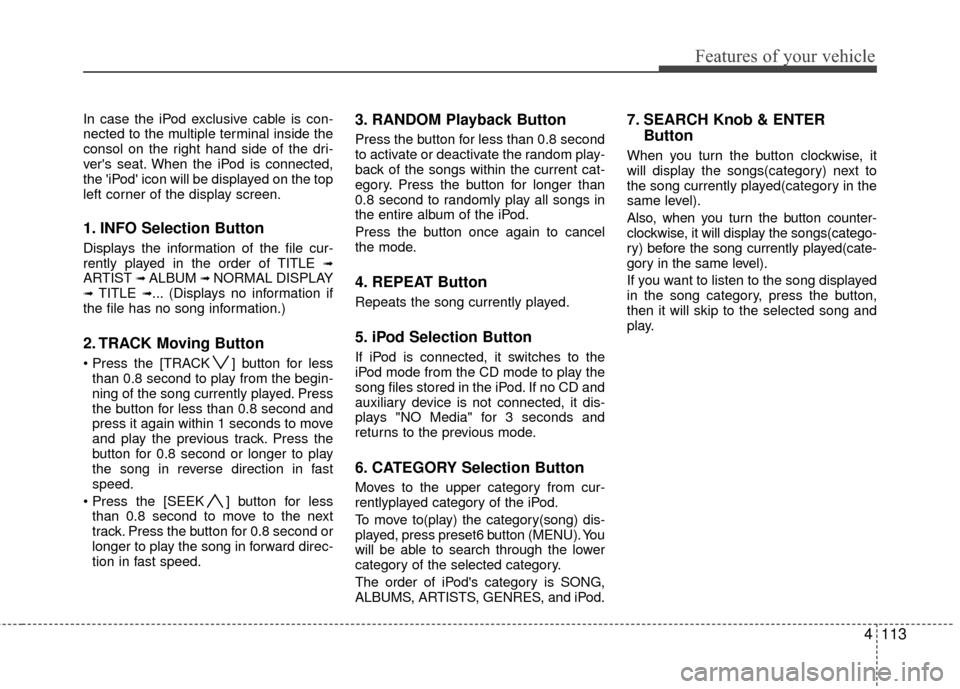
In case the iPod exclusive cable is con-
nected to the multiple terminal inside the
consol on the right hand side of the dri-
ver's seat. When the iPod is connected,
the 'iPod' icon will be displayed on the top
left corner of the display screen.
1. INFO Selection Button
Displays the information of the file cur-
rently played in the order of TITLE ➟ARTIST ➟ ALBUM ➟ NORMAL DISPLAY➟ TITLE ➟... (Displays no information if
the file has no song information.)
2. TRACK Moving Button
] button for less than 0.8 second to play from the begin-
ning of the song currently played. Press
the button for less than 0.8 second and
press it again within 1 seconds to move
and play the previous track. Press the
button for 0.8 second or longer to play
the song in reverse direction in fast
speed.
] button for less than 0.8 second to move to the next
track. Press the button for 0.8 second or
longer to play the song in forward direc-
tion in fast speed.
3. RANDOM Playback Button
Press the button for less than 0.8 second
to activate or deactivate the random play-
back of the songs within the current cat-
egory. Press the button for longer than
0.8 second to randomly play all songs in
the entire album of the iPod.
Press the button once again to cancel
the mode.
4. REPEAT Button
Repeats the song currently played.
5. iPod Selection Button
If iPod is connected, it switches to the
iPod mode from the CD mode to play the
song files stored in the iPod. If no CD and
auxiliary device is not connected, it dis-
plays "NO Media" for 3 seconds and
returns to the previous mode.
6. CATEGORY Selection Button
Moves to the upper category from cur-
rentlyplayed category of the iPod.
To move to(play) the category(song) dis-
played, press preset6 button (MENU). You
will be able to search through the lower
category of the selected category.
The order of iPod's category is SONG,
ALBUMS, ARTISTS, GENRES, and iPod.
7. SEARCH Knob & ENTER Button
When you turn the button clockwise, it
will display the songs(category) next to
the song currently played(category in the
same level).
Also, when you turn the button counter-
clockwise, it will display the songs(catego-
ry) before the song currently played(cate-
gory in the same level).
If you want to listen to the song displayed
in the song category, press the button,
then it will skip to the selected song and
play.
Page 196 of 338
4117
Features of your vehicle
How to Use SIRIUS Satellite
Radio
Your Kia vehicle is equipped with 3 months
complimentary period of SIRIUS Satellite
Radio so you have access to over 130
channels of music, information, and enter-
tainment programming.
Activation
In order to extend or reactivate your sub-
scription to SIRIUS Satellite Radio, you
will need to contact SIRIUS Customer
Care at 888-539-7474. Have your 12 digit
SID (Sirius Identification Number)/ESN
(Electronic Serial Number) ready. To
retrieve the SID/ESN, turn on the radio,
press the [SAT] button and tune to chan-
nel zero. Please note that the vehicle will
need to be turned on, in Sirius mode, and
have an unobstructed view of the sky in
order for the radio to receive the activa-
tion signal.
1. SATELLITE RADIO SelectionButton(SIRIUS Satellite Radio)
Press the [SAT] button to switch to SIR-
IUS Satellite Radio. It cycles through the
different bands as noted below.
SAT1
➟ SAT2 ➟ SAT3 ➟ SAT1 ➟...
2. Channel Selection Button
] or [SEEK ] but-
ton for less than 0.8 second to select
previous or next channel.
] or [SEEK ] but- ton for 0.8 or longer to continuously
move to previous or next channel.
top of the screen, channel up/down is
done through the channels within cur-
rent category.
3. Preset Selection Button
ond to play the channel saved in each
button.
second or longer to save current chan-
nel. An audible beep will play to confirm
the preset is stored.
4. SCAN Button
ically scans the radio stations upwards.
channel, starting from the initial chan-
nel, for ten seconds.
the scan feature and to listen to the cur-
rently selected channel.
top of the screen, channel changing is
done through the channels in current
category.
5. TUNE Knob and ENTER Button
While listening to SIRIUS broadcast,
rotate this knob to the right or left to
search other channels while listening to
current channels and push this knob to
select what you want to listen to.
(Turn to the right to search higher chan-
nels and left lower channels)
6. CAT/FOLDER Button
] or [FOLDER ] buttonto enter the Category List Mode, it dis-
plays cateogry items and highlights the
category that currently tuned channel
belongs to.
buttons to navigate category list.
Press [ENTER] button to select the low- est channel in highlighted category.
gory "CATEGORY" Icon is displayed at
the top of the screen.
Page 197 of 338
Features of your vehicle
118
4
7. INFO Selection Button
Displays the information of the channel
currently played by in the order of Artist/
Song title
➟Category/Channel name ➟Composer(if available) ➟ Artist/Song title ➟Category/Channel name ➟... (ART/TITLE
Selection)
Displays the information of the channel
currently played by in the order of
Category/Channel name
➟ Artist/Song
title ➟Composer(if available) ➟ Category
/Channel name ➟ Artist/Song title ➟...
(CAT/CH Selection) (If there is no infor-
mation of COMPOSER NAME, it returns
to main display.)
8. SETUP Button
Press this button to adjust to the SCROLL,
SDVC, SIRIUS and adjustment mode.
If no action is taken for 5 seconds after
pressing the button, it will return to the pre-
vious radio mode.(After entering SETUP
mode, move between items using the
left,right and PUSH functions of the TUNE
button.)
The setup item changes from SCROLL
➟SDVC ➟ SIRIUS ➟ SCROLL ➟...
✽ ✽ Troubleshooting
1. Antenna Error
If this message is displayed, the anten-
na or antenna cable is broken or
unplugged. Please consult with your
Kia dealership.
2. Acquiring Signal If this message is displayed, it means
that the antenna is covered and that
the SIRIUS Satellite Radio signal is
not available. Ensure the antenna is
uncovered and has a clear view of the
sky.