rear KIA Rondo 2011 2.G Owner's Manual
[x] Cancel search | Manufacturer: KIA, Model Year: 2011, Model line: Rondo, Model: KIA Rondo 2011 2.GPages: 338, PDF Size: 6.51 MB
Page 10 of 338

Your vehicle at a glance
22
INTERIOR OVERVIEW
B010000AUN-EU
1. Door lock/unlock button ......................4-9
2. Inner door handle ..............................4-10
3. Outside rearview mirror control switch ................................................4-30
4. Central door lock switch ....................4-10
5. Power window lock button.................4-17
6. Power window switches ....................4-15
7. Fuse box ............................................7-45
8. Instrument panel illumination control knob ..................................................4-33
9. ESC OFF button* ..............................5-19
10. Front windshield deicer button* ......4-60
11. Hood release lever ..........................4-18
12. Steering wheel ................................4-27
13. Steering wheel tilt lever...................4-28
14. Seat...................................................3-2
* : if equipped
OUN009001N
Page 15 of 338
WARNING- Loose objects
Loose objects in the driver’s foot
area could interfere with the opera-
tion of the foot pedals, possibly
causing an accident. Do not place
anything under the front seats.
Safety features of your vehicle
23
C010000AUN-EE
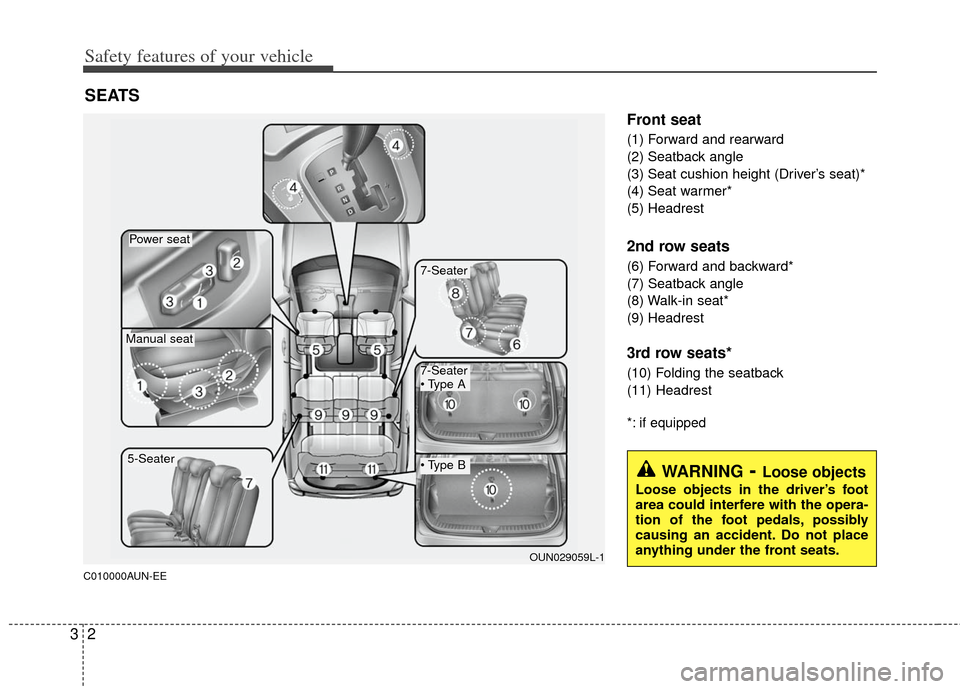
Front seat
(1) Forward and rearward
(2) Seatback angle
(3) Seat cushion height (Driver’s seat)*
(4) Seat warmer*
(5) Headrest
2nd row seats
(6) Forward and backward*
(7) Seatback angle
(8) Walk-in seat*
(9) Headrest
3rd row seats*
(10) Folding the seatback
(11) Headrest
*: if equipped
SEATS
OUN029059L-1
7-Seater
7-Seater
5-Seater
Power seat
Manual seat
Page 17 of 338
Safety features of your vehicle
43
(Continued)
When resetting the rear seatbackto the upright position, make
sure it is securely latched by
pushing it forward and rear-
wards.
To avoid the possibility of burns from a hot rear floor surface, do
not remove the carpet in the
cargo area. Emission controls
beneath this floor generate high
exhaust temperatures.
WARNING
After adjusting the seat, always
check that it is securely locked into
place by attempting to move the
seat forward or reverse without
using the lock release lever.
Sudden or unexpected movement
of the driver's seat could cause you
to lose control of the vehicle result-
ing in an accident.
WARNING- Rear seat-
backs (2nd and/or 3rd row)
The rear seatback must be
securely latched. If not, passen-
gers and objects could be thrown
forward resulting in serious
injury or death in the event of a
sudden stop or collision.
Luggage and other cargo should be laid flat in the cargo area. If
objects are large, heavy, or must
be piled, they must be secured.
Under no circumstances should
cargo be piled higher than the
seatbacks. Failure to follow these
warnings could result in serious
injury or death in the event of a
sudden stop, collision or rollover.
No passenger should ride in the cargo area or sit or lie on folded
seatbacks while the vehicle is
moving. All passengers must be
in seats and restrained properly
while riding.
(Continued)
WARNING
Do not adjust the seat while wear-ing seat belts. Moving the seat
cushion forward may cause
strong pressure on the abdomen.
Use extreme caution so that hands or other objects are not
caught in the seat mechanisms
while the seat is moving.
Do not put a cigarette lighter on the floor or seat. When you oper-
ate the seat, gas may gush out of
the lighter and cause fire.
Page 18 of 338
35
Safety features of your vehicle
Front seat adjustment - manual
C010101AUN
Forward and rearward
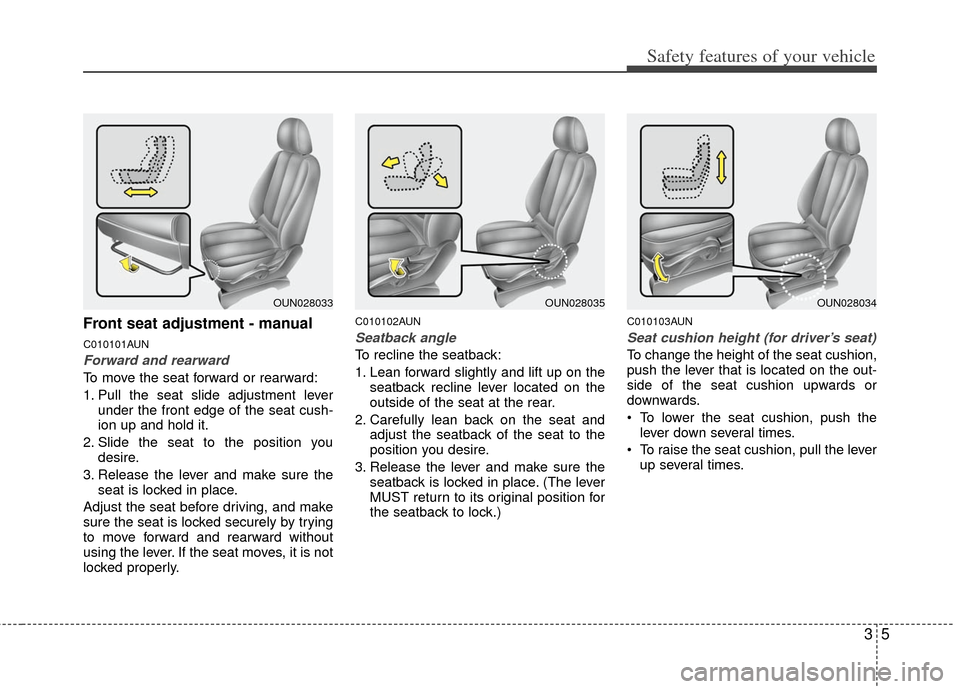
To move the seat forward or rearward:
1. Pull the seat slide adjustment leverunder the front edge of the seat cush-
ion up and hold it.
2. Slide the seat to the position you desire.
3. Release the lever and make sure the seat is locked in place.
Adjust the seat before driving, and make
sure the seat is locked securely by trying
to move forward and rearward without
using the lever. If the seat moves, it is not
locked properly.
C010102AUN
Seatback angle
To recline the seatback:
1. Lean forward slightly and lift up on the seatback recline lever located on the
outside of the seat at the rear.
2. Carefully lean back on the seat and adjust the seatback of the seat to the
position you desire.
3. Release the lever and make sure the seatback is locked in place. (The lever
MUST return to its original position for
the seatback to lock.)
C010103AUN
Seat cushion height (for driver’s seat)
To change the height of the seat cushion,
push the lever that is located on the out-
side of the seat cushion upwards or
downwards.
To lower the seat cushion, push thelever down several times.
To raise the seat cushion, pull the lever up several times.
OUN028034OUN028033OUN028035
Page 20 of 338
37
Safety features of your vehicle
Adjusting the height up and down
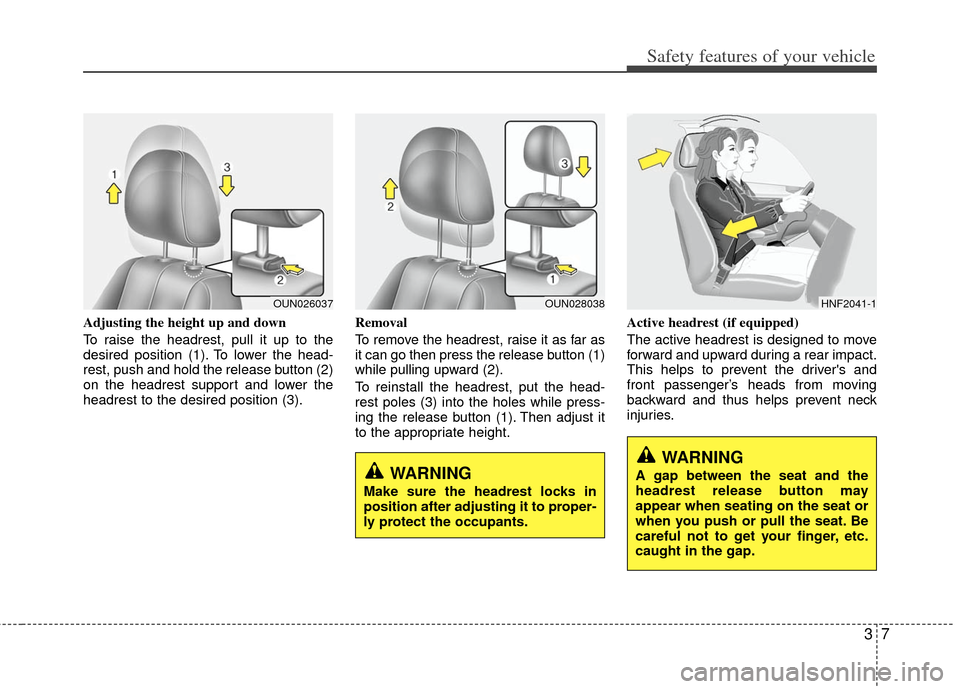
To raise the headrest, pull it up to the
desired position (1). To lower the head-
rest, push and hold the release button (2)
on the headrest support and lower the
headrest to the desired position (3).Removal
To remove the headrest, raise it as far as
it can go then press the release button (1)
while pulling upward (2).
To reinstall the headrest, put the head-
rest poles (3) into the holes while press-
ing the release button (1). Then adjust it
to the appropriate height.Active headrest (if equipped)
The active headrest is designed to move
forward and upward during a rear impact.
This helps to prevent the driver's and
front passenger’s heads from moving
backward and thus helps prevent neck
injuries.
HNF2041-1OUN026037OUN028038
WARNING
Make sure the headrest locks in
position after adjusting it to proper-
ly protect the occupants.
WARNING
A gap between the seat and the
headrest release button may
appear when seating on the seat or
when you push or pull the seat. Be
careful not to get your finger, etc.
caught in the gap.
Page 23 of 338
Safety features of your vehicle
10
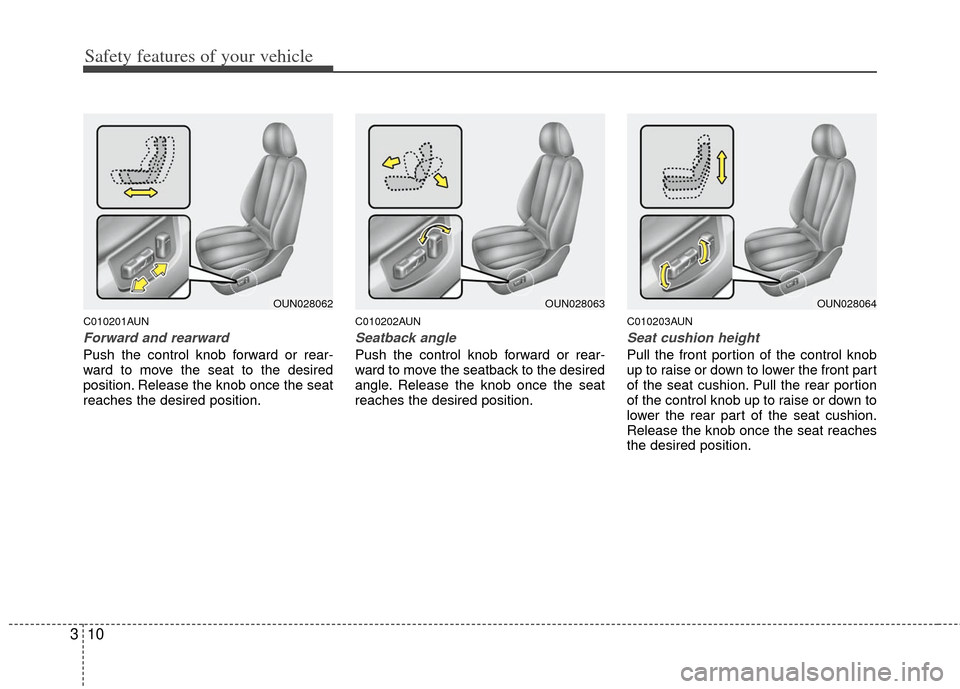
3
C010201AUN
Forward and rearward
Push the control knob forward or rear-
ward to move the seat to the desired
position. Release the knob once the seat
reaches the desired position.
C010202AUN
Seatback angle
Push the control knob forward or rear-
ward to move the seatback to the desired
angle. Release the knob once the seat
reaches the desired position.
C010203AUN
Seat cushion height
Pull the front portion of the control knob
up to raise or down to lower the front part
of the seat cushion. Pull the rear portion
of the control knob up to raise or down to
lower the rear part of the seat cushion.
Release the knob once the seat reaches
the desired position.
OUN028063OUN028064OUN028062
Page 24 of 338
311
Safety features of your vehicle
Rear seat adjustment
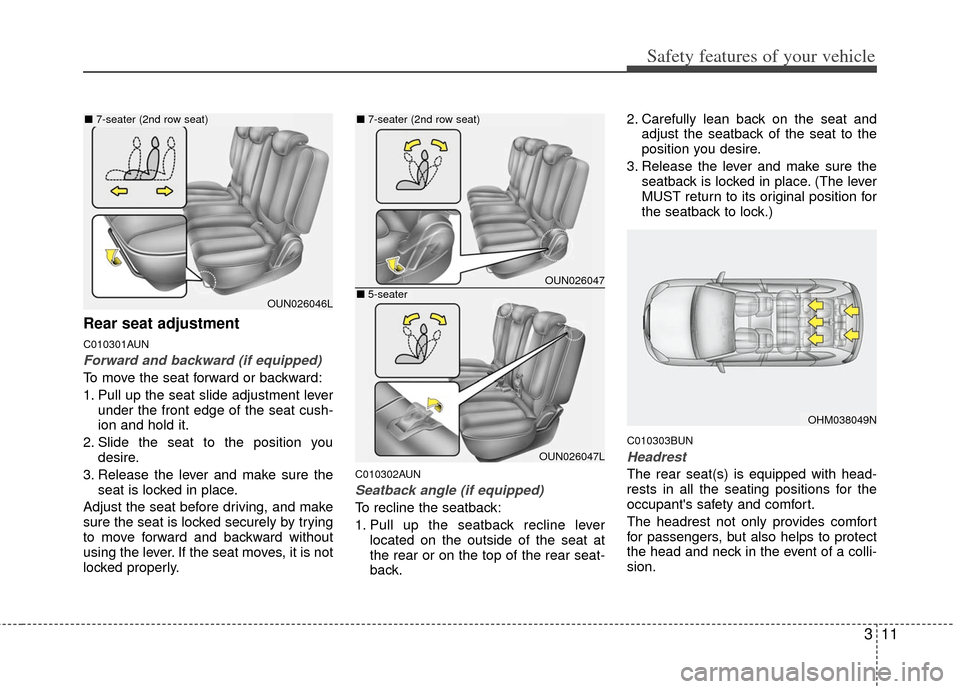
C010301AUN
Forward and backward (if equipped)
To move the seat forward or backward:
1. Pull up the seat slide adjustment leverunder the front edge of the seat cush-
ion and hold it.
2. Slide the seat to the position you desire.
3. Release the lever and make sure the seat is locked in place.
Adjust the seat before driving, and make
sure the seat is locked securely by trying
to move forward and backward without
using the lever. If the seat moves, it is not
locked properly.
C010302AUN
Seatback angle (if equipped)
To recline the seatback:
1. Pull up the seatback recline lever located on the outside of the seat at
the rear or on the top of the rear seat-
back. 2. Carefully lean back on the seat and
adjust the seatback of the seat to the
position you desire.
3. Release the lever and make sure the seatback is locked in place. (The lever
MUST return to its original position for
the seatback to lock.)
C010303BUN
Headrest
The rear seat(s) is equipped with head-
rests in all the seating positions for the
occupant's safety and comfort.
The headrest not only provides comfort
for passengers, but also helps to protect
the head and neck in the event of a colli-
sion.
OUN026046L
■7-seater (2nd row seat)
OUN026047
OUN026047L
■7-seater (2nd row seat)
■5-seater
OHM038049N
Page 26 of 338
313
Safety features of your vehicle
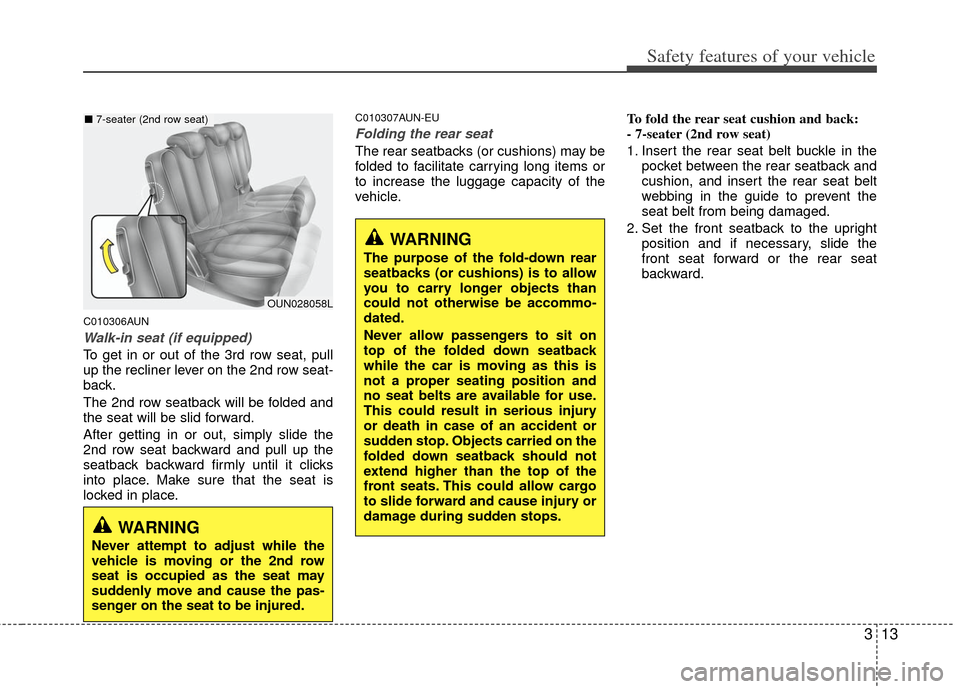
C010306AUN
Walk-in seat (if equipped)
To get in or out of the 3rd row seat, pull
up the recliner lever on the 2nd row seat-
back.
The 2nd row seatback will be folded and
the seat will be slid forward.
After getting in or out, simply slide the
2nd row seat backward and pull up the
seatback backward firmly until it clicks
into place. Make sure that the seat is
locked in place.
C010307AUN-EU
Folding the rear seat
The rear seatbacks (or cushions) may be
folded to facilitate carrying long items or
to increase the luggage capacity of the
vehicle.To fold the rear seat cushion and back:
- 7-seater (2nd row seat)
1. Insert the rear seat belt buckle in the
pocket between the rear seatback and
cushion, and insert the rear seat belt
webbing in the guide to prevent the
seat belt from being damaged.
2. Set the front seatback to the upright position and if necessary, slide the
front seat forward or the rear seat
backward.
OUN028058L
■7-seater (2nd row seat)
WARNING
Never attempt to adjust while the
vehicle is moving or the 2nd row
seat is occupied as the seat may
suddenly move and cause the pas-
senger on the seat to be injured.
WARNING
The purpose of the fold-down rear
seatbacks (or cushions) is to allow
you to carry longer objects than
could not otherwise be accommo-
dated.
Never allow passengers to sit on
top of the folded down seatback
while the car is moving as this is
not a proper seating position and
no seat belts are available for use.
This could result in serious injury
or death in case of an accident or
sudden stop. Objects carried on the
folded down seatback should not
extend higher than the top of the
front seats. This could allow cargo
to slide forward and cause injury or
damage during sudden stops.
Page 27 of 338
Safety features of your vehicle
14
3
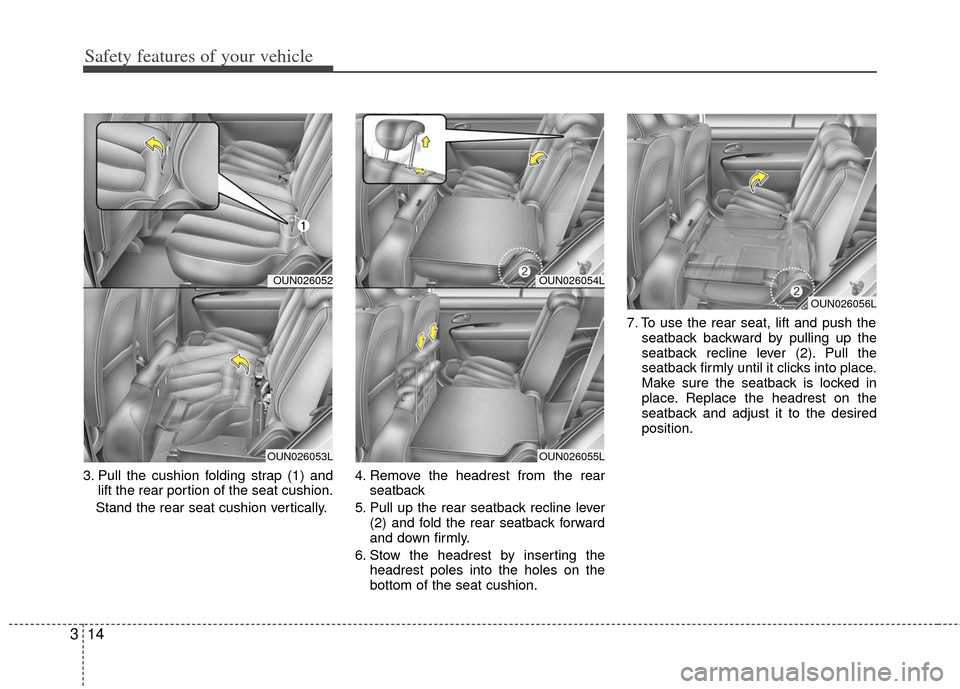
3. Pull the cushion folding strap (1) and
lift the rear portion of the seat cushion.
Stand the rear seat cushion vertically. 4. Remove the headrest from the rear
seatback
5. Pull up the rear seatback recline lever (2) and fold the rear seatback forward
and down firmly.
6. Stow the headrest by inserting the headrest poles into the holes on the
bottom of the seat cushion. 7. To use the rear seat, lift and push the
seatback backward by pulling up the
seatback recline lever (2). Pull the
seatback firmly until it clicks into place.
Make sure the seatback is locked in
place. Replace the headrest on the
seatback and adjust it to the desired
position.
OUN026054L
OUN026055L
OUN026052
OUN026053L
OUN026056L
Page 28 of 338
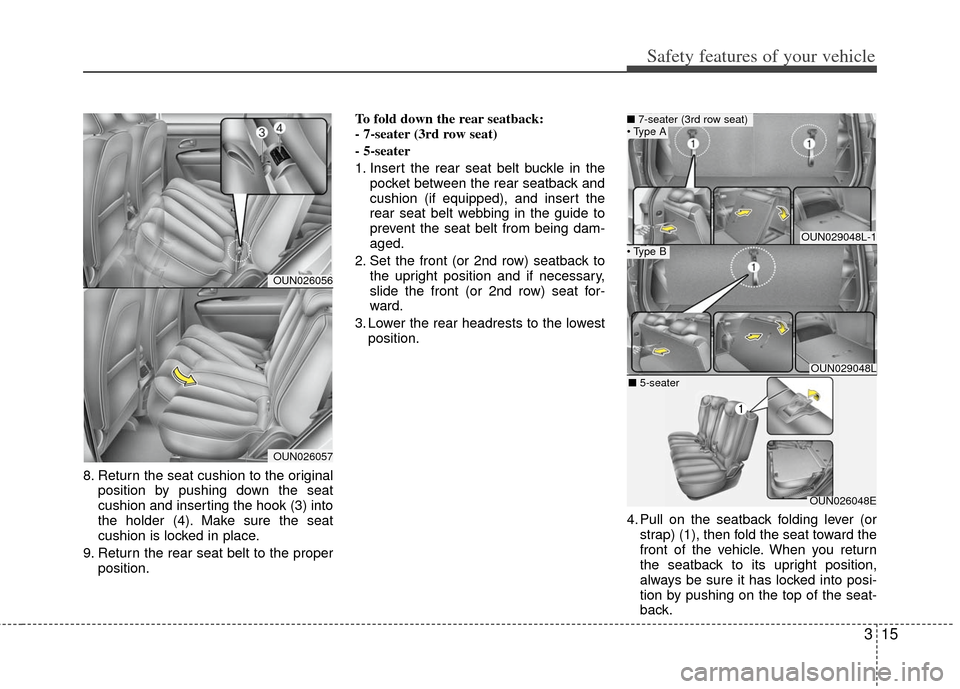
315
Safety features of your vehicle
8. Return the seat cushion to the originalposition by pushing down the seat
cushion and inserting the hook (3) into
the holder (4). Make sure the seat
cushion is locked in place.
9. Return the rear seat belt to the proper position. To fold down the rear seatback:
- 7-seater (3rd row seat)
- 5-seater
1. Insert the rear seat belt buckle in the
pocket between the rear seatback and
cushion (if equipped), and insert the
rear seat belt webbing in the guide to
prevent the seat belt from being dam-
aged.
2. Set the front (or 2nd row) seatback to the upright position and if necessary,
slide the front (or 2nd row) seat for-
ward.
3. Lower the rear headrests to the lowest position.
4. Pull on the seatback folding lever (orstrap) (1), then fold the seat toward the
front of the vehicle. When you return
the seatback to its upright position,
always be sure it has locked into posi-
tion by pushing on the top of the seat-
back.
OUN026056
OUN026057
OUN029048L-1
OUN029048L
OUN026048E
■ 7-seater (3rd row seat)
■5-seater