sensor KIA Rondo 2015 3.G Owner's Guide
[x] Cancel search | Manufacturer: KIA, Model Year: 2015, Model line: Rondo, Model: KIA Rondo 2015 3.GPages: 564, PDF Size: 19.11 MB
Page 190 of 564

Features of your vehicle
102
4
High beam operation
1. Turn the light switch to the head-
light position.
2. Push the lever away from you. The high-beam indicator will light
when the headlight high beams are
switched on.
To prevent the battery from being discharged, do not leave the lights
on for a prolonged time while the
engine is not running.
CAUTION
Never place anything over sensor (1) located on theinstrument panel. This willensure better auto-light sys-tem control.
Don’t clean the sensor using a window cleaner. The cleanermay leave a light film whichcould interfere with sensoroperation.
If your vehicle has window tint or other types of metallic coat-ing on the front windshield,the Auto light system may notwork properly.
WARNING - High beams
Do not use high beam when
there are other vehicles. Using
high beam could obstruct the
other driver's vision.
ORP042119C
Page 194 of 564

Features of your vehicle
106
4
AUTO (Automatic) control
(if equipped)
The rain sensor located on the upper
end of the windshield glass senses
the amount of rainfall and controls
the wiping cycle for the proper inter-
val. The more it rains, the faster the
wiper operates. When the rain stops,
the wiper stops.
To vary the speed setting, turn the
speed control knob (1). If the wiper switch is set in AUTO
mode when the ignition switch is ON,
the wiper will operate once to per-
form a self-check of the system. Set
the wiper to off position when the
wiper is not in use.
Always remove all snow and ice and
defrost the windshield properly prior
to operating the windshield wipers.
.
ORP042127N
CAUTION
When washing the vehicle, set
the wiper switch in the OFF (O)position to stop the auto wiperoperation.
The wiper may operate and bedamaged if the switch is set inthe AUTO mode while washingthe vehicle.
Do not remove the sensor coverlocated on the upper end of thepassenger side windshieldglass. Damage to system partscould occur and may not be cov-ered by your vehicle warranty.
When starting the vehicle inwinter, set the wiper switch inthe OFF (O) position. Otherwise,wipers may operate and ice maydamage the windshield wiperblades. Always remove all snowand ice and defrost the wind-shield properly prior to operat-ing the windshield wipers.
CAUTION
When the ignition switch is ONand the windshield wiper switchis placed in the AUTO mode, usecaution in the following situa-tions to avoid any injury to thehands or other parts of the body:
Do not touch the upper end of the windshield glass facingthe rain sensor.
Do not wipe the upper end of the windshield glass with adamp or wet cloth.
Do not put pressure on the windshield glass.
Page 231 of 564

4143
Features of your vehicle
This indicator illuminates
when the auto defogging
system senses the mois-
ture of inside the wind-
shield and operates.
If more moisture is in the vehicle,
higher steps operate as follow.
Step 1 : Outside air position
Step 2 : Blowing air flow toward the windshield
Step 3 : Operating the air conditioning
Step 4 : Increasing air flow toward the windshield If your vehicle is equipped with the
auto defogging system, it is automat-
ically activated when the conditions
are met. However, if you would like to
cancel the auto defogging system,
press the front defroster button 4
times within 2 seconds while press-
ing the AUTO button. The indicator
will blink 3 times to notify you that the
system is cancelled.
To use the auto defogging system
again, follow the procedures men-
tioned above.
If the battery has been disconnected
or discharged, it resets to the auto
defogging status.
✽ ✽
NOTICE
When above indicator is turned on,
the mode indicator will goes out.
If the mode button is manually
selected, the selected mode is dis-
played for 3 seconds and then goes
out. However, the mode will still
work with the selected mode.
✽ ✽NOTICE
If the A/C off is manually selected
while the auto defogging system is
on, the auto defogging indicator will
blink 3 times to give notice that the
A/C off can not be selected.
CAUTION
Do not remove the sensor cover
located on the upper end of thedriver side windshield glass.Damage to the system partscould occur and may not be cov-ered by your vehicle warranty.
Page 396 of 564

611
What to do in an emergency
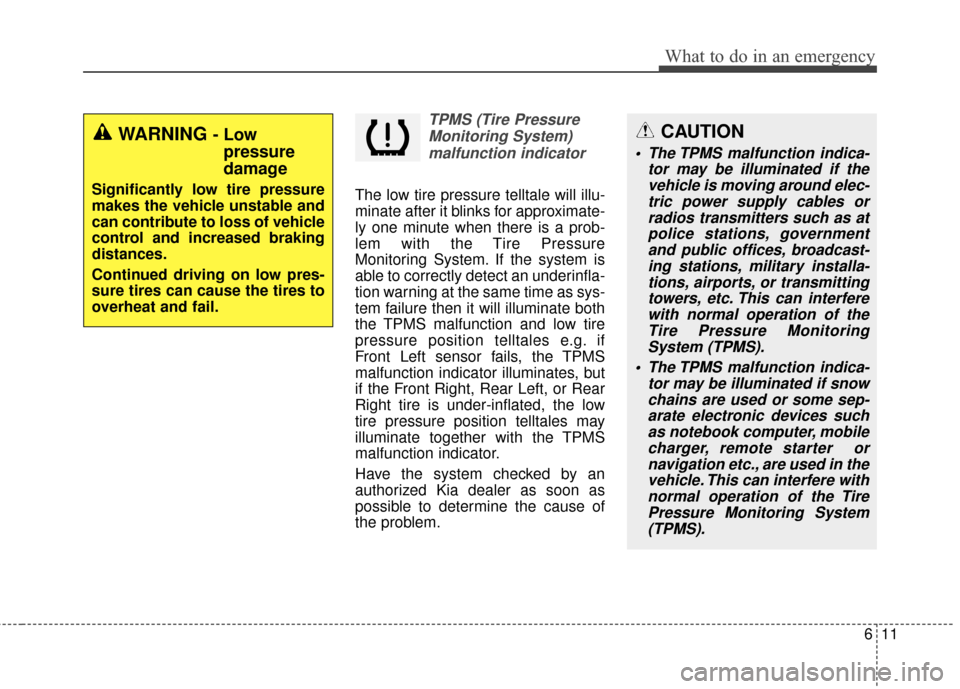
TPMS (Tire PressureMonitoring System)malfunction indicator
The low tire pressure telltale will illu-
minate after it blinks for approximate-
ly one minute when there is a prob-
lem with the Tire Pressure
Monitoring System. If the system is
able to correctly detect an underinfla-
tion warning at the same time as sys-
tem failure then it will illuminate both
the TPMS malfunction and low tire
pressure position telltales e.g. if
Front Left sensor fails, the TPMS
malfunction indicator illuminates, but
if the Front Right, Rear Left, or Rear
Right tire is under-inflated, the low
tire pressure position telltales may
illuminate together with the TPMS
malfunction indicator.
Have the system checked by an
authorized Kia dealer as soon as
possible to determine the cause of
the problem.
WARNING - Low pressure
damage
Significantly low tire pressure
makes the vehicle unstable and
can contribute to loss of vehicle
control and increased braking
distances.
Continued driving on low pres-
sure tires can cause the tires to
overheat and fail.
CAUTION
The TPMS malfunction indica-
tor may be illuminated if thevehicle is moving around elec-tric power supply cables orradios transmitters such as atpolice stations, governmentand public offices, broadcast-ing stations, military installa-tions, airports, or transmittingtowers, etc. This can interferewith normal operation of theTire Pressure MonitoringSystem (TPMS).
The TPMS malfunction indica- tor may be illuminated if snowchains are used or some sep-arate electronic devices suchas notebook computer, mobilecharger, remote starter ornavigation etc., are used in thevehicle. This can interfere withnormal operation of the TirePressure Monitoring System(TPMS).
Page 397 of 564

What to do in an emergency
12
6
Changing a tire with TPMS
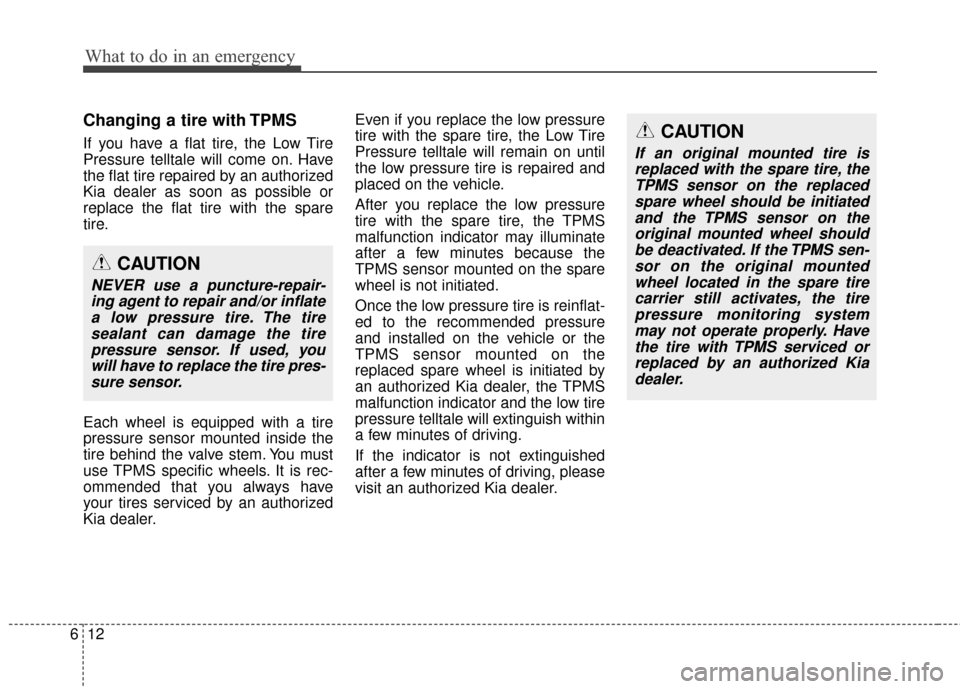
If you have a flat tire, the Low Tire
Pressure telltale will come on. Have
the flat tire repaired by an authorized
Kia dealer as soon as possible or
replace the flat tire with the spare
tire.
Each wheel is equipped with a tire
pressure sensor mounted inside the
tire behind the valve stem. You must
use TPMS specific wheels. It is rec-
ommended that you always have
your tires serviced by an authorized
Kia dealer. Even if you replace the low pressure
tire with the spare tire, the Low Tire
Pressure telltale will remain on until
the low pressure tire is repaired and
placed on the vehicle.
After you replace the low pressure
tire with the spare tire, the TPMS
malfunction indicator may illuminate
after a few minutes because the
TPMS sensor mounted on the spare
wheel is not initiated.
Once the low pressure tire is reinflat-
ed to the recommended pressure
and installed on the vehicle or the
TPMS sensor mounted on the
replaced spare wheel is initiated by
an authorized Kia dealer, the TPMS
malfunction indicator and the low tire
pressure telltale will extinguish within
a few minutes of driving.
If the indicator is not extinguished
after a few minutes of driving, please
visit an authorized Kia dealer.CAUTION
If an original mounted tire is
replaced with the spare tire, theTPMS sensor on the replacedspare wheel should be initiatedand the TPMS sensor on theoriginal mounted wheel shouldbe deactivated. If the TPMS sen-sor on the original mountedwheel located in the spare tirecarrier still activates, the tirepressure monitoring systemmay not operate properly. Havethe tire with TPMS serviced orreplaced by an authorized Kiadealer.
CAUTION
NEVER use a puncture-repair-ing agent to repair and/or inflatea low pressure tire. The tiresealant can damage the tirepressure sensor. If used, youwill have to replace the tire pres-sure sensor.
Page 482 of 564

769
Maintenance
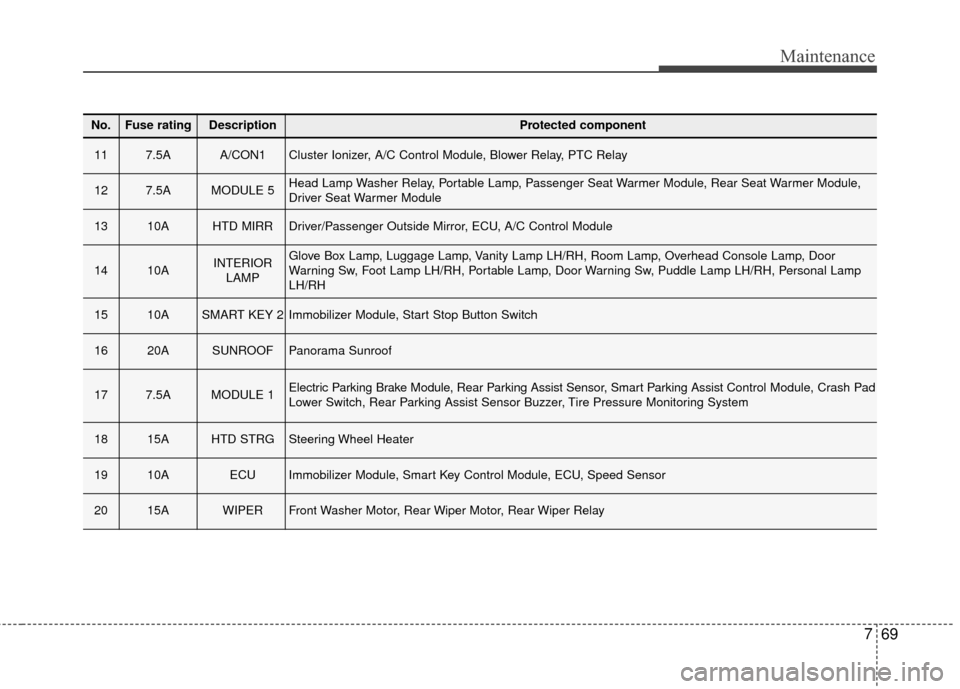
No.Fuse ratingDescriptionProtected component
117.5AA/CON1Cluster Ionizer, A/C Control Module, Blower Relay, PTC Relay
127.5AMODULE 5Head Lamp Washer Relay, Portable Lamp, Passenger Seat Warmer Module, Rear Seat Warmer Module,
Driver Seat Warmer Module
1310AHTD MIRRDriver/Passenger Outside Mirror, ECU, A/C Control Module
1410AINTERIORLAMPGlove Box Lamp, Luggage Lamp, Vanity Lamp LH/RH, Room Lamp, Overhead Console Lamp, Door
Warning Sw, Foot Lamp LH/RH, Portable Lamp, Door Warning Sw, Puddle Lamp LH/RH, Personal Lamp
LH/RH
1510ASMART KEY 2Immobilizer Module, Start Stop Button Switch
1620ASUNROOFPanorama Sunroof
177.5AMODULE 1Electric Parking Brake Module, Rear Parking Assist Sensor, Smart Parking Assist Control Module, Crash Pad
Lower Switch, Rear Parking Assist Sensor Buzzer, Tire Pressure Monitoring System
1815AHTD STRGSteering Wheel Heater
1910AECUImmobilizer Module, Smart Key Control Module, ECU, Speed Sensor
2015AWIPERFront Washer Motor, Rear Wiper Motor, Rear Wiper Relay
Page 487 of 564

Maintenance
74
7
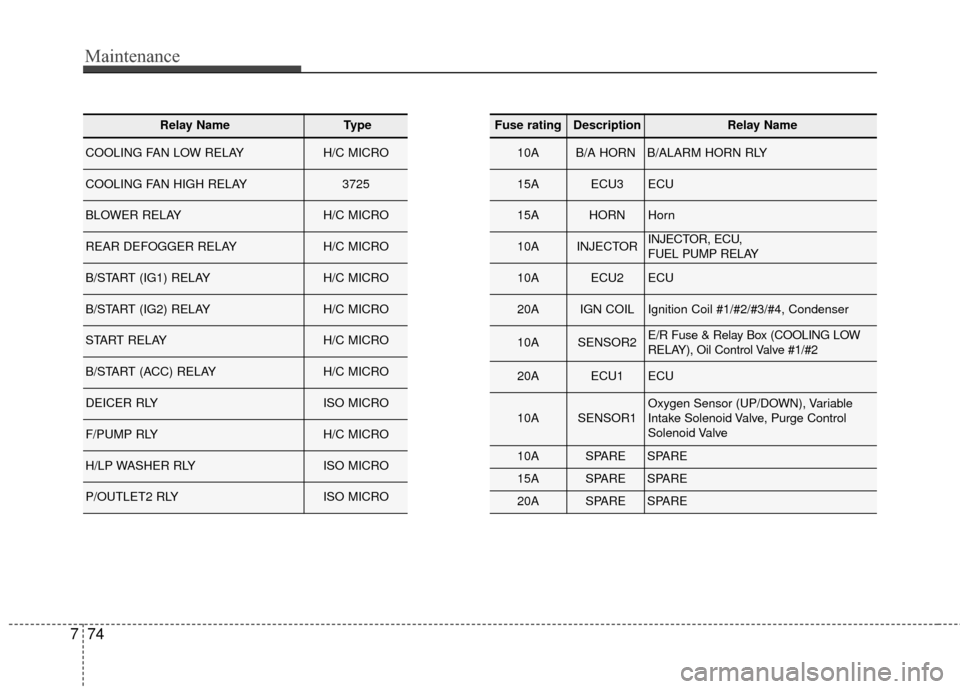
Relay NameType
COOLING FAN LOW RELAYH/C MICRO
COOLING FAN HIGH RELAY3725
BLOWER RELAYH/C MICRO
REAR DEFOGGER RELAYH/C MICRO
B/START (IG1) RELAYH/C MICRO
B/START (IG2) RELAYH/C MICRO
START RELAYH/C MICRO
B/START (ACC) RELAYH/C MICRO
DEICER RLYISO MICRO
F/PUMP RLYH/C MICRO
H/LP WASHER RLYISO MICRO
P/OUTLET2 RLYISO MICRO
Fuse ratingDescriptionRelay Name
10AB/A HORNB/ALARM HORN RLY
15AECU3ECU
15AHORNHorn
10AINJECTORINJECTOR, ECU,
FUEL PUMP RELAY
10AECU2ECU
20AIGN COILIgnition Coil #1/#2/#3/#4, Condenser
10ASENSOR2E/R Fuse & Relay Box (COOLING LOW
RELAY), Oil Control Valve #1/#2
20AECU1ECU
10ASENSOR1Oxygen Sensor (UP/DOWN), Variable
Intake Solenoid Valve, Purge Control
Solenoid Valve
10ASPARESPARE
15ASPARESPARE
20ASPARESPARE