lock KIA Sedona 2012 2.G Owner's Manual
[x] Cancel search | Manufacturer: KIA, Model Year: 2012, Model line: Sedona, Model: KIA Sedona 2012 2.GPages: 370, PDF Size: 6.75 MB
Page 322 of 370
Maintenance
66
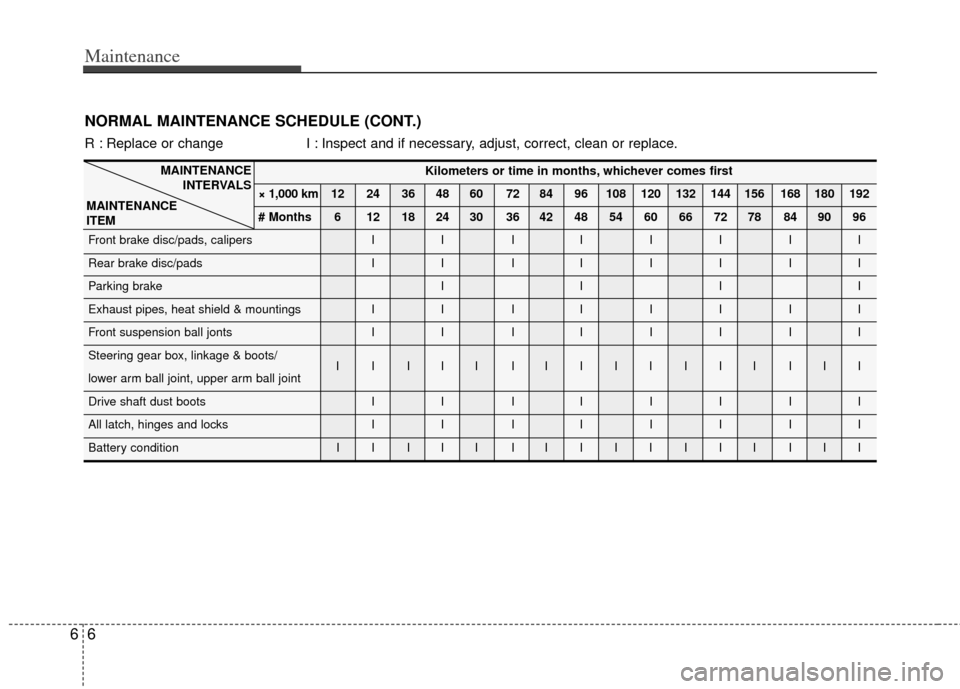
Kilometers or time in months, whichever comes first
× 1,000 km 12 24 36 48 60 72 84 96 108 120 132 144 156 168 180 192
# Months 6 12 18 24 30 36 42 48 54 60 66 72 78 84 90 96
Front brake disc/pads, calipers I I I IIIII
Rear brake disc/pads I I I IIIII
Parking brake I I I I
Exhaust pipes, heat shield & mountings I I I IIIII
Front suspension ball jonts I I I IIIII
Steering gear box, linkage & boots/ IIIII IIIIIIII III
lower arm ball joint, upper arm ball joint
Drive shaft dust boots I I I IIIII
All latch, hinges and locks I I I IIIII
Battery condition I I I I I I IIIIIII III
MAINTENANCE
INTERVALS
MAINTENANCE
ITEM
NORMAL MAINTENANCE SCHEDULE (CONT.)
R : Replace or change I : Inspect and if necessary, adjust, correct, clean or replace.
Page 327 of 370
611
Maintenance
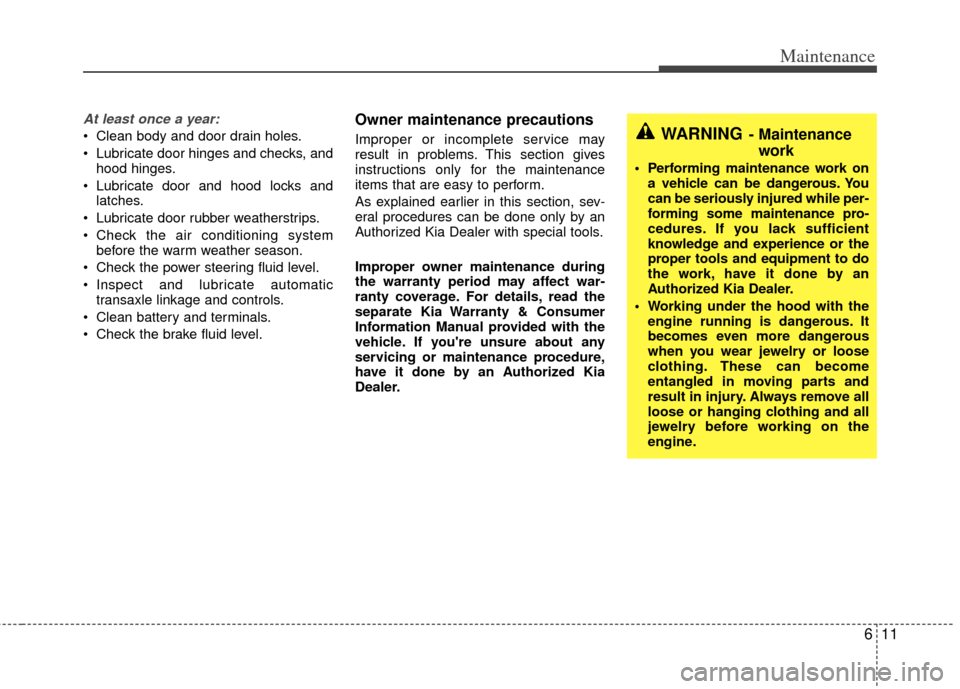
At least once a year:
Clean body and door drain holes.
Lubricate door hinges and checks, andhood hinges.
Lubricate door and hood locks and latches.
Lubricate door rubber weatherstrips.
Check the air conditioning system before the warm weather season.
Check the power steering fluid level.
Inspect and lubricate automatic transaxle linkage and controls.
Clean battery and terminals.
Check the brake fluid level.
Owner maintenance precautions
Improper or incomplete service may
result in problems. This section gives
instructions only for the maintenance
items that are easy to perform.
As explained earlier in this section, sev-
eral procedures can be done only by an
Authorized Kia Dealer with special tools.
Improper owner maintenance during
the warranty period may affect war-
ranty coverage. For details, read the
separate Kia Warranty & Consumer
Information Manual provided with the
vehicle. If you're unsure about any
servicing or maintenance procedure,
have it done by an Authorized Kia
Dealer.WARNING- Maintenance work
Performing maintenance work on
a vehicle can be dangerous. You
can be seriously injured while per-
forming some maintenance pro-
cedures. If you lack sufficient
knowledge and experience or the
proper tools and equipment to do
the work, have it done by an
Authorized Kia Dealer.
Working under the hood with the engine running is dangerous. It
becomes even more dangerous
when you wear jewelry or loose
clothing. These can become
entangled in moving parts and
result in injury. Always remove all
loose or hanging clothing and all
jewelry before working on the
engine.
Page 330 of 370
Maintenance
14
6
ENGINE COOLANT
The high-pressure cooling system has a
reservoir filled with year-round antifreeze
coolant. The reservoir is filled at the fac-
tory.
Check the antifreeze protection and
coolant level at least once a year, at the
beginning of the winter season, and
before traveling to a colder climate.
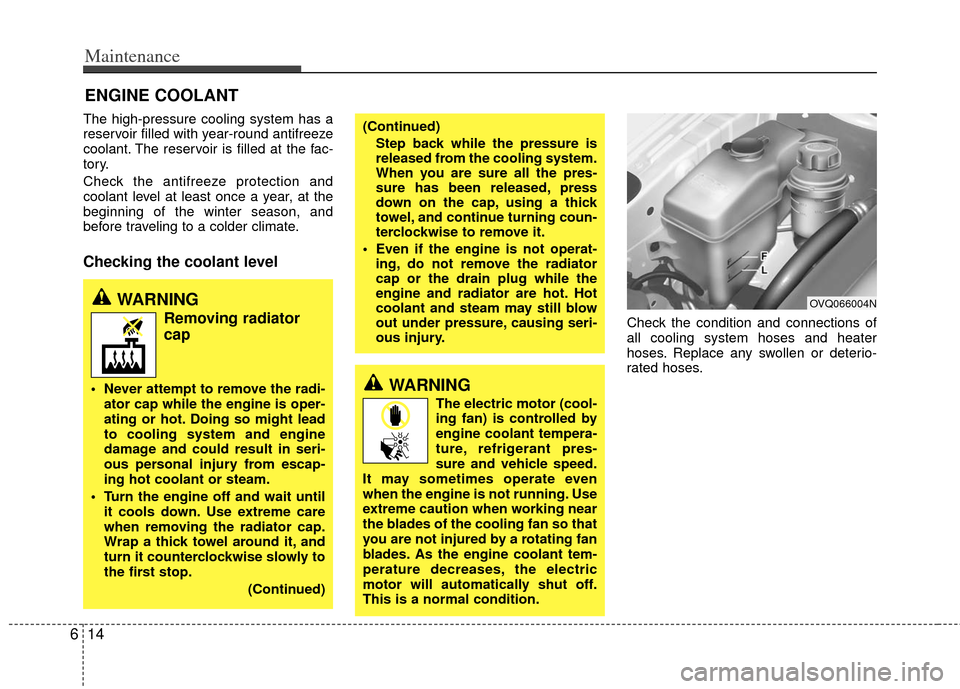
Checking the coolant level
Check the condition and connections of
all cooling system hoses and heater
hoses. Replace any swollen or deterio-
rated hoses.
WARNING
Removing radiator
cap
Never attempt to remove the radi-
ator cap while the engine is oper-
ating or hot. Doing so might lead
to cooling system and engine
damage and could result in seri-
ous personal injury from escap-
ing hot coolant or steam.
Turn the engine off and wait until it cools down. Use extreme care
when removing the radiator cap.
Wrap a thick towel around it, and
turn it counterclockwise slowly to
the first stop.
(Continued)
(Continued)Step back while the pressure is
released from the cooling system.
When you are sure all the pres-
sure has been released, press
down on the cap, using a thick
towel, and continue turning coun-
terclockwise to remove it.
Even if the engine is not operat- ing, do not remove the radiator
cap or the drain plug while the
engine and radiator are hot. Hot
coolant and steam may still blow
out under pressure, causing seri-
ous injury.
OVQ066004N
WARNING
The electric motor (cool-
ing fan) is controlled by
engine coolant tempera-
ture, refrigerant pres-
sure and vehicle speed.
It may sometimes operate even
when the engine is not running. Use
extreme caution when working near
the blades of the cooling fan so that
you are not injured by a rotating fan
blades. As the engine coolant tem-
perature decreases, the electric
motor will automatically shut off.
This is a normal condition.
Page 334 of 370
Maintenance
18
6
LUBRICANTS AND FLUIDS
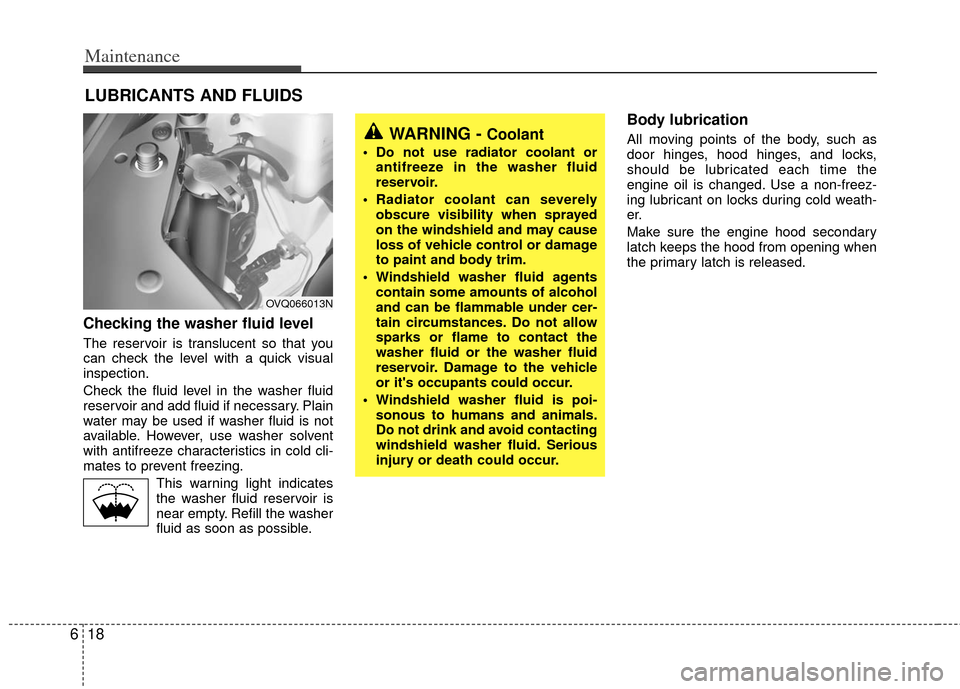
Checking the washer fluid level
The reservoir is translucent so that you
can check the level with a quick visual
inspection.
Check the fluid level in the washer fluid
reservoir and add fluid if necessary. Plain
water may be used if washer fluid is not
available. However, use washer solvent
with antifreeze characteristics in cold cli-
mates to prevent freezing.
This warning light indicatesthe washer fluid reservoir is
near empty. Refill the washer
fluid as soon as possible.
Body lubrication
All moving points of the body, such as
door hinges, hood hinges, and locks,
should be lubricated each time the
engine oil is changed. Use a non-freez-
ing lubricant on locks during cold weath-
er.
Make sure the engine hood secondary
latch keeps the hood from opening when
the primary latch is released.WARNING - Coolant
Do not use radiator coolant or antifreeze in the washer fluid
reservoir.
Radiator coolant can severely obscure visibility when sprayed
on the windshield and may cause
loss of vehicle control or damage
to paint and body trim.
Windshield washer fluid agents contain some amounts of alcohol
and can be flammable under cer-
tain circumstances. Do not allow
sparks or flame to contact the
washer fluid or the washer fluid
reservoir. Damage to the vehicle
or it's occupants could occur.
Windshield washer fluid is poi- sonous to humans and animals.
Do not drink and avoid contacting
windshield washer fluid. Serious
injury or death could occur.
OVQ066013N
Page 337 of 370
621
Maintenance
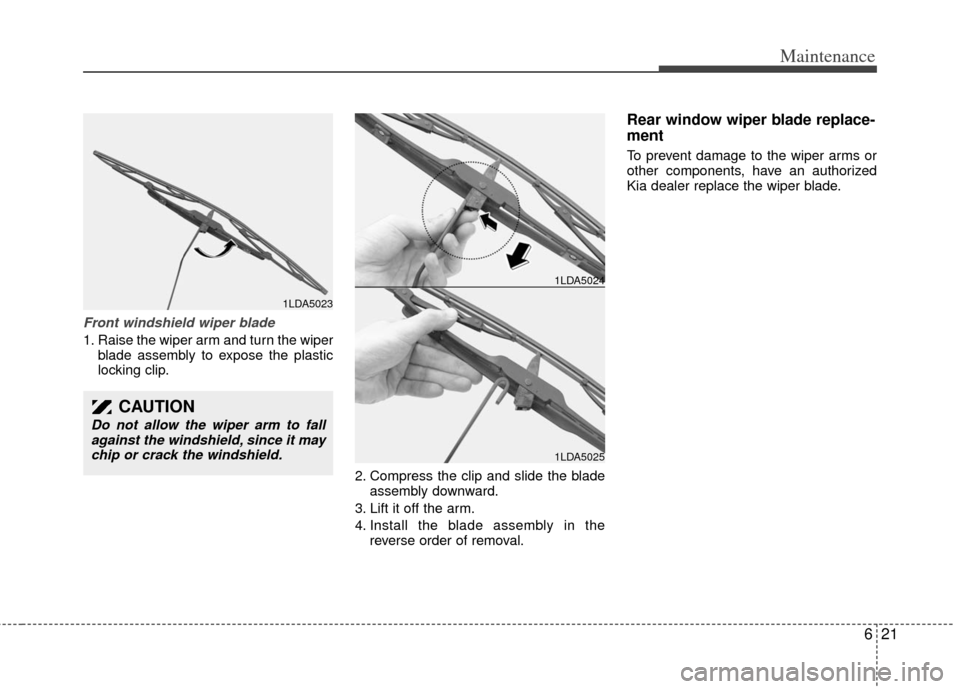
Front windshield wiper blade
1. Raise the wiper arm and turn the wiperblade assembly to expose the plastic
locking clip.
2. Compress the clip and slide the bladeassembly downward.
3. Lift it off the arm.
4. Install the blade assembly in the reverse order of removal.
Rear window wiper blade replace-
ment
To prevent damage to the wiper arms or
other components, have an authorized
Kia dealer replace the wiper blade.
1LDA5023
1LDA5024
1LDA5025
CAUTION
Do not allow the wiper arm to fallagainst the windshield, since it maychip or crack the windshield.
Page 340 of 370
Maintenance
24
6
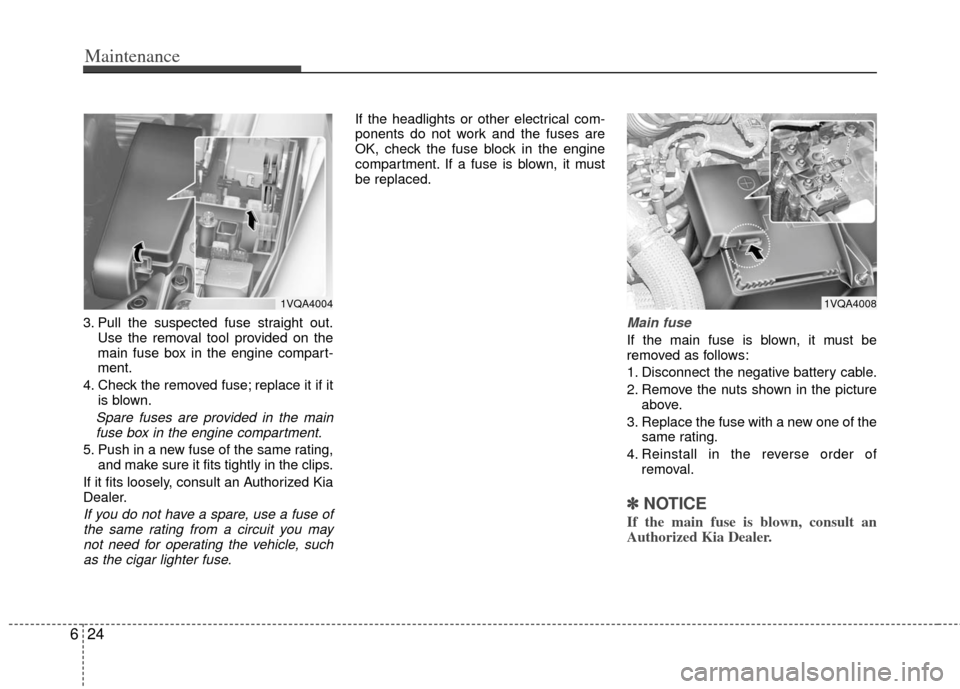
3. Pull the suspected fuse straight out.
Use the removal tool provided on the
main fuse box in the engine compart-
ment.
4. Check the removed fuse; replace it if it is blown.
Spare fuses are provided in the mainfuse box in the engine compartment.
5. Push in a new fuse of the same rating, and make sure it fits tightly in the clips.
If it fits loosely, consult an Authorized Kia
Dealer.
If you do not have a spare, use a fuse of the same rating from a circuit you maynot need for operating the vehicle, such as the cigar lighter fuse.
If the headlights or other electrical com-
ponents do not work and the fuses are
OK, check the fuse block in the engine
compartment. If a fuse is blown, it must
be replaced.
Main fuse
If the main fuse is blown, it must be
removed as follows:
1. Disconnect the negative battery cable.
2. Remove the nuts shown in the picture above.
3. Replace the fuse with a new one of the same rating.
4. Reinstall in the reverse order of removal.
✽ ✽NOTICE
If the main fuse is blown, consult an
Authorized Kia Dealer.
1VQA40081VQA4004
Page 342 of 370
Maintenance
26
6
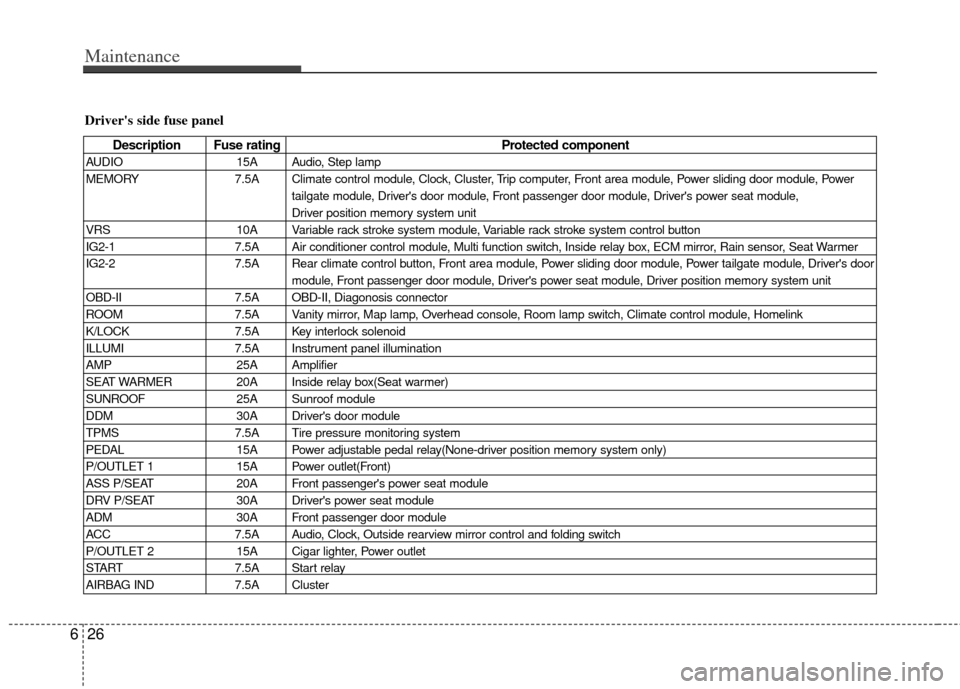
Driver's side fuse panel
Description Fuse rating Protected component
AUDIO15A Audio, Step lamp
MEMORY 7.5A Climate control module, Clock, Cluster, Trip computer, Front area module, Power sliding door module, Power
tailgate module, Driver's door module, Front passenger door module, Driver's power seat module,
Driver position memory system unit
VRS 10A Variable rack stroke system module, Variable rack stroke system control button
IG2-1 7.5A Air conditioner control module, Multi function switch, Inside relay box, ECM mirror, Rain sensor, Seat Warmer
IG2-2 7.5A Rear climate control button, Front area module, Power sliding door module, Power tailgate module, Driver's door
module, Front passenger door module, Driver's power seat module, Driver position memory system unit
OBD-II 7.5A OBD-II, Diagonosis connector
ROOM 7.5A Vanity mirror, Map lamp, Overhead console, Room lamp switch, Climate control module, Homelink
K/LOCK 7.5A Key interlock solenoid
ILLUMI 7.5A Instrument panel illumination
AMP 25A Amplifier
SEAT WARMER 20A Inside relay box(Seat warmer)
SUNROOF 25A Sunroof module
DDM 30A Driver's door module
TPMS 7.5A Tire pressure monitoring system
PEDAL 15A Power adjustable pedal relay(None-driver position memory system only)
P/OUTLET 1 15A Power outlet(Front)
ASS P/SEAT 20A Front passenger's power seat module
DRV P/SEAT 30A Driver's power seat module
ADM 30A Front passenger door module
ACC 7.5A Audio, Clock, Outside rearview mirror control and folding switch
P/OUTLET 2 15A Cigar lighter, Power outlet
START 7.5A Start relay
AIRBAG IND 7.5A Cluster
Page 343 of 370
627
Maintenance
Description Fuse ratingProtected component
ENG7.5A Automatic shift lever switch, Vehicle speed sensor, Inhibitor switch, Transaxle control module,
Input speed sensor, Output speed sensor, Back-up lamp switch, Fuel filter
IG1 7.5A Trip computer, Buzzer(Back warning system), Cluster, ESC switch, Ambient temperature sensor, Generator
ABS 7.5A ABS control module, ESC control module, Yaw rate sensor, Steering angle sensor
AIRBAG 15A Air bag control module
ALTERNATOR - Generator relay
SHUNT - Shunt connector
Description Fuse rating Protected component
RR D/LOCK20A Sliding door lock relay, Sliding door unlock relay, Sliding door lock actuator, Tailgate lock actuator
RR WIPER 15A Rear wiper relay, Rear wiper motor
RR DEFOG 25A Rear window defroster relay, Rear window defroster
POWER TAIL GATE 30A Power tailgate module
P/QUARTER 10A Power rear quarter glass open relay, Power rear quarter glass close relay, Power rear quarter glass motor
RR P/WIN-RH 25A Sliding door power window relay(Right), Sliding door power window motor(Right)
RR P/WIN-LH 25A Sliding door power window relay(Left), Sliding door power window motor(Left)
PSD-RH 30A Power sliding door module(Right)
PSD-LH 30A Power sliding door module(Left)
LUGGAGE 7.5A Step lamp, Power tailgate ON/OFF switch, Tailgate lamp
FUEL DOOR 15A Fuel filler lid relay, Fuel filler lid actuator
RR P/OTLT-LH 15A Rear power outlet(Left)
RR P/OTLT-RH 15A Rear power outlet(Right)
RR DEFOG RELAY - Rear window defroster relay
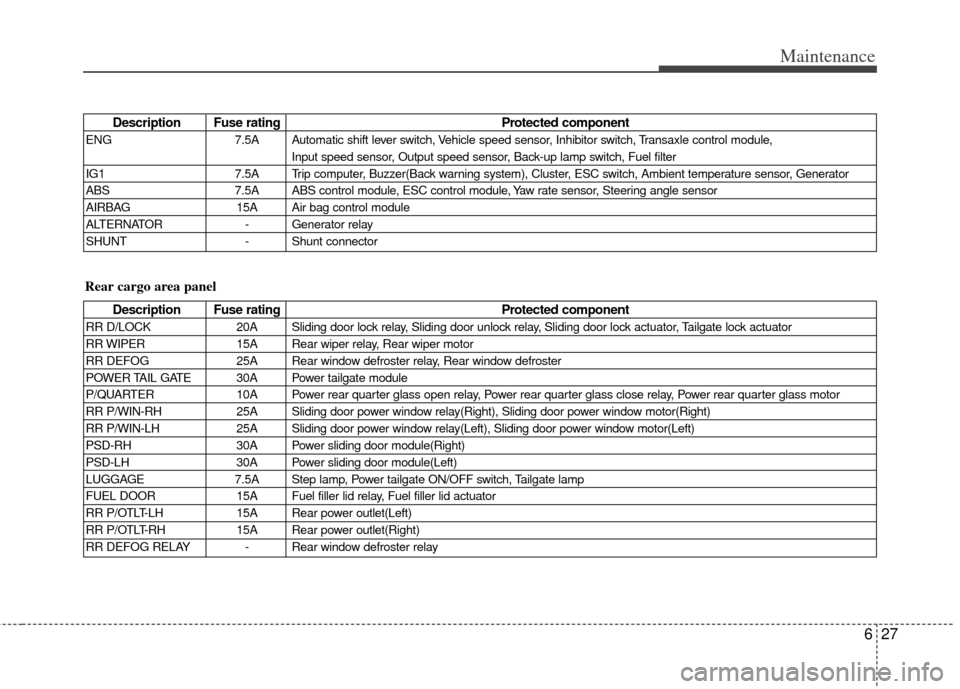
Rear cargo area panel
Page 346 of 370
Maintenance
30
6
OVQ066018N
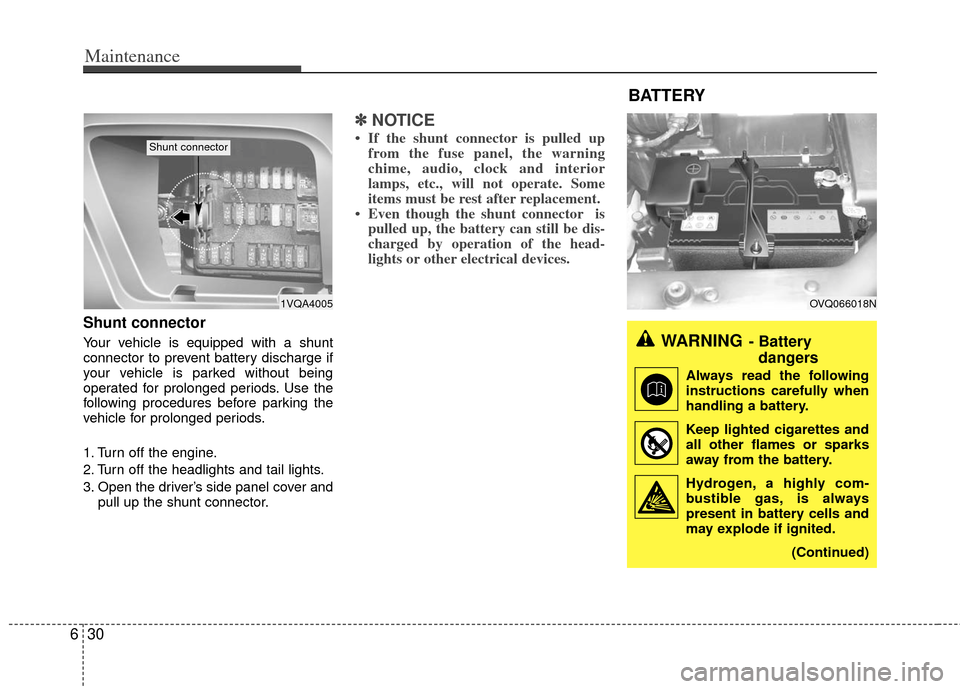
Shunt connector
Your vehicle is equipped with a shunt
connector to prevent battery discharge if
your vehicle is parked without being
operated for prolonged periods. Use the
following procedures before parking the
vehicle for prolonged periods.
1. Turn off the engine.
2. Turn off the headlights and tail lights.
3. Open the driver’s side panel cover and
pull up the shunt connector.
✽ ✽NOTICE
• If the shunt connector is pulled up
from the fuse panel, the warning
chime, audio, clock and interior
lamps, etc., will not operate. Some
items must be rest after replacement.
• Even though the shunt connector is pulled up, the battery can still be dis-
charged by operation of the head-
lights or other electrical devices.
1VQA4005
Shunt connector
BATTERY
WARNING- Battery
dangers
Always read the following
instructions carefully when
handling a battery.
Keep lighted cigarettes and all other flames or sparks
away from the battery.
Hydrogen, a highly com- bustible gas, is always
present in battery cells and
may explode if ignited.
(Continued)
Page 348 of 370
Maintenance
32
6
If the battery gradually discharges
because of high electric load while the
vehicle is being used, recharge it at 20-
30A for two hours.
Items to be reset after the battery
has been discharged or the bat-
tery has been disconnected.
Clock (See Chapter 3)
Sunroof (See Chapter 3)
Trip computer (See Chapter 3)
Climate control system (See Chapter3)
Audio (See Chapter 3)
Power sliding door and power tailgate (See Chapter 3)
Tire care
For proper maintenance, safety, and
maximum fuel economy, you must
always maintain recommended tire
inflation pressures and stay within
the load limits and weight distribution
recommended for your vehicle.
Recommended cold tire inflation
pressures
All tire pressures (including the
spare) should be checked every day
when the tires are cold. “Cold Tires”
means the vehicle has not been driv-
en for at least three hours or driven
less than 1.6 km (one mile).
Recommended pressures must be
maintained for the best ride, top vehi-
cle handling, and minimum tire wear.
CAUTION
Before performing maintenance or recharging the battery, turn offall accessories and stop theengine.
The negative battery cable must be removed first and installed lastwhen the battery is disconnected.
WARNING- Recharging battery
When recharging the battery,
observe the following precautions:
The battery must be removed
from the vehicle and placed in an
area with good ventilation.
Do not allow cigarettes, sparks, or flame near the battery.
(Continued)
(Continued)
Watch the battery during charg-ing, and stop or reduce the charg-
ing rate if the battery cells begin
gassing (boiling) violently or if
the temperature of the electrolyte
of any cell exceeds 49°C (120°F).
Wear eye protection when check- ing the battery during charging.
Disconnect the battery charger in the following order.
1. Turn off the battery charger main switch.
2. Unhook the negative clamp from the negative battery terminal.
3. Unhook the positive clamp from the positive battery terminal.
TIRES AND WHEELS