change time KIA Sedona 2013 2.G Owner's Guide
[x] Cancel search | Manufacturer: KIA, Model Year: 2013, Model line: Sedona, Model: KIA Sedona 2013 2.GPages: 370, PDF Size: 6.75 MB
Page 293 of 370
431
Driving your vehicle
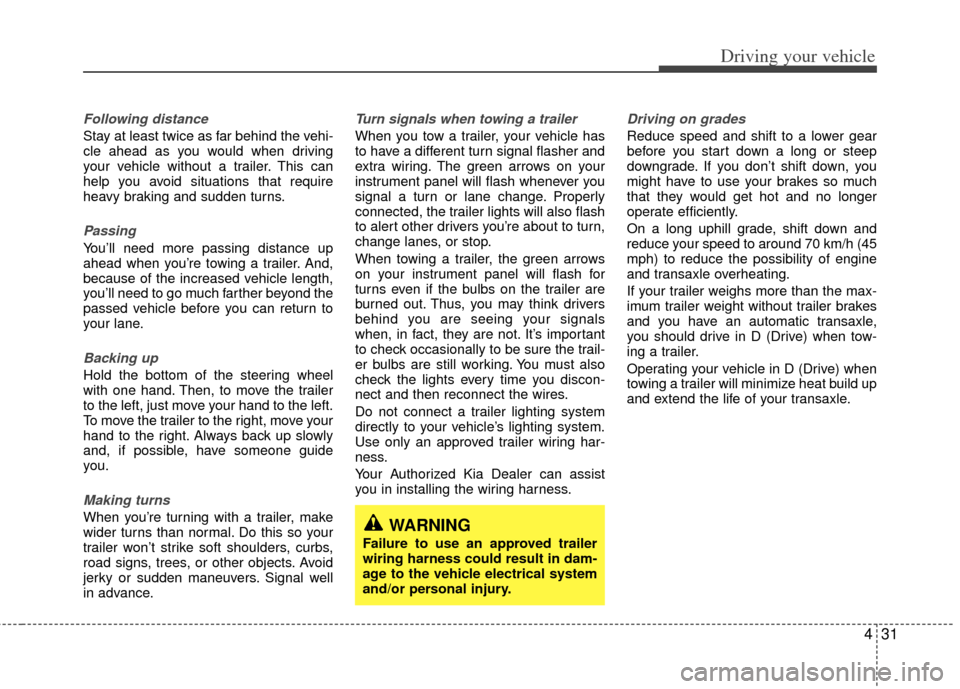
Following distance
Stay at least twice as far behind the vehi-
cle ahead as you would when driving
your vehicle without a trailer. This can
help you avoid situations that require
heavy braking and sudden turns.
Passing
You’ll need more passing distance up
ahead when you’re towing a trailer. And,
because of the increased vehicle length,
you’ll need to go much farther beyond the
passed vehicle before you can return to
your lane.
Backing up
Hold the bottom of the steering wheel
with one hand. Then, to move the trailer
to the left, just move your hand to the left.
To move the trailer to the right, move your
hand to the right. Always back up slowly
and, if possible, have someone guide
you.
Making turns
When you’re turning with a trailer, make
wider turns than normal. Do this so your
trailer won’t strike soft shoulders, curbs,
road signs, trees, or other objects. Avoid
jerky or sudden maneuvers. Signal well
in advance.
Turn signals when towing a trailer
When you tow a trailer, your vehicle has
to have a different turn signal flasher and
extra wiring. The green arrows on your
instrument panel will flash whenever you
signal a turn or lane change. Properly
connected, the trailer lights will also flash
to alert other drivers you’re about to turn,
change lanes, or stop.
When towing a trailer, the green arrows
on your instrument panel will flash for
turns even if the bulbs on the trailer are
burned out. Thus, you may think drivers
behind you are seeing your signals
when, in fact, they are not. It’s important
to check occasionally to be sure the trail-
er bulbs are still working. You must also
check the lights every time you discon-
nect and then reconnect the wires.
Do not connect a trailer lighting system
directly to your vehicle’s lighting system.
Use only an approved trailer wiring har-
ness.
Your Authorized Kia Dealer can assist
you in installing the wiring harness.
Driving on grades
Reduce speed and shift to a lower gear
before you start down a long or steep
downgrade. If you don’t shift down, you
might have to use your brakes so much
that they would get hot and no longer
operate efficiently.
On a long uphill grade, shift down and
reduce your speed to around 70 km/h (45
mph) to reduce the possibility of engine
and transaxle overheating.
If your trailer weighs more than the max-
imum trailer weight without trailer brakes
and you have an automatic transaxle,
you should drive in D (Drive) when tow-
ing a trailer.
Operating your vehicle in D (Drive) when
towing a trailer will minimize heat build up
and extend the life of your transaxle.
WARNING
Failure to use an approved trailer
wiring harness could result in dam-
age to the vehicle electrical system
and/or personal injury.
Page 319 of 370
63
Maintenance
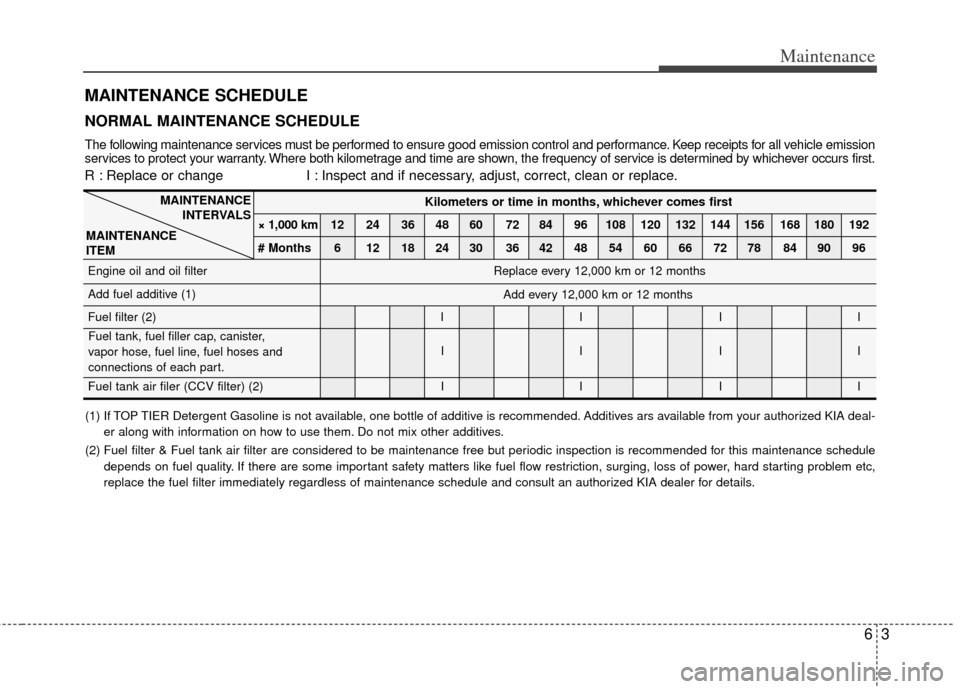
MAINTENANCE SCHEDULE
Kilometers or time in months, whichever comes first
× 1,000 km 12 24 36 48 60 72 84 96 108 120 132 144 156 168 180 192
# Months 6 12 18 24 30 36 42 48 54 60 66 72 78 84 90 96
Engine oil and oil filter
Add fuel additive (1)
Fuel filter (2) I I I I
II II
Fuel tank air filer (CCV filter) (2)II II
MAINTENANCE
INTERVALS
MAINTENANCE
ITEM
Replace every 12,000 km or 12 months
Add every 12,000 km or 12 months
(1) If TOP TIER Detergent Gasoline is not available, one bottle of additive is recommended. Additives ars available from your authorized KIA deal- er along with information on how to use them. Do not mix other additives.
(2) Fuel filter & Fuel tank air filter are considered to be maintenance free\
but periodic inspection is recommended for this maintenance schedule depends on fuel quality. If there are some important safety matters like fuel flow restriction, surging, loss of power, hard starting problem etc,
replace the fuel filter immediately regardless of maintenance schedule a\
nd consult an authorized KIA dealer for details.
The following maintenance services must be performed to ensure good emission control and performance. Keep receipts for all vehicle emission
services to protect your warranty. Where both kilometrage and time are shown, the frequency of service is determined by whichever occurs first.
R : Replace or change I : Inspect and if necessary, adjust, correct, clean or replace.
NORMAL MAINTENANCE SCHEDULE
Fuel tank, fuel filler cap, canister,
vapor hose, fuel line, fuel hoses and
connections of each part.
Page 320 of 370
Maintenance
46
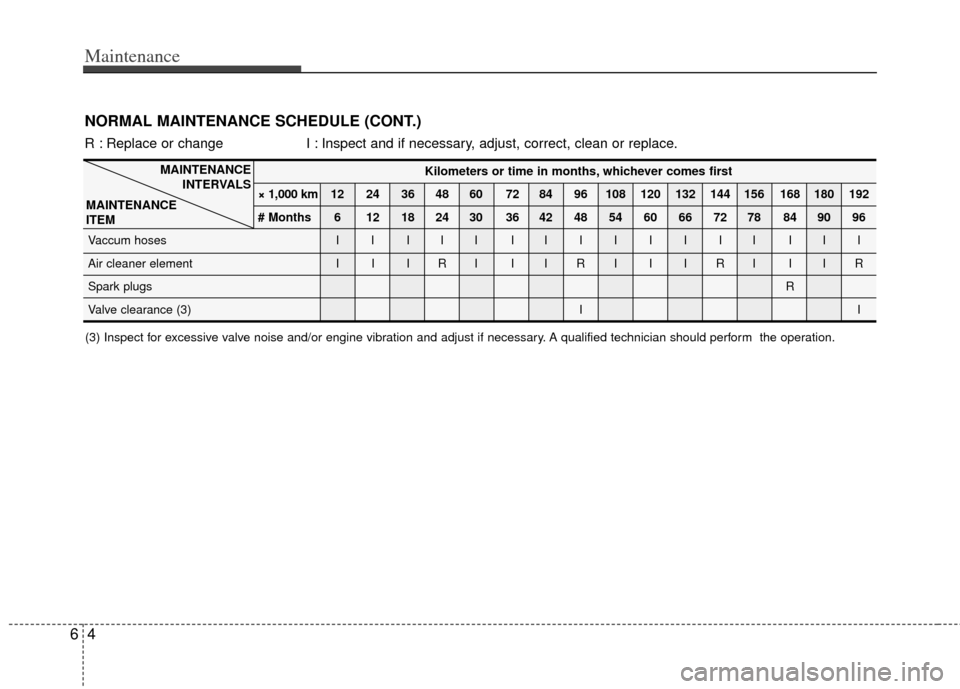
Kilometers or time in months, whichever comes first
× 1,000 km 12 24 36 48 60 72 84 96 108 120 132 144 156 168 180 192
# Months 6 12 18 24 30 36 42 48 54 60 66 72 78 84 90 96
Vaccum hoses I I I I I I IIIIIII III
Air cleaner element I I I R I I I R I I I R I I I R
Spark plugs R
Valve clearance (3) II
MAINTENANCE
INTERVALS
MAINTENANCE
ITEM
(3) Inspect for excessive valve noise and/or engine vibration and adjust if necessary. A qualified technician should perform th e operation.
R : Replace or change I : Inspect and if necessary, adjust, correct, clean or replace.
NORMAL MAINTENANCE SCHEDULE (CONT.)
Page 321 of 370
65
Maintenance
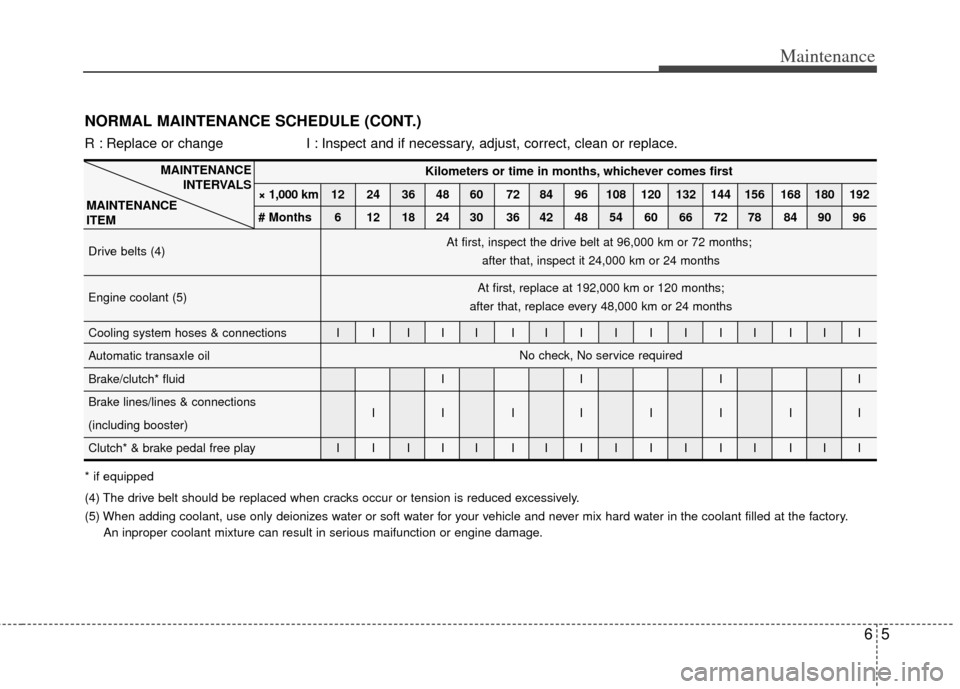
NORMAL MAINTENANCE SCHEDULE (CONT.)
MAINTENANCEINTERVALS
MAINTENANCE
ITEM
R : Replace or change I : Inspect and if necessary, adjust, correct, clean or replace.
* if equipped
(4) The drive belt should be replaced when cracks occur or tension is reduced excessively.
(5) When adding coolant, use only deionizes water or soft water for your vehicle and never mix hard water in the coolant filled at the factory.
An inproper coolant mixture can result in serious maifunction or engine damage. Kilometers or time in months, whichever comes first
× 1,000 km 12 24 36 48 60 72 84 96 108 120 132 144 156 168 180 192
# Months 6 12 18 24 30 36 42 48 54 60 66 72 78 84 90 96
Drive belts (4)
Engine coolant (5)
Cooling system hoses & connections I I I I I I IIIIIII III
Automatic transaxle oil
Brake/clutch* fluid I I I I
Brake lines/lines & connections IIIIIIII
(including booster)
Clutch* & brake pedal free play I I I I I I IIIIIII III
At first, inspect the drive belt at 96,000 km or 72 months;
after that, inspect it 24,000 km or 24 months
At first, replace at 192,000 km or 120 months;
after that, replace every 48,000 km or 24 months
No check, No service required
Page 322 of 370
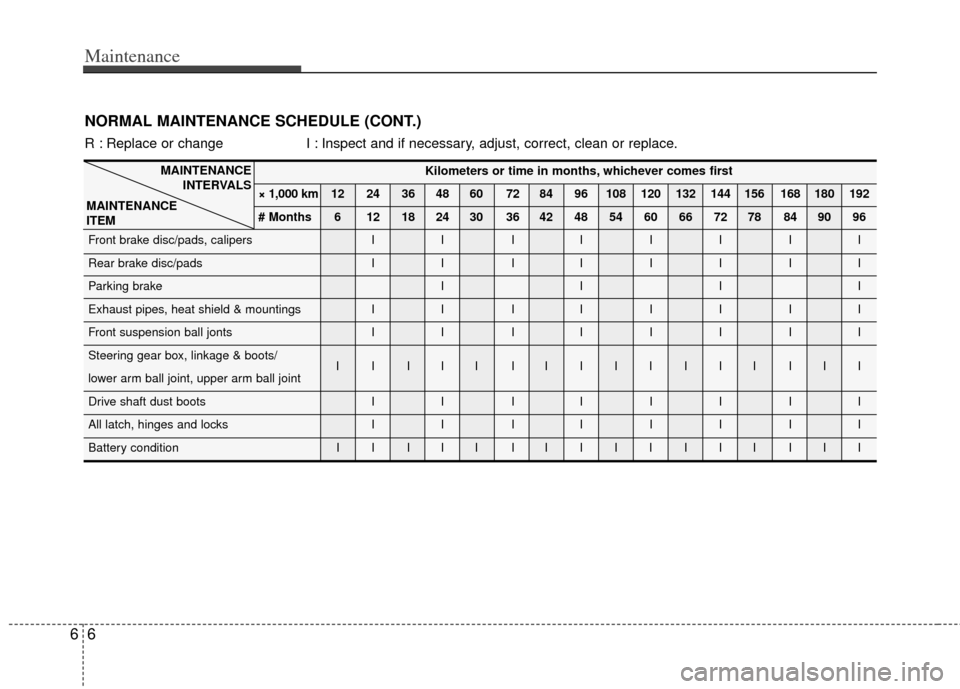
Maintenance
66
Kilometers or time in months, whichever comes first
× 1,000 km 12 24 36 48 60 72 84 96 108 120 132 144 156 168 180 192
# Months 6 12 18 24 30 36 42 48 54 60 66 72 78 84 90 96
Front brake disc/pads, calipers I I I IIIII
Rear brake disc/pads I I I IIIII
Parking brake I I I I
Exhaust pipes, heat shield & mountings I I I IIIII
Front suspension ball jonts I I I IIIII
Steering gear box, linkage & boots/ IIIII IIIIIIII III
lower arm ball joint, upper arm ball joint
Drive shaft dust boots I I I IIIII
All latch, hinges and locks I I I IIIII
Battery condition I I I I I I IIIIIII III
MAINTENANCE
INTERVALS
MAINTENANCE
ITEM
NORMAL MAINTENANCE SCHEDULE (CONT.)
R : Replace or change I : Inspect and if necessary, adjust, correct, clean or replace.
Page 323 of 370
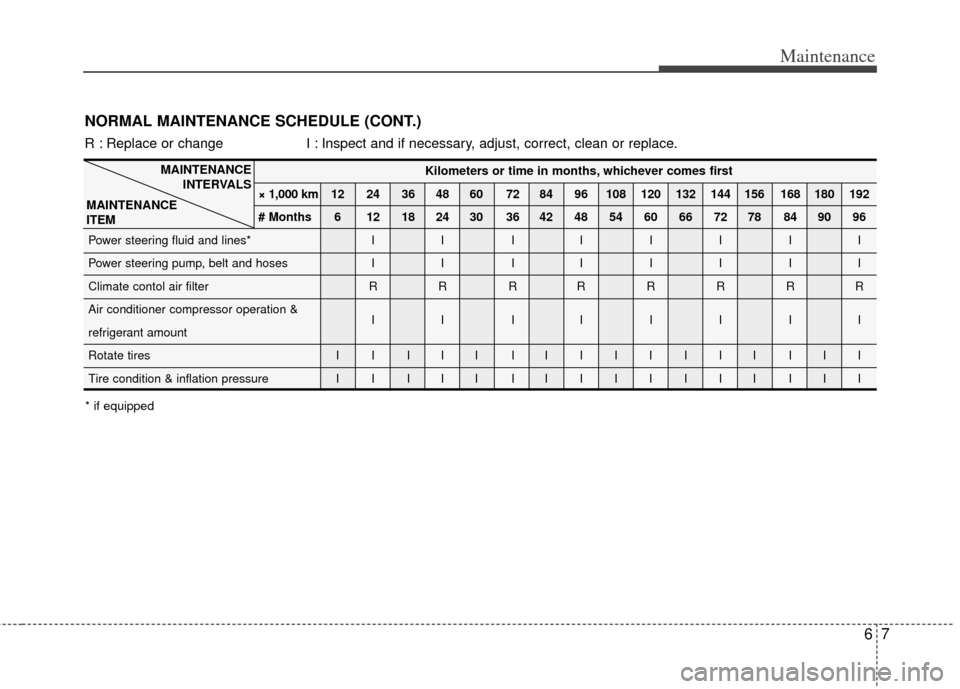
67
Maintenance
Kilometers or time in months, whichever comes first
× 1,000 km 12 24 36 48 60 72 84 96 108 120 132 144 156 168 180 192
# Months 6 12 18 24 30 36 42 48 54 60 66 72 78 84 90 96
Power steering fluid and lines* I I I IIIII
Power steering pump, belt and hoses I I I IIIII
Climate contol air filter R R R RRRRR
Air conditioner compressor operation & IIIIIIII
refrigerant amount
Rotate tires I I I I I I IIIIIII III
Tire condition & inflation pressure I I I I I I IIIIIII III
MAINTENANCE
INTERVALS
MAINTENANCE
ITEM
NORMAL MAINTENANCE SCHEDULE (CONT.)
R : Replace or change I : Inspect and if necessary, adjust, correct, clean or replace.
* if equipped
Page 329 of 370
613
Maintenance
ENGINE OIL
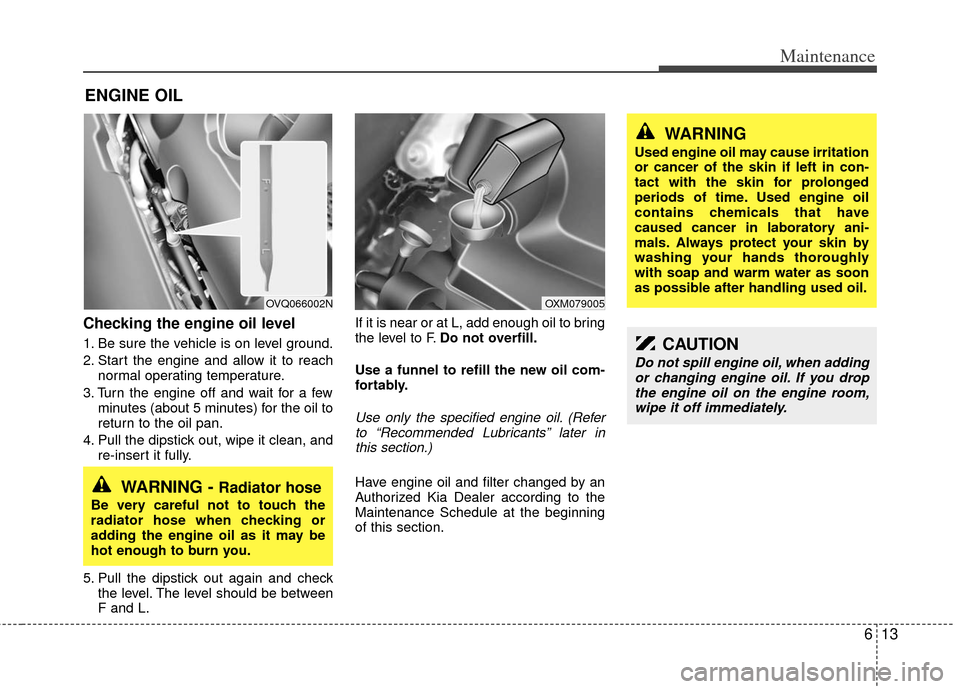
Checking the engine oil level
1. Be sure the vehicle is on level ground.
2. Start the engine and allow it to reachnormal operating temperature.
3. Turn the engine off and wait for a few minutes (about 5 minutes) for the oil to
return to the oil pan.
4. Pull the dipstick out, wipe it clean, and re-insert it fully.
5. Pull the dipstick out again and check the level. The level should be between
F and L. If it is near or at L, add enough oil to bring
the level to F.
Do not overfill.
Use a funnel to refill the new oil com-
fortably.
Use only the specified engine oil. (Refer to “Recommended Lubricants” later in this section.)
Have engine oil and filter changed by an
Authorized Kia Dealer according to the
Maintenance Schedule at the beginning
of this section.
WARNING
Used engine oil may cause irritation
or cancer of the skin if left in con-
tact with the skin for prolonged
periods of time. Used engine oil
contains chemicals that have
caused cancer in laboratory ani-
mals. Always protect your skin by
washing your hands thoroughly
with soap and warm water as soon
as possible after handling used oil.
WARNING - Radiator hose
Be very careful not to touch the
radiator hose when checking or
adding the engine oil as it may be
hot enough to burn you.
OVQ066002NOXM079005
CAUTION
Do not spill engine oil, when addingor changing engine oil. If you drop the engine oil on the engine room,wipe it off immediately.
Page 334 of 370
Maintenance
18
6
LUBRICANTS AND FLUIDS
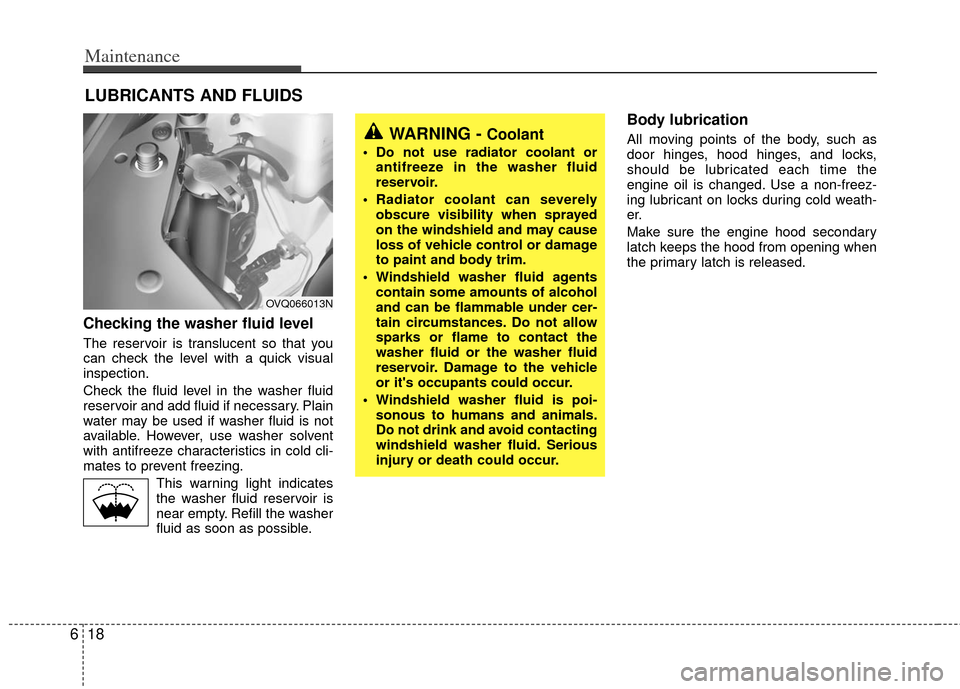
Checking the washer fluid level
The reservoir is translucent so that you
can check the level with a quick visual
inspection.
Check the fluid level in the washer fluid
reservoir and add fluid if necessary. Plain
water may be used if washer fluid is not
available. However, use washer solvent
with antifreeze characteristics in cold cli-
mates to prevent freezing.
This warning light indicatesthe washer fluid reservoir is
near empty. Refill the washer
fluid as soon as possible.
Body lubrication
All moving points of the body, such as
door hinges, hood hinges, and locks,
should be lubricated each time the
engine oil is changed. Use a non-freez-
ing lubricant on locks during cold weath-
er.
Make sure the engine hood secondary
latch keeps the hood from opening when
the primary latch is released.WARNING - Coolant
Do not use radiator coolant or antifreeze in the washer fluid
reservoir.
Radiator coolant can severely obscure visibility when sprayed
on the windshield and may cause
loss of vehicle control or damage
to paint and body trim.
Windshield washer fluid agents contain some amounts of alcohol
and can be flammable under cer-
tain circumstances. Do not allow
sparks or flame to contact the
washer fluid or the washer fluid
reservoir. Damage to the vehicle
or it's occupants could occur.
Windshield washer fluid is poi- sonous to humans and animals.
Do not drink and avoid contacting
windshield washer fluid. Serious
injury or death could occur.
OVQ066013N