battery KIA SEDONA 2017 Features and Functions Guide
[x] Cancel search | Manufacturer: KIA, Model Year: 2017, Model line: SEDONA, Model: KIA SEDONA 2017Pages: 54, PDF Size: 4.91 MB
Page 7 of 54
5ALWAYS CHECK THE OWNER’S MANUAL FOR COMPLETE OPER ATING INFORMATION AND SAFET Y WARNINGS *IF EQUIPPED
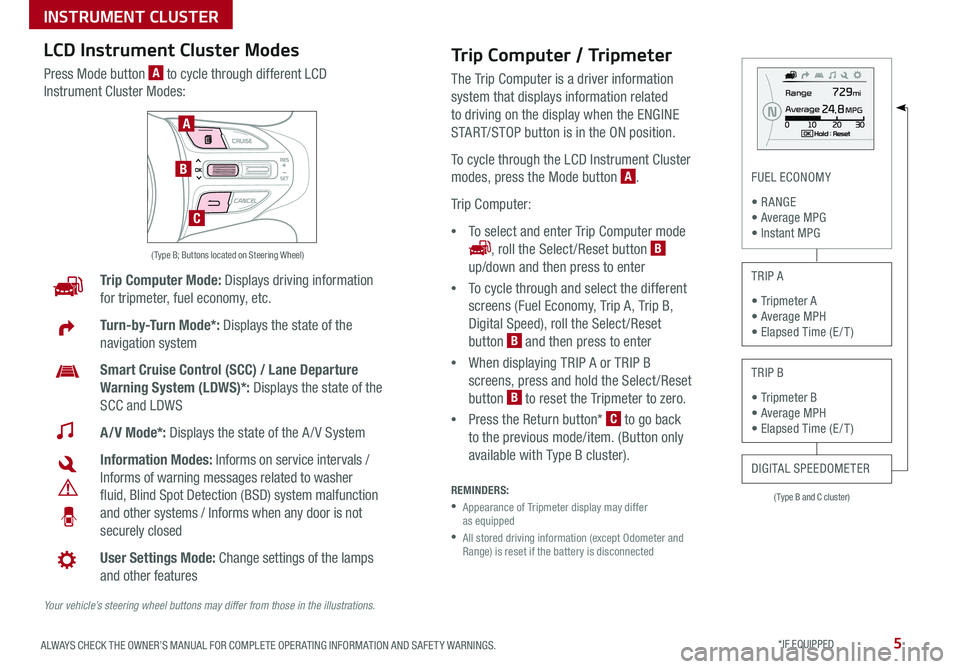
( Type B and C cluster)
FUEL ECONOMY
• R ANGE • Average MPG • Instant MPG
TRIP A
• Tripmeter A • Average MPH • Elapsed Time (E / T )
TRIP B
• Tripmeter B • Average MPH • Elapsed Time (E / T )
DIGITAL SPEEDOMETER
Trip Computer Mode: Displays driving information
for tripmeter, fuel economy, etc
Turn-by-Turn Mode*: Displays the state of the
navigation system
Smart Cruise Control (SCC) / Lane Departure
Warning System (LDWS)*: Displays the state of the
SCC and LDWS
A/V Mode*: Displays the state of the A / V System
Information Modes: Informs on service intervals /
Informs of warning messages related to washer
fluid, Blind Spot Detection (BSD) system malfunction
and other systems / Informs when any door is not
securely closed
User Settings Mode: Change settings of the lamps
and other features
Your vehicle’s steering wheel buttons may differ from those in the illustrations.
( Type B; Buttons located on Steering Wheel)
A
B
C
Trip Computer / Tripmeter
The Trip Computer is a driver information
system that displays information related
to driving on the display when the ENGINE
START/STOP button is in the ON position
To cycle through the LCD Instrument Cluster
modes, press the Mode button A
Trip Computer:
•To select and enter Trip Computer mode
, roll the Select /Reset button B
up/down and then press to enter
•To cycle through and select the different
screens (Fuel Economy, Trip A, Trip B,
Digital Speed), roll the Select /Reset
button B and then press to enter
•When displaying TRIP A or TRIP B
screens, press and hold the Select /Reset
button B to reset the Tripmeter to zero
•Press the Return button* C to go back
to the previous mode/item (Button only
available with Type B cluster)
REMINDERS:
•
Appearance of Tripmeter display may differ as equipped
•
All stored driving information (except Odometer and Range) is reset if the battery is disconnected
LCD Instrument Cluster Modes
Press Mode button A to cycle through different LCD
Instrument Cluster Modes:
INSTRUMENT CLUSTER
Page 14 of 54
SEDONA FEATURES & FUNCTIONS GUIDE12*IF EQUIPPED
Reverse Parking Aid Function*
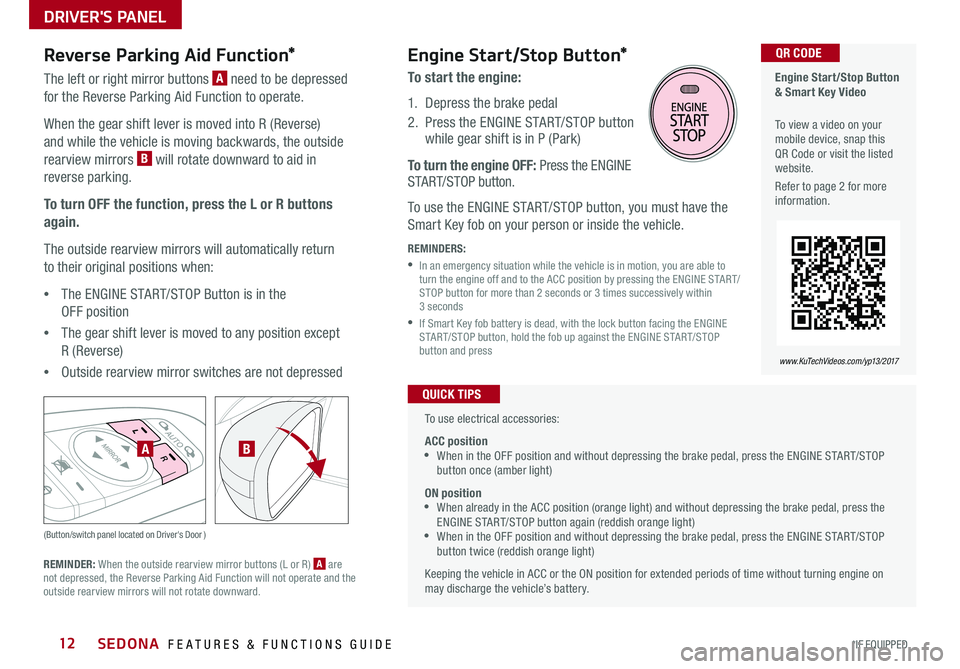
The left or right mirror buttons A need to be depressed
for the Reverse Parking Aid Function to operate
When the gear shift lever is moved into R (Reverse)
and while the vehicle is moving backwards, the outside
rearview mirrors B will rotate downward to aid in
reverse parking
To turn OFF the function, press the L or R buttons
again.
The outside rearview mirrors will automatically return
to their original positions when:
•The ENGINE START/STOP Button is in the
OFF position
•The gear shift lever is moved to any position except
R (Reverse)
•
Outside rearview mirror switches are not depressed
REMINDER: When the outside rearview mirror buttons (L or R) A are not depressed, the Reverse Parking Aid Function will not operate and the outside rearview mirrors will not rotate downward
(Button/switch panel located on Driver's Door )
AB
Engine Start/Stop Button & Smart Key Video
To view a video on your mobile device, snap this QR Code or visit the listed website
Refer to page 2 for more information
QR CODE
www.KuTechVideos.com/yp13/2017
Engine Start/Stop Button*
To start the engine:
1 Depress the brake pedal
2
Press the ENGINE START/STOP button while gear shift is in P (Park)
To turn the engine OFF: Press the ENGINE START/STOP button
To use the ENGINE START/STOP button, you must have the
Smart Key fob on your person or inside the vehicle
REMINDERS:
•
In an emergency situation while the vehicle is in motion, you are able to turn the engine off and to the ACC position by pressing the ENGINE START/STOP button for more than 2 seconds or 3 times successively within 3 seconds
•
If Smart Key fob battery is dead, with the lock button facing the ENGINE START/STOP button, hold the fob up against the ENGINE START/STOP button and press
To use electrical accessories:
ACC position •When in the OFF position and without depressing the brake pedal, press the ENGINE START/STOP button once (amber light)
ON position •When already in the ACC position (orange light) and without depressing the brake pedal, press the ENGINE START/STOP button again (reddish orange light) •
When in the OFF position and without depressing the brake pedal, press the ENGINE START/STOP button twice (reddish orange light)
Keeping the vehicle in ACC or the ON position for extended periods of time without turning engine on may discharge the vehicle’s battery
QUICK TIPS
DRIVER'S PANEL
Page 23 of 54
21ALWAYS CHECK THE OWNER’S MANUAL FOR COMPLETE OPER ATING INFORMATION AND SAFET Y WARNINGS *IF EQUIPPED
AUDIO SYSTEMS
UVO eServices System Videos To view a video on your mobile device, snap this QR Code or visit the listed website
Refer to page 2 for more information
QR CODE
www.KuTechVideos.com/audio/uvo3_eservices
UVO eServices System*
– FM/AM/SiriusXM®/Media (USB, iPod®, Aux, Bluetooth® Audio, My Music, Pandora®)
APPS
RADIO
MEDIA PHONE
SEEK UVO
TRACK SETUP
POWER
PUSH
VOL FILEENTER
TUNE
v
v
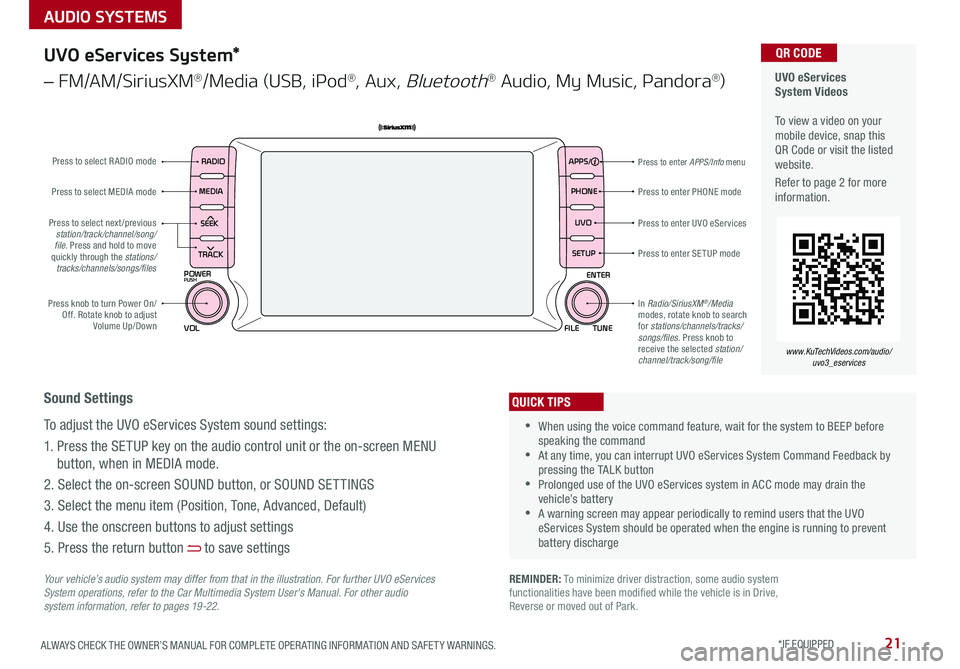
Press to enter PHONE mode
Press to enter APPS/Info menu
Press to enter SE TUP mode
Press to enter UVO eServicesPress to select next /previous station/track/channel/song/file. Press and hold to move quickly through the stations/tracks/channels/songs/files
Press knob to turn Power On/Off Rotate knob to adjust Volume Up/Down
Press to select MEDIA mode
Press to select RADIO mode
In Radio/SiriusXM®/Media modes, rotate knob to search for stations/channels/tracks/songs/files Press knob to receive the selected station/channel/track/song/file
Your vehicle’s audio system may differ from that in the illustration. For further UVO eServices System operations, refer to the Car Multimedia System User's Manual. For other audio system information, refer to pages 19 -22.
Sound Settings
To adjust the UVO eServices System sound settings:
1 Press the SETUP key on the audio control unit or the on-screen MENU
button, when in MEDIA mode
2 Select the on-screen SOUND button, or SOUND SET TINGS
3 Select the menu item (Position, Tone, Advanced, Default)
4 Use the onscreen buttons to adjust settings
5 Press the return button to save settings
•When using the voice command feature, wait for the system to BEEP before speaking the command •At any time, you can interrupt UVO eServices System Command Feedback by pressing the TALK button •Prolonged use of the UVO eServices system in ACC mode may drain the vehicle’s battery •A warning screen may appear periodically to remind users that the UVO eServices System should be operated when the engine is running to prevent battery discharge
QUICK TIPS
REMINDER: To minimize driver distraction, some audio system functionalities have been modified while the vehicle is in Drive, Reverse or moved out of Park
Page 24 of 54
AUDIO SYSTEMS
SEDONA FEATURES & FUNCTIONS GUIDE22*IF EQUIPPED
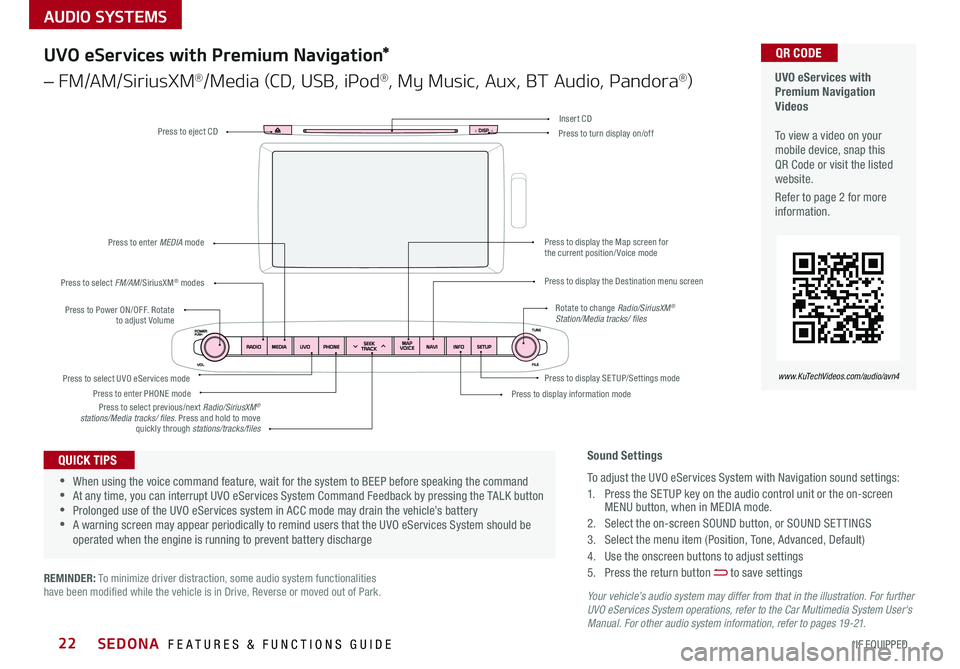
Your vehicle’s audio system may differ from that in the illustration. For further UVO eServices System operations, refer to the Car Multimedia System User's Manual. For other audio system information, refer to pages 19 -21.
Press to Power ON/OFF Rotate to adjust Volume
Press to enter PHONE mode
Press to select FM/AM/SiriusXM® modes
Press to enter MEDIA mode
Press to display SE TUP/Settings mode Press to select UVO eServices mode
Press to display the Map screen for the current position/ Voice mode
Press to display the Destination menu screen
Press to display information mode
Press to eject CDPress to turn display on/off
Press to select previous/next Radio/SiriusXM® stations/Media tracks/ files Press and hold to move quickly through stations/tracks/files
Insert CD
Rotate to change Radio/SiriusXM® Station/Media tracks/ files
UVO eServices with Premium Navigation Videos To view a video on your mobile device, snap this QR Code or visit the listed website
Refer to page 2 for more information
QR CODE
www.KuTechVideos.com/audio/avn4
Sound Settings
To adjust the UVO eServices System with Navigation sound settings:
1 Press the SETUP key on the audio control unit or the on-screen MENU button, when in MEDIA mode
2 Select the on-screen SOUND button, or SOUND SET TINGS
3 Select the menu item (Position, Tone, Advanced, Default)
4 Use the onscreen buttons to adjust settings
5 Press the return button to save settings
•When using the voice command feature, wait for the system to BEEP before speaking the command •At any time, you can interrupt UVO eServices System Command Feedback by pressing the TALK button •Prolonged use of the UVO eServices system in ACC mode may drain the vehicle’s battery •A warning screen may appear periodically to remind users that the UVO eServices System should be operated when the engine is running to prevent battery discharge
QUICK TIPS
UVO eServices with Premium Navigation*
– FM/AM/SiriusXM®/Media (CD, USB, iPod®, My Music, Aux, BT Audio, Pandora®)
REMINDER: To minimize driver distraction, some audio system functionalities have been modified while the vehicle is in Drive, Reverse or moved out of Park
Page 29 of 54
27ALWAYS CHECK THE OWNER’S MANUAL FOR COMPLETE OPER ATING INFORMATION AND SAFET Y WARNINGS *IF EQUIPPED
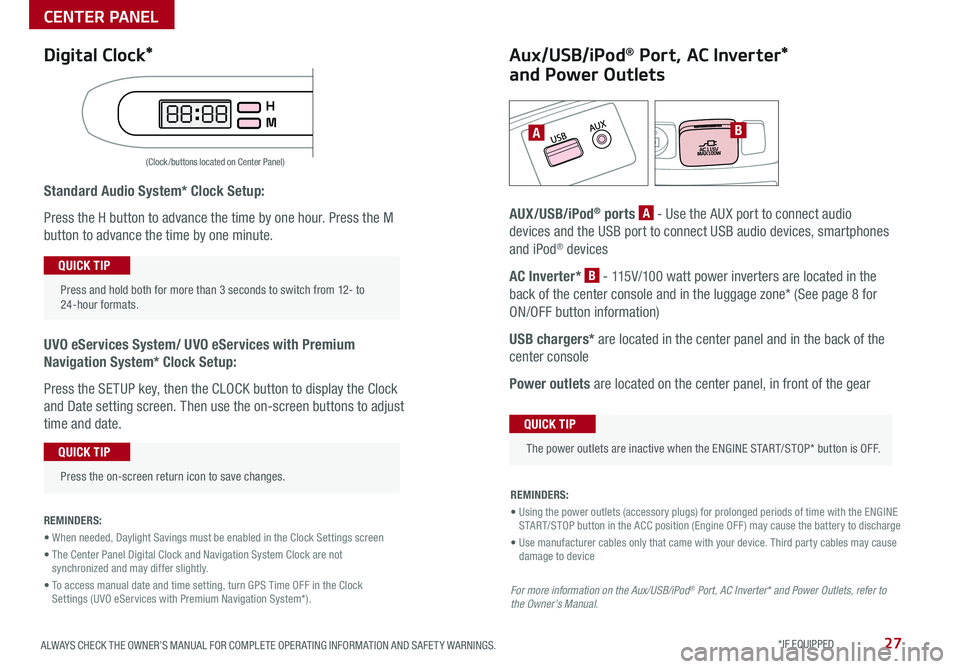
Standard Audio System* Clock Setup:
Press the H button to advance the time by one hour Press the M
button to advance the time by one minute
UVO eServices System/ UVO eServices with Premium
Navigation System* Clock Setup:
Press the SETUP key, then the CLOCK button to display the Clock
and Date setting screen Then use the on-screen buttons to adjust
time and date
REMINDERS:
• When needed, Daylight Savings must be enabled in the Clock Settings screen
• The Center Panel Digital Clock and Navigation System Clock are not synchronized and may differ slightly
• To access manual date and time setting, turn GPS Time OFF in the Clock Settings (UVO eServices with Premium Navigation System*).
AB
(Clock /buttons located on Center Panel)
Aux/USB/iPod® Port, AC Inverter*
and Power Outlets
AUX/USB/iPod® ports A - Use the AUX port to connect audio
devices and the USB port to connect USB audio devices, smartphones
and iPod® devices
AC Inverter* B - 115V/100 watt power inverters are located in the
back of the center console and in the luggage zone* (See page 8 for
ON/OFF button information)
USB chargers* are located in the center panel and in the back of the
center console
Power outlets are located on the center panel, in front of the gear
Press and hold both for more than 3 seconds to switch from 12- to 24-hour formats
QUICK TIP
Press the on-screen return icon to save changes
QUICK TIP
The power outlets are inactive when the ENGINE START/STOP* button is OFF
QUICK TIP
REMINDERS:
• Using the power outlets (accessory plugs) for prolonged periods of time with the ENGINE START/STOP button in the ACC position (Engine OFF ) may cause the battery to discharge
• Use manufacturer cables only that came with your device Third party cables may cause damage to device
For more information on the Aux/USB/iPod® Port, AC Inverter* and Power Outlets, refer to the Owner's Manual.
Digital Clock*
CENTER PANEL
Page 39 of 54
37ALWAYS CHECK THE OWNER’S MANUAL FOR COMPLETE OPER ATING INFORMATION AND SAFET Y WARNINGS *IF EQUIPPED
Engine Start/Stop Button & Smart Key Video To view a video on your mobile device, snap this QR Code or visit the listed website
Refer to page 2 for more information
QR CODE
www.KuTechVideos.com/yp13/2017
• The Smart Key’s signal can be blocked by the normal operation of a cellular phone or smartphone To help prevent this, store each device separately
• If the Smart Key battery is weak or not working properly, hold the Smart Key fob up to the Engine Start /Stop button (Lock button side closest) and press to start engine
QUICK TIPS
Remote button configuration may vary depending on vehicle options.
Smart Key*
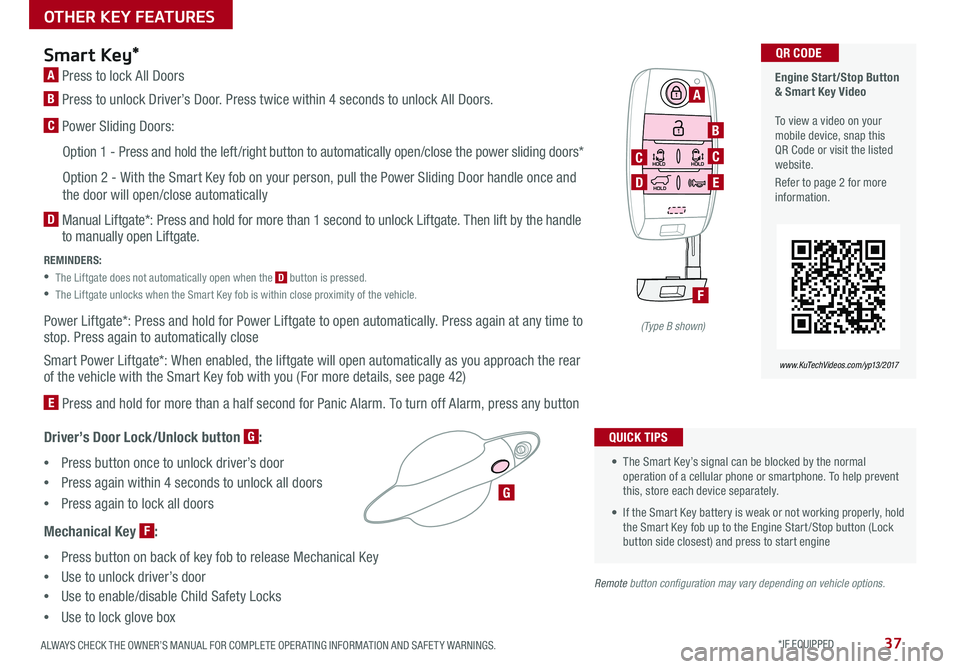
A Press to lock All Doors
B
Press to unlock Driver’s Door Press twice within 4 seconds to unlock All Doors
C Power Sliding Doors:
Option 1 - Press and hold the left /right button to automatically open/close the power sliding doors*
Option 2 - With the Smart Key fob on your person, pull the Power Sliding Door handle once and
the door will open/close automatically
D
Manual Liftgate*: Press and hold for more than 1 second to unlock Liftgate Then lift by the handle to manually open Liftgate
REMINDERS:
•
The Liftgate does not automatically open when the D button is pressed
•
The Liftgate unlocks when the Smart Key fob is within close proximity of the vehicle
Power Liftgate*: Press and hold for Power Liftgate to open automatically Press again at any time to stop Press again to automatically close
Smart Power Liftgate*: When enabled, the liftgate will open automatically as you approach the rear of the vehicle with the Smart Key fob with you (For more details, see page 42)
E Press and hold for more than a half second for Panic Alarm To turn off Alarm, press any button
Driver’s Door Lock/Unlock button G:
•Press button once to unlock driver’s door
•Press again within 4 seconds to unlock all doors
•
Press again to lock all doors
Mechanical Key F:
•Press button on back of key fob to release Mechanical Key
•Use to unlock driver’s door
•Use to enable/disable Child Safety Locks
•Use to lock glove box
A
B
C
E
G
D
C
F
(Type B shown)
OTHER KEY FEATURES
Page 41 of 54
39ALWAYS CHECK THE OWNER’S MANUAL FOR COMPLETE OPER ATING INFORMATION AND SAFET Y WARNINGS *IF EQUIPPED
FRONT
REARFRONTREARFRONTREARFRONTREAR
REAR
REAR
Map/Room Lamps
Automatic turn off function*
The interior lights automatically turn off approximately 30 seconds after
the ENGINE START/STOP button is OFF
Map/Room Lamp Operation
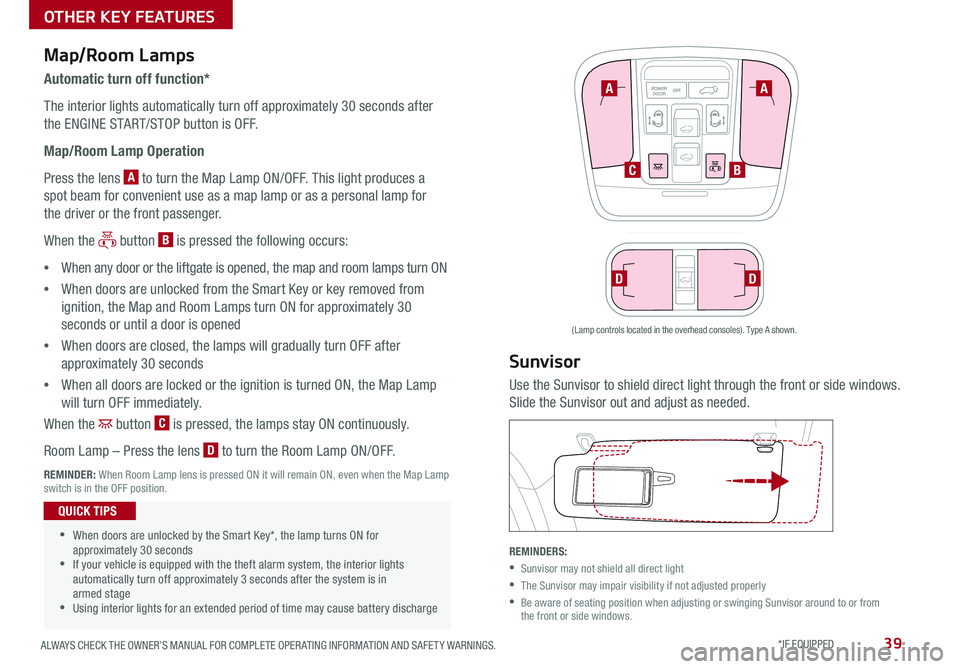
Press the lens A to turn the Map Lamp ON/OFF This light produces a
spot beam for convenient use as a map lamp or as a personal lamp for
the driver or the front passenger
When the button B is pressed the following occurs:
•When any door or the liftgate is opened, the map and room lamps turn ON
•When doors are unlocked from the Smart Key or key removed from
ignition, the Map and Room Lamps turn ON for approximately 30
seconds or until a door is opened
•When doors are closed, the lamps will gradually turn OFF after
approximately 30 seconds
•When all doors are locked or the ignition is turned ON, the Map Lamp
will turn OFF immediately
When the button C is pressed, the lamps stay ON continuously
Room Lamp – Press the lens D to turn the Room Lamp ON/OFF
REMINDER: When Room Lamp lens is pressed ON it will remain ON, even when the Map Lamp switch is in the OFF position
FRONT
REARFRONTREARFRONTREARFRONTREAR
REAR
REAR
•When doors are unlocked by the Smart Key*, the lamp turns ON for approximately 30 seconds •If your vehicle is equipped with the theft alarm system, the interior lights automatically turn off approximately 3 seconds after the system is in armed stage •Using interior lights for an extended period of time may cause battery discharge
QUICK TIPS
A
CB
DD
A
Sunvisor
Use the Sunvisor to shield direct light through the front or side windows
Slide the Sunvisor out and adjust as needed
REMINDERS:
•Sunvisor may not shield all direct light
•The Sunvisor may impair visibility if not adjusted properly
•
Be aware of seating position when adjusting or swinging Sunvisor around to or from the front or side windows
(Lamp controls located in the overhead consoles) Type A shown
OTHER KEY FEATURES
Page 47 of 54
45ALWAYS CHECK THE OWNER’S MANUAL FOR COMPLETE OPER ATING INFORMATION AND SAFET Y WARNINGS
MAINTENANCE
Normal Maintenance Schedule
When your vehicle requires service, remember that your dealer knows your vehicle best Your dealer has factory-trained technicians, recommended special tools,
genuine Kia replacement parts and is dedicated to your complete satisfaction For expert advice and quality service, see your authorized Kia dealer
7,500 miles
PERFORM
•Rotate tire
•Add fuel additive1 (Every 7,500 miles)
REPLACE
•Engine oil and filter (Every 7,500 miles)
INSPECT*
•Battery condition
•Air cleaner filter
•Vacuum hose
•Power steering fluid**
•Power steering pump, belt and hoses**
15,000 miles
PERFORM
•Rotate tire
•Add fuel additive1 (Every 7,500 miles)
REPLACE
•Climate control air filter (For evaporator and blower unit)
•Engine oil and filter (Every 7,500 miles)
INSPECT*
•Battery condition
•Air cleaner filter
•Vacuum hose
•Air conditioning refrigerant
•Brake hoses and lines
•Drive shafts and boots
•Exhaust pipe and muffler
•Front brake disc/pads, calipers
•Rear brake disc/pads
•Steering gear box, linkage & boots/lower
arm ball joint, upper arm ball joint
•Suspension mounting bolts
•Power steering fluid**
•Power steering pump, belt and hoses**
*And, if necessary, adjust, correct, clean or replace * *If equipped
1 If TOP TIER detergent gasoline is not available, one bottle of additive is recommended Additives are available from your authorized Kia dealer along with information on how to use them Do not mix other additives
QUICK TIP
Check your Maintenance Schedule or schedule an appointment with a dealer using your UVO eServices account by logging into your UVO App or your account on MyUVO com ( Vehicles equipped with UVO eServices only - See page 20 for setup information)
*And, if necessary, adjust, correct, clean or replace * *If equipped
1 If TOP TIER detergent gasoline is not available, one bottle of additive is recommended Additives are available from your authorized Kia dealer along with information on how to use them Do not mix other additives
Page 48 of 54

SEDONA FEATURES & FUNCTIONS GUIDE46
MAINTENANCE
Normal Maintenance Schedule (Continued)
22,500 miles
PERFORM
•Rotate tire
•Add fuel additive1 (Every 7,500 miles)
REPLACE
•Engine oil and filter (Every 7,500 miles)
INSPECT*
•Battery condition
•Air cleaner filter
•Vacuum hose
•Power steering fluid**
•Power steering pump, belt and hoses**
30,000 miles
PERFORM
•Rotate tire
•Add fuel additive1 (Every 7,500 miles)
REPLACE
•Climate control air filter (For evaporator and blower unit)
•Air cleaner filter
•Engine oil and filter (Every 7,500 miles)
INSPECT*
•Battery condition
•Vacuum hose
•Air conditioning refrigerant
•Brake hoses and lines
•Drive shafts and boots
•Exhaust system
•Front brake disc/pads, calipers
•Rear brake disc/pads
•Steering gear box, linkage & boots/
lower arm ball joint, upper arm ball joint
•Suspension mounting bolts
•Brake fluid
•Fuel filter2
•Fuel lines, fuel hoses and connections
•Fuel tank air filter2
•Parking brake
•Vapor hose and fuel filler cap
•Power steering fluid**
•Power steering pump, belt and hoses**
*And, if necessary, adjust, correct, clean or replace **If equipped
1 If TOP TIER Detergent Gasoline is not available, one bottle of additive is recommended Additives are available from your authorized Kia dealer along with information on how to use them Do not mix other additives
*And, if necessary, adjust, correct, clean or replace * *If equipped
1 If TOP TIER Detergent Gasoline is not available, one bottle of additive is recommended Additives are available from your authorized Kia dealer along with information on how to use them Do not mix other additives 2 Fuel filter & Fuel tank air filter are considered to be maintenance free but periodic inspection is recommended for this maintenance schedule depends on fuel quality If there are some important safety matters like fuel flow restriction, surging, loss of power, hard starting problem etc, replace the fuel filter immediately regardless of maintenance schedule and consult an authorized Kia dealer for details
Page 49 of 54

47ALWAYS CHECK THE OWNER’S MANUAL FOR COMPLETE OPER ATING INFORMATION AND SAFET Y WARNINGS
Normal Maintenance Schedule (Continued)
37,500 miles
PERFORM
•Rotate tire
•Add fuel additive1 (Every 7,500 miles)
REPLACE
•Engine oil and filter (Every 7,500 miles)
INSPECT*
•Battery condition
•Air cleaner filter
•Vacuum hose
•Power steering fluid**
•Power steering pump, belt and hoses**
45,000 miles
PERFORM
•Rotate tire
•Fuel additive1 (Every 7,500 miles)
REPLACE
•Climate control air filter (For evaporator and blower unit)
•Engine oil and filter (Every 7,500 miles)
INSPECT*
•Battery condition
•Air cleaner filter
•Vacuum hose
•Air conditioning refrigerant
•Brake hoses and lines
•Drive shafts and boots
•Exhaust system
•Front brake disc/pads, calipers
•Rear brake disc/pads
•Steering gear box, linkage &
boots/lower arm ball joint, upper
arm ball joint
•Suspension mounting bolts
•Power steering fluid**
•Power steering pump,
belt and hoses**
*And, if necessary, adjust, correct, clean or replace * *If equipped
1 If TOP TIER Detergent Gasoline is not available, one bottle of additive is recommended Additives are available from your authorized Kia dealer along with information on how to use them Do not mix other additives
*And, if necessary, adjust, correct, clean or replace * *If equipped
1 If TOP TIER Detergent Gasoline is not available, one bottle of additive is recommended Additives are available from your authorized Kia dealer along with information on how to use them Do not mix other additives
MAINTENANCE