change key battery KIA SEDONA 2018 Features and Functions Guide
[x] Cancel search | Manufacturer: KIA, Model Year: 2018, Model line: SEDONA, Model: KIA SEDONA 2018Pages: 54, PDF Size: 4.83 MB
Page 24 of 54

AUDIO SYSTEMS
SEDONA FEATURES & FUNCTIONS GUIDE22*IF EQUIPPED
Your vehicle’s audio system may differ from that in the illustration. For further UVO eServices System operations, refer to the Car Multimedia System User's Manual. For other audio system information, refer to pages 19 -21.
CD IN
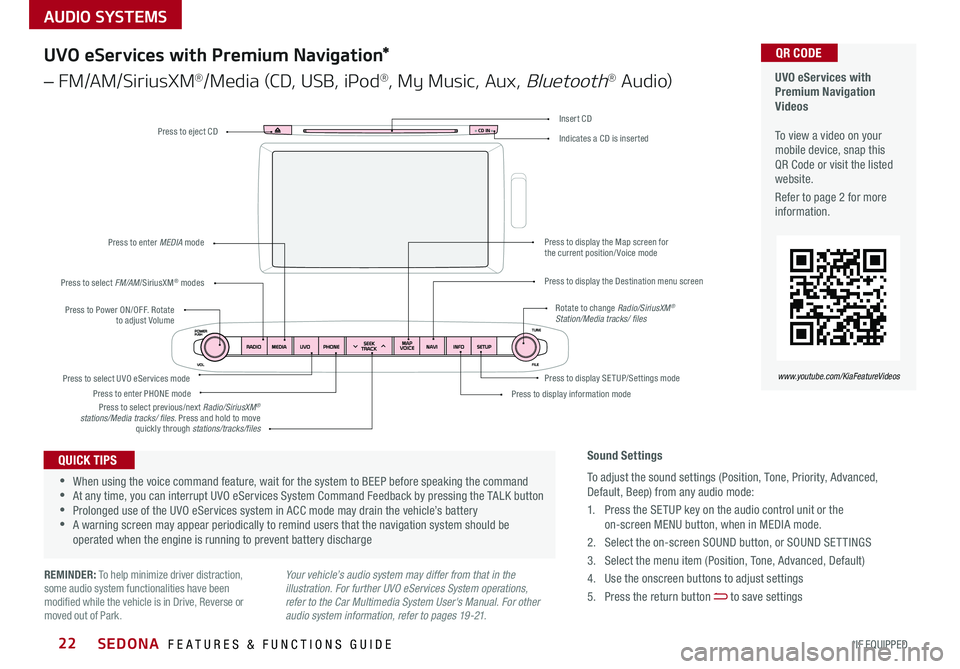
Press to Power ON/OFF Rotate to adjust Volume
Press to enter PHONE mode
Press to select FM/AM/SiriusXM® modes
Press to enter MEDIA mode
Press to display SE TUP/Settings mode Press to select UVO eServices mode
Press to display the Map screen for the current position/ Voice mode
Press to display the Destination menu screen
Press to display information mode
Press to eject CD
Press to select previous/next Radio/SiriusXM® stations/Media tracks/ files Press and hold to move quickly through stations/tracks/files
Insert CD
Indicates a CD is inserted
Rotate to change Radio/SiriusXM® Station/Media tracks/ files
UVO eServices with Premium Navigation Videos To view a video on your mobile device, snap this QR Code or visit the listed website
Refer to page 2 for more information
QR CODE
www.youtube.com/KiaFeatureVideos
Sound Settings
To adjust the sound settings (Position, Tone, Priority, Advanced, Default, Beep) from any audio mode:
1 Press the SETUP key on the audio control unit or the on-screen MENU button, when in MEDIA mode
2 Select the on-screen SOUND button, or SOUND SET TINGS
3 Select the menu item (Position, Tone, Advanced, Default)
4 Use the onscreen buttons to adjust settings
5 Press the return button to save settings
•When using the voice command feature, wait for the system to BEEP before speaking the command •At any time, you can interrupt UVO eServices System Command Feedback by pressing the TALK button •Prolonged use of the UVO eServices system in ACC mode may drain the vehicle’s battery •A warning screen may appear periodically to remind users that the navigation system should be operated when the engine is running to prevent battery discharge
QUICK TIPS
UVO eServices with Premium Navigation*
– FM/AM/SiriusXM®/Media (CD, USB, iPod®, My Music, Aux, Bluetooth® Au d io)
REMINDER: To help minimize driver distraction, some audio system functionalities have been modified while the vehicle is in Drive, Reverse or moved out of Park
Page 29 of 54

27ALWAYS CHECK THE OWNER’S MANUAL FOR COMPLETE OPER ATING INFORMATION AND SAFET Y WARNINGS *IF EQUIPPED
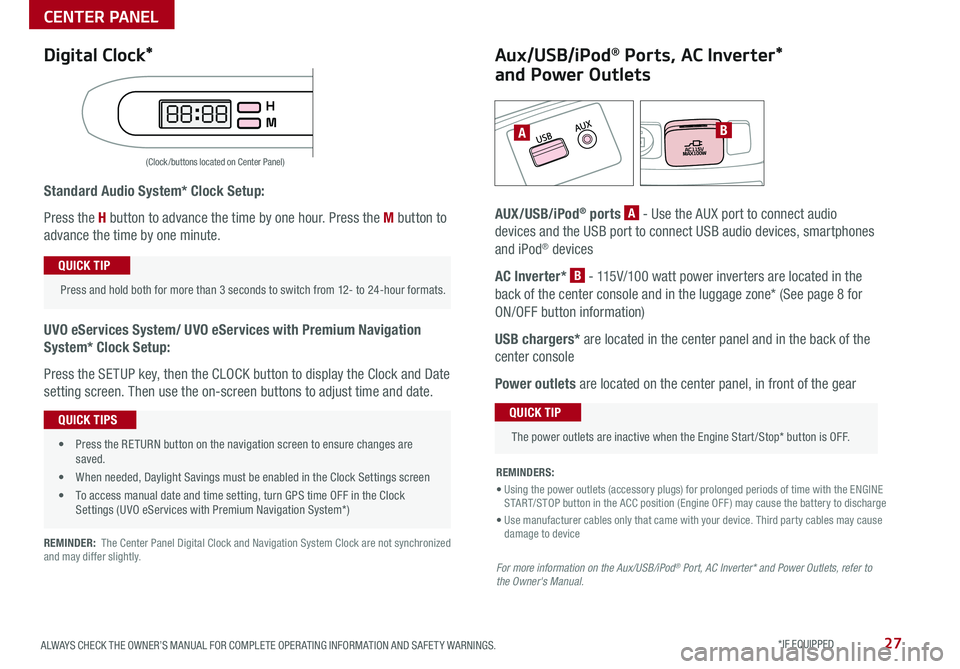
Standard Audio System* Clock Setup:
Press the H button to advance the time by one hour Press the M button to
advance the time by one minute
UVO eServices System/ UVO eServices with Premium Navigation
System* Clock Setup:
Press the SETUP key, then the CLOCK button to display the Clock and Date
setting screen Then use the on-screen buttons to adjust time and date
REMINDER: The Center Panel Digital Clock and Navigation System Clock are not synchronized and may differ slightly
AB
(Clock /buttons located on Center Panel)
Aux/USB/iPod® Ports, AC Inverter*
and Power Outlets
AUX/USB/iPod® ports A - Use the AUX port to connect audio
devices and the USB port to connect USB audio devices, smartphones
and iPod® devices
AC Inverter* B - 115V/100 watt power inverters are located in the
back of the center console and in the luggage zone* (See page 8 for
ON/OFF button information)
USB chargers* are located in the center panel and in the back of the
center console
Power outlets are located on the center panel, in front of the gear
Press and hold both for more than 3 seconds to switch from 12- to 24-hour formats
QUICK TIP
The power outlets are inactive when the Engine Start /Stop* button is OFF
QUICK TIP
REMINDERS:
• Using the power outlets (accessory plugs) for prolonged periods of time with the ENGINE START/STOP button in the ACC position (Engine OFF ) may cause the battery to discharge
• Use manufacturer cables only that came with your device Third party cables may cause damage to device
For more information on the Aux/USB/iPod® Port, AC Inverter* and Power Outlets, refer to the Owner's Manual.
Digital Clock*
• Press the RETURN button on the navigation screen to ensure changes are saved
• When needed, Daylight Savings must be enabled in the Clock Settings screen
• To access manual date and time setting, turn GPS time OFF in the Clock Settings (UVO eServices with Premium Navigation System*)
QUICK TIPS
CENTER PANEL