bulb KIA SEDONA 2018 Owners Manual
[x] Cancel search | Manufacturer: KIA, Model Year: 2018, Model line: SEDONA, Model: KIA SEDONA 2018Pages: 586, PDF Size: 14.1 MB
Page 204 of 586
Features of your vehicle
102
4
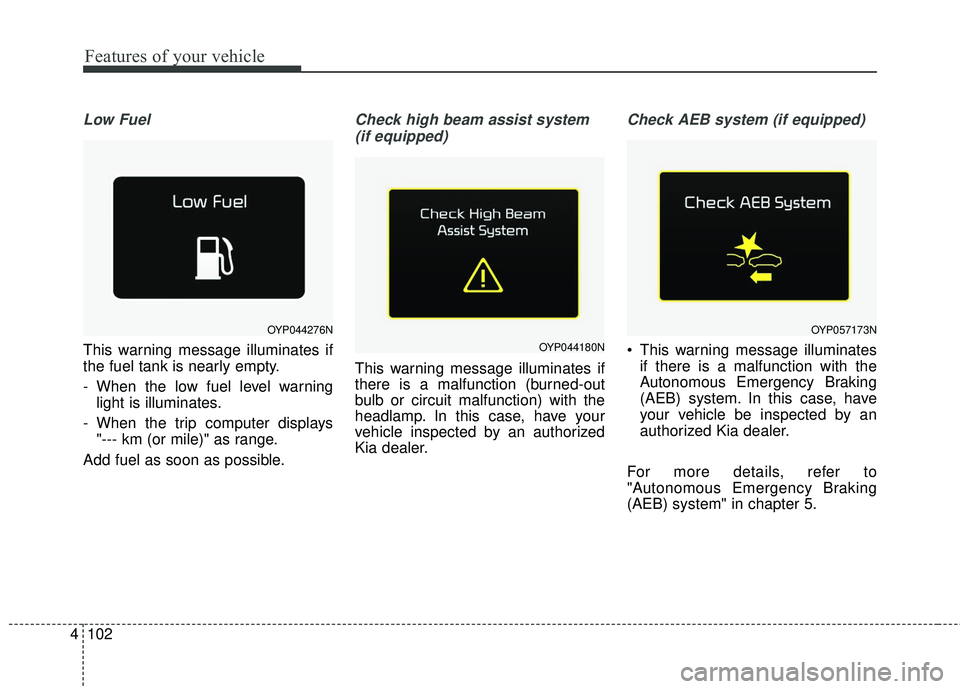
Low Fuel
This warning message illuminates if
the fuel tank is nearly empty.
- When the low fuel level warning
light is illuminates.
- When the trip computer displays "--- km (or mile)" as range.
Add fuel as soon as possible.
Check high beam assist system (if equipped)
This warning message illuminates if
there is a malfunction (burned-out
bulb or circuit malfunction) with the
headlamp. In this case, have your
vehicle inspected by an authorized
Kia dealer.
Check AEB system (if equipped)
• This warning message illuminates if there is a malfunction with the
Autonomous Emergency Braking
(AEB) system. In this case, have
your vehicle be inspected by an
authorized Kia dealer.
For more details, refer to
"Autonomous Emergency Braking
(AEB) system" in chapter 5.
OYP044276N
OYP044180N
OYP057173N
Page 238 of 586
Features of your vehicle
136
4
Do not place any accessories,
stickers or tint the windshield.
Have the windshield glass replaced from an authorized dealer.
Do not remove or impact related parts of the High Beam system.
Be careful that water doesn’t get into the High Beam unit.
Do not place objects on the dash- board that reflects light such as
mirrors, white paper, etc. The sys-
tem may malfunction if sunlight is
reflected.
At times, the High Beam system may not work properly, always
check the road conditions for your
safety. When the system does not
operate normally, manually change
between the high beam and low
beam.Turn signals and lane change
signals
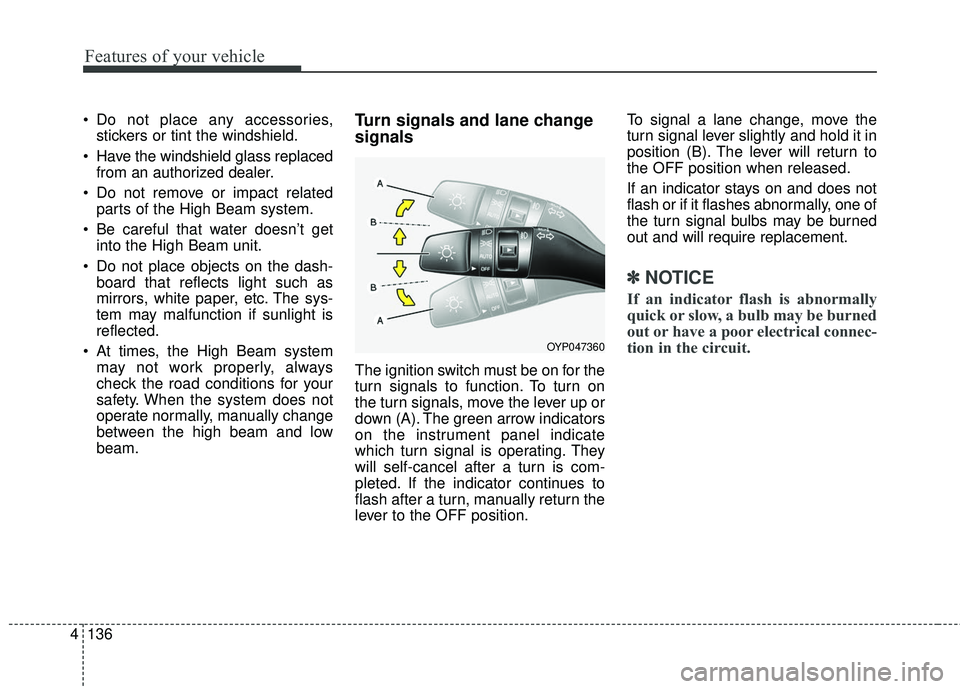
The ignition switch must be on for the
turn signals to function. To turn on
the turn signals, move the lever up or
down (A). The green arrow indicators
on the instrument panel indicate
which turn signal is operating. They
will self-cancel after a turn is com-
pleted. If the indicator continues to
flash after a turn, manually return the
lever to the OFF position. To signal a lane change, move the
turn signal lever slightly and hold it in
position (B). The lever will return to
the OFF position when released.
If an indicator stays on and does not
flash or if it flashes abnormally, one of
the turn signal bulbs may be burned
out and will require replacement.
✽ ✽
NOTICE
If an indicator flash is abnormally
quick or slow, a bulb may be burned
out or have a poor electrical connec-
tion in the circuit.
OYP047360
Page 438 of 586
Driving your vehicle
94
5
Turn signals when towing a trailer
When you tow a trailer, your vehicle
has to have a different turn signal
flasher and extra wiring. The green
arrows on your instrument panel will
flash whenever you signal a turn or
lane change. Properly connected,
the trailer lights will also flash to alert
other drivers you’re about to turn,
change lanes, or stop.
When towing a trailer, the green
arrows on your instrument panel will
flash for turns even if the bulbs on
the trailer are burned out. Thus, you
may think drivers behind you are
seeing your signals when, in fact,
they are not. It’s important to check
occasionally to be sure the trailer
bulbs are still working. You must also
check the lights every time you dis-
connect and then reconnect the
wires.
Do not connect a trailer lighting sys-
tem directly to your vehicle’s lighting
system. Use only an approved trailer
wiring harness.
An authorized Kia dealer can assist
you in installing the wiring harness.
Driving on grades
Reduce speed and shift to a lower
gear before you start down a long or
steep downgrade. If you don’t shift
down, you might have to use your
brakes so much that they would get
hot and no longer operate efficiently.
On a long uphill grade, shift down
and reduce your speed to around 70
km/h (45 mph) to reduce the possi-
bility of engine and transaxle over-
heating.
If your trailer weighs more than the
maximum trailer weight without trail-
er brakes and you have an automat-
ic transaxle, you should drive in D
(Drive) when towing a trailer.
Operating your vehicle in D (Drive)
when towing a trailer will minimize
heat build up and extend the life of
your transaxle.CAUTION
Always use an approved trailer
wiring harness. Failure to usean approved trailer wiring har-ness could result in damage tothe vehicle electrical system.
Page 472 of 586
. . . . . . . . . . . . . . . . . . . . . . . . . . . . . . . . . 7-54
. . . . . . . . . . . . . . . . . . . . . . . . . . . . 7-54
. . . . . . . . . . . . . . . . . . . . . . . . . 7-54
. . . . . . . . . . . . . . . . . . . . . . . . . . . . . . 7-61
. . . . . . . . . . . . . . . . . . . . . . . . . . . . . . . . 7-61
. . . . . . . . . . . . . . . . . . . . . . . . . . . . . . . . . . . 7-\
61
. . . . . . . . . . . . . . . . . . . . . . . . . . . . . . 7-61
. . . . . . . . . . . . . . . . . . . . . . . . . . 7-62
Fuses . . . . . . . . . . . . . . . . . . . . . . . . . . . . . . . . . . . . \
7-64
. . . . . . . . . . . . . . . . . . . 7-65
Light bulbs . . . . . . . . . . . . . . . . . . . . . . . . . . . . . . . 7-74
. . . . . . . . . . . . . . . . . . . 7-75
. . . . . . . . . . . . . . . . 7-80
. . . . . . . . 7-80
. . . . . . . . . . . 7-83
. . . . . . . . . . . . 7-83
. . . . . . . . . . . . . . . . . 7-84
Appearance care . . . . . . . . . . . . . . . . . . . . . . . . . . . 7-85
. . . . . . . . . . . . . . . . . . . . . . . . . . . . . . . . 7-85
. . . . . . . . . . . . . . . . . . . . . . . . . . . . . . . . . 7-91
Emission control system . . . . . . . . . . . . . . . . . . . . 7-94
. . . . . . . . . . . . . . 7-94
Onboard Refueling Vapor Recovery) system . . . . . 7-95
. . . . . . . . . . . . . . . . 7-95
7
Page 544 of 586
Maintenance
74
7
LIGHT BULBS
Use only the bulbs of the specified
wattage.
✽ ✽ NOTICE
• If the light bulb or lamp connector
is removed from an operating
lamp activated by electricity, the
fuse box’s electronic device may
scan it as a malfunction.
Therefore, a lamp malfunction
history may be recorded in
Diagnostic Trouble Code (DTC) in
the fuse box.
• It is normal for an operating lamp may blink temporarily. Since this
occurrence is due stabilization
function of the vehicle’s electronic
control device, if the lamp lights
up normally after temporary
blinking, there is no problem in
the vehicle.
However, if the lamp continues to
blink several times or turn off
completely, there may be an error
in the vehicle’s electronic control
device. So please have the vehicle
checked by an authorized Kia
dealer immediately. WARNING - Working on
the lights
Prior to working on the light,
firmly apply the parking brake,
ensure that the ignition switch
is turned to the LOCK position
and turn off the lights to avoid
sudden movement of the vehi-
cle and burning your fingers or
receiving an electric shock.
CAUTION -Light replace-
ment
Be sure to replace the burned-
out bulb with one of the samewattage rating. Otherwise, itmay cause damage to the fuseor electric wiring system.
CAUTION -Headlamp
Lens
To prevent damage, do notclean headlamp lens with chem-ical solvents or strong deter-gents.
Page 545 of 586
775
Maintenance
If you don’t have necessary tools, the
correct bulbs and the expertise, con-
sult an authorized Kia dealer. In many
cases, it is difficult to replace vehicle
light bulbs because other parts of the
vehicle must be removed before you
can get to the bulb. This is especially
true if you have to remove the head-
light assembly to get to the bulb(s).
Removing/installing the headlight
assembly can result in damage to
the vehicle.Front light bulb replacement
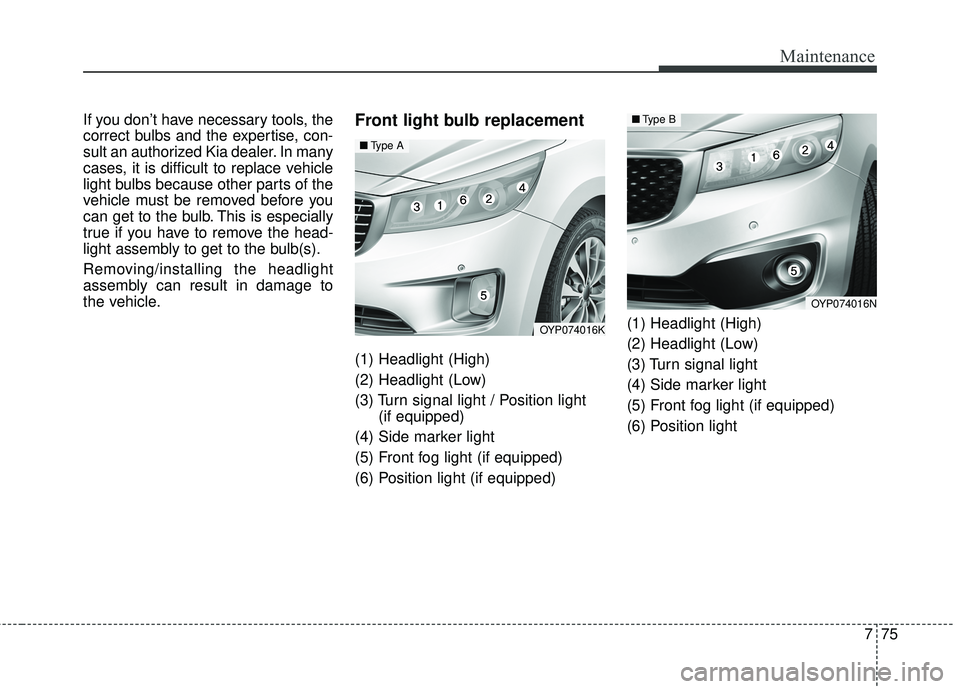
(1) Headlight (High)
(2) Headlight (Low)
(3) Turn signal light / Position light(if equipped)
(4) Side marker light
(5) Front fog light (if equipped)
(6) Position light (if equipped) (1) Headlight (High)
(2) Headlight (Low)
(3) Turn signal light
(4) Side marker light
(5) Front fog light (if equipped)
(6) Position light
OYP074016K
■
Type A
OYP074016N
■Type B
Page 546 of 586
Maintenance
76
7
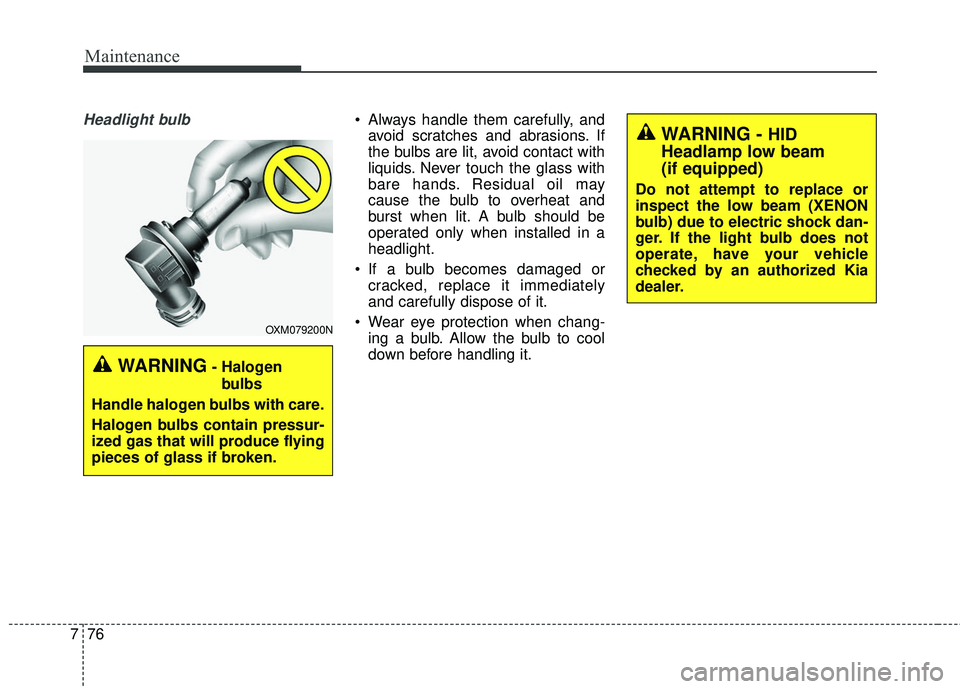
Headlight bulb Always handle them carefully, and
avoid scratches and abrasions. If
the bulbs are lit, avoid contact with
liquids. Never touch the glass with
bare hands. Residual oil may
cause the bulb to overheat and
burst when lit. A bulb should be
operated only when installed in a
headlight.
If a bulb becomes damaged or cracked, replace it immediately
and carefully dispose of it.
Wear eye protection when chang- ing a bulb. Allow the bulb to cool
down before handling it.
WARNING - HID
Headlamp low beam
(if equipped)
Do not attempt to replace or
inspect the low beam (XENON
bulb) due to electric shock dan-
ger. If the light bulb does not
operate, have your vehicle
checked by an authorized Kia
dealer.
OXM079200N
WARNING- Halogen
bulbs
Handle halogen bulbs with care.
Halogen bulbs contain pressur-
ized gas that will produce flying
pieces of glass if broken.
Page 547 of 586
777
Maintenance
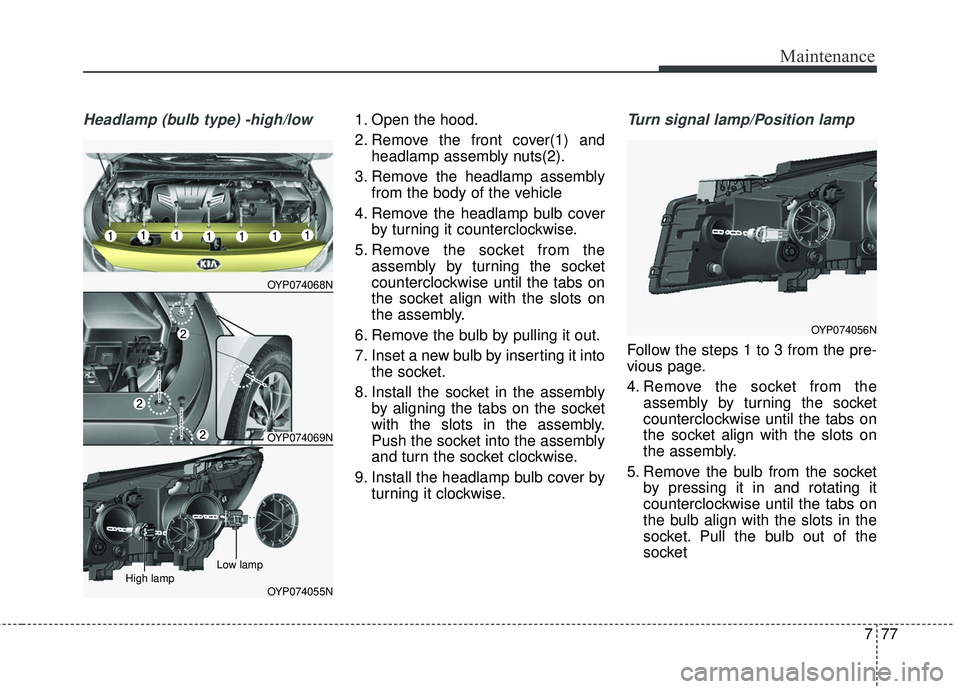
Headlamp (bulb type) -high/low1. Open the hood.
2. Remove the front cover(1) andheadlamp assembly nuts(2).
3. Remove the headlamp assembly from the body of the vehicle
4. Remove the headlamp bulb cover by turning it counterclockwise.
5. Remove the socket from the assembly by turning the socket
counterclockwise until the tabs on
the socket align with the slots on
the assembly.
6. Remove the bulb by pulling it out.
7. Inset a new bulb by inserting it into the socket.
8. Install the socket in the assembly by aligning the tabs on the socket
with the slots in the assembly.
Push the socket into the assembly
and turn the socket clockwise.
9. Install the headlamp bulb cover by turning it clockwise.Turn signal lamp/Position lamp
Follow the steps 1 to 3 from the pre-
vious page.
4. Remove the socket from theassembly by turning the socket
counterclockwise until the tabs on
the socket align with the slots on
the assembly.
5. Remove the bulb from the socket by pressing it in and rotating it
counterclockwise until the tabs on
the bulb align with the slots in the
socket. Pull the bulb out of the
socket
OYP074068N
OYP074069N
OYP074055NHigh lampLow lamp
OYP074056N
Page 548 of 586
Maintenance
78
7
6. Insert a new bulb by inserting it
into the socket and rotating it until
it locks into place.
7. Install the socket in the assembly by aligning the tabs on the socket
with the slots in the assembly.
Push the socket into the assembly
and turn the socket clockwise.
✽ ✽NOTICE
If bulb will not rotate inside socket,
remove bulb, rotate 180°, and try
again.
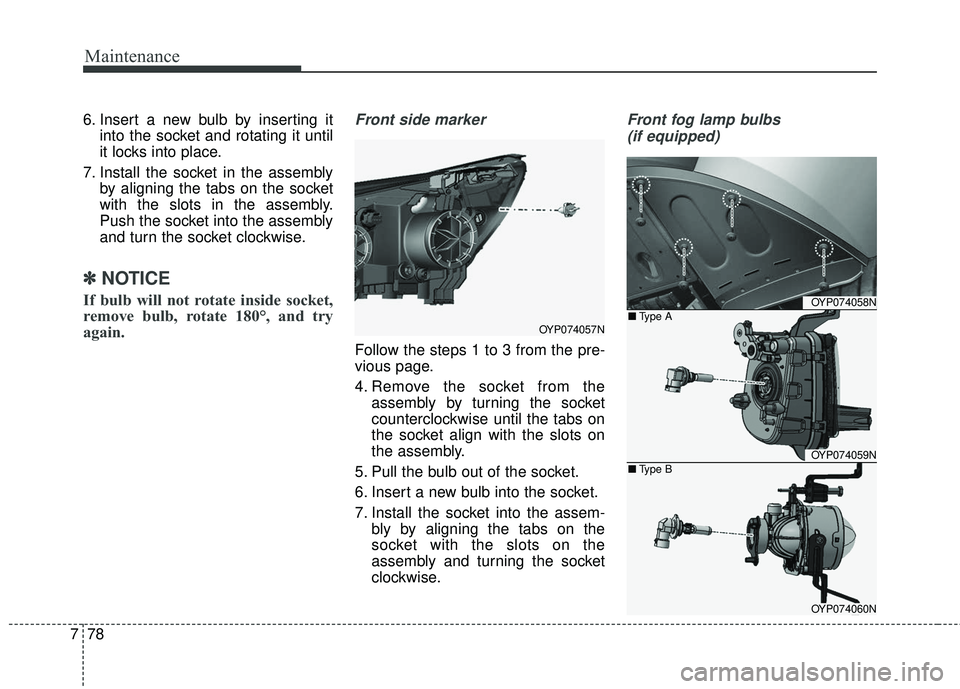
Front side marker
Follow the steps 1 to 3 from the pre-
vious page.
4. Remove the socket from the
assembly by turning the socket
counterclockwise until the tabs on
the socket align with the slots on
the assembly.
5. Pull the bulb out of the socket.
6. Insert a new bulb into the socket.
7. Install the socket into the assem- bly by aligning the tabs on the
socket with the slots on the
assembly and turning the socket
clockwise.
Front fog lamp bulbs
(if equipped)
OYP074057N
OYP074058N
OYP074059N
OYP074060N
■ Type A
■ Type B
Page 549 of 586
779
Maintenance
1. Remove the front bumper undercover.
2. Reach your hand into the back of the front bumper.
3. Disconnect the power connector from the socket.
4. Remove the bulb-socket from the housing by turning the socket
counter clockwise until the tabs on
the socket align with the slots on
the housing.
5. Install the new bulb-socket into the housing by aligning the tabs on
the socket with the slots in the
housing. Push the socket into the
housing and turn the socket clock-
wise.
6. Connect the power connector to the socket.
7. Reinstall the front bumper under cover.✽ ✽NOTICE
Always have the headlight aiming
adjusted after an accident or the
headlight assembly is reinstalled at a
authorized Kia dealer.
Headlamp (HID type), Front posi-
tion (LED), bulb replacement
If the light bulb does not operate,
have the vehicle checked by an
authorized Kia dealer.
✽ ✽ NOTICE
HID lamps have superior perform-
ance vs. halogen bulbs. HID lamps
are estimated by the manufacturer
to last twice as long or longer than
halogen bulbs depending on their
frequency of use. They will probably
require replacement at some point
in the life of the vehicle. Cycling the
headlamps on and off more than
typical use will shorten HID lamps
life. HID lamps do not fail in the
same manner as halogen incandes-
cent lamps. If a headlamp goes out
after a period of operation but will
immediately relamp when the head-
lamp switch is cycled it is likely the
HID lamp needs to be replaced. HID
lamping components are more com-
plex than conventional halogen
bulbs thus have higher replacement
cost.