USB KIA SEDONA 2020 Quick Start Guide Base Audio
[x] Cancel search | Manufacturer: KIA, Model Year: 2020, Model line: SEDONA, Model: KIA SEDONA 2020Pages: 2, PDF Size: 0.6 MB
Page 2 of 2

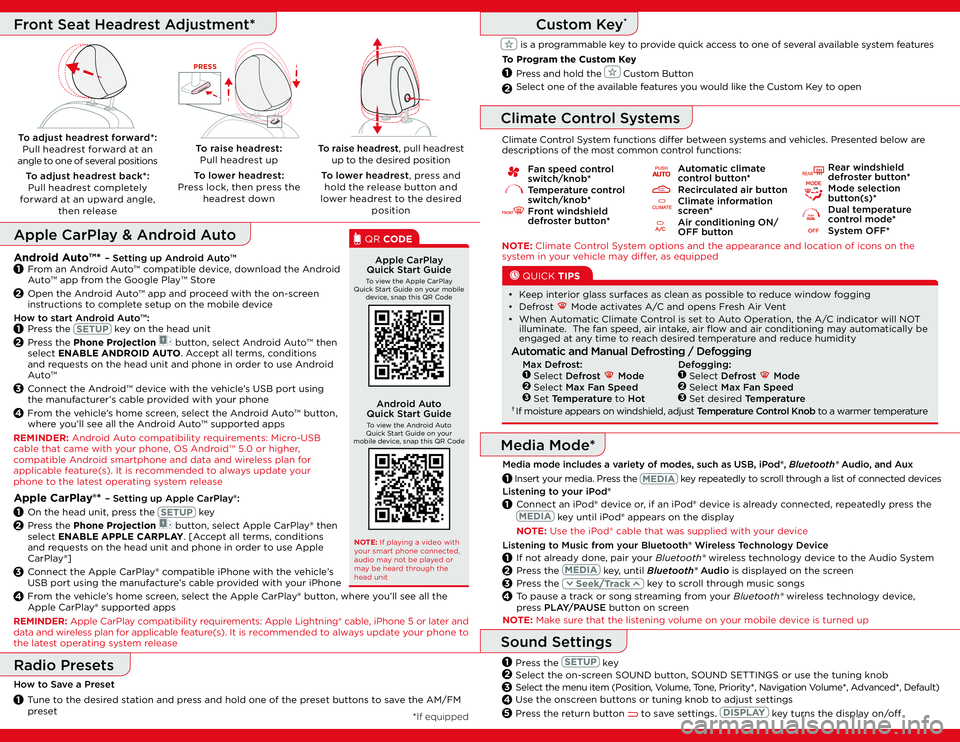
Fan speed control switch/knob* Temperature control switch/knob* Front windshield defroster button*
Automatic climate control button* Recirculated air button Climate information screen* Air conditioning ON/OFF button
Rear windshield defroster button*
Mode selection button(s)* Dual temperature control mode* System OFF*
Listening to your iPod®
1 Connect an iPod® device or, if an iPod® device is already connected, repeatedly press the
key until iPod® appears on the display
NOTE: Use the iPod® cable that was supplied with your device
Listening to Music from your Bluetooth® Wireless Technology Device
1 If not already done, pair your Bluetooth® wireless technology device to the Audio System
2 Press the key, until Bluetooth® Audio is displayed on the screen
3 Press the key to scroll through music songs
4 To pause a track or song streaming from your Bluetooth® wireless technology device, press PLAY/PAUSE button on screen
*If equipped
NOTE: Climate Control System options and the appearance and location of icons on the system in your vehicle may differ, as equipped
Climate Control System functions differ between systems and vehicles. Presented below are descriptions of the most common control functions:
QUICK TIPS
• Keep interior glass surfaces as clean as possible to reduce window fogging
• Defrost Mode activates A/C and opens Fresh Air Vent
• When Automatic Climate Control is set to Auto Operation, the A/C indicator will NOT illuminate. The fan speed, air intake, air flow and air conditioning may automatically be engaged at any time to reach desired temperature and reduce humidity
Automatic and Manual Defrosting / Defogging
Max Defrost:1 Select Defrost Mode2 Select Max Fan Speed3 Set Temperature to Hot† If moisture appears on windshield, adjust Temperature Control Knob to a warmer temperature
1 Insert your media. Press the key repeatedly to scroll through a list of connected devices
Media Mode*
Media mode includes a variety of modes, such as USB, iPod®, Bluetooth® Audio, and Aux
Climate Control Systems
To raise headrest, pull headrest up to the desired position
To lower headrest, press and hold the release button and lower headrest to the desired position
To adjust headrest forward*: Pull headrest forward at an angle to one of several positions
To adjust headrest back*: Pull headrest completely forward at an upward angle, then release
To raise headrest: Pull headrest up
To lower headrest: Press lock, then press the headrest down
PRESS
Front Seat Headrest Adjustment*
NOTE: Make sure that the listening volume on your mobile device is turned up
Press the key
Select the on-screen SOUND button, SOUND SETTINGS or use the tuning knob
Select the menu item (Position, Volume, Tone, Priority*, Navigation Volume*, Advanced*, Default)
Use the onscreen buttons or tuning knob to adjust settings
Press the return button to save settings. key turns the display on/off
Sound Settings
2
3
4
1
5
Radio Presets
How to Save a Preset
1 Tune to the desired station and press and hold one of the preset buttons to save the AM/FM preset
Custom Key*
is a programmable key to provide quick access to one of several available system features
To Program the Custom Key
Press and hold the Custom Button
Select one of the available features you would like the Custom Key to open 2
1
Apple CarPlay®* – Setting up Apple CarPlay®:
1 On the head unit, press the key
2 Press the Phone Projection button, select Apple CarPlay® then select ENABLE APPLE CARPLAY. [Accept all terms, conditions and requests on the head unit and phone in order to use Apple CarPlay®]
3 Connect the Apple CarPlay® compatible iPhone with the vehicle’s USB port using the manufacture’s cable provided with your iPhone
4 From the vehicle’s home screen, select the Apple CarPlay® button, where you’ll see all the Apple CarPlay® supported apps
Apple CarPlay & Android Auto
Apple CarPlay Quick Start GuideTo view the Apple CarPlay Quick Start Guide on your mobile device, snap this QR Code
QR CODE
Android Auto Quick Start GuideTo view the Android Auto Quick Start Guide on your mobile device, snap this QR Code
NOTE: If playing a video with your smart phone connected, audio may not be played or may be heard through the head unit
Android Auto™* – Setting up Android Auto™1 From an Android Auto™ compatible device, download the Android Auto™ app from the Google Play™ Store
2 Open the Android Auto™ app and proceed with the on-screen instructions to complete setup on the mobile device
How to start Android Auto™:1 Press the key on the head unit
2 Press the Phone Projection button, select Android Auto™ then select ENABLE ANDROID AUTO. Accept all terms, conditions and requests on the head unit and phone in order to use Android Auto™
3 Connect the Android™ device with the vehicle’s USB port using the manufacturer’s cable provided with your phone
4 From the vehicle’s home screen, select the Android Auto™ button, where you’ll see all the Android Auto™ supported apps
REMINDER: Android Auto compatibility requirements: Micro-USB cable that came with your phone, OS Android™ 5.0 or higher, compatible Android smartphone and data and wireless plan for applicable feature(s). It is recommended to always update your phone to the latest operating system release
REMINDER: Apple CarPlay compatibility requirements: Apple Lightning® cable, iPhone 5 or later and data and wireless plan for applicable feature(s). It is recommended to always update your phone to the latest operating system release
Defogging:1 Select Defrost Mode2 Select Max Fan Speed3 Set desired Temperature