heater KIA Sorento 2007 1.G Owner's Manual
[x] Cancel search | Manufacturer: KIA, Model Year: 2007, Model line: Sorento, Model: KIA Sorento 2007 1.GPages: 325, PDF Size: 5.01 MB
Page 24 of 325
315
Knowing your vehicle
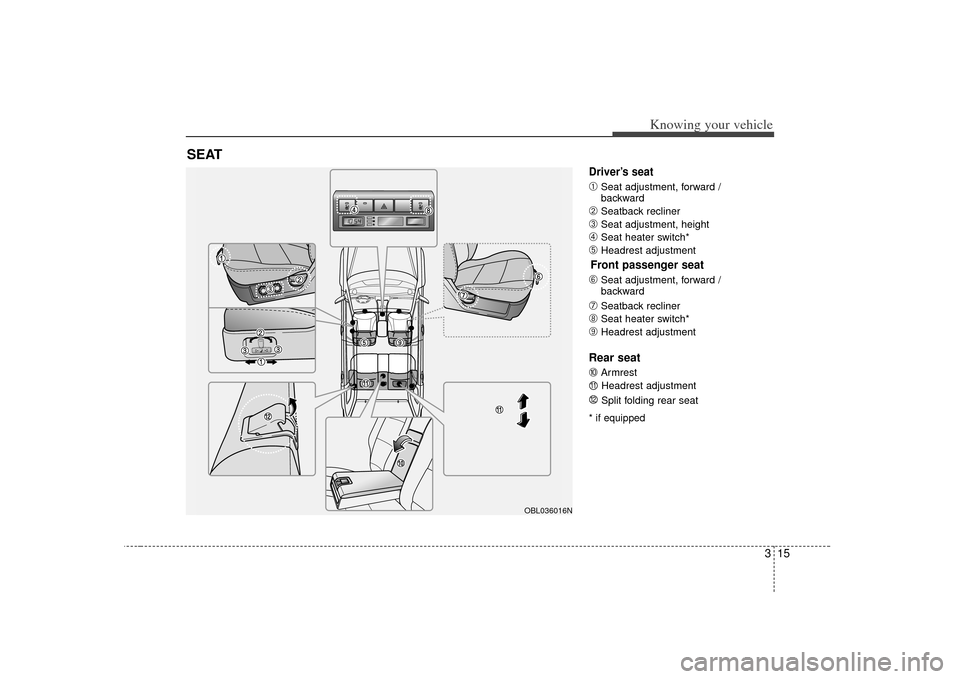
Driver’s seat➀
Seat adjustment, forward /
backward
➁
Seatback recliner
➂
Seat adjustment, height
➃
Seat heater switch*
➄
Headrest adjustmentFront passenger seat\b
Seat adjustment, forward /
backward
➆
Seatback recliner
➇
Seat heater switch*
➈
Headrest adjustment
Rear seat
\f
ArmrestHeadrest adjustment
Split folding rear seat
* if equipped
SEAT
OBL036016N
1112
Page 30 of 325
321
Knowing your vehicle
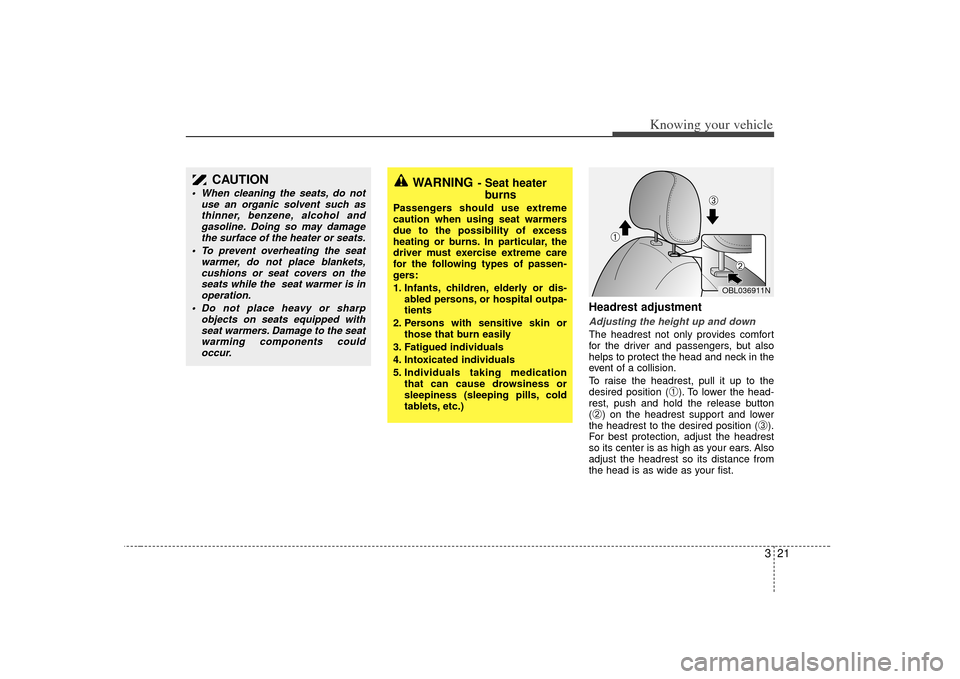
Headrest adjustmentAdjusting the height up and downThe headrest not only provides comfort
for the driver and passengers, but also
helps to protect the head and neck in the
event of a collision.
To raise the headrest, pull it up to the
desired position (
➀). To lower the head-
rest, push and hold the release button
(
➁) on the headrest support and lower
the headrest to the desired position (
➂).
For best protection, adjust the headrest
so its center is as high as your ears. Also
adjust the headrest so its distance from
the head is as wide as your fist.
WARNING
- Seat heater burns
Passengers should use extreme
caution when using seat warmers
due to the possibility of excess
heating or burns. In particular, the
driver must exercise extreme care
for the following types of passen-
gers:
1. Infants, children, elderly or dis-
abled persons, or hospital outpa-
tients
2. Persons with sensitive skin or those that burn easily
3. Fatigued individuals
4. Intoxicated individuals
5. Individuals taking medication that can cause drowsiness or
sleepiness (sleeping pills, cold
tablets, etc.)
CAUTION
When cleaning the seats, do not use an organic solvent such asthinner, benzene, alcohol andgasoline. Doing so may damagethe surface of the heater or seats.
To prevent overheating the seat warmer, do not place blankets,cushions or seat covers on theseats while the seat warmer is in operation.
Do not place heavy or sharp objects on seats equipped withseat warmers. Damage to the seatwarming components could occur.
OBL036911N
➀
➁
➂
Page 85 of 325
Knowing your vehicle76
3Outside rearview mirror heater
(if equipped) The outside rearview mirror heater is
actuated in connection with the rear win-
dow defroster. To heat the outside
rearview mirror glass, push the button for
the rear window defroster.
The rearview mirror heater (and rear win-
dow defroster) will not operate unless the
engine is running.
The outside rearview mirror glass will be
heated for defrosting or defogging and
will give you improved rear vision in
inclement weather conditions. Push the
button again to turn the heater off. The
outside rearview mirror heater automati-
cally turns off after 20 minutes.
Day/night rearview mirror Adjust the rearview mirror to center on
the view through the rear window. Make
this adjustment before you start driving.
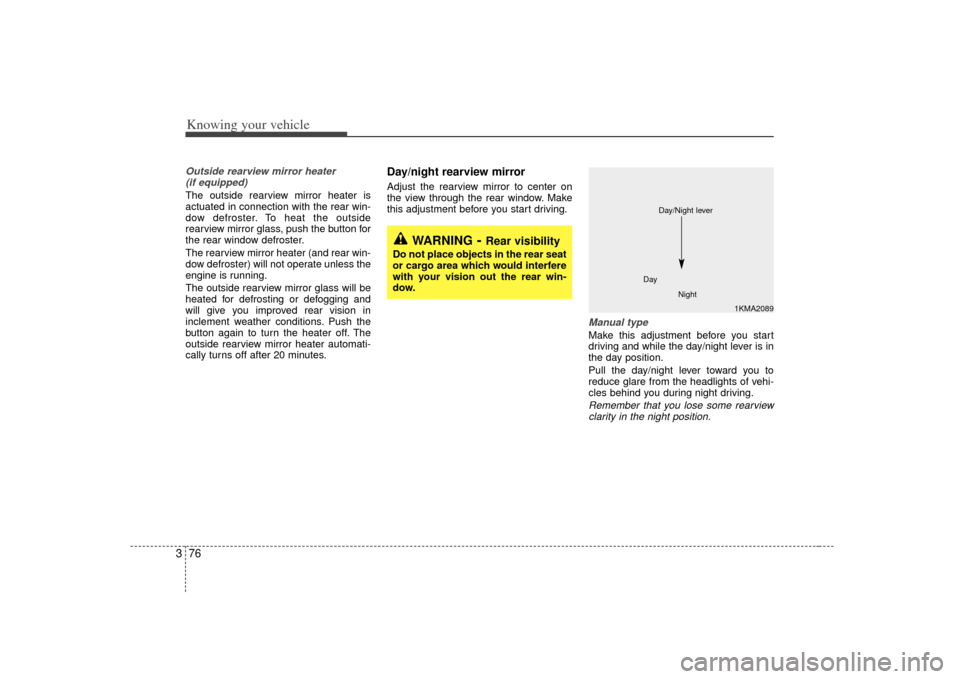
Manual type Make this adjustment before you start
driving and while the day/night lever is in
the day position.
Pull the day/night lever toward you to
reduce glare from the headlights of vehi-
cles behind you during night driving.Remember that you lose some rearviewclarity in the night position.
1KMA2089
Day
Night
Day/Night lever
WARNING
- Rear visibility
Do not place objects in the rear seat
or cargo area which would interfere
with your vision out the rear win-
dow.
Page 98 of 325
389
Knowing your vehicle
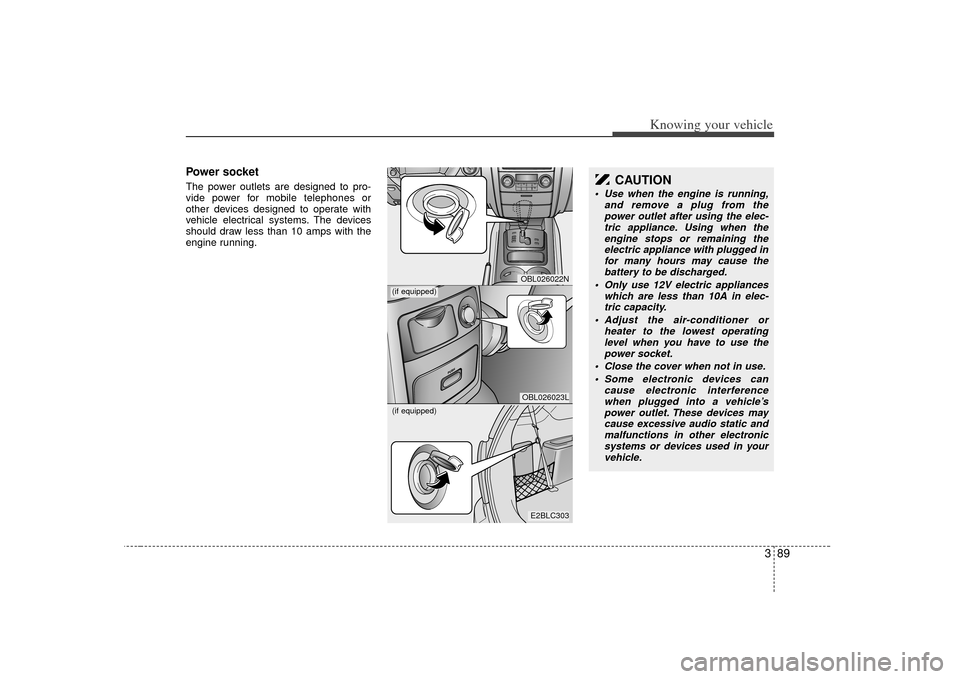
Power socketThe power outlets are designed to pro-
vide power for mobile telephones or
other devices designed to operate with
vehicle electrical systems. The devices
should draw less than 10 amps with the
engine running.
E2BLC303OBL026023LOBL026022N
(if equipped)(if equipped)
CAUTION
Use when the engine is running,and remove a plug from thepower outlet after using the elec- tric appliance. Using when theengine stops or remaining the electric appliance with plugged infor many hours may cause thebattery to be discharged.
Only use 12V electric appliances which are less than 10A in elec-tric capacity.
Adjust the air-conditioner or heater to the lowest operatinglevel when you have to use thepower socket.
Close the cover when not in use. Some electronic devices can cause electronic interferencewhen plugged into a vehicle’s power outlet. These devices maycause excessive audio static and malfunctions in other electronicsystems or devices used in your vehicle.
Page 187 of 325
457
Driving your vehicle
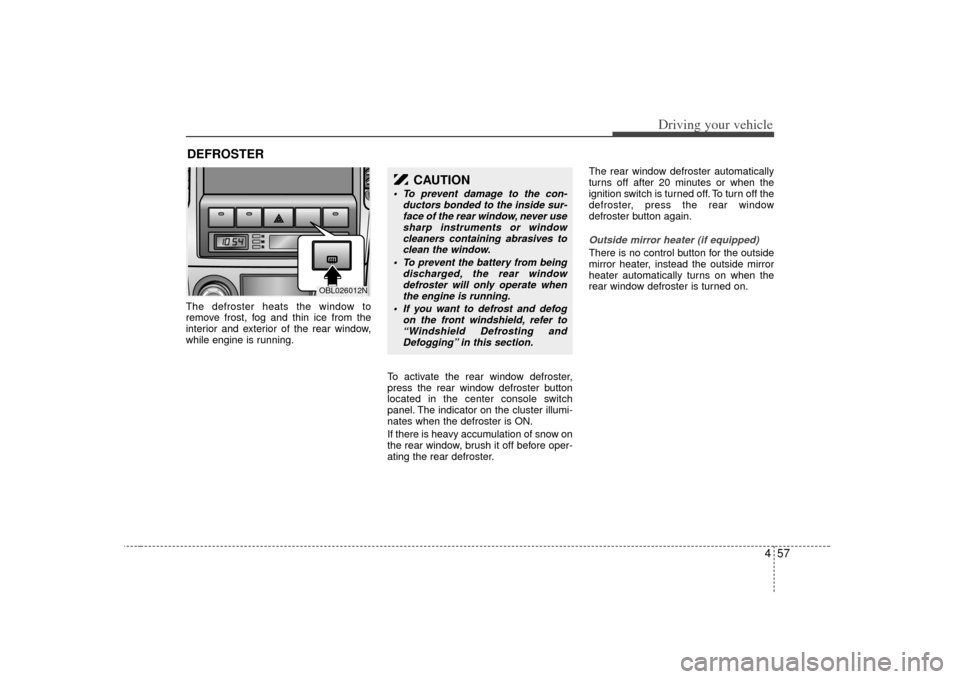
The defroster heats the window to
remove frost, fog and thin ice from the
interior and exterior of the rear window,
while engine is running.To activate the rear window defroster,
press the rear window defroster button
located in the center console switch
panel. The indicator on the cluster illumi-
nates when the defroster is ON.
If there is heavy accumulation of snow on
the rear window, brush it off before oper-
ating the rear defroster.The rear window defroster automatically
turns off after 20 minutes or when the
ignition switch is turned off. To turn off the
defroster, press the rear window
defroster button again.
Outside mirror heater (if equipped)There is no control button for the outside
mirror heater, instead the outside mirror
heater automatically turns on when the
rear window defroster is turned on.
DEFROSTER
OBL026012N
CAUTION
To prevent damage to the con-
ductors bonded to the inside sur-face of the rear window, never usesharp instruments or window cleaners containing abrasives toclean the window.
To prevent the battery from being discharged, the rear windowdefroster will only operate whenthe engine is running.
If you want to defrost and defog on the front windshield, refer to“Windshield Defrosting andDefogging” in this section.
Page 205 of 325
475
Driving your vehicle
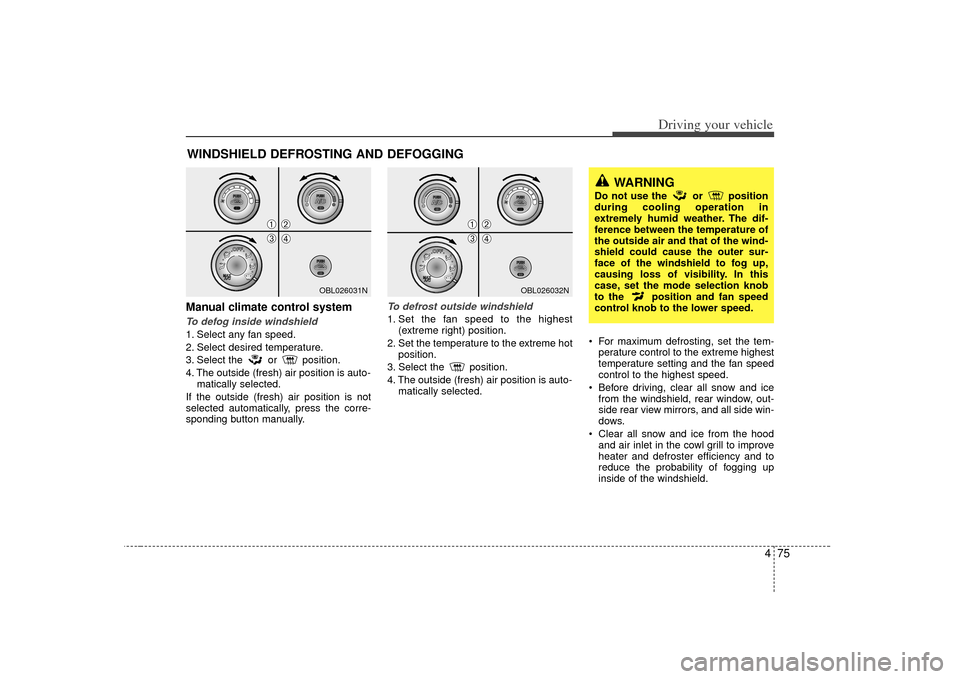
Manual climate control systemTo defog inside windshield 1. Select any fan speed.
2. Select desired temperature.
3. Select the or position.
4. The outside (fresh) air position is auto-matically selected.
If the outside (fresh) air position is not
selected automatically, press the corre-
sponding button manually.
To defrost outside windshield 1. Set the fan speed to the highest (extreme right) position.
2. Set the temperature to the extreme hot position.
3. Select the position.
4. The outside (fresh) air position is auto- matically selected. For maximum defrosting, set the tem-
perature control to the extreme highest
temperature setting and the fan speed
control to the highest speed.
Before driving, clear all snow and ice from the windshield, rear window, out-
side rear view mirrors, and all side win-
dows.
Clear all snow and ice from the hood and air inlet in the cowl grill to improve
heater and defroster efficiency and to
reduce the probability of fogging up
inside of the windshield.
WINDSHIELD DEFROSTING AND DEFOGGING
OBL026031N
OBL026032N
➀
➁
\b
➃
➀
➁
\b
➃
WARNING
Do not use the or position
during cooling operation in
extremely humid weather. The dif-
ference between the temperature of
the outside air and that of the wind-
shield could cause the outer sur-
face of the windshield to fog up,
causing loss of visibility. In this
case, set the mode selection knob
to the position and fan speed
control knob to the lower speed.
Page 206 of 325
Driving your vehicle76
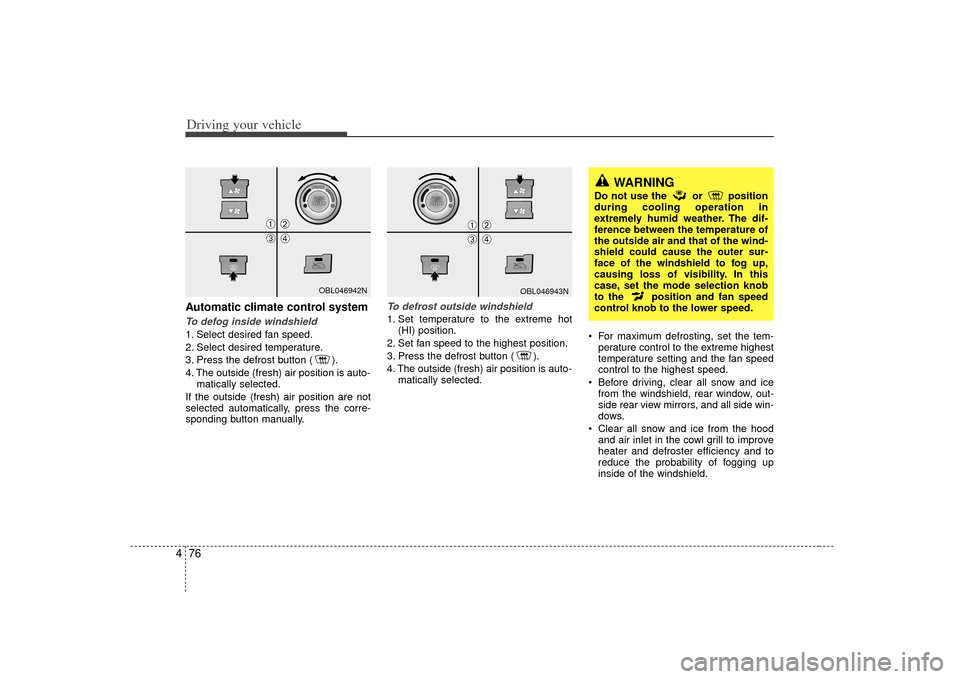
4Automatic climate control systemTo defog inside windshield 1. Select desired fan speed.
2. Select desired temperature.
3. Press the defrost button ( ).
4. The outside (fresh) air position is auto-
matically selected.
If the outside (fresh) air position are not
selected automatically, press the corre-
sponding button manually.
To defrost outside windshield 1. Set temperature to the extreme hot (HI) position.
2. Set fan speed to the highest position.
3. Press the defrost button ( ).
4. The outside (fresh) air position is auto- matically selected. For maximum defrosting, set the tem-
perature control to the extreme highest
temperature setting and the fan speed
control to the highest speed.
Before driving, clear all snow and ice from the windshield, rear window, out-
side rear view mirrors, and all side win-
dows.
Clear all snow and ice from the hood and air inlet in the cowl grill to improve
heater and defroster efficiency and to
reduce the probability of fogging up
inside of the windshield.
OBL046942N
OBL046943N
➀
➁
\b
➃
➀
➁
\b
➃
WARNING
Do not use the or position
during cooling operation in
extremely humid weather. The dif-
ference between the temperature of
the outside air and that of the wind-
shield could cause the outer sur-
face of the windshield to fog up,
causing loss of visibility. In this
case, set the mode selection knob
to the position and fan speed
control knob to the lower speed.
Page 251 of 325
63
In case of an emergency
OVERHEATING If your temperature gauge indicates over-
heating, if you experience a loss of
power, or if you hear a loud knocking or
pinging noise, the engine has probably
overheated. Should any of these symp-
toms occur, use the following procedure:
1. Turn on the hazard warning flasher,then drive to the nearest safe location
and stop your vehicle; set the automat-
ic transmission in P (Park), or shift the
manual transmission to N (Neutral)
and apply the parking brake.
2. Make sure the air conditioner is off.
3. If coolant or steam is boiling out of the radiator, stop the engine and call an
Authorized Kia Dealer for assistance. If coolant is not boiling out, allow the
engine to idle and open the hood to
permit the engine to cool gradually.
If the temperature does not go down
with the engine idling, stop the engine
and allow sufficient time for it to cool.
4. The coolant level should then be checked. If the level in the reservoir is
low, look for leaks at the radiator hoses
and connections, heater hoses and
connections, radiator, and water
pump. If you find a major leak or anoth-
er problem that may have caused the
engine to overheat, do not operate the
engine until it has been corrected. Call
an Authorized Kia Dealer for assis-
tance. If you do not find a leak or other
problem, carefully add coolant to the
reservoir.
If the engine frequently overheats, havethe cooling system checked and repaired by an Authorized Kia Dealer.
WARNING
- Removing
radiator cap
Do not remove the radiator cap
when the engine and radiator are
hot. Scalding hot coolant and steam
may blow out under pressure. This
could cause serious injury.
Page 259 of 325
611
In case of an emergency
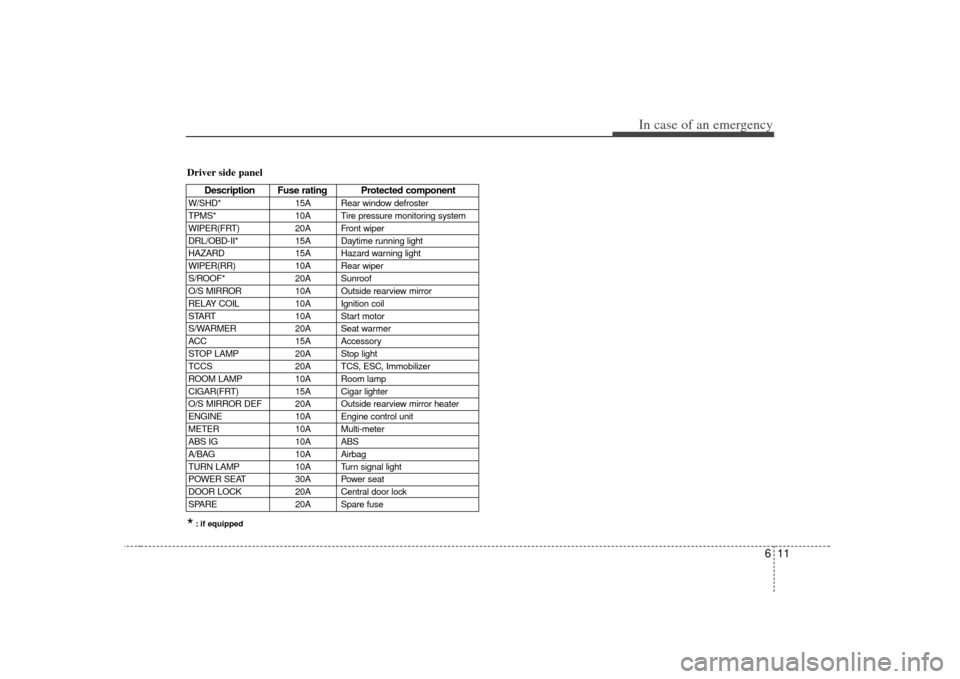
Driver side panel
Description Fuse rating Protected component
W/SHD*15A Rear window defroster
TPMS* 10A Tire pressure monitoring system
WIPER(FRT) 20A Front wiper
DRL/OBD-II* 15A Daytime running light
HAZARD 15A Hazard warning light
WIPER(RR) 10A Rear wiper
S/ROOF* 20A Sunroof
O/S MIRROR 10A Outside rearview mirror
RELAY COIL 10A Ignition coil
START 10A Start motor
S/WARMER 20A Seat warmer
ACC 15A Accessory
STOP LAMP 20A Stop light
TCCS 20A TCS, ESC, Immobilizer
ROOM LAMP 10A Room lamp
CIGAR(FRT) 15A Cigar lighter
O/S MIRROR DEF 20A Outside rearview mirror heater
ENGINE 10A Engine control unit
METER 10A Multi-meter
ABS IG 10A ABS
A/BAG 10A Airbag
TURN LAMP 10A Turn signal light
POWER SEAT 30A Power seat
DOOR LOCK 20A Central door lock
SPARE 20A Spare fuse*: if equipped
Page 281 of 325
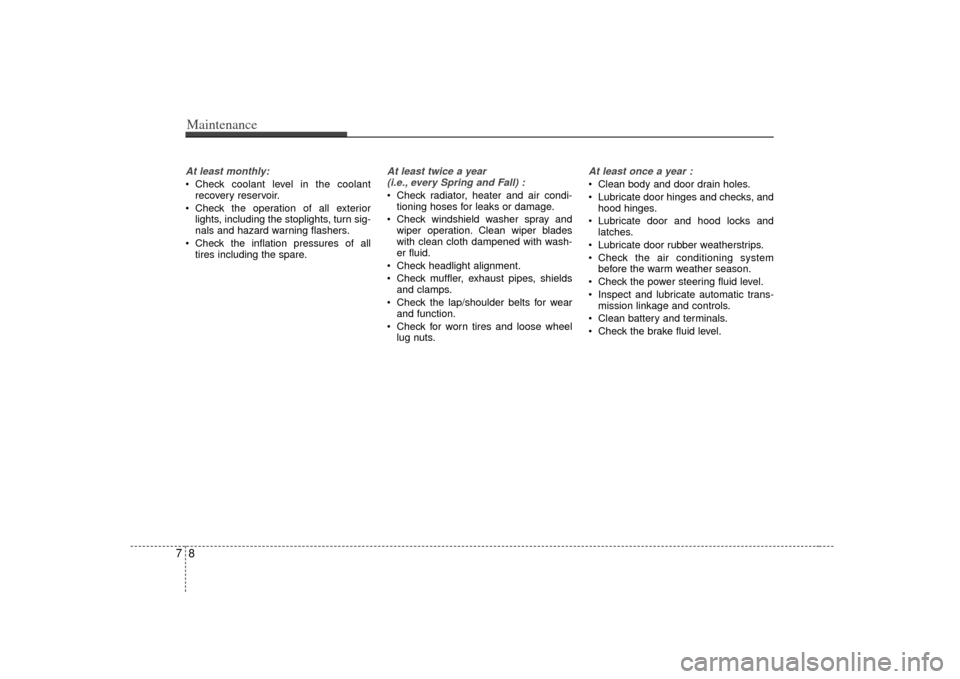
Maintenance87At least monthly: Check coolant level in the coolantrecovery reservoir.
Check the operation of all exterior lights, including the stoplights, turn sig-
nals and hazard warning flashers.
Check the inflation pressures of all tires including the spare.
At least twice a year (i.e., every Spring and Fall) : Check radiator, heater and air condi- tioning hoses for leaks or damage.
Check windshield washer spray and wiper operation. Clean wiper blades
with clean cloth dampened with wash-
er fluid.
Check headlight alignment.
Check muffler, exhaust pipes, shields and clamps.
Check the lap/shoulder belts for wear and function.
Check for worn tires and loose wheel lug nuts.
At least once a year : Clean body and door drain holes.
Lubricate door hinges and checks, andhood hinges.
Lubricate door and hood locks and latches.
Lubricate door rubber weatherstrips.
Check the air conditioning system before the warm weather season.
Check the power steering fluid level.
Inspect and lubricate automatic trans- mission linkage and controls.
Clean battery and terminals.
Check the brake fluid level.