width KIA Sorento 2007 1.G Owner's Manual
[x] Cancel search | Manufacturer: KIA, Model Year: 2007, Model line: Sorento, Model: KIA Sorento 2007 1.GPages: 325, PDF Size: 5.01 MB
Page 105 of 325
Knowing your vehicle96
3
CAUTION
The crossbars should be placed
in the proper load carrying posi-tions prior to placing items ontothe roof rack.
If the vehicle is equipped with a sunroof, be sure not to positioncargo onto the roof rack in such away that it could interfere withsunroof operation.
When carrying cargo on the roof rack, take the necessary precau-tions to make sure the cargo doesnot damage the roof of the vehicle.
When carrying large objects on the roof rack, make sure they donot exceed the overall roof length or width.
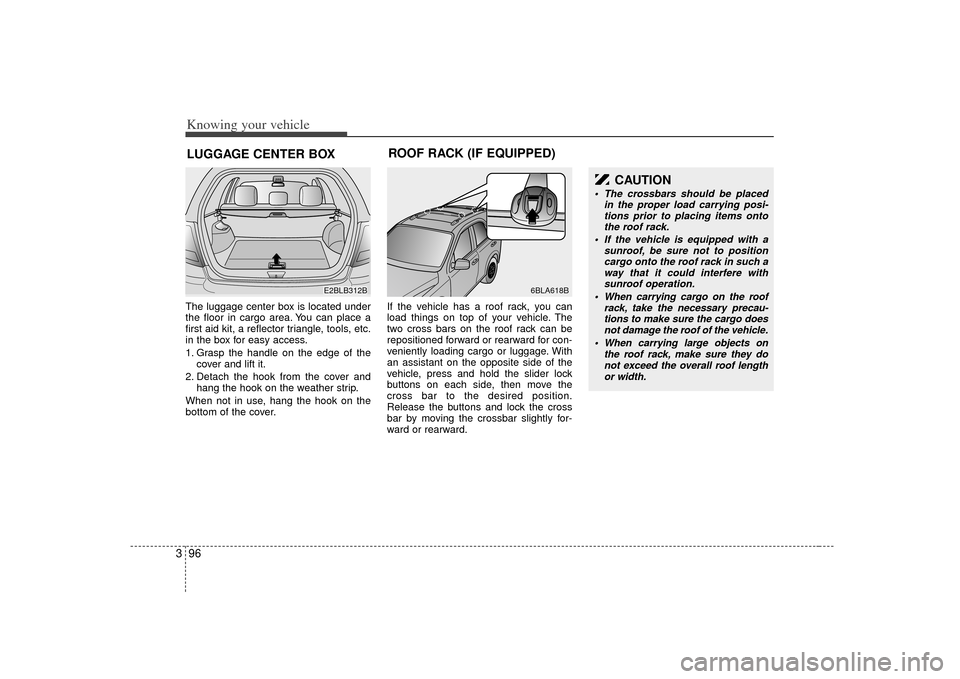
The luggage center box is located under
the floor in cargo area. You can place a
first aid kit, a reflector triangle, tools, etc.
in the box for easy access.
1. Grasp the handle on the edge of the cover and lift it.
2. Detach the hook from the cover and hang the hook on the weather strip.
When not in use, hang the hook on the
bottom of the cover. If the vehicle has a roof rack, you can
load things on top of your vehicle. The
two cross bars on the roof rack can be
repositioned forward or rearward for con-
veniently loading cargo or luggage. With
an assistant on the opposite side of the
vehicle, press and hold the slider lock
buttons on each side, then move the
cross bar to the desired position.
Release the buttons and lock the cross
bar by moving the crossbar slightly for-
ward or rearward.LUGGAGE CENTER BOX
E2BLB312B
6BLA618B
ROOF RACK (IF EQUIPPED)
Page 229 of 325
521
Driving tips
Stalling downhillStalling is much more likely to happen
going uphill. But if it happens going
downhill, here’s what to do.
Stop your vehicle by applying thebrakes. Then apply the parking brake.
Move the shift lever to P (Park) in auto- matic transmission or shift to N
(Neutral) in manual transmission and,
while still braking, restart the engine.
Shift back to a low gear, release the parking brake, and drive straight down.
If the engine won’t start, get out and seek help. Exit on the uphill side of the
vehicle and stay clear of the path the
vehicle would take if it rolled downhill.
Driving across an inclineSooner or later, an off-road trail will prob-
ably go across the incline of a hill. If this
happens, you have to decide whether or
not to try to drive across the incline. Here
are some things to consider:
A hill that can be driven straight up ordown may be too steep to drive across.
When you go straight up or down a hill,
the length of the wheel base (the dis-
tance from the front wheels to the rear
wheels) reduces the likelihood the
vehicle will tumble end over end. But
when you drive across an incline, the
much narrower track width (the dis-
tance between the left and right
wheels) may not prevent the vehicle
from tilting and rolling over. Also, driv-
ing across an incline puts more weight
on the downhill wheels. This could
cause a downhill slide or a rollover.
Surface conditions can be a problem when you drive across a hill. Loose
gravel, muddy spots, or even wet grass
can cause your tires to slip sideways. If
the vehicle slips sideways, it can hit
something that will tip it (a rock, a rut,
etc.) and cause it to roll over. Hidden obstacles can make the steep-
ness of the incline even worse. If you
drive across a rock with the uphill
wheels, or if the downhill wheels drop
into a rut or depression, your vehicle
can tilt even more.
For reasons like these, you need to
decide carefully whether or not to try to
drive across an incline. Just because the
trail goes across the incline doesn’t
mean you have to drive it.
WARNING
- Roll over
Driving across an incline that’s too
steep will make your vehicle roll
over. You could be seriously or
fatally injured. If you have any
doubt about the steepness of the
incline, don’t drive across it. Find
another route instead.
Page 303 of 325
Maintenance30
7Wheel replacement When replacing the metal wheels for
any reason, make sure the new
wheels are equivalent to the original
factory units in diameter, rim width
and offset.
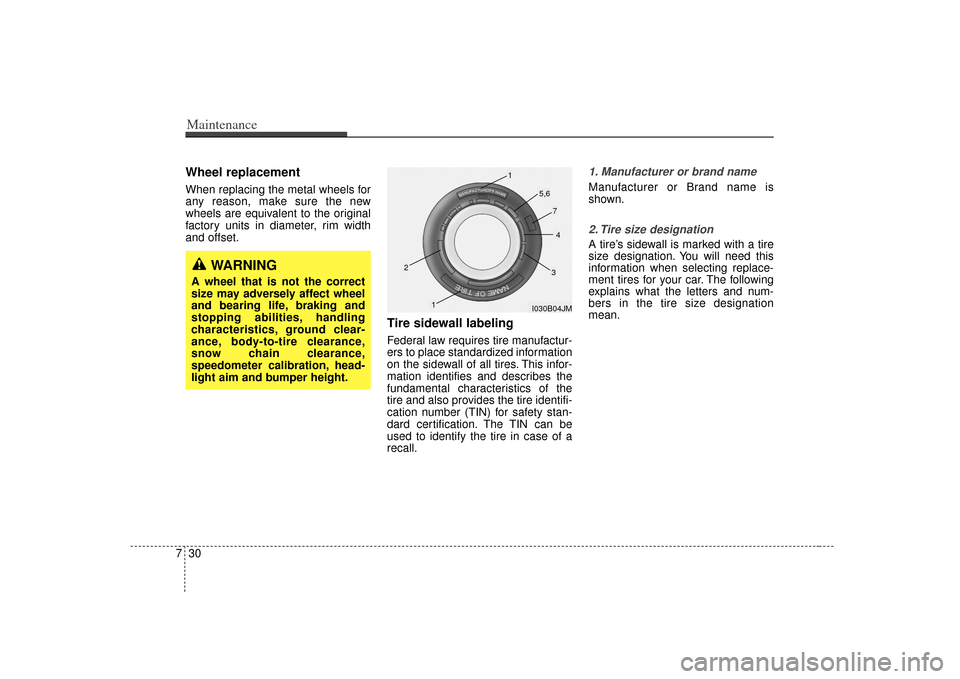
Tire sidewall labelingFederal law requires tire manufactur-
ers to place standardized information
on the sidewall of all tires. This infor-
mation identifies and describes the
fundamental characteristics of the
tire and also provides the tire identifi-
cation number (TIN) for safety stan-
dard certification. The TIN can be
used to identify the tire in case of a
recall.
1. Manufacturer or brand nameManufacturer or Brand name is
shown.2. Tire size designation A tire’s sidewall is marked with a tire
size designation. You will need this
information when selecting replace-
ment tires for your car. The following
explains what the letters and num-
bers in the tire size designation
mean.
WARNING
A wheel that is not the correct
size may adversely affect wheel
and bearing life, braking and
stopping abilities, handling
characteristics, ground clear-
ance, body-to-tire clearance,
snow chain clearance,
speedometer calibration, head-
light aim and bumper height.
I030B04JM
1
1
2
34
5,6
7
Page 304 of 325
731
Maintenance
Example tire size designation:
(These numbers are provided as an
example only; your tire size designa-
tor could vary depending on your
vehicle.)
P245/70R16 106T
P - Applicable vehicle type (tiresmarked with the prefix “P’’ are
intended for use on passenger
cars or light trucks; however, not
all tires have this marking).
245 - Tire width in millimeters.
70 - Aspect ratio. The tire’s section height as a percentage of its
width.
R - Tire construction code (Radial).
16 - Rim diameter in inches.
106 - Load Index, a numerical code associated with the maximum
load the tire can carry.
T - Speed Rating Symbol. See the speed rating chart in this section
for additional information. Wheel size designation
Wheels are also marked with impor-
tant information that you need if you
ever have to replace one. The follow-
ing explains what the letters and
numbers in the wheel size designa-
tion mean.
Example wheel size designation:
7.0 JJX16
7.0 - Rim width in inches.
JJ - Rim contour designation.
16 - Rim diameter in inches.
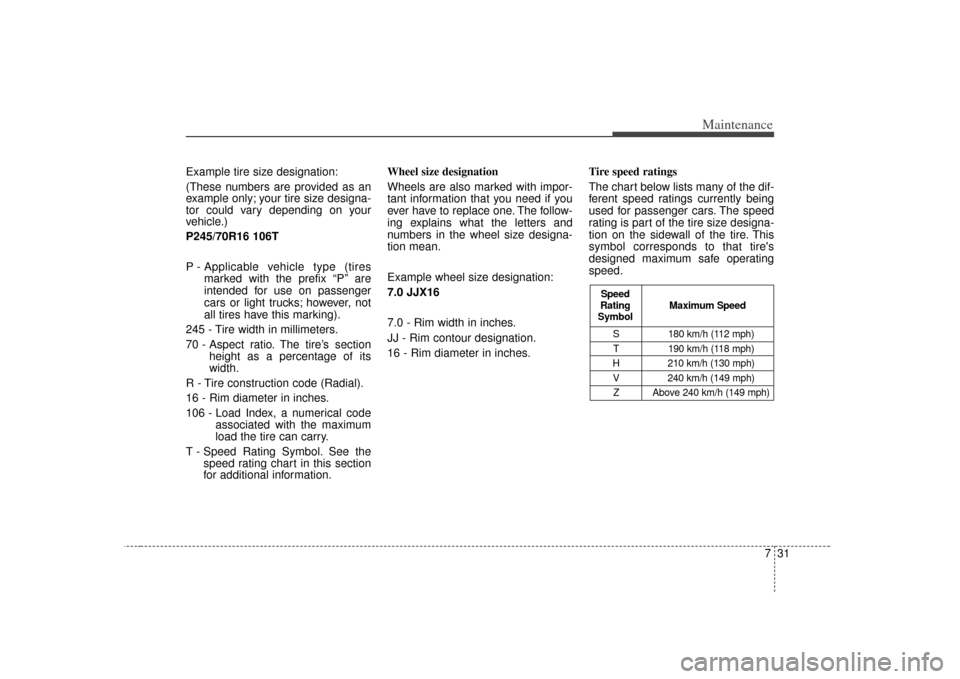
Tire speed ratings
The chart below lists many of the dif-
ferent speed ratings currently being
used for passenger cars. The speed
rating is part of the tire size designa-
tion on the sidewall of the tire. This
symbol corresponds to that tire's
designed maximum safe operating
speed.
S 180 km/h (112 mph)
T 190 km/h (118 mph)
H 210 km/h (130 mph) V 240 km/h (149 mph)Z Above 240 km/h (149 mph)
Maximum Speed
Speed
Rating
Symbol
Page 307 of 325
Maintenance34
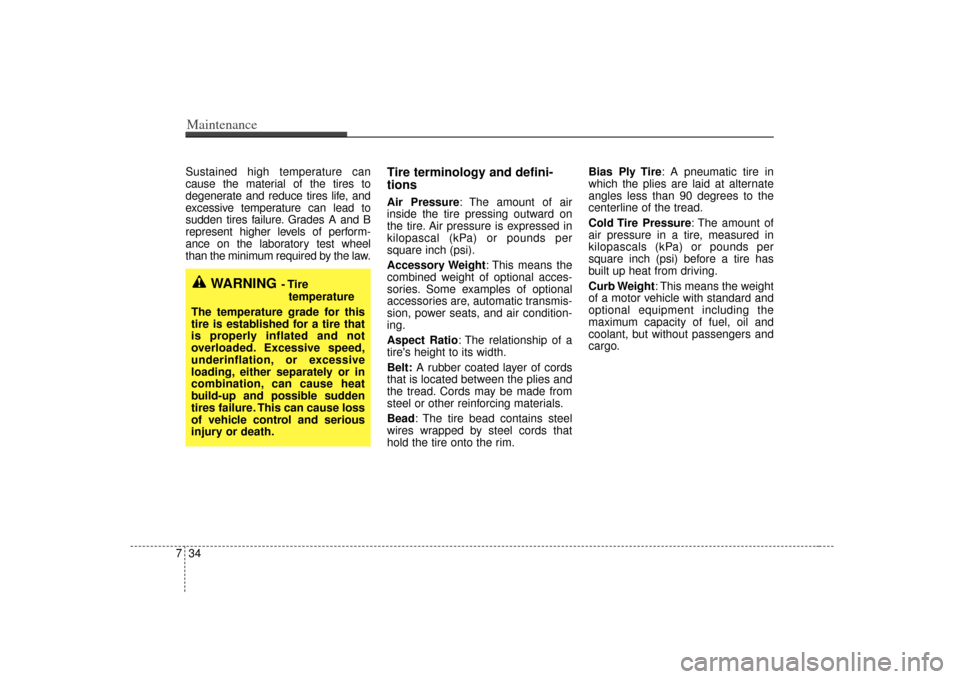
7Sustained high temperature can
cause the material of the tires to
degenerate and reduce tires life, and
excessive temperature can lead to
sudden tires failure. Grades A and B
represent higher levels of perform-
ance on the laboratory test wheel
than the minimum required by the law.
Tire terminology and defini-
tionsAir Pressure: The amount of air
inside the tire pressing outward on
the tire. Air pressure is expressed in
kilopascal (kPa) or pounds per
square inch (psi).
Accessory Weight : This means the
combined weight of optional acces-
sories. Some examples of optional
accessories are, automatic transmis-
sion, power seats, and air condition-
ing.
Aspect Ratio : The relationship of a
tire's height to its width.
Belt: A rubber coated layer of cords
that is located between the plies and
the tread. Cords may be made from
steel or other reinforcing materials.
Bead: The tire bead contains steel
wires wrapped by steel cords that
hold the tire onto the rim. Bias Ply Tire
: A pneumatic tire in
which the plies are laid at alternate
angles less than 90 degrees to the
centerline of the tread.
Cold Tire Pressure: The amount of
air pressure in a tire, measured in
kilopascals (kPa) or pounds per
square inch (psi) before a tire has
built up heat from driving.
Curb Weight: This means the weight
of a motor vehicle with standard and
optional equipment including the
maximum capacity of fuel, oil and
coolant, but without passengers and
cargo.
WARNING
- Tire
temperature
The temperature grade for this
tire is established for a tire that
is properly inflated and not
overloaded. Excessive speed,
underinflation, or excessive
loading, either separately or in
combination, can cause heat
build-up and possible sudden
tires failure. This can cause loss
of vehicle control and serious
injury or death.
Page 319 of 325
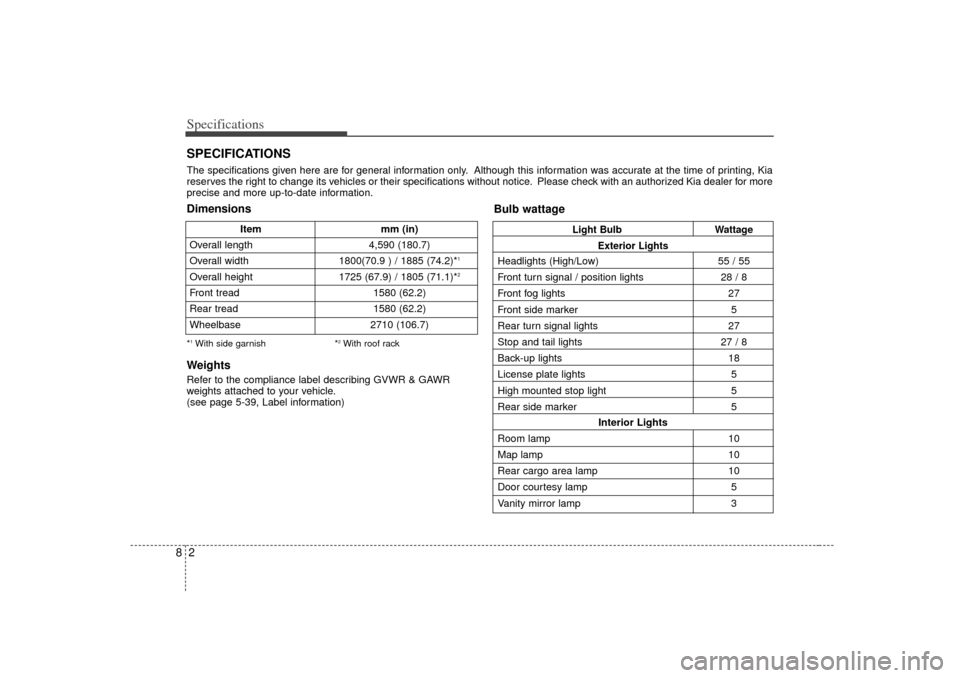
Specifications28SPECIFICATIONSThe specifications given here are for general information only. Although this information was accurate at the time of printing, Kia
reserves the right to change its vehicles or their specifications without notice. Please check with an authorized Kia dealer for more
precise and more up-to-date information.
Item mm (in)
Overall length 4,590 (180.7)
Overall width 1800(70.9 ) / 1885 (74.2)*
1
Overall height 1725 (67.9) / 1805 (71.1)*
2
Front tread 1580 (62.2)
Rear tread 1580 (62.2)
Wheelbase 2710 (106.7)Dimensions
Bulb wattage*1With side garnish*
2With roof rack
WeightsRefer to the compliance label describing GVWR & GAWR
weights attached to your vehicle.
(see page 5-39, Label information)
Light BulbWattage
Exterior Lights
Headlights (High/Low) 55 / 55
Front turn signal / position lights 28 / 8
Front fog lights 27
Front side marker 5
Rear turn signal lights 27
Stop and tail lights 27 / 8
Back-up lights 18
License plate lights 5
High mounted stop light 5
Rear side marker 5
Interior Lights
Room lamp 10
Map lamp 10
Rear cargo area lamp 10
Door courtesy lamp 5
Vanity mirror lamp 3