KIA Sorento 2009 2.G Owner's Manual
Manufacturer: KIA, Model Year: 2009, Model line: Sorento, Model: KIA Sorento 2009 2.GPages: 327, PDF Size: 5.03 MB
Page 121 of 327
Knowing your vehicle112
3Model D465
You can load one or more CDs (maxi-
mum of 6) into the CD changer through
the CD loading slot. To do so:
1. Press the Load button to load 1 CD.
The LCD screen displays the number
assigned to the CD as a flashing num-
ber. For example, if the CD changer
currently contains 4 CDs, the loaded
disc will be CD 5.
OR
Press and hold the Load button for
more than 2 seconds to load more than
1 CD.
The LCD screen displays empty slots
in the CD changer as flashing num-
bers.
2. The LCD screen displays the instruc- tions for loading one or more CDs.
Follow the instructions - Wait, Insert
CD1, Loading CD 1, Reading CD1,…
Reading CD6.
3. Once you have finished loading the CD or CDs, the CD player automatically
plays the first track of the last CD
loaded.
If the audio system was in Radio mode
while you were loading the CDs, it
automatically switches to CD player
mode.
✽ ✽ NOTICEThe LCD screen displays Changer Full
to indicate that the CD changer is full.
Do not try to load any other disc.2. Ejecting CDsModel D445
Press the CD EJECT ( ) button to
eject the CD in the CD player.
Model D465
Press the button once to eject the
last CD played.
Press and hold button for more than
2 seconds to eject all the CDs in the
changer in sequence beginning with the
last CD played.✽ ✽NOTICEYou can eject discs without switching on
the audio system using the Power ON-
OFF knob.
To eject 1 CD:
Press the EJECT button once.
If you are playing a CD, playback will
automatically switch to the next available
CD.
The LCD screen displays the number of
the CD ejected as a flashing number.
If there are no other disc left in the CD
changer, the audio system automatically
switches to Radio mode and resumes
with the last channel or frequency select-
ed.
OR
If the audio system is in Radio mode, the
last CD played will be ejected.
The LCD screen displays the number of
the CD ejected as a flashing number.
To eject all CDs:
Press and hold the EJECT button for
more than 2 seconds to eject all the CDs
in the CD changer.
The LCD screen displays the CDs being
ejected in the CD changer as flashing
numbers. The CDs are ejected in
sequence. Follow the instructions dis-
played on the LCD screen to remove all
CDs from the changer.
Page 122 of 327
3 113
Knowing your vehicle
✽
✽NOTICEIf the audio system is in Radio mode,
you can eject CDs without interrupting
the operation of the radio. 3. Selecting a disc to playModel D445
Only the CD loaded in the player can be
played.
Model D465
You can select any disc loaded in the CD
changer for playback.
To do so:
Press the corresponding CD selector
button (1~6).
The CD changer automatically loads the
selected CD and begins playback of the
first track.
The LCD screen displays the selected
CD as a flashing number.
4. Selecting and playing tracks
(songs)To select tracks, you can use one of 3
methods:
Method 1:
Press the Track Up or Track Down but-
ton repeatedly until you find the track you
want.
Method 2:
Rotate the File Search knob to scroll to
the track you want. The number counter
in the LCD screen shows you the track
number.
Press the File Search knob to ENTER
your selection and begin playback. Method 3 (only for MP3 and WMA
CDs):
Press the DIR Up
or Down buttons
repeatedly to switch to the directory you
want on the CD.
The LCD screen displays the name of
the directory you have switched to.
Rotate the File Search knob to scroll to
the track you want in the selected direc-
tory. The number counter in the LCD
screen shows you the track number.
Press the File Search knob to ENTER
your selection and begin playback.
Page 123 of 327
Knowing your vehicle114
35. Using the Repeat function (RPT
button)To repeat playback of the current
track:
Press the RPT button once. The LCD
screen displays RPT to indicate that it is
in REPEAT mode. Playback of the cur-
rent track will be repeated.
Press the RPT button again to resume
normal playback. The RPT indicator is
cleared.
To repeat playback of all tracks on the
current CD/File Directory:
Press and hold the RPT button for more
than 2 seconds. The LCD screen dis-
plays RPT ALL to indicate that it is in
REPEAT ALL mode. The tracks of the
current audio CD or the tracks in the cur-
rent MP3 file directory will be repeated.
Press the RPT button again to resume
normal playback. The RPT ALL indicator
is cleared.
6. Using the Random playback func- tion (RDM button)For random playback in audio CDs
(also applies to current MP3 file direc-
tory):
Press the RDM button once. The LCD
screen displays RDM to indicate that it is
in RANDOM mode. Tracks on the current
audio CD/MP3 directory will be randomly
selected and played.
Press the RDM button again to resume
normal playback. The RDM indicator is
cleared. Normal playback resumes.
For random playback of all tracks on a
CD (only for MP3 and WMA CDs):
Press and hold the RDM button for more
than 2 seconds. The LCD screen dis-
plays RDM ALL to indicate that it is in
RANDOM ALL mode. Tracks from all
directories in the MP3/WMA CD will be
randomly selected and played.
Press the RDM button again to resume
normal playback. The RDM ALLindicator
is cleared.
7. Using the Bookmark function (MARK button) The Bookmark function allows you to
select and add up to 20 tracks from any
CD in the CD changer to a playlist (mark-
list). You can then play the tracks on the
playlist whenever you want.
Adding tracks to the playlist (mark-
list):
1. Play the track you want.
2. Press and hold the MARK button for
more than 2 seconds to add the cur-
rent track to the playlist (marklist). The
LCD screen displays MARK to indicate
that the track has been added to the
playlist (marklist).
3. Repeat steps 1 & 2 to add more tracks to the marklist (maximum of 20 book-
marks.)
Page 124 of 327
3 115
Knowing your vehicle
Playing tracks on the playlist (mark-
list):
1. Press the MARKbutton once. The
LCD screen displays MARK to indicate
that it is in bookmark mode and auto-
matically begins playback of the tracks
saved on the playlist (marklist) in
sequence.
2. Press the MARK button again to
resume normal playback. The MARK
indicator is cleared. Normal playback
resumes.
Deleting tracks from the playlist
(marklist):
1. Press the MARK button once. The
LCD screen displays MARK to indicate
that it is in bookmark mode and auto-
matically begins playback of the tracks
saved on the playlist (marklist) in
sequence.
2. Select the track you want to remove. (See Selecting and playing tracks
(songs))
3. Press and hold the MARK button for
more than 2 seconds. The LCD screen
displays TRACK DELETED to confirm
that the bookmark has been deleted. Deleting all tracks from the playlist
(marklist):
1. Press the MARK
button once. The
LCD screen displays MARK to indicate
that it is in bookmark mode and auto-
matically begins playback of the tracks
saved on the playlist (marklist) in
sequence.
2. Press and hold the MARK button for
more than 4 seconds. The LCD screen
displays MARKLIST EMPTY to con-
firm that all the bookmarks in the
playlist (marklist) have been deleted.
✽ ✽ NOTICEIf rotate the File Search knob in non-
bookmark mode, LCD screen shall dis-
play MARK indicator for the tracks
saved on the playlist (marklist).
8. Using the file information function*
(INFO button)* This function can only be used withMP3/WMA tracks.
Press the INFO button repeatedly to dis-
play information about the track. The
LCD screen displays the File Name,
Artiste Name and Song Title in
sequence.✽ ✽ NOTICEThe information (File Name, Artiste
Name and Song Title) available for dis-
play depends on the information the
MP3/WMA file was encoded with. If the
relevant information was not included
when the file was encoded, you will not
be able to see it.
Page 125 of 327
Knowing your vehicle116
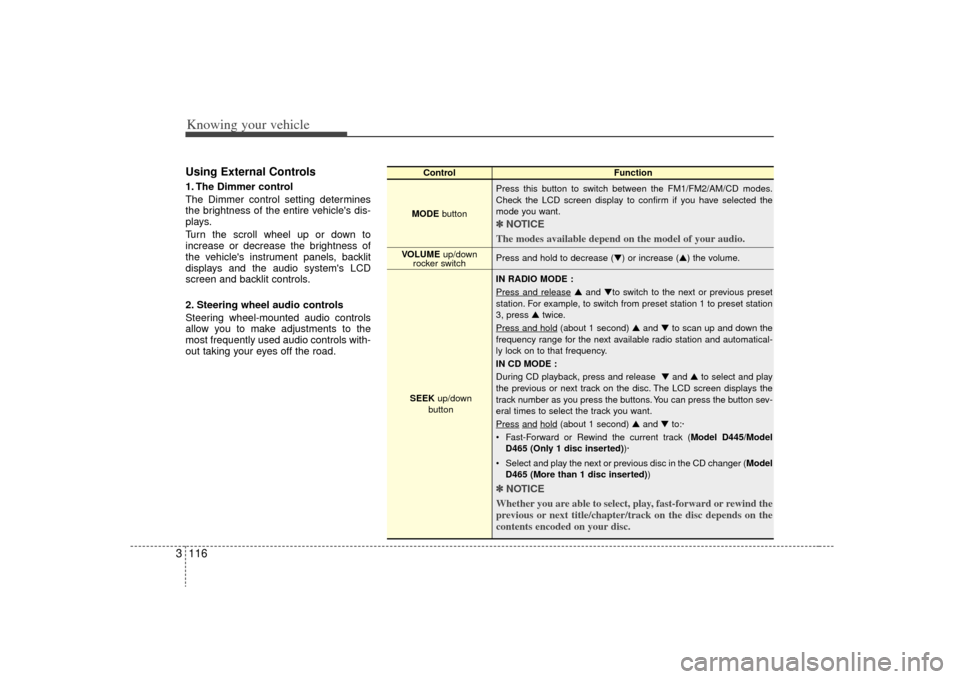
3Using External Controls1. The Dimmer control
The Dimmer control setting determines
the brightness of the entire vehicle's dis-
plays.
Turn the scroll wheel up or down to
increase or decrease the brightness of
the vehicle's instrument panels, backlit
displays and the audio system's LCD
screen and backlit controls.
2. Steering wheel audio controls
Steering wheel-mounted audio controls
allow you to make adjustments to the
most frequently used audio controls with-
out taking your eyes off the road.
Control Function
MODE button Press this button to switch between the FM1/FM2/AM/CD modes.
Check the LCD screen display to confirm if you have selected the
mode you want.
✽ ✽
NOTICE
The modes available depend on the model of your audio. Press and hold to decrease (▼) or increase (▲) the volume.
IN RADIO MODE :
Press and release
▲ and ▼to switch to the next or previous preset
station. For example, to switch from preset station 1 to preset station
3, press ▲ twice.
Press and hold
(about 1 second) ▲ and ▼to scan up and down the
frequency range for the next available radio station and automatical-
ly lock on to that frequency.
IN CD MODE :
During CD playback, press and release ▼ and ▲to select and play
the previous or next track on the disc. The LCD screen displays the
track number as you press the buttons. You can press the button sev-
eral times to select the track you want.
Press
and
hold
(about 1 second) ▲ and ▼to:·
Fast-Forward or Rewind the current track ( Model D445/Model
D465 (Only 1 disc inserted) )·
Select and play the next or previous disc in the CD changer (Model D465 (More than 1 disc inserted) )
✽ ✽
NOTICE
Whether you are able to select, play, fast-forward or rewind the
previous or next title/chapter/track on the disc depends on the
contents encoded on your disc.
VOLUME up/down
rocker switch
SEEK up/down
button
Page 126 of 327
3 117
Knowing your vehicle
Troubleshooting Poor Radio
ReceptionProblem:
Fading Signals / Interference /
Increased interference/ Static
FM Broadcasts - The further you move
away from the radio station's transmitting
source (normally within a city or town),
the weaker the signal will be. You might
experience abrupt breaks in transmis-
sion, garbled sound and also static even
though your radio remains tuned to the
same frequency.
AM Broadcasts - Even though AM radio
signals travel further and stronger than
FM radio signals, weather or terrain con-
ditions might adversely affect your radio's
ability to receive the signals.
Solution:
Use your audio system's Scan function to
automatically search for and select
another radio station with good signal
strength. Problem:
High-pitched static, distortion or a
'fluttering' sound (Multi-Path
Cancellation)
Radio stations transmitting on frequen-
cies that are very close to each other
may cause distortion or 'fluttering'. This
effect is known as Multi-Path
Cancellation. This normally occurs when
your tuner is receiving a station's trans-
mission as both direct and 'reflected'
radio signals or when your tuner receives
signals from more than 1 radio station
transmitting on frequencies that are very
close to each other.
Solution:
If the problem is caused by a temporary
deterioration in the signal strength of one
station's transmission, reduce the levels
of your audio system's Treble and Middle
settings to suppress the sound. If the
problem is caused by interference from
another station, select another radio sta-
tion with good and clear signal strength.
Problem:
Interference from another FM radio
broadcast ('station-swapping')
FM radio stations transmit on frequen-
cies that are very close to each other on
the FM band. When you travel further
and further away from a transmitting
source, the signal strength of that trans-
mission decreases. Your radio's ability to
'lock' on to that specific frequency is
affected. This is because your radio is
designed to lock on to the strongest sig-
nal it can detect. Therefore, another radio
station broadcasting on a frequency very
close to your original station could 'inter-
fere' with your reception and you might
start to hear the broadcast of the second
station. You will normally experience this
when you are moving away from a weak
signal and towards a stronger one.
Page 127 of 327
Knowing your vehicle118
3Solution:
Use your audio system's Scan function to
automatically search for and select
another radio station with good signal
strength.
Problem:
Interference caused by cellular
phones and 2-way radios
Operating cellular phones and 2-way
radios inside or within close proximity of
your car may interfere with your radio
reception. You may hear static, clicks,
sounds or other types of white noise from
your speakers.
Solution:
Cease operation of cellular phone or 2-
way radios. Alternatively, move away
from your car. The interference to your
radio reception should be reduced.
Caring for your Audio SystemYour audio system contains sophisticat-
ed electronics and precision-engineered
parts and components that are not user-
serviceable. To ensure trouble-free oper-
ation, please observe the following pre-
cautions:1. General Use and OperationYour audio system contains precision
electronic components that are tempera-
ture-, moisture-, and static-sensitive. You
should take care not to subject your
audio system to extremes in tempera-
tures or moisture. For example, if you
have parked your car in the sun, the inte-
rior of the car could be very hot. Ventilate
the car to reduce the interior temperature
before trying to operate the audio sys-
tem.
Never try to insert anything other than
properly formatted CDs into the CD play-
er. Foreign objects can cause the deli-
cate mechanism to jam and render your
CD player unusable. You must also follow
the instructions displayed on your audio
system's LCD screen.
For example, if your audio system is dis-
playing "Wait", you should never try to
force-load a CD into the CD player.
WARNING
• Your car's electrical systems con-
tain sensitive electronics compo-
nents. Interference from cellular
phones, 2-way radios and other
transmitting devices could
adversely affect the safe opera-
tion of your vehicle. This could
compromise the safety of both
the driver and other passengers
in the vehicle.
When using cellular phones, 2- way radios and other transmitting
devices in your vehicle, always
use a separate external antenna.
For restrictions on the use of
communications and transmitting
devices, please consult the rele-
vant product documentation.
Local laws may prohibit the use of cellular phones while driving. If
you need to make or answer a call
while driving, please stop the
vehicle in a safe place before pro-
ceeding.
Page 128 of 327
3 119
Knowing your vehicle
2. Your audio system's CD playerYour audio system includes a CD player
that allows you to play audio CDs, MP3
and WMA CDs. To ensure trouble-free
operation, please observe the following
precautions:
Caring for your CDs (Audio, MP3and WMA discs)
- Always hold and carry a CD by itsedges to prevent scratching the disc.
Fingerprints or dirt on the disc sur-
face may cause skips or other errors
during playback
- If your CDs become dirty, clean it with a mild detergent and water and wipe
it dry with a soft, lint-free cloth.
- Never clean your CDs using corrosive or volatile cleaning agents such as
benzene, thinner or cleaning sprays
meant for vinyl records. CD formats
Whether or not a CD can be played in
your CD player depends on how the
information on the CD has been
encoded. Some CDs may be incom-
patible with your CD player and cannot
be played back. For example, some
types of copy-protected audio CDs
which do not comply with the industry-
standard Red Book format may not be
played back. This does not indicate a
fault with your CD player. Please verify
that the encoding on your CD is com-
patible with your CD player. Consult the
CD's documentation for more details.
CAUTION
The creation and use of MP3 music files are governed by copy-right legislation that may be spe-cific to the country/district you reside in.
Specific copyrights attached to works may also govern their pos-session and use. Please observeall applicable copyright laws inthe operation and use of youraudio system’s CD player.
Page 129 of 327
4
Ignition switch / 4-2
Starting the engine / 4-4
Automatic transmission / 4-5
Four wheel drive (4WD) / 4-10
Limited slip differential / 4-19
Brake system / 4-20
Steering wheel / 4-25
Cruise control system / 4-27
Electronic stability control / 4-30
Rear parking assist system / 4-33
Instrument cluster / 4-36
Gauges / 4-37
Warnings and indicators / 4-39
Multi-meter / 4-45
Lighting / 4-51
Wipers and washers / 4-54
Defroster / 4-57
Hazard warning flasher / 4-58
Manual climate control system / 4-59
Automatic climate control system / 4-66
Windshield defrosting and defogging / 4-75
Driving your vehicle
Page 130 of 327
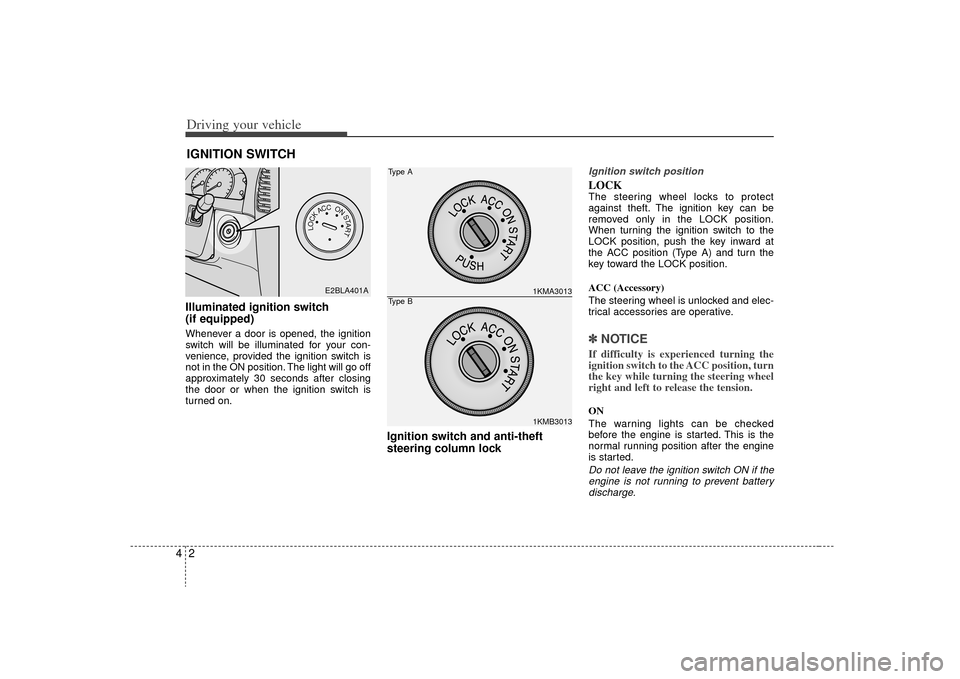
Driving your vehicle24Illuminated ignition switch
(if equipped)Whenever a door is opened, the ignition
switch will be illuminated for your con-
venience, provided the ignition switch is
not in the ON position. The light will go off
approximately 30 seconds after closing
the door or when the ignition switch is
turned on.
Ignition switch and anti-theft
steering column lock
Ignition switch positionLOCKThe steering wheel locks to protect
against theft. The ignition key can be
removed only in the LOCK position.
When turning the ignition switch to the
LOCK position, push the key inward at
the ACC position (Type A) and turn the
key toward the LOCK position.
ACC (Accessory)
The steering wheel is unlocked and elec-
trical accessories are operative.✽ ✽
NOTICEIf difficulty is experienced turning the
ignition switch to the ACC position, turn
the key while turning the steering wheel
right and left to release the tension.ON
The warning lights can be checked
before the engine is started. This is the
normal running position after the engine
is started.Do not leave the ignition switch ON if the
engine is not running to prevent batterydischarge.
IGNITION SWITCH
PUSH
LOCKACCONSTART
E2BLA401A
1KMA30131KMB3013
Type AType B