automatic KIA Sorento 2012 2.G Owner's Manual
[x] Cancel search | Manufacturer: KIA, Model Year: 2012, Model line: Sorento, Model: KIA Sorento 2012 2.GPages: 388, PDF Size: 7.56 MB
Page 5 of 388

Index2I
Air bags··················\
··················\
··················\
··················\
··3-41Air bag warning label··················\
··················\
············3-67
Air bag warning light ··················\
··················\
············3-44
Curtain air bag··················\
··················\
··················\
·····3-59
Driver's and passenger's front air bag ··················\
·····3-53
Occupant detection system··················\
··················\
····3-47
Side impact air bag··················\
··················\
················3-57
Air cleaner ··················\
··················\
··················\
···············7-25
Alarm system ··················\
··················\
··················\
···········4-13
Antenna ··················\
··················\
··················\
··················\
4-106
Anti-lock brake system (ABS) ··················\
··················\
··5-30
Appearance care··················\
··················\
··················\
·······7-58 Exterior care ··················\
··················\
··················\
········7-58
Interior care ··················\
··················\
··················\
·········7-63
Armrest ··················\
··················\
··················\
··················\
··3-20
Audio system ··················\
··················\
··················\
·········4-106 Antenna ··················\
··················\
··················\
·············4-106
Steering wheel audio control ··················\
················4-107
Auto lock mode (Passenger seat belt) ··················\
·········3-36
Automatic climate control system ··················\
···············4-87 Air conditioning ··················\
··················\
··················\
··4-93
Automatic heating and air conditioning··················\
··4-88
Manual heating and air conditioning ··················\
······4-89
Automatic transaxle ··················\
··················\
··················\
·5-15 Ignition key interlock system ··················\
··················\
5-19
Shift lock system ··················\
··················\
··················\
·5-18
Sports mode··················\
··················\
··················\
·········5-17 Battery··················\
··················\
··················\
··················\
····7-33
Battery saver function··················\
··················\
················4-67
Before driving ··················\
··················\
··················\
············5-3
Bottle holders, see cup holders ··················\
··················\
4-100
Brake system··················\
··················\
··················\
············5-27
Anti-lock brake system (ABS) ··················\
················5-30
Electronic stability control (ESC) ··················\
···········5-32
Parking brake ··················\
··················\
··················\
······5-28
Power brakes ··················\
··················\
··················\
·······5-27
Brake/clutch fluid ··················\
··················\
··················\
····7-22
Bulb wattage ··················\
··················\
··················\
··············8-2
Capacities (Lubricants) ··················\
··················\
················8-4
Care Exterior care ··················\
··················\
··················\
········7-58
Interior care ··················\
··················\
··················\
·········7-63
Tire care ··················\
··················\
··················\
··············7-36
Cargo capacity ··················\
··················\
··················\
·········5-63
Cargo weight··················\
··················\
··················\
············5-67
Center console storage ··················\
··················\
···············4-98
Central door lock switch··················\
··················\
············4-17
Certification label ··················\
··················\
··················\
····5-65
Changing tires ··················\
··················\
··················\
············6-9A
BC
XM CAN (ENG) INDEX.QXP 4/19/2011 10:59 AM Page 2
Page 6 of 388

I3
Index
ChainsSafety chains ··················\
··················\
··················\
·······5-54
Checking tire inflation pressure··················\
··················\
·7-37
Child restraint system ··················\
··················\
················3-33 Auto lock mode (Passenger seat belt) ··················\
·····3-36
Lower anchor system ··················\
··················\
············3-39
Tether anchor system ··················\
··················\
············3-38
Child-protector rear door lock ··················\
··················\
···4-18
Climate control system (Automatic) ··················\
···········4-87 Air conditioning ··················\
··················\
··················\
··4-93
Automatic heating and air conditioning··················\
··4-88
Manual heating and air conditioning ··················\
······4-89
3rd row air conditioning··················\
··················\
········4-83
Climate control system (Manual) ··················\
···············4-78 Air conditioning ··················\
··················\
··················\
··4-83
Heating and air conditioning··················\
··················\
·4-79
3rd row air conditioning··················\
··················\
········4-83
Climate control air filter··················\
··················\
···4-86, 7-27
Clock (Digital) ··················\
··················\
··················\
·······4-102
Combined instrument, see instrument cluster ···············4-48
Compact spare tire ··················\
··················\
··················\
···6-14
Compact spare tire replacement ··················\
··················\
7-41
Coolant ··················\
··················\
··················\
··················\
···7-19
Cooling fluid, see engine coolant ··················\
················7-19
Crankcase emission control system ··················\
·············7-64
Cruise control system ··················\
··················\
················5-39
Cup holder ··················\
··················\
··················\
·············4-100
Curtain air bag ··················\
··················\
··················\
·········3-59 Dashboard, see instrument cluster ··················\
···············4-48
Dashboard illumination, see instrument
panel illumination··················\
··················\
··················\
4-49
Defogging (Windshield) ··················\
··················\
············4-95
Defogging logic (Windshield) ··················\
··················\
···4-96
Defroster (Rear window) ··················\
··················\
···········4-77
Defrosting (Windshield) ··················\
··················\
············4-95
Digital clock··················\
··················\
··················\
···········4-102
Dimensions ··················\
··················\
··················\
················8-2
Display illumination, see instrument panel illumination··················\
··················\
··················\
4-49
Displays, see instrument cluster ··················\
··················\
4-48
Door locks··················\
··················\
··················\
················4-15 Central door lock switch ··················\
··················\
·······4-17
Child-protector rear door lock ··················\
················4-18
Drinks holders, see cup holders··················\
·················4-10\
0
Driver position memory system ··················\
··················\
4-34
Driver's air bag··············\
··················\
··················\
·············3-53
Driving at night··················\
··················\
··················\
········5-47
Driving in flooded areas ··················\
··················\
············5-48
Driving in the rain ··················\
··················\
··················\
···5-48
Economical operation ··················\
··················\
················5-43
Electric chromic mirror (ECM) ··················\
··················\
·4-39
DE
XM CAN (ENG) INDEX.QXP 4/19/2011 10:59 AM Page 3
Page 12 of 388

I9
Index
Summer tires ··················\
··················\
··················\
·······7-48
Tire care ··················\
··················\
··················\
··············7-36
Tire maintenance ··················\
··················\
··················\
·7-41
Tire replacement··················\
··················\
··················\
··7-40
Tire rotation··················\
··················\
··················\
·········7-38
Tire sidewall labeling ··················\
··················\
············7-42
Tire terminology and definitions ··················\
············7-46
Tire traction ··················\
··················\
··················\
·········7-41
Wheel alignment and tire balance ··················\
···········7-39
Wheel replacement ··················\
··················\
················7-41
Towing ··················\
··················\
··················\
··················\
···6-16 Emergency towing ··················\
··················\
················6-17
Towing capacity··················\
··················\
··················\
·······5-63
Trailer towing ··················\
··················\
··················\
··········5-53 Hitches··················\
··················\
··················\
·················5-54\
Safety chains ··················\
··················\
··················\
·······5-54
Trailer brakes ··················\
··················\
··················\
······5-54
Weight of the trailer ··················\
··················\
··············5-60
Transaxle Automatic transaxle ··················\
··················\
··············5-15
Manual transaxle ··················\
··················\
··················\
·5-12
Trip computer ··················\
··················\
··················\
··········4-51
Tripmeter ··················\
··················\
··················\
·················4-51\
Vehicle break-in process ··················\
··················\
·············1-5
Vehicle certification label··················\
··················\
············8-7 Vehicle handling instructions ··················\
··················\
······1-5
Vehicle identification number (VIN) ··················\
············8-7
Vehicle load limit ··················\
··················\
··················\
····5-62
Cargo capacity··················\
··················\
··················\
·····5-63
Certification label ··················\
··················\
··················\
5-65
Seating capacity ··················\
··················\
··················\
··5-62
Tire and loading information label ··················\
·········5-62
Towing capacity ··················\
··················\
··················\
··5-63
Vehicle capacity weight ··················\
··················\
········5-62
Vehicle weight glossary··················\
··················\
·············5-67 Base curb weight ··················\
··················\
··················\
·5-67
Cargo weight ··················\
··················\
··················\
·······5-67
GAW (Gross axle weight) ··················\
··················\
····5-67
GAWR (Gross axle weight rating) ··················\
·········5-67
GVW (Gross vehicle weight)··················\
··················\
5-67
GVWR (Gross vehicle weight rating) ··················\
····5-67
Vehicle curb weight ··················\
··················\
··············5-67
Warnings and indicators ··················\
··················\
············4-55
Washer fluid··················\
··················\
··················\
·············7-24
Weight glossary ··················\
··················\
··················\
·······5-67 Base curb weight ··················\
··················\
··················\
·5-67
Cargo weight ··················\
··················\
··················\
·······5-67
GAW (Gross axle weight) ··················\
··················\
····5-67
GAWR (Gross axle weight rating) ··················\
·········5-67
GVW (Gross vehicle weight)··················\
··················\
5-67V
W
XM CAN (ENG) INDEX.QXP 4/19/2011 10:59 AM Page 9
Page 16 of 388
13
Introduction
A020101AHM-EUYour new vehicle is designed to use only
unleaded fuel having a pump octane
number ((R+M)/2) of 87 (Research
Octane Number 91) or higher.
Your new vehicle is designed to obtain
maximum performance with UNLEADED
FUEL, as well as minimize exhaust emis-
sions and spark plug fouling.
A020103AUN-EUGasoline containing alcohol andmethanolGasohol, a mixture of gasoline and
ethanol (also known as grain alcohol),
and gasoline or gasohol containing
methanol (also known as wood alcohol)
are being marketed along with or instead
of leaded or unleaded gasoline.
Do not use gasohol containing more than
10% ethanol, and do not use gasoline or
gasohol containing any methanol. Either
of these fuels may cause drivability prob-
lems and damage to the fuel system.
Discontinue using gasohol of any kind if
drivability problems occur.
Vehicle damage or drivability problems
may not be covered by the manufactur-
er’s warranty if they result from the use
of:
1. Gasohol containing more than 10% ethanol.
2. Gasoline or gasohol containing methanol.
3. Leaded fuel or leaded gasohol.
FUEL REQUIREMENTS
CAUTION
Never add any fuel system cleaning agents to the fuel tank other thanwhat has been specified. (Consultan authorized KIA dealer for details.)
WARNING
• Do not "top off" after the nozzle automatically shuts off when
refueling.
Tighten the cap until it clicks, oth- erwise the Check Engine
light will illuminate.
Always check that the fuel cap is installed securely to prevent fuel
spillage in the event of an acci-
dent.
XM CAN (ENG) 1.QXP 4/19/2011 10:21 AM Page 3
Page 33 of 388
Safety features of your vehicle10
3During mild weather or under conditions
where the operation of the seat heater is
not needed, keep the switches in the
"OFF" position.
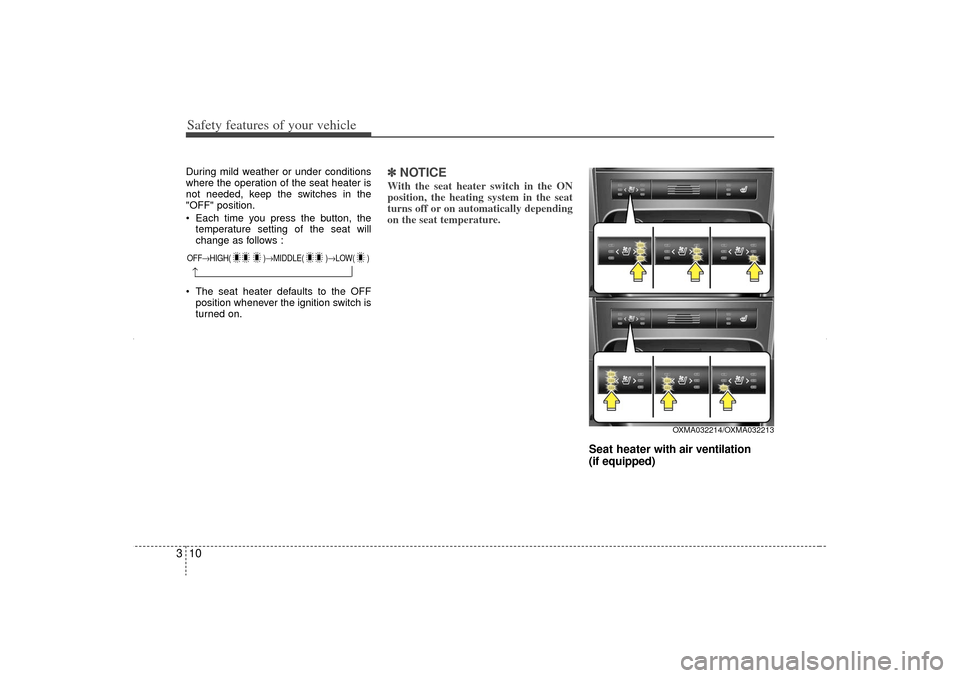
Each time you press the button, the
temperature setting of the seat will
change as follows :
The seat heater defaults to the OFF position whenever the ignition switch is
turned on.
✽ ✽ NOTICEWith the seat heater switch in the ON
position, the heating system in the seat
turns off or on automatically depending
on the seat temperature.
Seat heater w ith air ventilation
(if equipped)
OFF→ HIGH( )→ MIDDLE( )→LOW( )→
OXMA032214/OXMA032213
XM CAN (ENG) 3.QXP 4/19/2011 10:26 AM Page 10
Page 40 of 388
317
Safety features of your vehicle
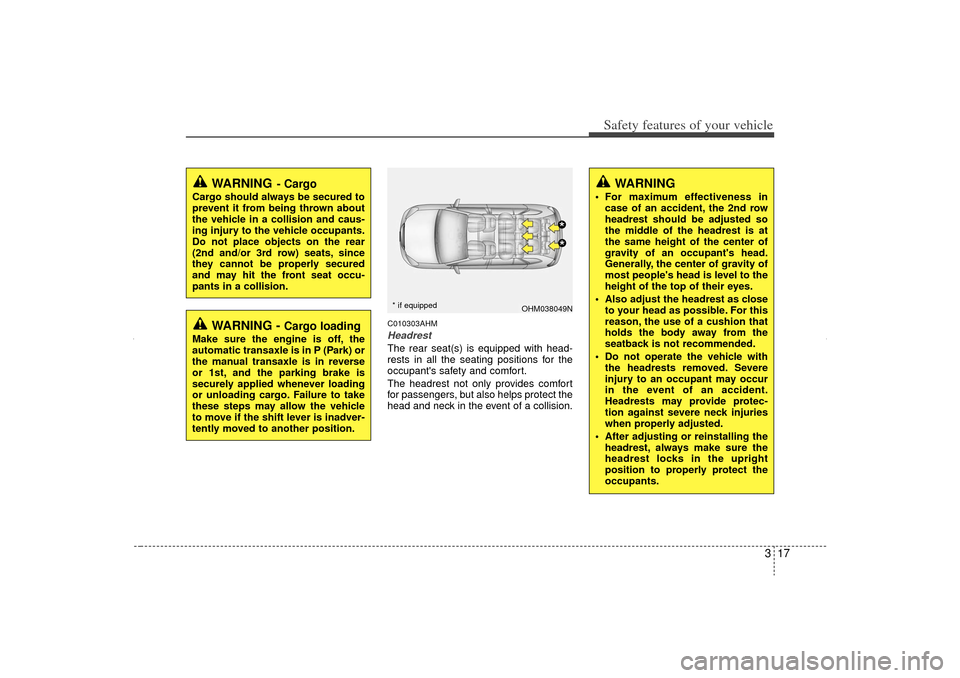
C010303AHMHeadrestThe rear seat(s) is equipped with head-
rests in all the seating positions for the
occupant's safety and comfort.
The headrest not only provides comfort
for passengers, but also helps protect the
head and neck in the event of a collision.
WARNING
- Cargo
Cargo should always be secured to
prevent it from being thrown about
the vehicle in a collision and caus-
ing injury to the vehicle occupants.
Do not place objects on the rear
(2nd and/or 3rd row) seats, since
they cannot be properly secured
and may hit the front seat occu-
pants in a collision.
WARNING -
Cargo loading
Make sure the engine is off, the
automatic transaxle is in P (Park) or
the manual transaxle is in reverse
or 1st, and the parking brake is
securely applied whenever loading
or unloading cargo. Failure to take
these steps may allow the vehicle
to move if the shift lever is inadver-
tently moved to another position.
WARNING
For maximum effectiveness incase of an accident, the 2nd row
headrest should be adjusted so
the middle of the headrest is at
the same height of the center of
gravity of an occupant's head.
Generally, the center of gravity of
most people's head is level to the
height of the top of their eyes.
Also adjust the headrest as close to your head as possible. For this
reason, the use of a cushion that
holds the body away from the
seatback is not recommended.
Do not operate the vehicle with the headrests removed. Severe
injury to an occupant may occur
in the event of an accident.
Headrests may provide protec-
tion against severe neck injuries
when properly adjusted.
After adjusting or reinstalling the headrest, always make sure the
headrest locks in the upright
position to properly protect the
occupants.
OHM038049N
**
* if equipped
XM CAN (ENG) 3.QXP 4/19/2011 10:27 AM Page 17
Page 42 of 388
319
Safety features of your vehicle
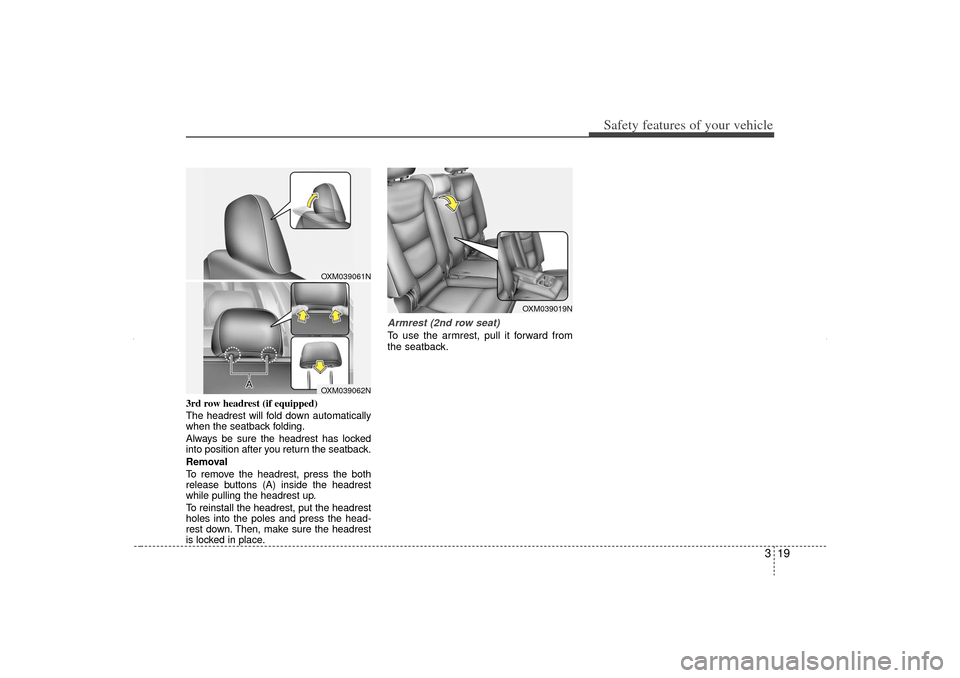
3rd row headrest (if equipped)
The headrest will fold down automatically
when the seatback folding.
Always be sure the headrest has locked
into position after you return the seatback.
Removal
To remove the headrest, press the both
release buttons (A) inside the headrest
while pulling the headrest up.
To reinstall the headrest, put the headrest
holes into the poles and press the head-
rest down. Then, make sure the headrest
is locked in place.
Armrest (2nd row seat)To use the armrest, pull it forward from
the seatback.
OXM039061NOXM039062N
OXM039019N
XM CAN (ENG) 3.QXP 4/19/2011 10:28 AM Page 19
Page 45 of 388
Safety features of your vehicle22
3If the driver's seat belt is not fastened
when the ignition switch is turned on, the
seat belt warning light and the seat belt
warning chime will operate for approxi-
mately 6 seconds. But if it is fastened
within the 6 seconds, the warning light
will blink until the 6 seconds are up. The
warning chime will turn off immediately.
If the driver's seat belt is disconnected
after the ignition switch is turned to the
ON position, the seat belt warning light
and chime will operate for approximately
6 seconds. But if it is fastened within the
6 seconds, the warning light and chime
will turn off immediately. If the driver's
seat belt is not fastened when the vehicle
speed exceeds 10 km/h (6 mph), the
seat belt warning light and chime will
operate for approximately 11 times with a
pattern of 6 seconds on and 24 seconds
off until the belt is fastened or the vehicle
speed decreases below 5 km/h (3 mph).
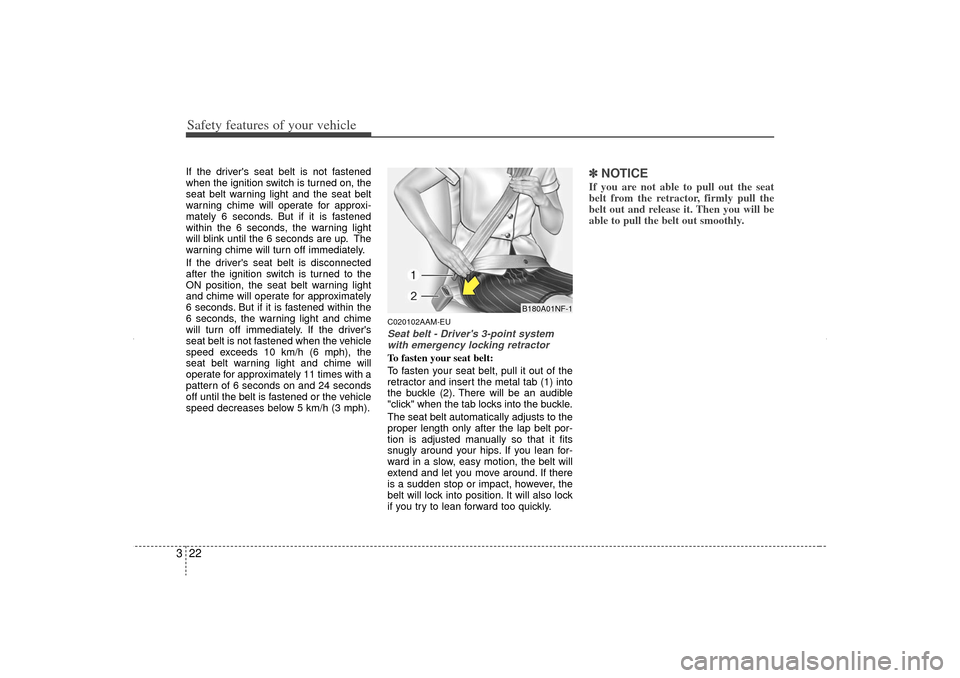
C020102AAM-EUSeat belt - Driver's 3-point system
with emergency locking retractorTo fasten your seat belt:
To fasten your seat belt, pull it out of the
retractor and insert the metal tab (1) into
the buckle (2). There will be an audible
"click" when the tab locks into the buckle.
The seat belt automatically adjusts to the
proper length only after the lap belt por-
tion is adjusted manually so that it fits
snugly around your hips. If you lean for-
ward in a slow, easy motion, the belt will
extend and let you move around. If there
is a sudden stop or impact, however, the
belt will lock into position. It will also lock
if you try to lean forward too quickly.
✽ ✽ NOTICEIf you are not able to pull out the seat
belt from the retractor, firmly pull the
belt out and release it. Then you will be
able to pull the belt out smoothly.
B180A01NF-1
XM CAN (ENG) 3.QXP 4/19/2011 10:28 AM Page 22
Page 47 of 388
Safety features of your vehicle24
3C020106AUNSeat belts - Front passenger and rear
seat 3-point system with combination locking retractorTo fasten your seat belt:
Combination retractor type seat belts are
installed in the rear seat positions to help
accommodate the installation of child
restraint systems. Although a combina-
tion retractor is also installed in the front
passenger seat position, it is strongly
recommended that children always be
seated in the rear seat. NEVER place
any infant restraint system in the front
seat of the vehicle.
This type of seat belt combines the fea-
tures of both an emergency locking
retractor seat belt and an automatic lock-
ing retractor seat belt. To fasten your seat
belt, pull it out of the retractor and insert
the metal tab into the buckle. There will
be an audible "click" when the tab locks
into the buckle. When not securing a
child restraint, the seat belt operates in
the same way as the driver's seat belt
(Emergency Locking Retractor Type). It
automatically adjusts to the proper length
only after the lap belt portion of the seat
belt is adjusted manually so that it fits
snugly around your hips. When the seat belt is fully extended from
the retractor to allow the installation of a
child restraint system, the seat belt oper-
ation changes to allow the belt to retract,
but not to extend (Automatic Locking
Retractor Type). Refer to “Using a child
restraint system” in this section.
✽ ✽
NOTICEAlthough the combination retractor
provides the same level of protection for
seated passengers in either emergency
or automatic locking modes, have the
seated passengers use the emergency
locking feature for improved conven-
ience. The automatic locking function is
intended to facilitate child restraint
installation. To convert from the auto-
matic locking feature to the emergency
locking operation mode, allow the
unbuckled seat belt to fully retract.
CAUTION
Do NOT fold down the left portion of
the rear seat back when the rearcenter seat belt is buckled. ALWAYS UNBUCKLE the rear center seatbelt before folding down the leftportion of the rear seat back. If the rear center seat belt is buckledwhen the left portion of the rear seat back is folded down, distortionand damage to the top portion ofthe seat back and seat belt garnish may result, causing the seat back tolock into the folded down position.
XM CAN (ENG) 3.QXP 4/19/2011 10:28 AM Page 24
Page 60 of 388

337
Safety features of your vehicle
4. Slowly allow the shoulder portion ofthe seat belt to retract and listen for an
audible “clicking” or “ratcheting” sound.
This indicates that the retractor is in
the “Auto Lock” mode. If no distinct
sound is heard, repeat steps 3 and 4. 5. Remove as much slack from the belt
as possible by pushing down on the
child restraint system while feeding the
shoulder belt back into the retractor.
6. Push and pull on the child restraint system to confirm that the seat belt is
holding it firmly in place. If it is not,
release the seat belt and repeat steps
2 through 6.
7. Double check that the retractor is in the “Auto Lock” mode by attempting to
pull more of the seat belt out of the
retractor. If you cannot, the retractor is
in the “Auto Lock” mode.
To remove the child restraint, press the
release button on the buckle and then
pull the lap/shoulder belt out of the
restraint and allow the seat belt to retract
fully. When the seat belt is allowed to
retract to its fully stowed position, the
retractor will automatically switch
from the “Auto Lock” mode to the
emergency lock mode for normal
adult usage.
OEN036104
OEN036103
WARNING
- Auto lock
mode
The lap/shoulder belt automatically
returns to the “emergency lock
mode” whenever the belt is allowed
to retract fully. Therefore, the pre-
ceding seven steps must be fol-
lowed each time a child restraint is
installed.
If the retractor is not in the
Automatic Locking mode, the child
restraint can move when your vehi-
cle turns or stops suddenly. A child
can be seriously injured or killed if
the child restraint is not properly
anchored to the car, including set-
ting the retractor to the Automatic
Locking mode.
XM CAN (ENG) 3.QXP 4/19/2011 10:28 AM Page 37