key KIA SORENTO 2014 Features and Functions Guide
[x] Cancel search | Manufacturer: KIA, Model Year: 2014, Model line: SORENTO, Model: KIA SORENTO 2014Pages: 42, PDF Size: 8.74 MB
Page 3 of 42
Active ECO System* 05
Air Conditioning / Climate Control 22
Audio System - Standard* 16
Audio System - Navigation System* 20
Audio System - UVO System* 19
AUX/USB/iPod® Port & Power Outlets 21
Bluetooth® Wireless Technology 12
Cruise Control* 14
Digital Clock 21
Folding 2nd & 3rd Row Seats* 27
Front Active Headrests 28
PASSENGER AIR BAG OFF Indicator 35
Smart Key* 29
Tire Pressure Monitoring System (TPMS) 05
Windshield/Rear Wipers & Washers* 11
VIDEOS & QR CODES 02INSTRUMENT CLUSTERInstrument Cluster Overview / Indicators & Warning Lights 03Trip Computer / Tripmeter* 04Fuel Efficiency 04Tire Pressure Monitoring System (TPMS) 05Active ECO System* 05DRIVER’S PANELElectronic Stability Control (ESC) 06Blind Spot Detection (BSD) System* 06Hill-Start Assist Control (HAC) 06Hood Release Lever and Latch 06Instrument Panel Dimmer* 07All Wheel Drive (AWD) Transfer Mode* 07Heated Steering Wheel Button* 07Power Windows, Window Lock & Central Door Lock 08Electric/Folding Mirrors* 08Power/Heated Outside Mirrors* 08Engine Start/Stop Button* 08STEERING WHEEL CONTROLSTilt/Telescopic Steering Wheel 09LCD Display Control 09Headlights & High Beams 10Turn Signals & Fog Lights* 10Windshield/Rear Wipers & Washers* 11Bluetooth® Wireless Technology 12Audio Controls 14Cruise Control 14FlexSteer™ Steering Wheel Mode* 15AUDIO SYSTEMStandard Audio System Overview* 16Standard Audio System Operation* 17UVO System* 19Navigation System* 20
CENTER PANELDigital Clock 21AUX/USB/iPod® Port & Power Outlets 21Automatic Climate Control* 22Manual Climate Control* 233rd Row Air Conditioning Control* 23Automatic Gear Shift with Sportmatic® Shifting 24S E AT I N GSeat Warmers/Ventilated Seats* 25Driver Position Memory System* 25Power Adjustable Driver’s Seat* 266-Way Manual Adjustable Driver’s Seat* 26Folding 2nd & 3rd Row Seats* 27Front Active Headrests* 28Front Seat Headrest Adjustment 28OTHER KEY FEATURESRemote Keyless Entry (Folding Key)* 29Double-Turn Lock/Unlock All* 29Smart Key* 29HomeLink® with Auto-Dimming Rearview Mirror* 30Power Tailgate 31Fuel Cap / Malfunction Indicator (Check Engine Light) 31Manual Rear Hatch Release Button 31Map/Room/Dome Lamps 32Sunvisor 32Sunroof Operation* 33Roof Rack* 33 Rear-Camera Display* 34Backup Warning System* 34SAFETYOccupant Detection System (ODS) / PASSENGER AIR BAG OFF Indicator 35Child Safety Locks 35Safety Belts 36LEGAL DISCLAIMERS (See Back Inside Cover Page) MAINTENANCE (See Back Cover)
ESSENTIAL FEATURES
SORENTO FEATURES & FUNCTIONS GUIDE*IF EQUIPPED
Driving while drowsy or distracted is dangerous and should be avoided. Drivers should remain attentive to driving and exercise caution when using vehicle systems while driving.
Page 5 of 42
3ALWAYS CHECK THE OWNER’S MANUAL FOR COMPLETE OPERATING INFORMATION AND SAFET Y WARNINGS
INSTRUMENT CLUSTER
Charging System Warning Light
Cruise SET Indicator
Cruise Indicator
Engine Oil Pressure Warning Light
Low Fuel Level Warning Light
Electronic Brake Force Distribution (EBD) System Warning Light
Electronic Power Steering Warning Light
160140
120
100
80
60
40
20
0
MPH
0
20
40
60
80
100
120
140
160
180
200
220
240
260km/h
8
7
6
5
4
3
2 1
0 EF
C
H
x1000rpm
kmMPGMPH
/100km/hmi.INSTRANGE AVGE/Tc
F
X
!
8
7
6
5
4
3
2 1
0 EF
C
H
x1000rpm
kmMPGMPH
/100km/hmi.INSTRANGE AVGE/Tc
F
X
!
!
MPHkm/hN00
20
40
6080100120
140
16020406080100120140160180200220240260ODO123456160 140
120
100
80
60
40
20
0
MPH
0
20
40
60
80
100
120
140
160
180
200
220
240
260km/h
8
7
6
5
4
3
2 1
0 EF
C
H
x1000rpm
kmMPGMPH
/100km/hmi.INSTRANGE AVGE/Tc
F
X
!
8
7
6
5
4
3
2 1
0 EF
C
H
x1000rpm
kmMPGMPH
/100km/hmi.INSTRANGE AVGE/Tc
F
X
!
!
MPHkm/hN00
20
40
6080100120
140
16020406080100120140160180200220240260ODO123456
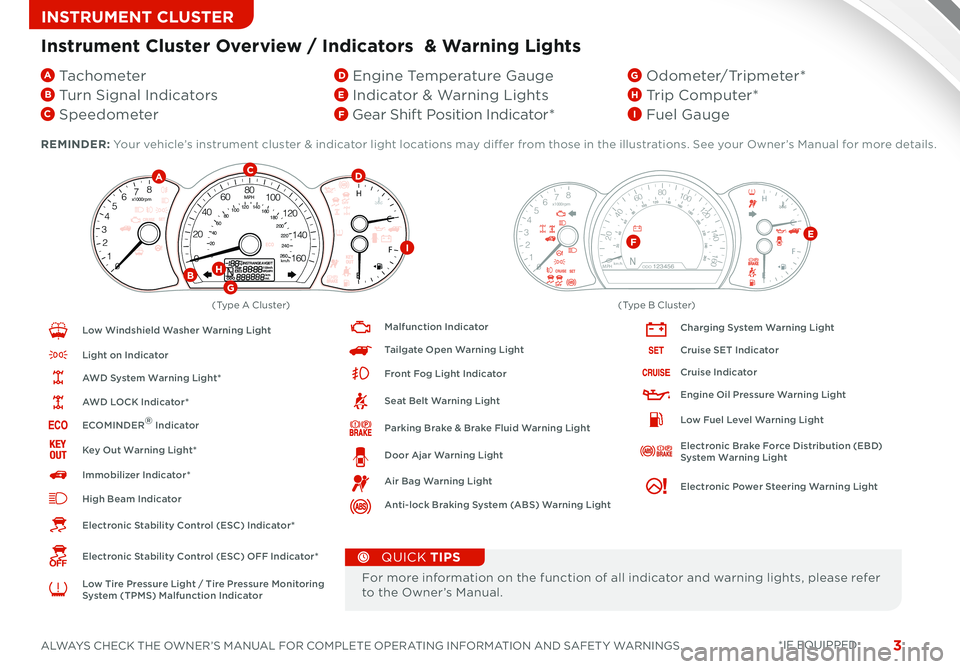
REMINDER: Your vehicle’s instrument cluster & indicator light locations may differ from those in the illustrations See your Owner’s Manual for more details
Instrument Cluster Overview / Indicators & Warning Lights
A Tachometer
B Turn Signal Indicators
C Speedometer
D Engine Temperature Gauge
E Indicator & Warning Lights
F Gear Shift Position Indicator*
G Odometer/Tripmeter*
H Trip Computer*
I Fuel Gauge
For more information on the function of all indicator and warning lights, please refer to the Owner’s Manual
QUICK TIPS
Low Windshield Washer Warning Light
Light on Indicator
AWD System Warning Light*
AWD LOCK Indicator*
ECOMINDER® Indicator
Key Out Warning Light*
Immobilizer Indicator*
High Beam Indicator
Electronic Stability Control (ESC) Indicator*
Electronic Stability Control (ESC) OFF Indicator*
Low Tire Pressure Light / Tire Pressure Monitoring System (TPMS) Malfunction Indicator
Malfunction Indicator
Tailgate Open Warning Light
Front Fog Light Indicator
Seat Belt Warning Light
Parking Brake & Brake Fluid Warning Light
Door Ajar Warning Light
Air Bag Warning Light
Anti-lock Braking System (ABS) Warning Light
*IF EQUIPPED
A
B
CD
G
H
IFE
(Type B Cluster)(Type A Cluster)
Page 10 of 42
SORENTO FEATURES & FUNCTIONS GUIDE8*IF EQUIPPED SORENTO FEATURES & FUNCTIONS GUIDE8
DRIVER’S PANELDRIVER’S PANELDRIVER’S PANEL
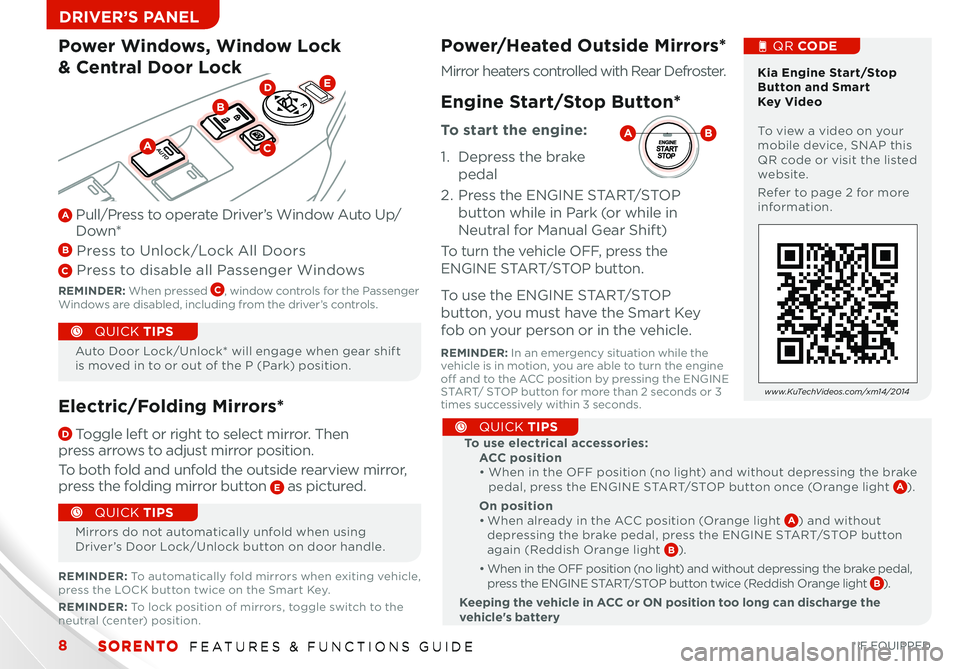
Power Windows, Window Lock
& Central Door Lock
Electric/Folding Mirrors*
D Toggle left or right to select mirror Thenpress arrows to adjust mirror position
To both fold and unfold the outside rearview mirror, press the folding mirror button E as pictured
A Pull/Press to operate Driver’s Window Auto Up/Down*
B Press to Unlock/Lock All Doors
C Press to disable all Passenger Windows
REMINDER: When pressed C, window controls for the Passenger Windows are disabled, including from the driver’s controls
LR
AUTO
D
C
E
A
B
Kia Engine Start/Stop Button and Smart Key Video To view a video on your mobile device, SNAP this QR code or visit the listed website
Refer to page 2 for more information
QR CODEPower/Heated Outside Mirrors*
Mirror heaters controlled with Rear Defroster
www.KuTechVideos.com/xm14/2014
Engine Start/Stop Button*
To start the engine:
1 Depress the brake
pedal
2
Press the ENGINE START/STOP
button while in Park (or while in
Neutral for Manual Gear Shift)
To turn the vehicle OFF, press the
ENGINE START/STOP button
To use the ENGINE START/STOP
button, you must have the Smart Key
fob on your person or in the vehicle
REMINDER: In an emergency situation while the vehicle is in motion, you are able to turn the engine off and to the ACC position by pressing the ENGINE START/ STOP button for more than 2 seconds or 3 times successively within 3 seconds
BA
Auto Door Lock/Unlock* will engage when gear shift is moved in to or out of the P (Park) position
Mirrors do not automatically unfold when using Driver’s Door Lock/Unlock button on door handle
QUICK TIPS
QUICK TIPS
REMINDER: To automatically fold mirrors when exiting vehicle, press the LOCK button twice on the Smart Key
REMINDER: To lock position of mirrors, toggle switch to the neutral (center) position
To use electrical accessories:ACC position • When in the OFF position (no light) and without depressing the brake pedal, press the ENGINE START/STOP button once (Orange light A)
On position • When already in the ACC position (Orange light A) and without depressing the brake pedal, press the ENGINE START/STOP button again (Reddish Orange light B)
• When in the OFF position (no light) and without depressing the brake pedal, press the ENGINE START/STOP button twice (Reddish Orange light B)
Keeping the vehicle in ACC or ON position too long can discharge the vehicle's battery
QUICK TIPS
Page 15 of 42
13ALWAYS CHECK THE OWNER’S MANUAL FOR COMPLETE OPERATING INFORMATION AND SAFET Y WARNINGS
STEERING WHEEL CONTROLS
• When using voice recognition, some phones may reverse the names in the contact list from {FIRST NAME} {LAST NAME} to {LAST NAME} {FIRST NAME)
• When using the voice command feature, wait for the system BEEP before speaking the command
• When using voice recognition to place a call, speak in a natural, moderate tone, with clear pronunciation
• Open windows, sunroof or an A/C fan operating at high speeds can interfere with voice recognition
• The Contacts Sync (Phonebook Download) feature allows you to choose whether your phone contact list will transfer to your vehicle contacts each time your phone is connected or only at the initial phone pairing
• If Contact Sync is set to ON, contacts stored in your phone will download each time your phone is connected There may be a delay before the system is available to place a call
• If Contact Sync set to OFF, your phone contacts will download only at the initial pairing This allows you to make calls without waiting for your phone contact list to download
•
If experiencing difficulty using voice recognition to place a call, be sure you are using the actual full contact name as entered in your phone book, not a casual or nickname (e g , if name was entered as “Robert Smith”, say “Call Robert Smith”, not “Call Bob Smith”)
QUICK TIPS
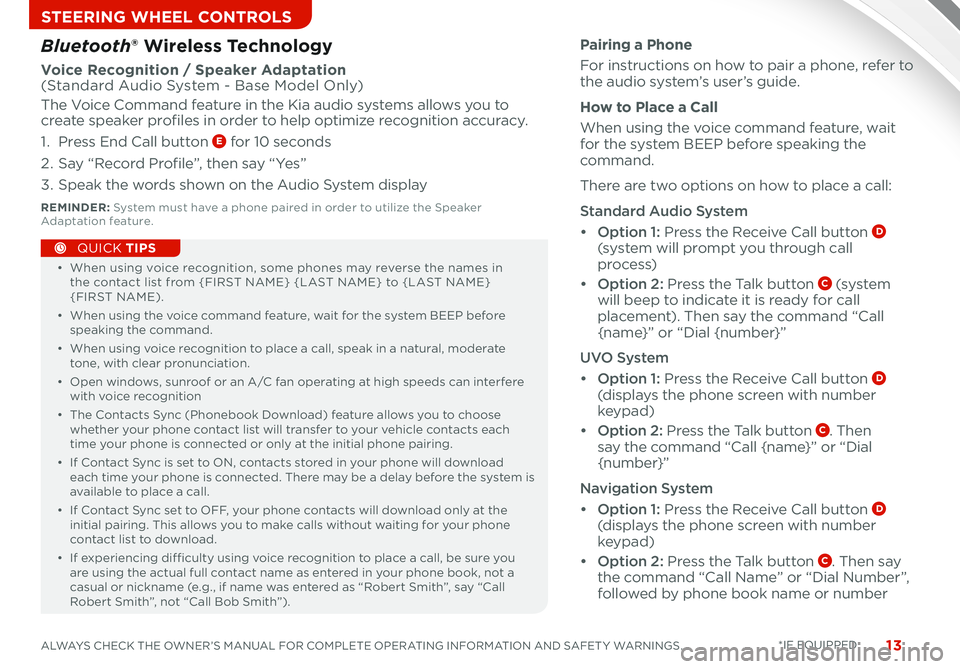
Pairing a Phone
For instructions on how to pair a phone, refer to the audio system’s user’s guide
How to Place a Call
When using the voice command feature, wait for the system BEEP before speaking the command
There are two options on how to place a call:
Standard Audio System
• Option 1: Press the Receive Call button D (system will prompt you through call
process)
• Option 2: Press the Talk button C (s ys te m will beep to indicate it is ready for call placement) Then say the command “Call {name}” or “Dial {number}”
UVO System
• Option 1: Press the Receive Call button D (displays the phone screen with number keypad)
• Option 2: Press the Talk button C Then say the command “Call {name}” or “Dial
{number}”
Navigation System
• Option 1: Press the Receive Call button D (displays the phone screen with number keypad)
• Option 2: Press the Talk button C Then say the command “Call Name” or “Dial Number”, followed by phone book name or number
Bluetooth® Wireless Technology
Voice Recognition / Speaker Adaptation (Standard Audio System - Base Model Only)
The Voice Command feature in the Kia audio systems allows you to create speaker profiles in order to help optimize recognition accuracy
1 Press End Call button E for 10 seconds
2 Say “Record Profile”, then say “Yes”
3 Speak the words shown on the Audio System display
REMINDER: System must have a phone paired in order to utilize the Speaker Adaptation feature
*IF EQUIPPED
Page 23 of 42
21ALWAYS CHECK THE OWNER’S MANUAL FOR COMPLETE OPERATING INFORMATION AND SAFET Y WARNINGS
CENTER PANEL
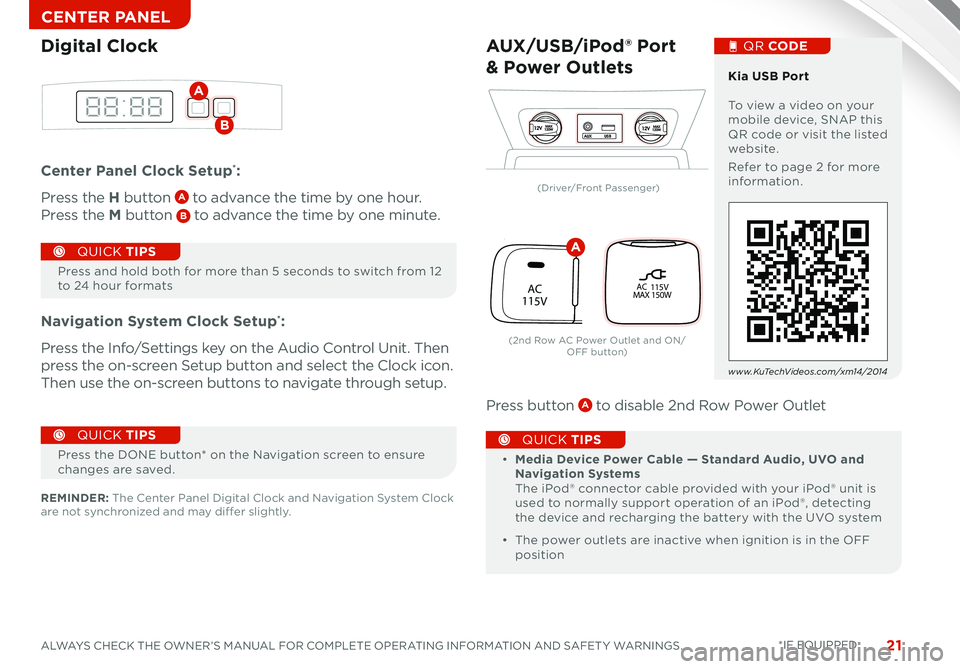
Center Panel Clock Setup*:
Press the H button A to advance the time by one hour
Press the M button B to advance the time by one minute
Navigation System Clock Setup*:
Press the Info/Settings key on the Audio Control Unit Then
press the on-screen Setup button and select the Clock icon
Then use the on-screen buttons to navigate through setup
Press button A to disable 2nd Row Power Outlet
Press and hold both for more than 5 seconds to switch from 12 to 24 hour formats
QUICK TIPS
Digital Clock
A
B12VMAX
120W12VMAX
120WAUX USB
AUX/USB/iPod® Port
& Power Outlets
• Media Device Power Cable — Standard Audio, UVO and Navigation Systems The iPod® connector cable provided with your iPod® unit is used to normally support operation of an iPod®, detecting the device and recharging the battery with the UVO system
• The power outlets are inactive when ignition is in the OFF position
QUICK TIPS
Kia USB Port To view a video on your mobile device, SNAP this QR code or visit the listed website
Refer to page 2 for more information
QR CODE
www.KuTechVideos.com/xm14/2014
REMINDER: The Center Panel Digital Clock and Navigation System Clock are not synchronized and may differ slightly
Press the DONE button* on the Navigation screen to ensure changes are saved
QUICK TIPS
*IF EQUIPPED
P
R
N
D
P R
N
DP
R
N
D
SHIFTLOCK RELEASE
activeECOAC
115VPOFF
AC 115V
MAX 150W
(Driver/Front Passenger)
(2nd Row AC Power Outlet and ON/O FF b ut to n)
A
Page 31 of 42
29ALWAYS CHECK THE OWNER’S MANUAL FOR COMPLETE OPERATING INFORMATION AND SAFET Y WARNINGS *IF EQUIPPED
OTHER KEY FEATURES
Smart Key*
The Smart Key’s signal can be blocked by the normal operation of a cellular phone or smartphone To help prevent this, store each device separately
QUICK TIPS
REMINDER: Remote button configuration may vary depending on vehicle options
REMINDER: Remote button configuration may vary depending on vehicle options
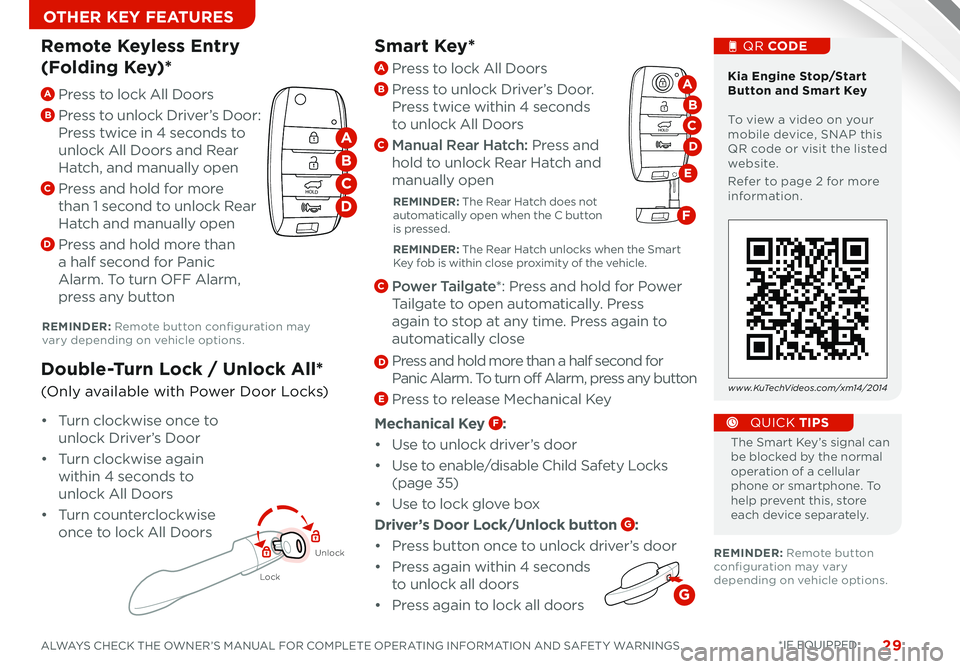
A Press to lock All Doors
B
Press to unlock Driver’s Door:
Press twice in 4 seconds to
unlock All Doors and Rear
Hatch, and manually open
C Press and hold for more
than 1 second to unlock Rear
Hatch and manually open
D Press and hold more than
a half second for Panic
Alarm To turn OFF Alarm,
press any button
Remote Keyless Entry
(Folding Key)*
Lock
Unlock
• Turn clockwise once to
unlock Driver’s Door
• Turn clockwise again
within 4 seconds to
unlock All Doors
• Turn counterclockwise
once to lock All Doors
Double-Turn Lock / Unlock All*
(Only available with Power Door Locks)
Kia Engine Stop/Start Button and Smart Key To view a video on your mobile device, SNAP this QR code or visit the listed website
Refer to page 2 for more information
QR CODE
www.KuTechVideos.com/xm14/2014
HOLD
HOLD
A
B
C
D
A Press to lock All Doors
B Press to unlock Driver’s Door
Press twice within 4 seconds
to unlock All Doors
C Manual Rear Hatch: Press and
hold to unlock Rear Hatch and
manually open
REMINDER: The Rear Hatch does not automatically open when the C button is pressed
REMINDER: The Rear Hatch unlocks when the Smart Key fob is within close proximity of the vehicle
C Power Tailgate*: Press and hold for Power
Tailgate to open automatically Press
again to stop at any time Press again to
automatically close
D Press and hold more than a half second for
Panic Alarm To turn off Alarm, press any button
E Press to release Mechanical Key
Mechanical Key F:
• Use to unlock driver’s door
• Use to enable/disable Child Safety Locks
(page 35)
• Use to lock glove box
Driver’s Door Lock/Unlock button G:
• Press button once to unlock driver’s door
• Press again within 4 seconds
to unlock all doors
•
Press again to lock all doors
HOLD
HOLD
D
A
B
E
C
F
G
Page 32 of 42
SORENTO FEATURES & FUNCTIONS GUIDE30*IF EQUIPPED
OTHER KEY FEATURES
•
• You can reprogram a single HomeLink ® button by repeating Step 2
• Erasing programmed buttons will delete all trained transmitters
QUICK TIPS
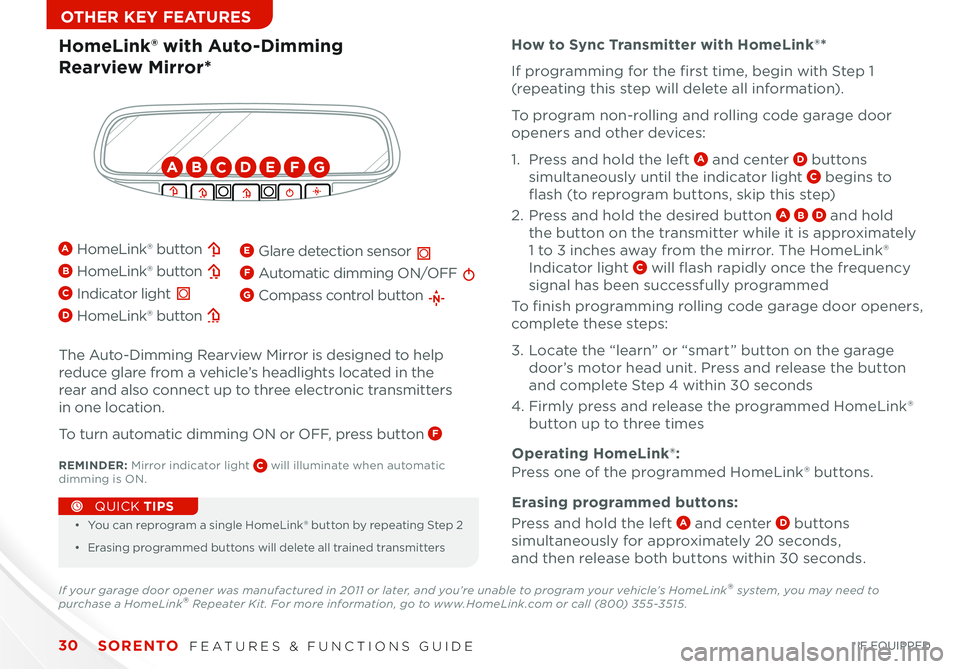
The Auto-Dimming Rearview Mirror is designed to help
reduce glare from a vehicle’s headlights located in the
rear and also connect up to three electronic transmitters
in one location
To turn automatic dimming ON or OFF, press button F
HomeLink® with Auto-Dimming
Rearview Mirror*
How to Sync Transmitter with HomeLink®*
Erasing programmed buttons:
A HomeLink® button
B HomeLink® button
C Indicator light
D HomeLink® button
E Glare detection sensor
F Automatic dimming ON/OFF
G Compass control button
If programming for the first time, begin with Step 1
(repeating this step will delete all information)
To program non-rolling and rolling code garage door
openers and other devices:
1 Press and hold the left A and center D buttons
simultaneously until the indicator light C begins to
flash (to reprogram buttons, skip this step)
2 Press and hold the desired button A B D and hold
the button on the transmitter while it is approximately
1 to 3 inches away from the mirror The HomeLink®
Indicator light C will flash rapidly once the frequency
signal has been successfully programmed
To finish programming rolling code garage door openers,
complete these steps:
3 Locate the “learn” or “smart” button on the garage
door’s motor head unit Press and release the button
and complete Step 4 within 30 seconds
4 Firmly press and release the programmed HomeLink®
button up to three times
Press and hold the left A and center D buttons
simultaneously for approximately 20 seconds,
and then release both buttons within 30 seconds
Operating HomeLink®:
Press one of the programmed HomeLink® buttons REMINDER: Mirror indicator light C will illuminate when automatic dimming is ON
If your garage door opener was manufactured in 2011 or later, and you’re unable to program your vehicle’s HomeLink® system, you may need to purchase a HomeLink® Repeater Kit. For more information, go to www.HomeLink.com or call (800) 355-3515 .
ABCDEFG
Page 33 of 42
31ALWAYS CHECK THE OWNER’S MANUAL FOR COMPLETE OPERATING INFORMATION AND SAFET Y WARNINGS *IF EQUIPPED
OTHER KEY FEATURES
CLICK!
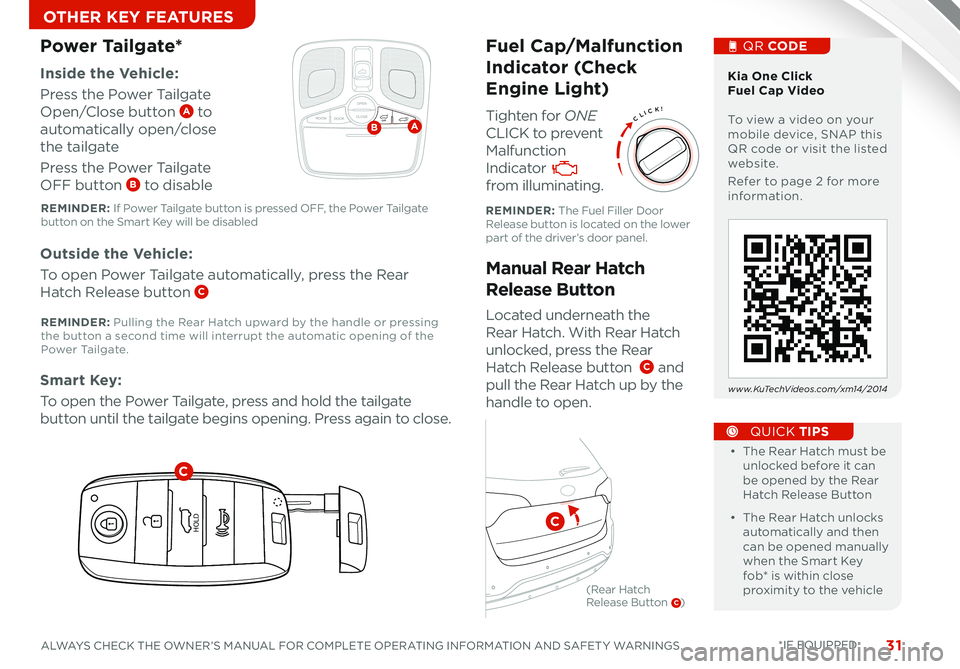
Fuel Cap/Malfunction
Indicator (Check
Engine Light)
Tighten for ONE
CLICK to prevent
Malfunction
Indicator
from illuminating
Located underneath the
Rear Hatch With Rear Hatch
unlocked, press the Rear
Hatch Release button C and
pull the Rear Hatch up by the
handle to open
Inside the Vehicle:
Press the Power Tailgate
Open/Close button A to
automatically open/close
the tailgate
Press the Power Tailgate
OFF button B to disable
Manual Rear Hatch
Release Button
Power Tailgate*
Outside the Vehicle:
To open Power Tailgate automatically, press the Rear
Hatch Release button C
Smart Key:
To open the Power Tailgate, press and hold the tailgate
button until the tailgate begins opening Press again to close •
• The Rear Hatch must be unlocked before it can be opened by the Rear Hatch Release Button
• The Rear Hatch unlocks automatically and then can be opened manually when the Smart Key fob* is within close proximity to the vehicle
QUICK TIPS
Kia One Click Fuel Cap Video To view a video on your mobile device, SNAP this QR code or visit the listed website
Refer to page 2 for more information
QR CODE
www.KuTechVideos.com/xm14/2014
How to Sync Transmitter with HomeLink®*
REMINDER: The Fuel Filler Door Release button is located on the lower part of the driver’s door panel
REMINDER: If Power Tailgate button is pressed OFF, the Power Tailgate button on the Smart Key will be disabled
REMINDER: Pulling the Rear Hatch upward by the handle or pressing the button a second time will interrupt the automatic opening of the Power Ta i l g a t e
OPEN
CLOSEROOM DOOROFFAB
HOLD
HOLD
C
C
(Rear Hatch Release Button C)
Page 34 of 42
SORENTO FEATURES & FUNCTIONS GUIDE32*IF EQUIPPED
OTHER KEY FEATURES
OPEN
CLOSE
ROOM DOOROFF
OPEN
CLOSE
ROOM DOOROFF
OPEN
CLOSE
DOOR ON
OPEN
CLOSE
ROOM DOOROFF
OPEN
CLOSE
ROOM DOOROFF
OPEN
CLOSE
DOOR ON
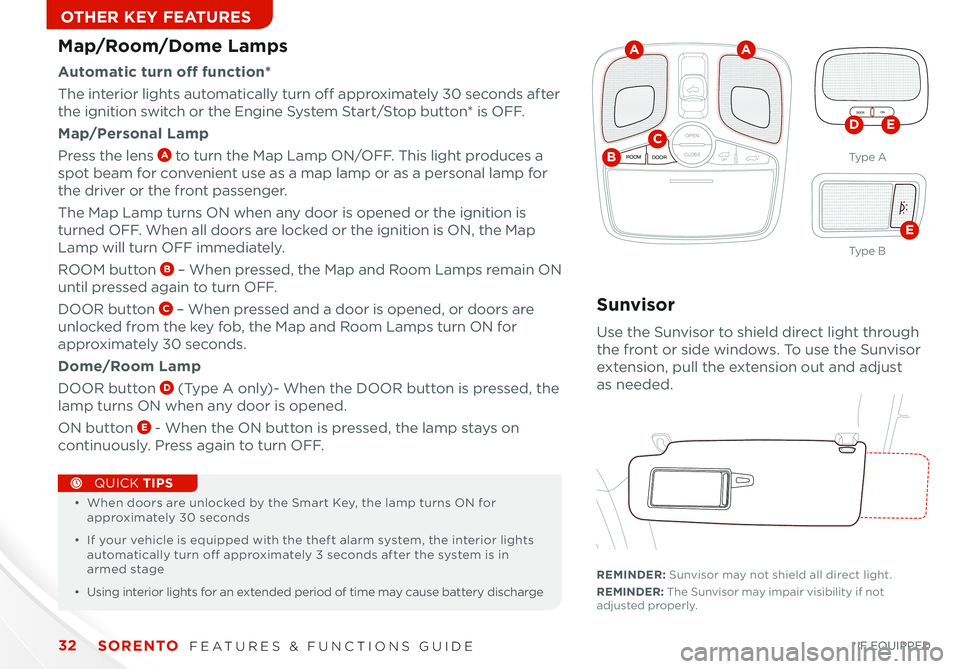
Map/Room/Dome Lamps
Automatic turn off function*
The interior lights automatically turn off approximately 30 seconds after
the ignition switch or the Engine System Start/Stop button* is OFF
Map/Personal Lamp
Press the lens A to turn the Map Lamp ON/OFF This light produces a
spot beam for convenient use as a map lamp or as a personal lamp for
the driver or the front passenger
The Map Lamp turns ON when any door is opened or the ignition is
turned OFF When all doors are locked or the ignition is ON, the Map
Lamp will turn OFF immediately
ROOM button B – When pressed, the Map and Room Lamps remain ON
until pressed again to turn OFF
DOOR button C – When pressed and a door is opened, or doors are
unlocked from the key fob, the Map and Room Lamps turn ON for
approximately 30 seconds
Dome/Room Lamp
DOOR button D (Type A only)- When the DOOR button is pressed, the
lamp turns ON when any door is opened
ON button E - When the ON button is pressed, the lamp stays on
continuously Press again to turn OFF
•
• When doors are unlocked by the Smart Key, the lamp turns ON for approximately 30 seconds
• If your vehicle is equipped with the theft alarm system, the interior lights automatically turn off approximately 3 seconds after the system is in armed stage
• Using interior lights for an extended period of time may cause battery discharge
QUICK TIPS
A
B
CDE
E
A
Sunvisor
Use the Sunvisor to shield direct light through
the front or side windows To use the Sunvisor
extension, pull the extension out and adjust
as needed
REMINDER: Sunvisor may not shield all direct light
REMINDER: The Sunvisor may impair visibility if not adjusted properly
Ty p e A
Ty p e B
Page 35 of 42
33ALWAYS CHECK THE OWNER’S MANUAL FOR COMPLETE OPERATING INFORMATION AND SAFET Y WARNINGS *IF EQUIPPED
OTHER KEY FEATURES
OPEN
CLOSE
ROOM DOOROFF
OPEN
CLOSE
ROOM DOOROFF
OPEN
CLOSE
DOOR ON
A
B
•
• To stop the Sunroof/Sunshade at any position, push or pull the sunroof control lever in any direction
QUICK TIPS
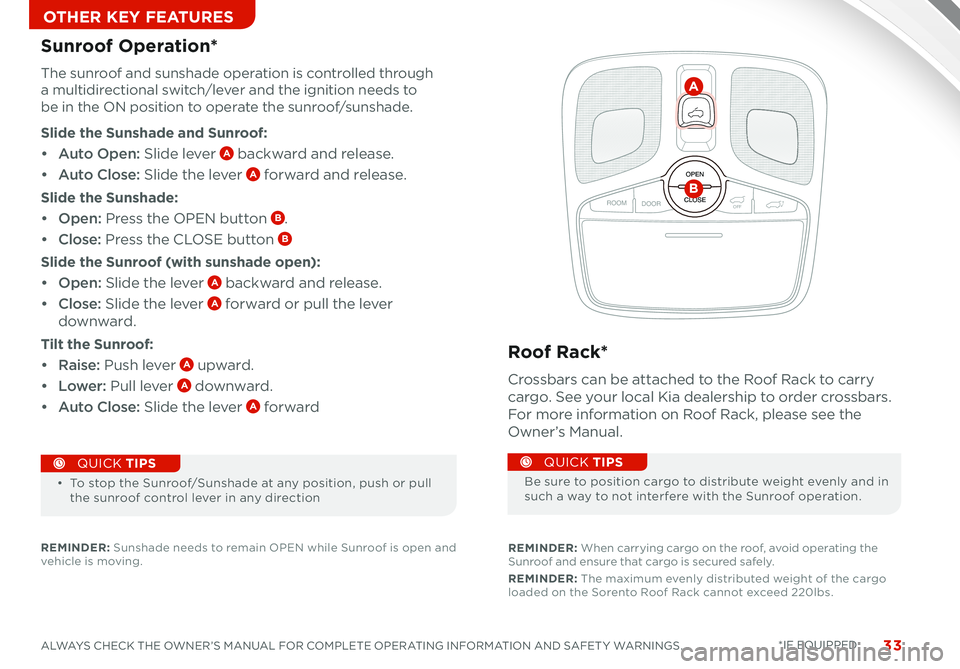
Sunroof Operation*
The sunroof and sunshade operation is controlled through
a multidirectional switch/lever and the ignition needs to
be in the ON position to operate the sunroof/sunshade
Slide the Sunshade and Sunroof:
• Auto Open: Slide lever A backward and release
• Auto Close: Slide the lever A forward and release
Slide the Sunshade:
• Open: Press the OPEN button B
• Close: Press the CLOSE button B
Slide the Sunroof (with sunshade open):
• Open: Slide the lever A backward and release
• Close: Slide the lever A forward or pull the lever
downward
Tilt the Sunroof:
• Raise: Push lever A upward
• Lower: Pull lever A downward
• Auto Close: Slide the lever A forward
REMINDER: Sunshade needs to remain OPEN while Sunroof is open and vehicle is moving
Roof Rack*
Crossbars can be attached to the Roof Rack to carry
cargo See your local Kia dealership to order crossbars
For more information on Roof Rack, please see the
Owner’s Manual
REMINDER: When carrying cargo on the roof, avoid operating the Sunroof and ensure that cargo is secured safely
REMINDER: The maximum evenly distributed weight of the cargo loaded on the Sorento Roof Rack cannot exceed 220lbs
Be sure to position cargo to distribute weight evenly and in such a way to not interfere with the Sunroof operation
QUICK TIPS