check engine light KIA SORENTO 2015 Features and Functions Guide
[x] Cancel search | Manufacturer: KIA, Model Year: 2015, Model line: SORENTO, Model: KIA SORENTO 2015Pages: 42, PDF Size: 6.83 MB
Page 3 of 42

Active ECO System* 06
Air Conditioning / Climate Control 22
Audio System - Standard* 17
Audio System - Navigation System* 20
Audio System - UVO eServices System* 19
Aux/USB/iPod® Port & Power Outlets 21
Bluetooth® Wireless Technology 14
Cruise Control 13
Digital Clock 21
Folding 2nd & 3rd Row Seats* 27
Front Active Headrests 28
Front Windshield/Rear Wipers & Washers* 11
Fuel Economy 04
PASSENGER AIR BAG OFF Indicator 36
Rear-Camera Display* 34
Smart Key* 29
Tire Pressure Monitoring System (TPMS) 06
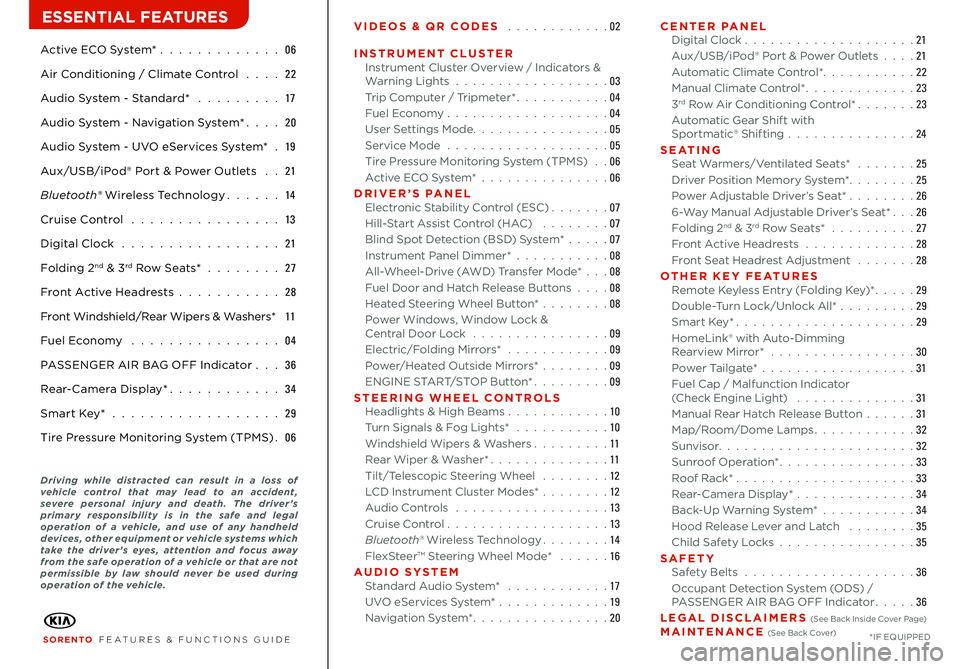
VIDEOS & QR CODES 02
INSTRUMENT CLUSTERInstrument Cluster Overview / Indicators & Warning Lights 03Trip Computer / Tripmeter* 04Fuel Economy 04User Settings Mode 05Service Mode 05Tire Pressure Monitoring System (TPMS) 06Active ECO System* 06DRIVER’S PANELElectronic Stability Control (ESC) 07Hill-Start Assist Control (HAC) 07Blind Spot Detection (BSD) System* 07Instrument Panel Dimmer* 08All-Wheel-Drive (AWD) Transfer Mode* 08Fuel Door and Hatch Release Buttons 08Heated Steering Wheel Button* 08Power Windows, Window Lock & Central Door Lock 09Electric/Folding Mirrors* 09Power/Heated Outside Mirrors* 09ENGINE START/STOP Button* 09STEERING WHEEL CONTROLSHeadlights & High Beams 10Turn Signals & Fog Lights* 10Windshield Wipers & Washers 11Rear Wiper & Washer* 11Tilt/Telescopic Steering Wheel 12LCD Instrument Cluster Modes* 12Audio Controls 13Cruise Control 13Bluetooth® Wireless Technology 14FlexSteer™ Steering Wheel Mode* 16AUDIO SYSTEMStandard Audio System* 17UVO eServices System* 19Navigation System* 20
CENTER PANELDigital Clock 21Aux/USB/iPod® Port & Power Outlets 21Automatic Climate Control* 22Manual Climate Control* 233rd Row Air Conditioning Control* 23Automatic Gear Shift with Sportmatic® Shifting 24S E AT I N GSeat Warmers/Ventilated Seats* 25Driver Position Memory System* 25Power Adjustable Driver’s Seat* 266-Way Manual Adjustable Driver’s Seat* 26Folding 2nd & 3rd Row Seats* 27Front Active Headrests 28Front Seat Headrest Adjustment 28OTHER KEY FEATURESRemote Keyless Entry (Folding Key)* 29Double-Turn Lock/Unlock All* 29Smart Key* 29HomeLink® with Auto-Dimming Rearview Mirror* 30Power Tailgate* 31Fuel Cap / Malfunction Indicator (Check Engine Light) 31Manual Rear Hatch Release Button 31Map/Room/Dome Lamps 32Sunvisor 32Sunroof Operation* 33Roof Rack* 33 Rear-Camera Display* 34Back-Up Warning System* 34Hood Release Lever and Latch 35Child Safety Locks 35SAFETYSafety Belts 36Occupant Detection System (ODS) / PASSENGER AIR BAG OFF Indicator 36LEGAL DISCLAIMERS (See Back Inside Cover Page) MAINTENANCE (See Back Cover)
ESSENTIAL FEATURES
SORENTO FEATURES & FUNCTIONS GUIDE*IF EQUIPPED
Driving while distracted can result in a loss of vehicle control that may lead to an accident, severe personal injury and death. The driver ’s primary responsibility is in the safe and legal operation of a vehicle, and use of any handheld devices, other equipment or vehicle systems which take the driver ’s eyes, attention and focus away from the safe operation of a vehicle or that are not permissible by law should never be used during operation of the vehicle.
Page 5 of 42

3
160140
120
100
80
60
40
20
0
MPH
0
20
40
60
80
100
120
140
160
180
200
220
240
260km/h
8
7
6
5
4
3
2 1
0 EF
C
H
x1000rpm
!
8
7
6
5
4
3
2 1
0 EF
C
H
x1000rpm
kmMPGMPH
/100km/hmi.
INSTRANGE AVGE/Tc
F
X
!
!
MPHkm/hN00
20
40
6080100120
140
16020406080100120140160180200220240260ODO123456
ALWAYS CHECK THE OWNER’S MANUAL FOR COMPLETE OPERATING INFORMATION AND SAFET Y WARNINGS
INSTRUMENT CLUSTER
160140
120
100
80
60
40
20
0
MPH
0
20
40
60
80
100
120
140
160
180
200
220
240
260km/h
8
7
6
5
4
3
2 1
0 EF
C
H
x1000rpm
!
8
7
6
5
4
3
2 1
0 EF
C
H
x1000rpm
kmMPGMPH
/100km/hmi.INSTRANGE AVGE/Tc
F
X
!
!
MPHkm/hN00
20
40
6080100120
140
16020406080100120140160180200220240260ODO123456
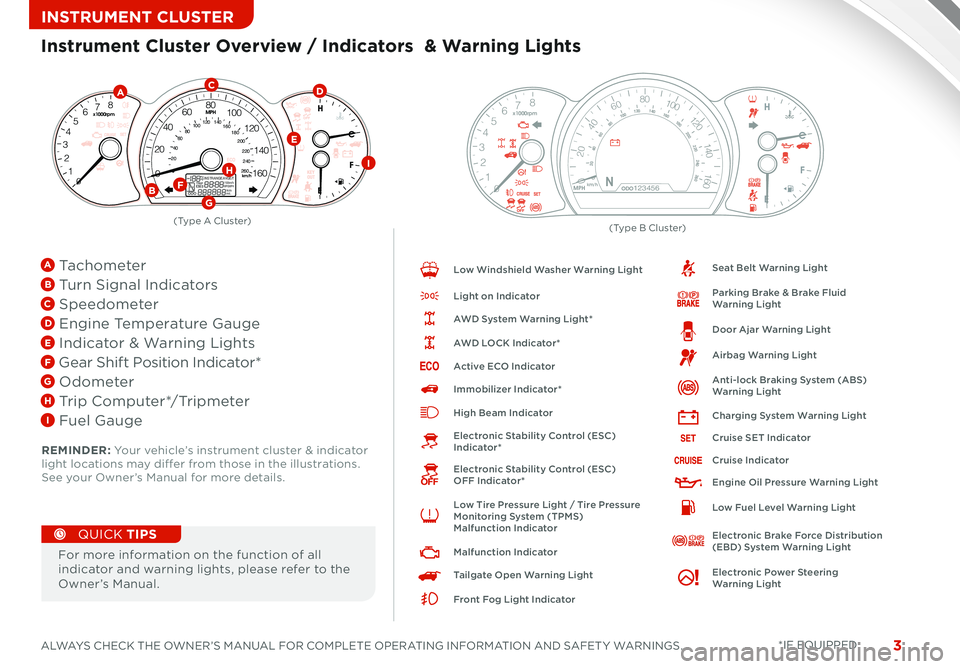
REMINDER: Your vehicle’s instrument cluster & indicator light locations may differ from those in the illustrations See your Owner’s Manual for more details
Instrument Cluster Overview / Indicators & Warning Lights
For more information on the function of all indicator and warning lights, please refer to the Owner’s Manual
QUICK TIPS
Low Windshield Washer Warning Light
Light on Indicator
AWD System Warning Light*
AWD LOCK Indicator*
Active ECO Indicator
Immobilizer Indicator*
High Beam Indicator
Electronic Stability Control (ESC) Indicator*
Electronic Stability Control (ESC) OFF Indicator*
Low Tire Pressure Light / Tire Pressure Monitoring System (TPMS) Malfunction Indicator
Malfunction Indicator
Tailgate Open Warning Light
Front Fog Light Indicator
Seat Belt Warning Light
Parking Brake & Brake Fluid Warning Light
Door Ajar Warning Light
Airbag Warning Light
Anti-lock Braking System (ABS) Warning Light
Charging System Warning Light
Cruise SET Indicator
Cruise Indicator
Engine Oil Pressure Warning Light
Low Fuel Level Warning Light
Electronic Brake Force Distribution (EBD) System Warning Light
Electronic Power Steering Warning Light
*IF EQUIPPED
A
BF
CD
E
G
HI
(Type B Cluster)(Type A Cluster)
A Tachometer
B Turn Signal Indicators
C Speedometer
D Engine Temperature Gauge
E Indicator & Warning Lights
F Gear Shift Position Indicator*
G Odometer
H Trip Computer*/Tripmeter
I Fuel Gauge
km
MPGMPH
/100km/h
mi.
INSTRANGE
AVGE/T
c
F
km
MPGMPH
/100km/h
mi.
INSTRANGE
AVGE/T
c
F
Page 7 of 42

5ALWAYS CHECK THE OWNER’S MANUAL FOR COMPLETE OPERATING INFORMATION AND SAFET Y WARNINGS *IF EQUIPPED
INSTRUMENT CLUSTER
LCD Display: Maintenance Video To view a video on your mobile device, snap this QR Code or visit the listed website
Refer to page 2 for more information
LCD Display Video
w w w. KuTechVideos .com/xm13/2015
w w w. KuTechVideos .com/xm13/2015
Service Interval Setting:
To set up the maintenance schedule when in User Settings mode:
• Press the Move/Reset button B and toggle to
Service Interval Press the Mode/Select button A to enter
• Press the Move/Reset button A and toggle to ON,
then press the Mode/Select button A Then press
the Move/Reset button B to scroll and select the desired miles or months for your next service
• Press the Mode/Select button A to enter
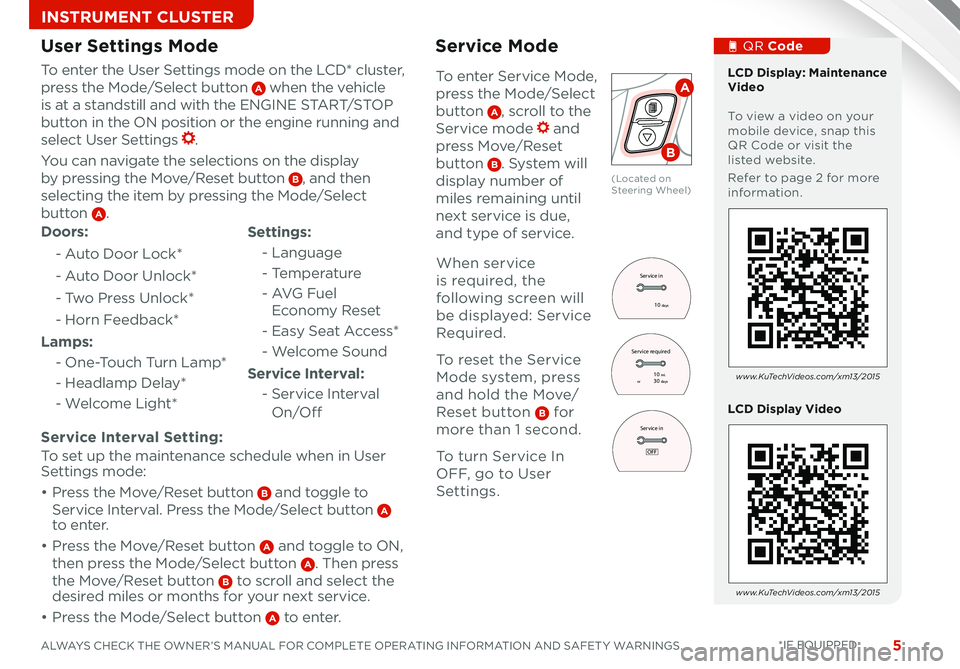
To enter the User Settings mode on the LCD* cluster,
press the Mode/Select button A when the vehicle
is at a standstill and with the ENGINE START/STOP
button in the ON position or the engine running and
select User Settings
You can navigate the selections on the display
by pressing the Move/Reset button B, and then
selecting the item by pressing the Mode/Select
button A
Doors:
- Auto Door Lock*
- Auto Door Unlock*
- Two Press Unlock*
- Horn Feedback*
Lamps:
- One-Touch Turn Lamp*
- Headlamp Delay*
- Welcome Light*
User Settings Mode
Settings:
- Language
- Temperature
- AVG Fuel
Economy Reset
- Easy Seat Access*
- Welcome Sound
Service Interval:
- Service Interval
O n/O ff
To enter Service Mode,
press the Mode/Select
button A, scroll to the
Service mode and
press Move/Reset
button B System will
display number of
miles remaining until
next service is due,
and type of service
Service Mode
Service in
10
days
Service in
Service required 30
days10 mi.
or
OFF
User Settings
Door
Lamp Settings
Service Interval
Service in
10
days
Service in
Service required 30
days10 mi.
or
OFF
User Settings
Door
Lamp Settings
Service Interval
A
B
(Located on Steering Wheel)
When service
is required, the
following screen will
be displayed: Service
Required
To reset the Service
Mode system, press
and hold the Move/
Reset button B for
more than 1 second
To turn Service In
OFF, go to User
Settings
Service in
10
days
Service in
Service required 30
days10 mi.
or
OFF
User Settings
Door
Lamp Settings
Service Interval
QR Code
Page 8 of 42

6
Kia Tire Pressure Monitoring System Video
To view a video on your mobile device, snap this QR Code or visit the listed website
Refer to page 2 for more information
Active ECO Indicator Video
QR CodeTire Pressure Monitoring System (TPMS)
REMINDER: Consult your dealer for service if Low Tire Pressure Light remains illuminated after inflating your tire(s)
w w w. KuTechVideos .com/xm13/2015
w w w. KuTechVideos .com/xm13/2015
•
• Even with TPMS, tire pressure should be checked manually at least once a month Only adjust Tire Pressure on “cold tires”
• For proper maintenance, safety, and optimal fuel economy, maintain recommended tire inflation pressures and stay within the load limits and weight distribution recommended for your vehicle
• In winter or cold weather, the TPMS light may illuminate if the tire pressure was adjusted to the recommended tire inflation pressure during warm weather
QUICK TIPS
ac tive
EC OAC
115VPO FF
To help improve your fuel efficiency:
• Drive at a moderate speed, accelerating smoothly and at a moderate rate
• Keep tires inflated to the recommended pressure
• Be sure the wheels are properly aligned
QUICK TIPS
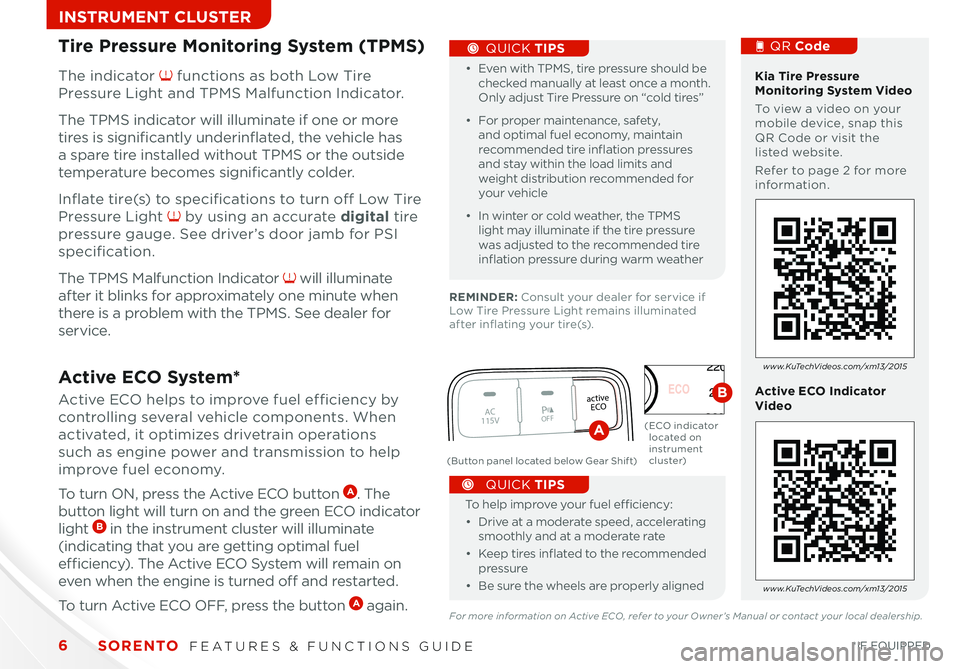
Active ECO System*
Active ECO helps to improve fuel efficiency by
controlling several vehicle components When
activated, it optimizes drivetrain operations
such as engine power and transmission to help
improve fuel economy
To turn ON, press the Active ECO button A The
button light will turn on and the green ECO indicator
light B in the instrument cluster will illuminate
(indicating that you are getting optimal fuel
efficiency) The Active ECO System will remain on
even when the engine is turned off and restarted
To turn Active ECO OFF, press the button A again
(Button panel located below Gear Shif t)
( ECO indicator located on instrument cluster)
160140
120
100
80
60
40
20
0
MPH
0
20
40
60
80
100
120
140
160
180
200
220
240
260km/h
8
7
6
5
4
3
2 1
0 EF
C
H
x1000rpm
!
8
7
6
5
4
3
2 1
0 EF
C
H
x1000rpm
kmMPGMPH
/100km/h
mi.
INSTRANGE AVGE/Tc
F
X
!
!
MPHkm/hN00
20
40
60
80100
120
140
160
20
40
60
80
100120140160
180
200
220
240
260
ODO123456
For more information on Active ECO, refer to your Owner’s Manual or contact your local dealership.
B
A
The indicator functions as both Low Tire
Pressure Light and TPMS Malfunction Indicator
The TPMS indicator will illuminate if one or more
tires is significantly underinflated, the vehicle has
a spare tire installed without TPMS or the outside
temperature becomes significantly colder
Inflate tire(s) to specifications to turn off Low Tire
Pressure Light by using an accurate digital tire
pressure gauge See driver’s door jamb for PSI
specification
The TPMS Malfunction Indicator will illuminate
after it blinks for approximately one minute when
there is a problem with the TPMS See dealer for
service
SORENTO FEATURES & FUNCTIONS GUIDE
*IF EQUIPPED
INSTRUMENT CLUSTER
km
MPGMPH
/100km/h
mi.
INSTRANGE
AVGE/T
c
F
Page 11 of 42

99
Power Windows, Window Lock
& Central Door Lock
Electric/Folding Mirrors*
Toggle switch D left or right to select mirror Thenpress arrows to adjust power outside mirror position
To both fold and unfold the power outside rearview mirror, press the folding mirror button E as pictured
A Pull/Press to operate Driver’s Window Auto Up/Down*
B Press to Lock/Unlock All Doors
C Press to disable rear Passenger Windows
REMINDER: When pressed C, window controls for the Rear Passenger Windows are disabled, including from the driver’s controls
LR
AUTO
D
C
E
A
B
Kia ENGINE START/STOP Button and Smart Key Video To view a video on your mobile device, snap this QR Code or visit the listed website
Refer to page 2 for more information
QR CodePower/Heated Outside Mirrors*
Mirror heaters controlled with Rear Defroster
w w w. KuTechVideos .com/xm13/2015
ENGINE START/STOP Button*
To start the engine:
1 Depress the brake
pedal
2
Press the ENGINE START/STOP
button while in Park
To turn the vehicle OFF, press the
ENGINE START/STOP button
To use the ENGINE START/STOP
button, you must have the Smart Key
fob on your person or in the vehicle
REMINDER: In an emergency situation while the vehicle is in motion, you are able to turn the engine off and to the ACC position by pressing the ENGINE START/ STOP button for more than 2 seconds or 3 times successively within 3 seconds
BA
Auto Door Lock/Unlock* will engage when gear shift is moved in to or out of the P (Park) position
Mirrors do not automatically unfold when using Driver’s Door Lock/Unlock button on door handle
QUICK TIPS
QUICK TIPS
REMINDER: To automatically fold mirrors when exiting vehicle, press the LOCK button twice on the Smart Key
REMINDER: To lock position of mirrors, toggle switch to the neutral (center) position
To use electrical accessories:ACC position • When in the OFF position (no light) and without depressing the brake pedal, press the ENGINE START/STOP button once (Orange light A)
On position •
When already in the ACC position (Orange light A) and without depressing the brake pedal, press the ENGINE START/STOP button again (Reddish Orange light B)
• When in the OFF position (no light) and without depressing the brake pedal, press the ENGINE START/STOP button twice (Reddish Orange light B)
Keeping the vehicle in ACC or ON position too long can discharge the vehicle's battery
QUICK TIPS
ALWAYS CHECK THE OWNER’S MANUAL FOR COMPLETE OPERATING INFORMATION AND SAFET Y WARNINGS. *IF EQUIPPED
DRIVER’S PANELDRIVER’S PANELDRIVER’S PANEL
Page 23 of 42

21ALWAYS CHECK THE OWNER’S MANUAL FOR COMPLETE OPERATING INFORMATION AND SAFET Y WARNINGS
CENTER PANEL
Center Panel Clock Setup*:
Press the H button A to advance the time by one hour
Press the M button B to advance the time by one minute
Navigation System Clock Setup*:
Press the Info/Settings key on the Audio Control Unit Then
press the on-screen Setup button and select the Clock icon
Then use the on-screen buttons to navigate through setup
Press button A to turn the 2nd Row Power Outlet
ON (LED lit)
Press and hold both for more than 5 seconds to switch from 12 to 24 hour formats
QUICK TIPS
Digital Clock
A
B12VMAX
120W12VMAX
120WAUX USB
Aux/USB/iPod® Port
& Power Outlets
•
• The powet outlets are inactive when the ignition is in the OFF position
• The 115 volt AC outlet operates only when vehicle engine is ON
QUICK TIPS
Kia USB Port Video To view a video on your mobile device, snap this QR Code or visit the listed website
Refer to page 2 for more information
QR Code
w w w. KuTechVideos .com/xm13/2015
REMINDER: The Center Panel Digital Clock and Navigation System Clock are not synchronized and may differ slightly
Press the DONE button* on the Navigation screen to ensure changes are saved
QUICK TIPS
*IF EQUIPPED
P
R
N
D
P R
N
DP
R
N
D
SHIFTLOCK RELEASE
activeECOAC
115VPOFF
AC 115V
MAX 150W
(Driver/Front Passenger)
(Button located below Gear Shift) (2nd Row AC Power Outlet)
A
Page 33 of 42

31
CLICK!
Fuel Cap/Malfunction
Indicator (Check
Engine Light)
Tighten for ONE
CLICK to prevent
Malfunction
Indicator
from illuminating
Located underneath the
Rear Hatch With Rear Hatch
unlocked, press the Rear
Hatch Release button C and
pull the Rear Hatch up by the
handle to open
Inside the Vehicle:
Press the Power Tailgate
Open/Close button A to
automatically open/close
the tailgate
Press the Power Tailgate
OFF button B to disable
Manual Rear Hatch
Release Button
Power Tailgate*
Outside the Vehicle:
To open Power Tailgate
automatically, press
the Rear Hatch Release
button C
Close by pushing Power
Tailgate Close button D
•
• The Rear Hatch must be unlocked before it can be opened by the Rear Hatch Release Button
• The Rear Hatch unlocks automatically and then can be opened manually when the Smart Key fob* is within close proximity to the vehicle
QUICK TIPS
Kia One Click Fuel Cap Video To view a video on your mobile device, snap this QR Code or visit the listed website
Refer to page 2 for more information
QR Code
w w w. KuTechVideos .com/xm13/2015
How to Sync Transmitter with HomeLink®*
REMINDER: The Fuel Filler Door Release button is located on the lower part of the driver’s door panel
REMINDER: If Power Tailgate button is pressed OFF, the Power Tailgate button on the Smart Key will be disabled
OPEN
CLOSEROOM DOOROFFAB
(Rear Hatch Release Button C)
CD
(Located inside Re a r H atc h)
Smart Key:
To open the Power Tailgate, press and
hold the tailgate E until the tailgate
begins opening Press again to close
REMINDER: Pulling the Rear Hatch upward by the handle or pressing the button a second time will interrupt the automatic opening of the Power Ta i l g a t e
HOLD
HOLDHOLDE
ALWAYS CHECK THE OWNER’S MANUAL FOR COMPLETE OPERATING INFORMATION AND SAFET Y WARNINGS. *IF EQUIPPED
OTHER KEY FEATURES
Page 36 of 42

34
The Back-up Warning System is not a safety
device The Back-up Warning System is a
supplemental system that assists the driver
by chiming if any object is detected within the
sensing area to the rear and side of the vehicle
when backing up
To turn the Backup Warning System OFF, press
the button A (LED will be lit)
Back-up Warning System
(Rear-Parking Assist System)*
Press the Back-up Warning System OFF button to deactivate the system
QUICK TIPSREMINDER: If the vehicle is moving at speeds over 3 mph (5 kmh), the system may not activate correc tly
REMINDER: When more than two objects are sensed at the same time, the closest one will be recognized first
REMINDER: The Rear-Camera Display and Back-Up Warning System are not substitutes for proper and safe backing-up procedures Always drive safely and use caution when backing up The Rear-Camera Display and Back-Up Warning System may not detect every object behind the vehicle
Rear-Camera Display*
The Rear-Camera Display system is not
a safety device It is a supplemental
system that displays the view behind
the vehicle through the Navigation*
or UVO* screen while the vehicle is in
Reverse
The Rear- Camera Display activates
when the:
1 ENGINE START/STOP button* is in the
ON position (Reddish Orange Light)
2
Gear Shift Lever is in the R (Reverse)
position
W arning! Check yo ur sur roun dings for safe\fy
Sorento Rear Parking Assist System Video To view a video on your mobile device, snap this QR Code or visit the listed website
Refer to page 2 for more information
w w w. KuTechVideos .com/xm13/2015
(button located below Gear Shift)
QR Code
REMINDER: UVO System - While camera is active, only the volume controls on the Audio System can be operated
REMINDER: Navigation System - While camera is active, only the Audio System can be operated on the Steering Wheel and Audio Control Unit Navigation features are disabled
active
EC OAC
115VPO FF
A
SORENTO FEATURES & FUNCTIONS GUIDE
*IF EQUIPPED
OTHER KEY FEATURES