change wheel KIA SORENTO 2018 Owners Manual
[x] Cancel search | Manufacturer: KIA, Model Year: 2018, Model line: SORENTO, Model: KIA SORENTO 2018Pages: 536, PDF Size: 13.42 MB
Page 23 of 536
Safety features of your vehicle
63
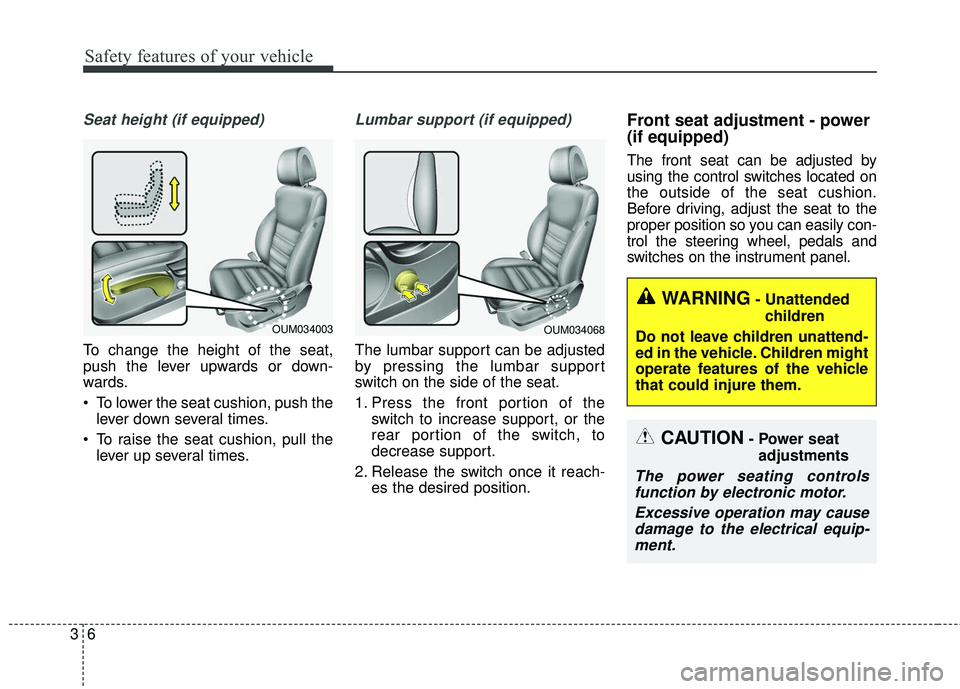
Seat height (if equipped)
To change the height of the seat,
push the lever upwards or down-
wards.
To lower the seat cushion, push thelever down several times.
To raise the seat cushion, pull the lever up several times.
Lumbar support (if equipped)
The lumbar support can be adjusted
by pressing the lumbar support
switch on the side of the seat.
1. Press the front portion of the switch to increase support, or the
rear portion of the switch, to
decrease support.
2. Release the switch once it reach- es the desired position.
Front seat adjustment - power
(if equipped)
The front seat can be adjusted by
using the control switches located on
the outside of the seat cushion.
Before driving, adjust the seat to the
proper position so you can easily con-
trol the steering wheel, pedals and
switches on the instrument panel.
CAUTION- Power seat
adjustments
The power seating controlsfunction by electronic motor.
Excessive operation may causedamage to the electrical equip-ment.
WARNING- Unattended
children
Do not leave children unattend-
ed in the vehicle. Children might
operate features of the vehicle
that could injure them.
OUM034068OUM034003
Page 87 of 536
Steering wheel . . . . . . . . . . . . . . . . . . . . . . . . . . . . . 4-55
• Electric power steering (EPS) . . . . . . . . . . . . . . . . . . 4-55
• Tilt and telescopic steering . . . . . . . . . . . . . . . . . . . . . 4-56
• Heated steering wheel . . . . . . . . . . . . . . . . . . . . . . . . . 4-57
• Horn . . . . . . . . . . . . . . . . . . . . . . . . . . . . . . . . . . . . \
. . . 4-57
Mirrors . . . . . . . . . . . . . . . . . . . . . . . . . . . . . . . . . . 4-59\
• Inside rearview mirror . . . . . . . . . . . . . . . . . . . . . . . . 4-59
• Outside rearview mirror. . . . . . . . . . . . . . . . . . . . . . . 4-69
Instrument cluster . . . . . . . . . . . . . . . . . . . . . . . . . 4-73
• Instrument cluster control . . . . . . . . . . . . . . . . . . . . . 4-74
• LCD display control . . . . . . . . . . . . . . . . . . . . . . . . . . 4-74
• Gauges . . . . . . . . . . . . . . . . . . . . . . . . . . . . . . . . . . . . \
. 4-75
• Transaxle shift indicator . . . . . . . . . . . . . . . . . . . . . . . 4-78
• Icy Road Warning Indicator . . . . . . . . . . . . . . . . . . . 4-78
LCD display . . . . . . . . . . . . . . . . . . . . . . . . . . . . . . 4-79
• LCD modes. . . . . . . . . . . . . . . . . . . . . . . . . . . . . . . . . .\
4-79
Trip modes (trip computer). . . . . . . . . . . . . . . . . . 4-80
• Trip Modes . . . . . . . . . . . . . . . . . . . . . . . . . . . . . . . . . . 4-80\
• Fuel Economy . . . . . . . . . . . . . . . . . . . . . . . . . . . . . . . 4-80
• Trip A/B . . . . . . . . . . . . . . . . . . . . . . . . . . . . . . . . . . . . \
4-82
• Digital speedometer . . . . . . . . . . . . . . . . . . . . . . . . . . . 4-83
• One time driving information mode . . . . . . . . . . . . . 4-83
• Turn by turn mode . . . . . . . . . . . . . . . . . . . . . . . . . . . 4-84
• ASCC/LDWS mode . . . . . . . . . . . . . . . . . . . . . . . . . . . 4-84
• A/V mode . . . . . . . . . . . . . . . . . . . . . . . . . . . . . . . . . . . 4-\
84• Service mode . . . . . . . . . . . . . . . . . . . . . . . . . . . . . . . . 4-85
• User settings mode. . . . . . . . . . . . . . . . . . . . . . . . . . . . 4-86
• Warning messages . . . . . . . . . . . . . . . . . . . . . . . . . . . . 4-90
Warning and indicator lights . . . . . . . . . . . . . . . . 4-97
• Warning lights . . . . . . . . . . . . . . . . . . . . . . . . . . . . . . . 4-97
• Indicator lights. . . . . . . . . . . . . . . . . . . . . . . . . . . . . . 4-105
Rear parking assist system . . . . . . . . . . . . . . . . . 4-109
• Operation of the rear parking assist system . . . . . . 4-109
• Non-operational conditions of
rear parking assist system . . . . . . . . . . . . . . . . . . . 4-110
• Rear parking assist system precautions . . . . . . . . . 4-111
• Self-diagnosis . . . . . . . . . . . . . . . . . . . . . . . . . . . . . . . 4-112
Rearview camera . . . . . . . . . . . . . . . . . . . . . . . . . 4-113
360° camera monitoring system . . . . . . . . . . . . . 4-114
Lighting . . . . . . . . . . . . . . . . . . . . . . . . . . . . . . . . . 4-115
• Battery saver function . . . . . . . . . . . . . . . . . . . . . . . . 4-115
• Daytime running light . . . . . . . . . . . . . . . . . . . . . . . . 4-115
• Lighting control . . . . . . . . . . . . . . . . . . . . . . . . . . . . . 4-115
• High beam operation . . . . . . . . . . . . . . . . . . . . . . . . . 4-117
• Turn signals and lane change signals. . . . . . . . . . . . 4-118
• Front fog light . . . . . . . . . . . . . . . . . . . . . . . . . . . . . . 4-119
• Check headlight . . . . . . . . . . . . . . . . . . . . . . . . . . . . . 4-119
• Headlight leveling device . . . . . . . . . . . . . . . . . . . . . 4-120
• AFLS (Adaptive Front Lighting System) . . . . . . . . 4-120
4
Page 140 of 536
455
Features of your vehicle
Electric power steering (EPS)
The power steering uses a motor to
assist you in steering the vehicle. If
the engine is off or if the power steer-
ing system becomes inoperative, the
vehicle may still be steered, but it will
require increased steering effort.
The motor driven power steering is
controlled by a power steering con-
trol unit which senses the steering
wheel torque and vehicle speed to
command the motor.
The steering becomes heavier as
the vehicle’s speed increases and
becomes lighter as the vehicle’s
speed decreases for optimum steer-
ing control.
Should you notice any change in the
effort required to steer during normal
vehicle operation, have the power
steering checked by an authorized
Kia dealer. If the Electric Power Steering
System does not operate normally,
the warning light will illuminate on
the instrument cluster. The steering
wheel may require increased
steering effort. Take your vehicle to
an authorized Kia dealer and have
the vehicle checked as soon as
possible.
When you operate the steering wheel in low temperature, noise
may occur. If temperature rises, the
noise will likely disappear. This is a
normal condition.
When the vehicle is stationary, and the steering wheel is turned all the
way to the left or right continuous-
ly, the steering wheel becomes
harder to turn. The power assist is
limited to protect the motor from
overheating.
As time passes, the steering wheel
will return to its normal condition.
✽ ✽ NOTICE
The following symptoms may occur
during normal vehicle operation:
• The EPS warning light does not
illuminate.
• The steering gets heavy immedi- ately after turning the ignition
switch on. This happens as the sys-
tem performs the EPS system
diagnostics. When the diagnostics
are completed, the steering wheel
will return to its normal condition.
• A click noise may be heard from the EPS relay after the ignition
switch is turned to the ON or
LOCK (OFF) position.
• A motor noise may be heard when the vehicle is at a stop or at a low
driving speed.
• If the Electric Power Steering System does not operate normally,
the warning light will illuminate on
the instrument cluster. The steer-
ing wheel may become difficult to
control or operate abnormally.
Take your vehicle to an authorized
Kia dealer and have the vehicle
checked as soon as possible. (Continued)
STEERING WHEEL
Page 141 of 536
Features of your vehicle
56
4
(Continued)
• When you operate the steering
wheel in low temperature, abnor-
mal noise may occur. If tempera-
ture rises, the noise will likely dis-
appear. This is a normal condition.
• When the charging system warning light comes on due to the low volt-
age (When the alternator or bat-
tery) does not operate normally or
malfunctions), the steering wheel
may require increased steering
effort.Tilt and telescopic steering
Tilt and telescopic steering allows
you to adjust the steering wheel
before you drive. You can also raise it
to give your legs more room when
you exit and enter the vehicle.
The steering wheel should be posi-
tioned so that it is comfortable for
you to drive, while permitting you to
see the instrument panel warning
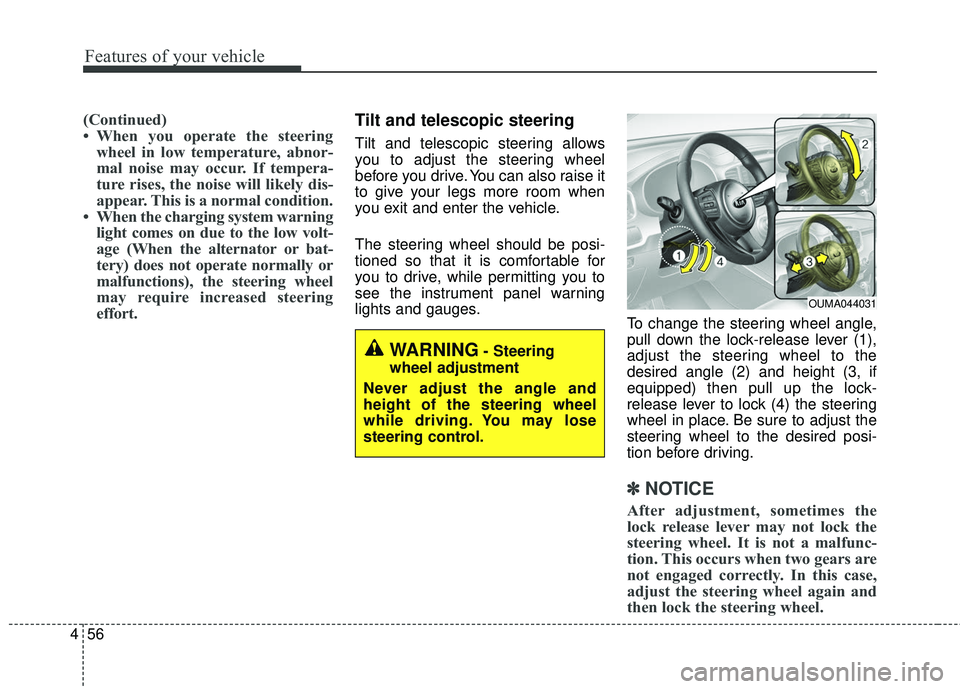
lights and gauges. To change the steering wheel angle,
pull down the lock-release lever (1),
adjust the steering wheel to the
desired angle (2) and height (3, if
equipped) then pull up the lock-
release lever to lock (4) the steering
wheel in place. Be sure to adjust the
steering wheel to the desired posi-
tion before driving.
✽ ✽NOTICE
After adjustment, sometimes the
lock release lever may not lock the
steering wheel. It is not a malfunc-
tion. This occurs when two gears are
not engaged correctly. In this case,
adjust the steering wheel again and
then lock the steering wheel.
OUMA044031
WARNING- Steering
wheel adjustment
Never adjust the angle and
height of the steering wheel
while driving. You may lose
steering control.
Page 159 of 536
Features of your vehicle
74
4
Instrument Cluster Control
Adjusting Instrument Cluster
Illumination
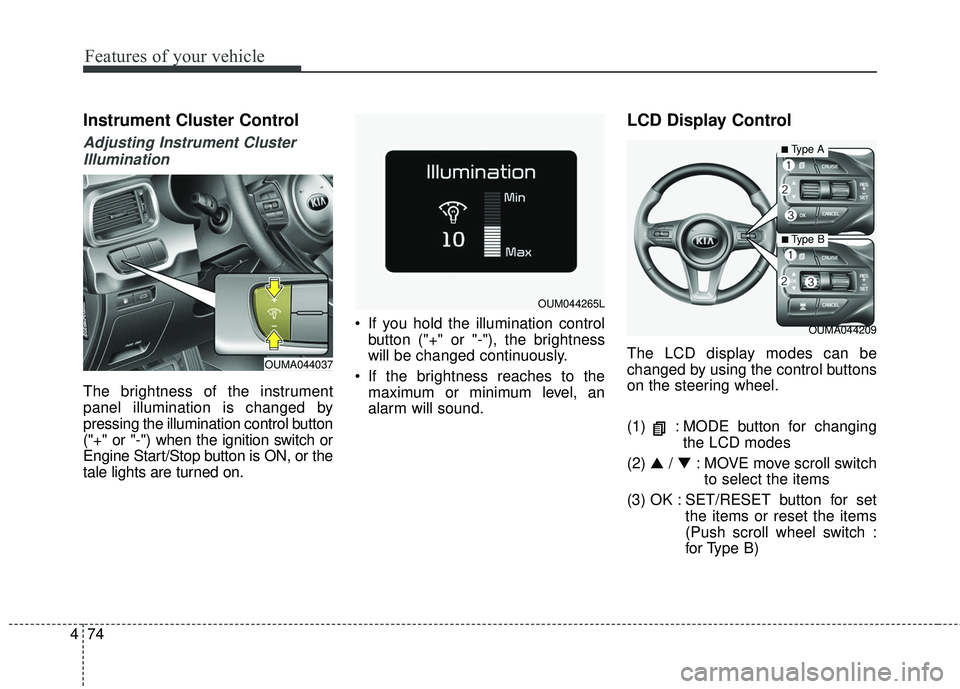
The brightness of the instrument
panel illumination is changed by
pressing the illumination control button
("+" or "-") when the ignition switch or
Engine Start/Stop button is ON, or the
tale lights are turned on. If you hold the illumination control
button ("+" or "-"), the brightness
will be changed continuously.
If the brightness reaches to the maximum or minimum level, an
alarm will sound.
LCD Display Control
The LCD display modes can be
changed by using the control buttons
on the steering wheel.
(1) : MODE button for changing the LCD modes
(2) ▲ /▼ : MOVE move scroll switch
to select the items
(3) OK : SET/RESET button for set the items or reset the items
(Push scroll wheel switch :
for Type B)
OUMA044209
OUM044265L
OUMA044037
■Type A
■ Type B
Page 176 of 536
491
Features of your vehicle
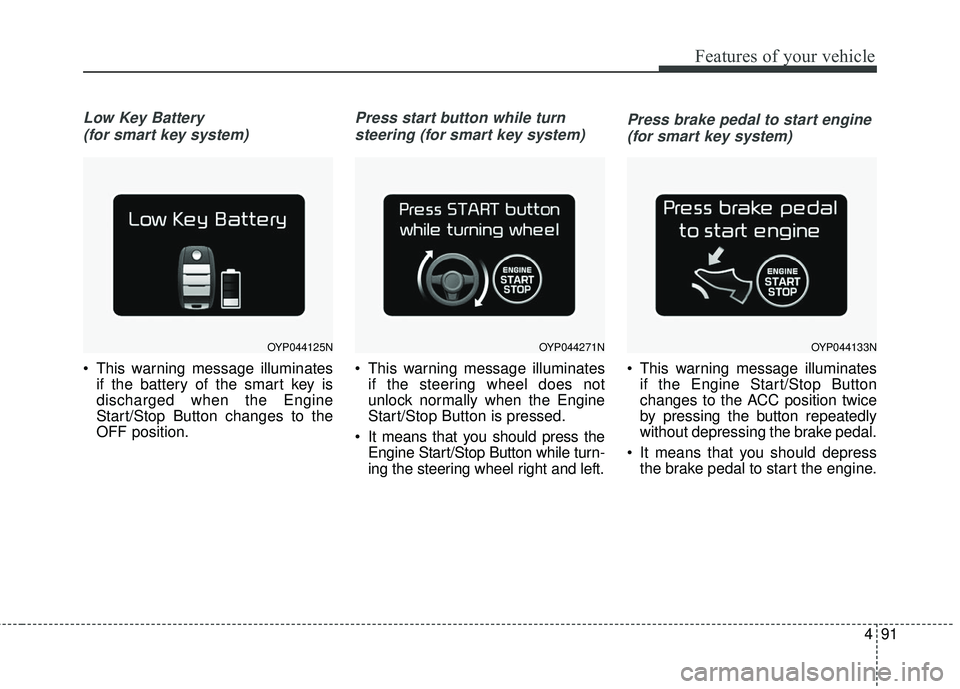
Low Key Battery (for smart key system)
This warning message illuminates if the battery of the smart key is
discharged when the Engine
Start/Stop Button changes to the
OFF position.
Press start button while turn
steering (for smart key system)
This warning message illuminates if the steering wheel does not
unlock normally when the Engine
Start/Stop Button is pressed.
It means that you should press the Engine Start/Stop Button while turn-
ing the steering wheel right and left.
Press brake pedal to start engine
(for smart key system)
This warning message illuminates if the Engine Start/Stop Button
changes to the ACC position twice
by pressing the button repeatedly
without depressing the brake pedal.
It means that you should depress the brake pedal to start the engine.
OYP044125NOYP044271NOYP044133N
Page 189 of 536
Features of your vehicle
104
4
The Master Warning Light illumi-
nates when more than one of the
above warning situations occur. At
this time, the LCD Modes Icon will
change from ( ) to ( ).
If the warning situation is solved, the
master warning light will be turned off
and the LCD Modes Icon will be
changed back to its previous icon ( ).
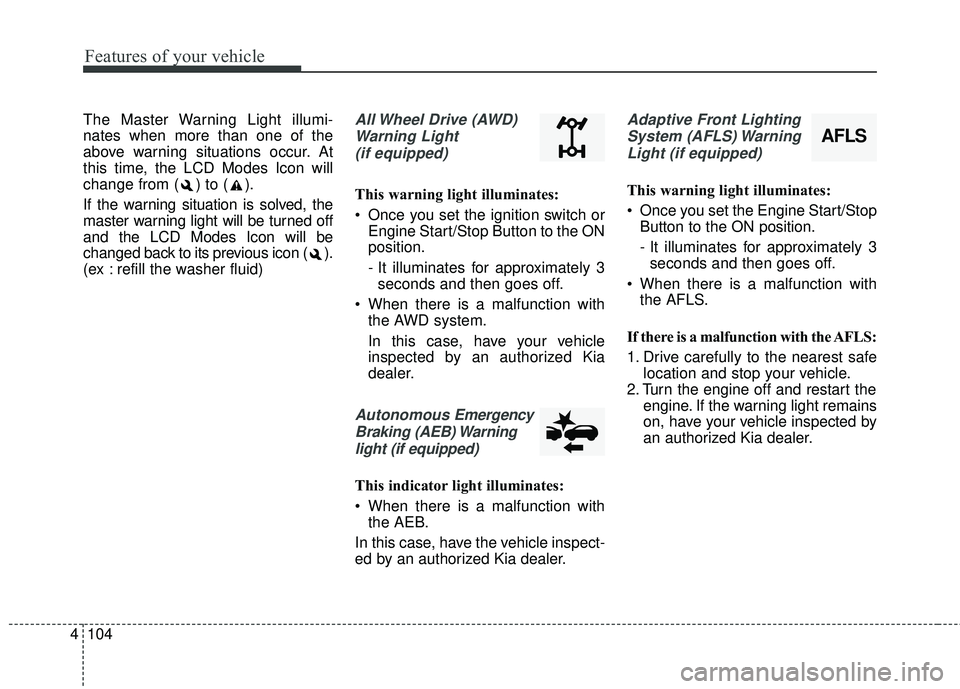
(ex : refill the washer fluid)All Wheel Drive (AWD)
Warning Light (if equipped)
This warning light illuminates:
Once you set the ignition switch or Engine Start/Stop Button to the ON
position.
- It illuminates for approximately 3seconds and then goes off.
When there is a malfunction with the AWD system.
In this case, have your vehicle
inspected by an authorized Kia
dealer.
Autonomous Emergency
Braking (AEB) Warning light (if equipped)
This indicator light illuminates:
When there is a malfunction with the AEB.
In this case, have the vehicle inspect-
ed by an authorized Kia dealer.
Adaptive Front Lighting System (AFLS) WarningLight (if equipped)
This warning light illuminates:
Once you set the Engine Start/Stop Button to the ON position.
- It illuminates for approximately 3seconds and then goes off.
When there is a malfunction with the AFLS.
If there is a malfunction with the AFLS:
1. Drive carefully to the nearest safe location and stop your vehicle.
2. Turn the engine off and restart the engine. If the warning light remains
on, have your vehicle inspected by
an authorized Kia dealer.
AFLS
Page 218 of 536
4133
Features of your vehicle
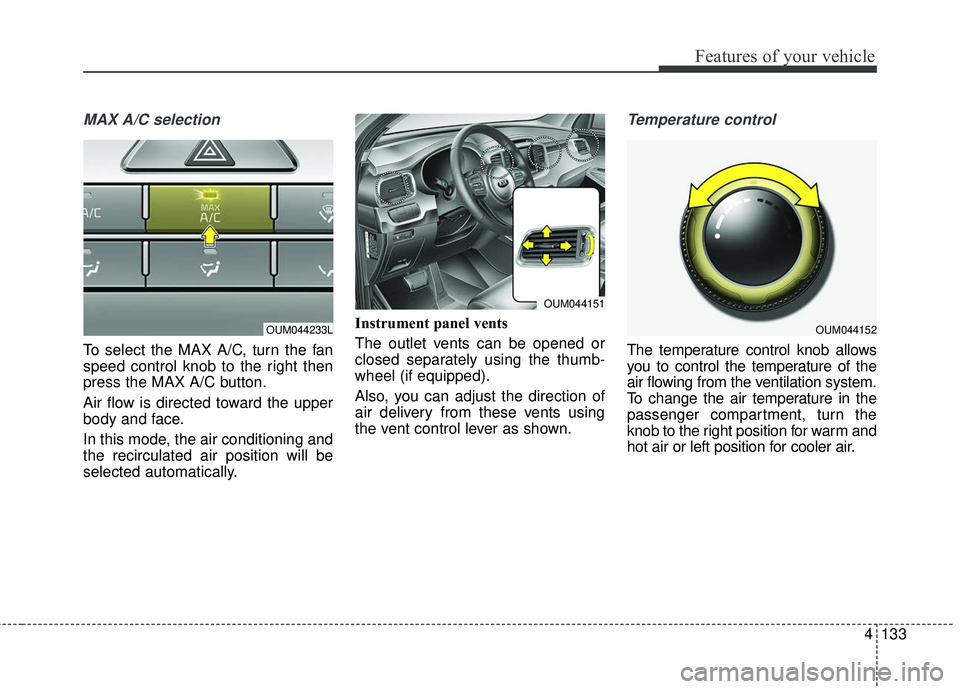
MAX A/C selection
To select the MAX A/C, turn the fan
speed control knob to the right then
press the MAX A/C button.
Air flow is directed toward the upper
body and face.
In this mode, the air conditioning and
the recirculated air position will be
selected automatically.Instrument panel vents
The outlet vents can be opened or
closed separately using the thumb-
wheel (if equipped).
Also, you can adjust the direction of
air delivery from these vents using
the vent control lever as shown.
Temperature control
The temperature control knob allows
you to control the temperature of the
air flowing from the ventilation system.
To change the air temperature in the
passenger compartment, turn the
knob to the right position for warm and
hot air or left position for cooler air.
OUM044233LOUM044152
OUM044151
Page 260 of 536
4175
Features of your vehicle
Steering wheel remote
controller
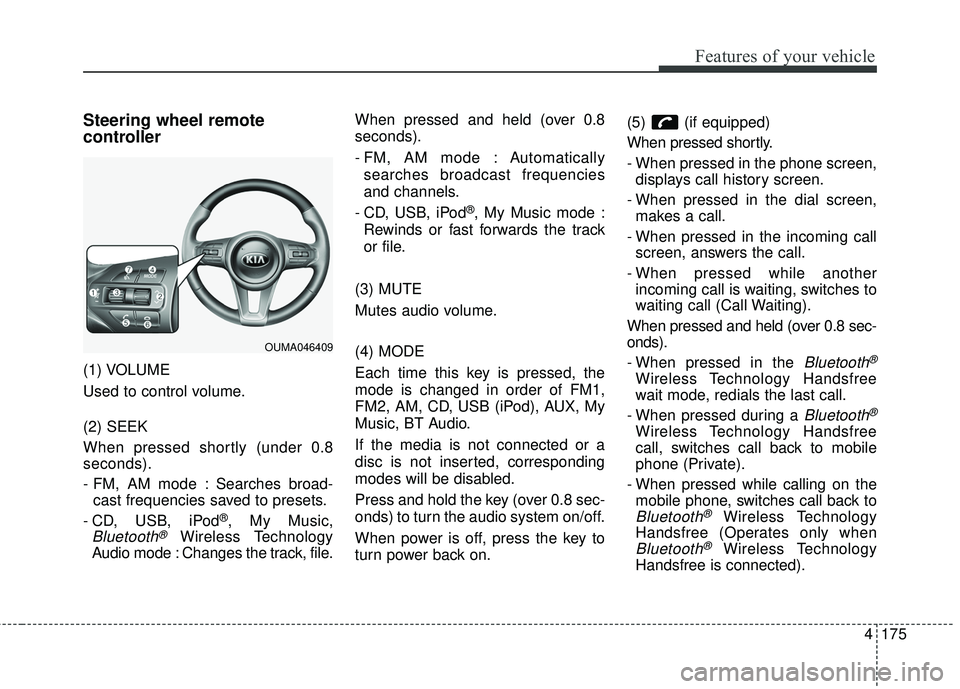
(1) VOLUME
Used to control volume.
(2) SEEK
When pressed shortly (under 0.8
seconds).
- FM, AM mode : Searches broad-cast frequencies saved to presets.
- CD, USB, iPod
®, My Music,
Bluetooth®Wireless Technology
Audio mode : Changes the track, file. When pressed and held (over 0.8
seconds).
- FM, AM mode : Automatically
searches broadcast frequencies
and channels.
- CD, USB, iPod
®, My Music mode :
Rewinds or fast forwards the track
or file.
(3) MUTE
Mutes audio volume.
(4) MODE
Each time this key is pressed, the
mode is changed in order of FM1,
FM2, AM, CD, USB (iPod), AUX, My
Music, BT Audio.
If the media is not connected or a
disc is not inserted, corresponding
modes will be disabled.
Press and hold the key (over 0.8 sec-
onds) to turn the audio system on/off.
When power is off, press the key to
turn power back on. (5) (if equipped)
When pressed shortly.
- When pressed in the phone screen,
displays call history screen.
- When pressed in the dial screen, makes a call.
- When pressed in the incoming call screen, answers the call.
- When pressed while another incoming call is waiting, switches to
waiting call (Call Waiting).
When pressed and held (over 0.8 sec-
onds).
- When pressed in the
Bluetooth®
Wireless Technology Handsfree
wait mode, redials the last call.
- When pressed during a
Bluetooth®
Wireless Technology Handsfree
call, switches call back to mobile
phone (Private).
- When pressed while calling on the mobile phone, switches call back to
Bluetooth®Wireless Technology
Handsfree (Operates only when
Bluetooth®Wireless Technology
Handsfree is connected).
OUMA046409
Page 285 of 536
515
Driving your vehicle
N (Neutral)
The wheels and transaxle are not
engaged. The vehicle will roll freely
even on the slightest incline unless
the parking brake or service brakes
are applied.
- Parking in N (Neutral) gear
Follow below steps when parking
and you want the vehicle to move
when pushed.
1. After parking your vehicle, depressthe brake pedal and move the
transaxle shift lever to [P] with the
ignition button in [ON] or while the
engine is running.
2. If the parking brake is applied release the parking brake.
- For EPB (Electronic ParkingBrake) equipped vehicles, push
the brake pedal with the ignition
button in [ON] or while the engine
is running to reapply the parking
brake. If [AUTO HOLD] function is
used while driving (If [AUTO
HOLD] indicator is on in the clus-
ter), press [AUTO HOLD] switch
and [AUTO HOLD] function
should be turn off. 3. While pressing the brake pedal,
turn the ignition button [OFF].
- For smart key equipped vehicles,the ignition switch can be moved
to [OFF] only when the shift lever
is in [P].
4. Change the gear shift lever to [N] (Neutral) while pressing the brake
pedal and pressing down a tool (e.g.
flathead screw-driver) into the
[SHIFT LOCK RELEASE] access
hole at the same time. Then, the
vehicle will move when external
force is applied. After the ignition switch has been
turned off, the electronic parking
brake cannot be disengaged.
For EPB (Electronic Parking Brake) equipped vehicles with
[AUTO HOLD] function used while
driving, if the ignition button has
been turned [OFF], the electronic
parking brake will be engaged
automatically. Therefore, [AUTO
HOLD] function should be turned
off before the ignition button is
turned off.
D (Drive)
This is the normal forward driving
position. The transaxle will automati-
cally shift through a 6-gear
sequence, providing the best fuel
economy and power.
For extra power when passing another
vehicle or climbing grades, depress
the accelerator fully, at which time the
transaxle will automatically downshift
to the next lower gear.
WARNING- Parking In Neutral
With the exception of parking in neutral gear, always park
the vehicle in [P] (Park) for
safety and apply the parking
brake.
Before parking in [N] (Neutral) gear, make sure the parking
ground is level and flat. Do not
park in [N] gear on any slopes
or gradients. If parked and left
in [N], the vehicle may move
and cause serious damage or
injury.