lock KIA SORENTO 2018 Owners Manual
[x] Cancel search | Manufacturer: KIA, Model Year: 2018, Model line: SORENTO, Model: KIA SORENTO 2018Pages: 536, PDF Size: 13.42 MB
Page 7 of 536
Introduction
41
Other fuels
Using fuels that contain Silicone (Si),
MMT (Manganese, Mn), Ferrocene
(Fe), and Other metalic additives,
may cause vehicle and engine dam-
age or cause misfiring, poor acceler-
ation, engine stalling, catalyst melt-
ing, clogging, abnormal corrosion,
life cycle reduction, etc.
Also, the Malfunction Indicator Lamp
(MIL) may illuminate.
✽ ✽
NOTICE
Damage to the fuel system or per-
formance problem caused by the use
of these fuels may not be covered by
your New Vehicle Limited
Warranty.
Use of MTBE
Kia recommends avoiding fuels con-
taining MTBE (Methyl Tertiary Butyl
Ether) over 15.0% vol. (Oxygen
Content 2.7% weight) in your vehicle.
Fuel containing MTBE over 15.0%
vol. (Oxygen Content 2.7% weight)
may reduce vehicle performance and
produce vapor lock or hard starting.
✽ ✽
NOTICE
Your New Vehicle Limited
Warranty may not cover damage to
the fuel system and any perform-
ance problems that are caused by
the use of fuels containing methanol
or fuels containing MTBE (Methyl
Tertiary Butyl Ether) over 15.0%
vol. (Oxygen Content 2.7% weight.)
Gasoline containing MMT
Some gasoline contains harmful man-
ganese-based fuel additives Such as
MMT(Methylcyclopentadienyl
Manganese Tricarbonyl). Kia does not
recommend the use of gasoline con-
taining MMT. This type of fuel can
reduce vehicle performance and affect
your emission control system. The
Malfunction Indicator Lamp on the
cluster may come on.
Do not use methanol
Fuels containing methanol (wood alco-
hol) should not be used in your vehicle.
This type of fuel can reduce vehicle
performance and damage components
of the fuel system, engine control sys-
tem and emission control system.
Fuel Additives
Kia recommends that you use good
quality gasolines treated with deter-
gent additives such as TOP TIER
Detergent Gasoline, which help pre-
vent deposit formation in the engine.
These gasolines will help the engine
run cleaner and enhance performance
of the Emission Control System. For
more information on TOP TIER
Detergent Gasoline, please go to the
website (www.toptiergas.com)
For customers who do not use TOP
TIER Detergent Gasoline regularly,
and have problems starting or the
engine does not run smoothly, addi-
tives that you can buy separately may
be added to the gasoline.
If TOP TIER Detergent Gasoline is not
available, one bottle of additive should
be added to the fuel tank at every
12,000 km (7,500 miles) or every
engine oil change is recommended.
Additives are available from your
authorized Kia dealer along with infor-
mation on how to use them. Do not
mix other additives.
Page 12 of 536
23
Your vehicle at a glance
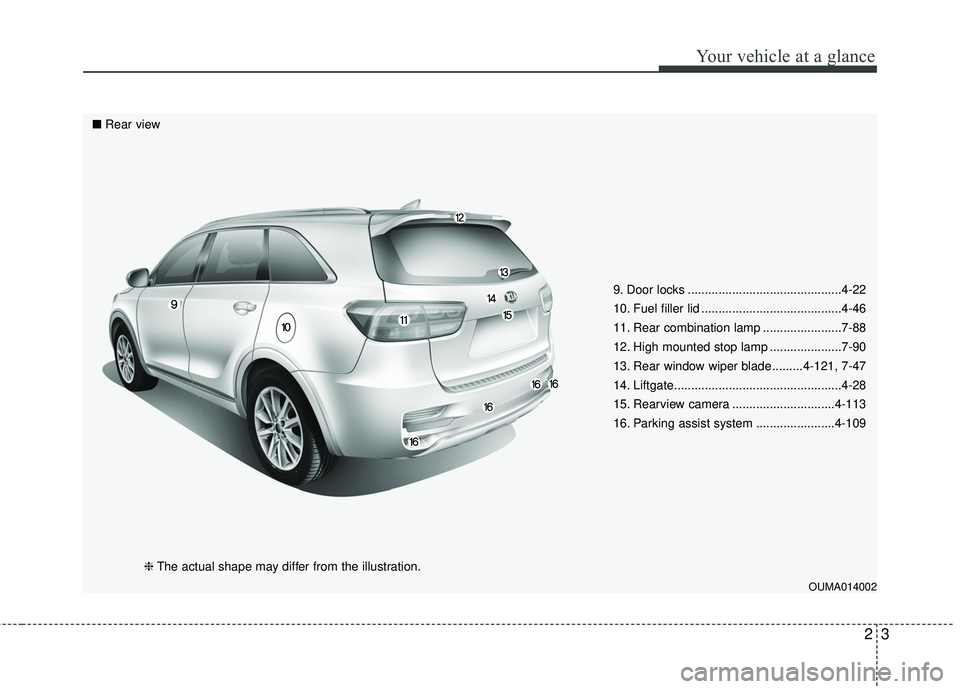
9. Door locks .............................................4-22
10. Fuel filler lid .........................................4-46
11. Rear combination lamp .......................7-88
12. High mounted stop lamp .....................7-90
13. Rear window wiper blade .........4-121, 7-47
14. Liftgate.................................................4-28
15. Rearview camera ..............................4-113
16. Parking assist system .......................4-109
OUMA014002
■Rear view
❈The actual shape may differ from the illustration.
Page 13 of 536
Your vehicle at a glance
42
INTERIOR OVERVIEW
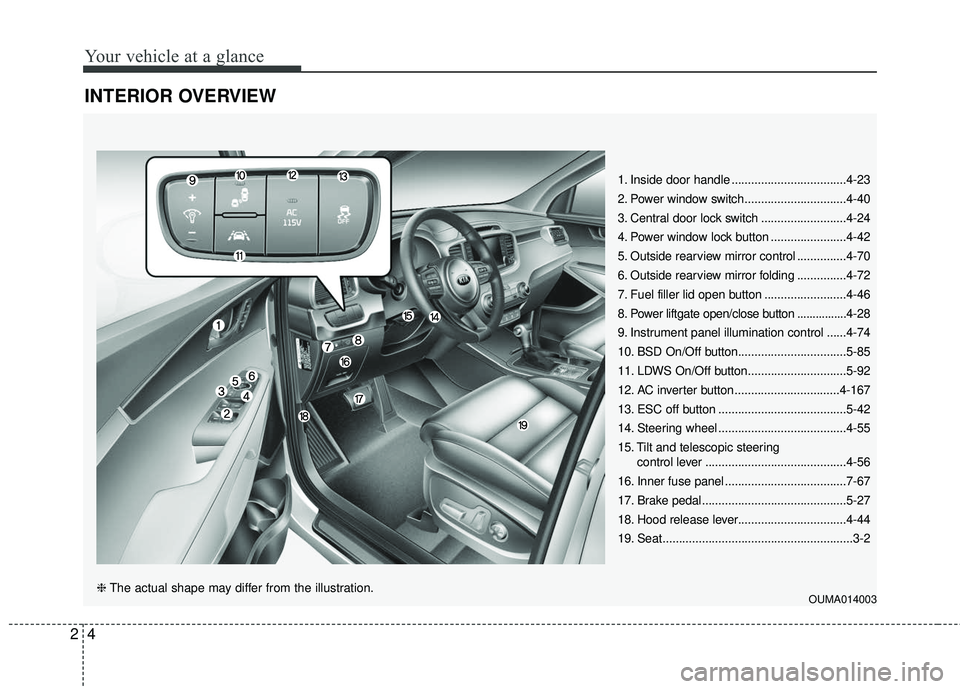
1. Inside door handle ...................................4-23
2. Power window switch...............................4-40
3. Central door lock switch ..........................4-24
4. Power window lock button .......................4-42
5. Outside rearview mirror control ...............4-70
6. Outside rearview mirror folding ...............4-72
7. Fuel filler lid open button .........................4-46
8. Power liftgate open/close button ................4-28
9. Instrument panel illumination control ......4-74
10. BSD On/Off button.................................5-85
11. LDWS On/Off button..............................5-92
12. AC inverter button ................................4-167
13. ESC off button .......................................5-42
14. Steering wheel .......................................4-55
15. Tilt and telescopic steering control lever ...........................................4-56
16. Inner fuse panel .....................................7-67
17. Brake pedal............................................5-27
18. Hood release lever.................................4-44
19. Seat..........................................................3-2
OUMA014003❈ The actual shape may differ from the illustration.
Page 14 of 536
INSTRUMENT PANEL OVERVIEW
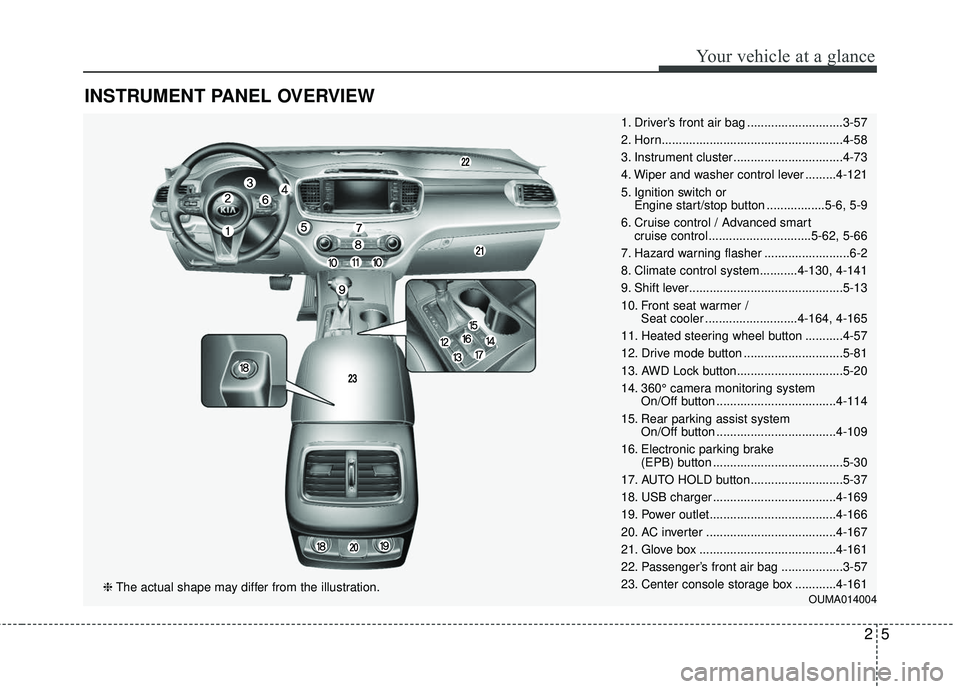
1. Driver’s front air bag ............................3-57
2. Horn.....................................................4-58
3. Instrument cluster ................................4-73
4. Wiper and washer control lever .........4-121
5. Ignition switch or Engine start/stop button .................5-6, 5-9
6. Cruise control / Advanced smart cruise control ..............................5-62, 5-66
7. Hazard warning flasher .........................6-2
8. Climate control system...........4-130, 4-141
9. Shift lever.............................................5-13
10. Front seat warmer / Seat cooler ...........................4-164, 4-165
11. Heated steering wheel button ...........4-57
12. Drive mode button .............................5-81
13. AWD Lock button...............................5-20
14. 360° camera monitoring system On/Off button ...................................4-114
15. Rear parking assist system On/Off button ...................................4-109
16. Electronic parking brake (EPB) button ......................................5-30
17. AUTO HOLD button...........................5-37
18. USB charger ....................................4-169
19. Power outlet.....................................4-166
20. AC inverter ......................................4-167
21. Glove box ........................................4-161
22. Passenger’s front air bag ..................3-57
23. Center console storage box ............4-161
OUMA014004❈ The actual shape may differ from the illustration.
25
Your vehicle at a glance
Page 21 of 536
Safety features of your vehicle
43
Feature of Seat Leather
Leather is made from the outerskin of an animal, which goes
through a special process to be
available for use. Since it is a nat-
ural substance, each part differs in
thickness or density.
Wrinkles may appear as a natural
result of stretching and shrinking
depending on the temperature and
humidity.
WARNING- Unexpected
Seat Movement
After adjusting a manual seat,
always check that it is locked by
shifting your weight to the front
and back. Sudden or unexpect-
ed movement of the driver's
seat could cause you to lose
control of the vehicle.WARNING - Rear seatbacks
Always lock the rear seatback
before driving. Failure to do so
could result in passengers or
objects being thrown forward
injuring vehicle occupants.
WARNING- Luggage and Cargo
Do not stack pile or stack lug-
gage or cargo higher than the
seatback in the cargo area. In an
accident the cargo could strike
and injury a passenger. If
objects are large, heavy or must
be piled, they must be secured
in the cargo area.
WARNING- Cargo Area
Do not allow passengers to ride
in the cargo area under any cir-
cumstance. The cargo area is
solely for the purpose of trans-
porting luggage or cargo.
WARNING- Seat adjust- ment
Do not adjust the seat while wearing seat belts. Moving the
seat forward will cause strong
pressure on the abdomen.
Do not place your hand near the seat while adjusting the
seat. Your hand could get
caught in the seat mechanism.
WARNING- Small objects
Use extreme caution when pick-
ing small objects trapped under
the seats or between the seat
and the center console. Your
hands might be cut or injured
by the sharp edges of the seats
mechanism.
Page 22 of 536
35
Safety features of your vehicle
The seat is made of stretchablematerial to improve comfort.
The parts contacting the body are curved and the side supporting
area is high which provides driving
comfort and stability.
Wrinkles may appear naturally from usage. It is not a fault of the
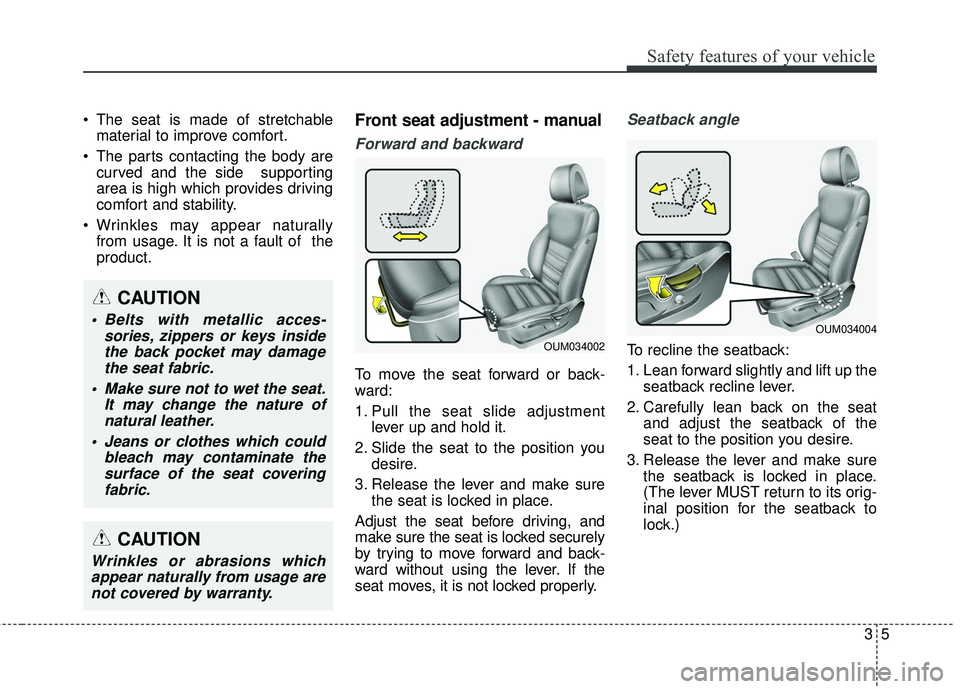
product.Front seat adjustment - manual
Forward and backward
To move the seat forward or back-
ward:
1. Pull the seat slide adjustment lever up and hold it.
2. Slide the seat to the position you desire.
3. Release the lever and make sure the seat is locked in place.
Adjust the seat before driving, and
make sure the seat is locked securely
by trying to move forward and back-
ward without using the lever. If the
seat moves, it is not locked properly.
Seatback angle
To recline the seatback:
1. Lean forward slightly and lift up the seatback recline lever.
2. Carefully lean back on the seat and adjust the seatback of the
seat to the position you desire.
3. Release the lever and make sure the seatback is locked in place.
(The lever MUST return to its orig-
inal position for the seatback to
lock.)OUM034002
OUM034004
CAUTION
Belts with metallic acces-sories, zippers or keys insidethe back pocket may damagethe seat fabric.
Make sure not to wet the seat. It may change the nature ofnatural leather.
Jeans or clothes which could bleach may contaminate thesurface of the seat coveringfabric.
CAUTION
Wrinkles or abrasions whichappear naturally from usage arenot covered by warranty.
Page 31 of 536
Safety features of your vehicle
14
3
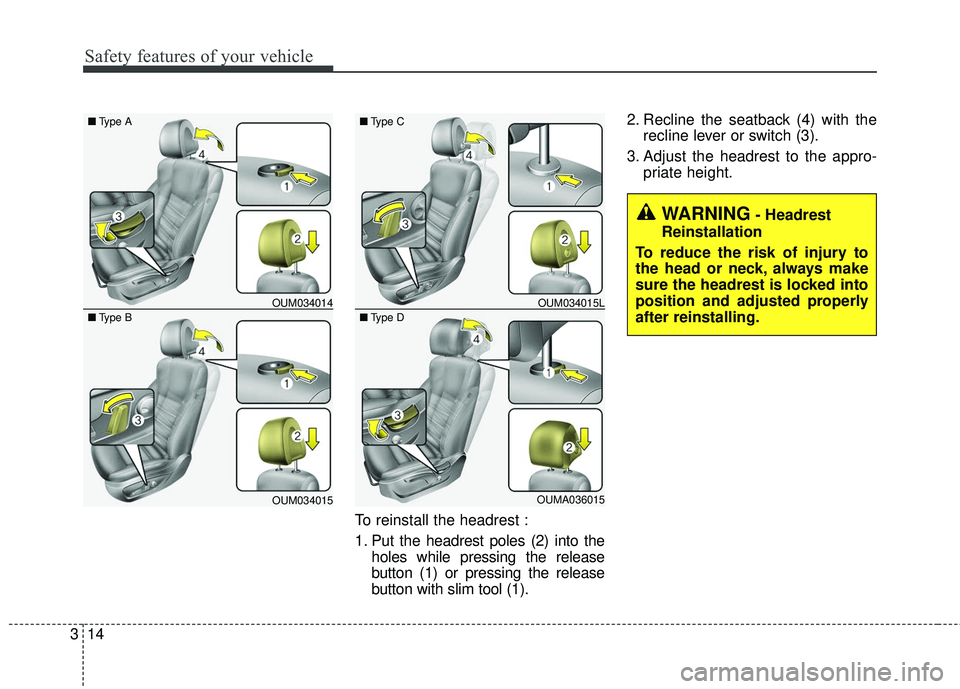
To reinstall the headrest :
1. Put the headrest poles (2) into the
holes while pressing the release
button (1) or pressing the release
button with slim tool (1). 2. Recline the seatback (4) with the
recline lever or switch (3).
3. Adjust the headrest to the appro- priate height.
OUM034014
OUM034015
■
Type B
■Type A
OUM034015L
OUMA036015
■
Type D
■Type C
WARNING- Headrest
Reinstallation
To reduce the risk of injury to
the head or neck, always make
sure the headrest is locked into
position and adjusted properly
after reinstalling.
Page 32 of 536
315
Safety features of your vehicle
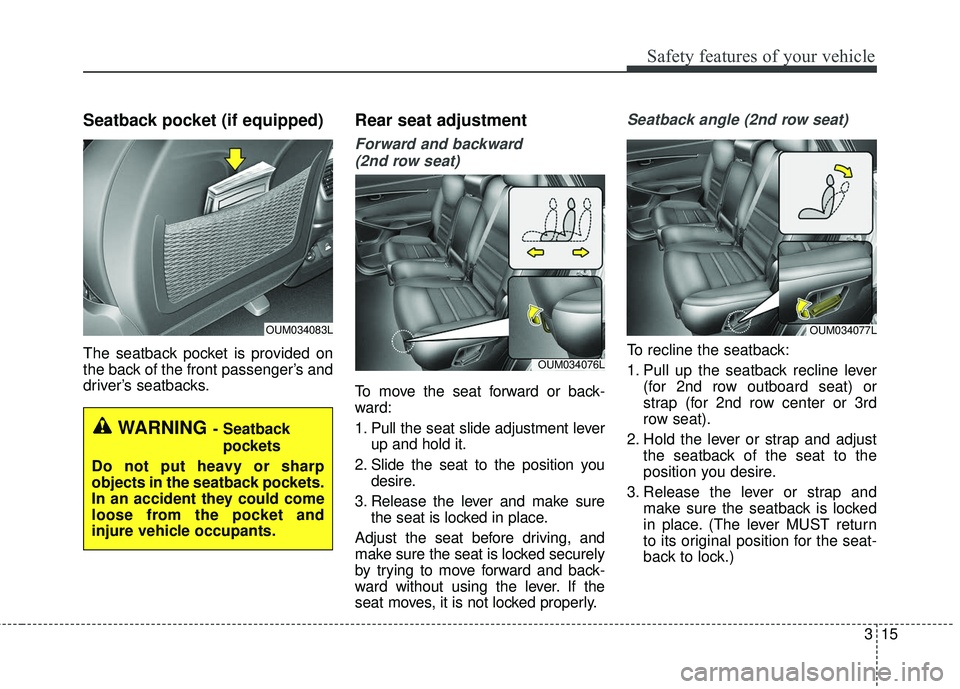
Seatback pocket (if equipped)
The seatback pocket is provided on
the back of the front passenger’s and
driver’s seatbacks.
Rear seat adjustment
Forward and backward (2nd row seat)
To move the seat forward or back-
ward:
1. Pull the seat slide adjustment lever up and hold it.
2. Slide the seat to the position you desire.
3. Release the lever and make sure the seat is locked in place.
Adjust the seat before driving, and
make sure the seat is locked securely
by trying to move forward and back-
ward without using the lever. If the
seat moves, it is not locked properly.
Seatback angle (2nd row seat)
To recline the seatback:
1. Pull up the seatback recline lever (for 2nd row outboard seat) or
strap (for 2nd row center or 3rd
row seat).
2. Hold the lever or strap and adjust the seatback of the seat to the
position you desire.
3. Release the lever or strap and make sure the seatback is locked
in place. (The lever MUST return
to its original position for the seat-
back to lock.)
WARNING- Seatback
pockets
Do not put heavy or sharp
objects in the seatback pockets.
In an accident they could come
loose from the pocket and
injure vehicle occupants.
OUM034083L
OUM034076L
OUM034077L
Page 33 of 536
Safety features of your vehicle
16
3
Walk-in seat (2nd row passenger
side, if equipped)
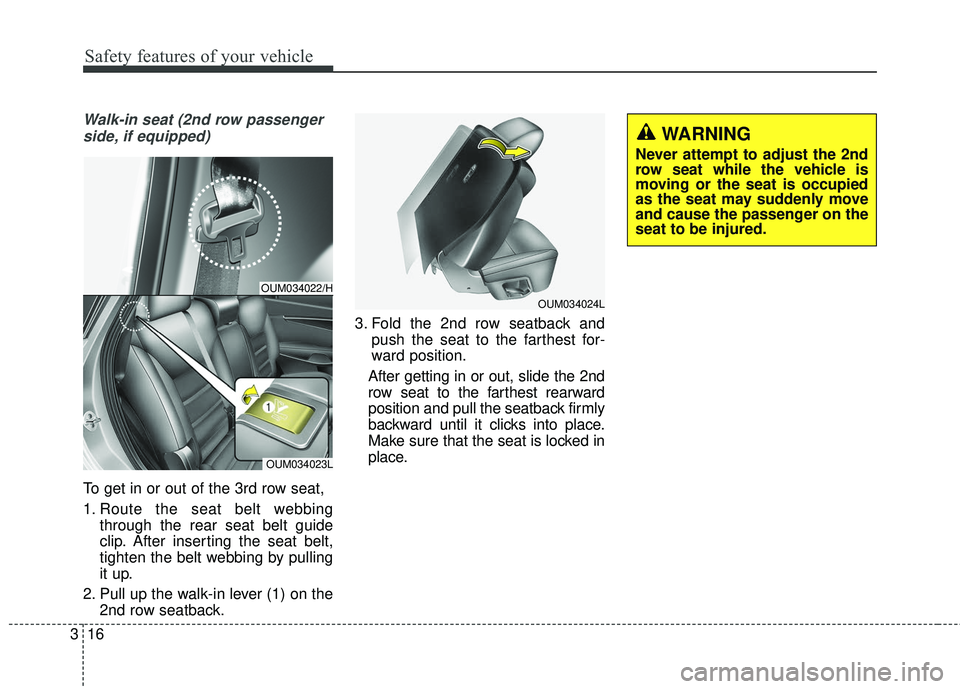
To get in or out of the 3rd row seat,
1. Route the seat belt webbing through the rear seat belt guide
clip. After inserting the seat belt,
tighten the belt webbing by pulling
it up.
2. Pull up the walk-in lever (1) on the 2nd row seatback. 3. Fold the 2nd row seatback and
push the seat to the farthest for-
ward position.
After getting in or out, slide the 2nd
row seat to the farthest rearward
position and pull the seatback firmly
backward until it clicks into place.
Make sure that the seat is locked in
place.
OUM034022/H
OUM034023L
OUM034024L
WARNING
Never attempt to adjust the 2nd
row seat while the vehicle is
moving or the seat is occupied
as the seat may suddenly move
and cause the passenger on the
seat to be injured.
Page 36 of 536
319
Safety features of your vehicle
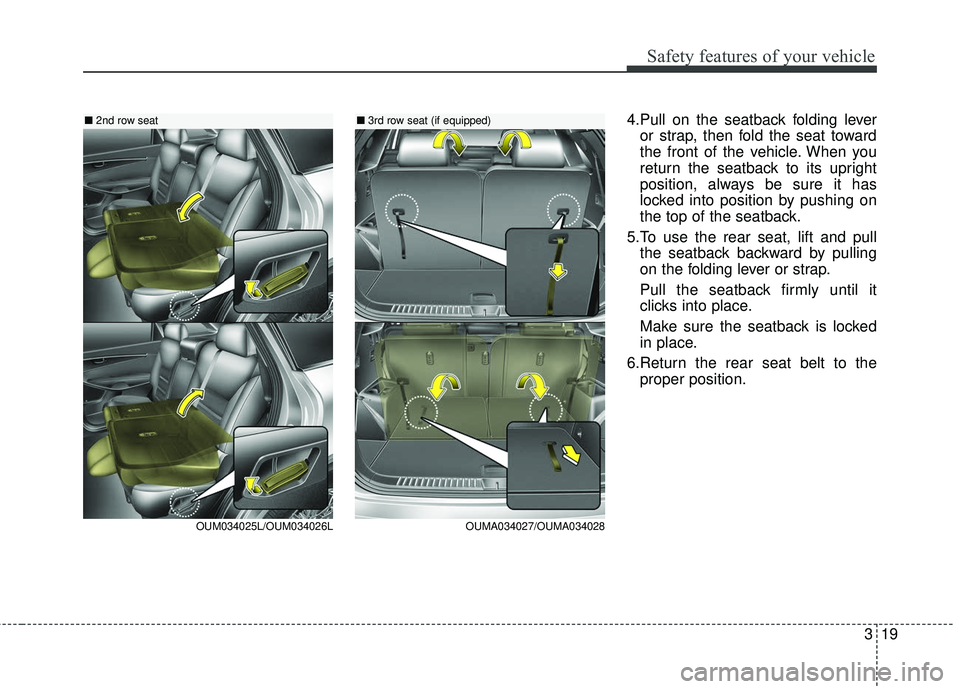
4.Pull on the seatback folding leveror strap, then fold the seat toward
the front of the vehicle. When you
return the seatback to its upright
position, always be sure it has
locked into position by pushing on
the top of the seatback.
5.To use the rear seat, lift and pull the seatback backward by pulling
on the folding lever or strap.
Pull the seatback firmly until it
clicks into place.
Make sure the seatback is locked
in place.
6.Return the rear seat belt to the proper position.
OUM034025L/OUM034026L
■ 2nd row seat■3rd row seat (if equipped)
OUMA034027/OUMA034028