sensor KIA SORENTO 2019 Workshop Manual
[x] Cancel search | Manufacturer: KIA, Model Year: 2019, Model line: SORENTO, Model: KIA SORENTO 2019Pages: 573, PDF Size: 10.61 MB
Page 429 of 573
613
What to do in an emergency
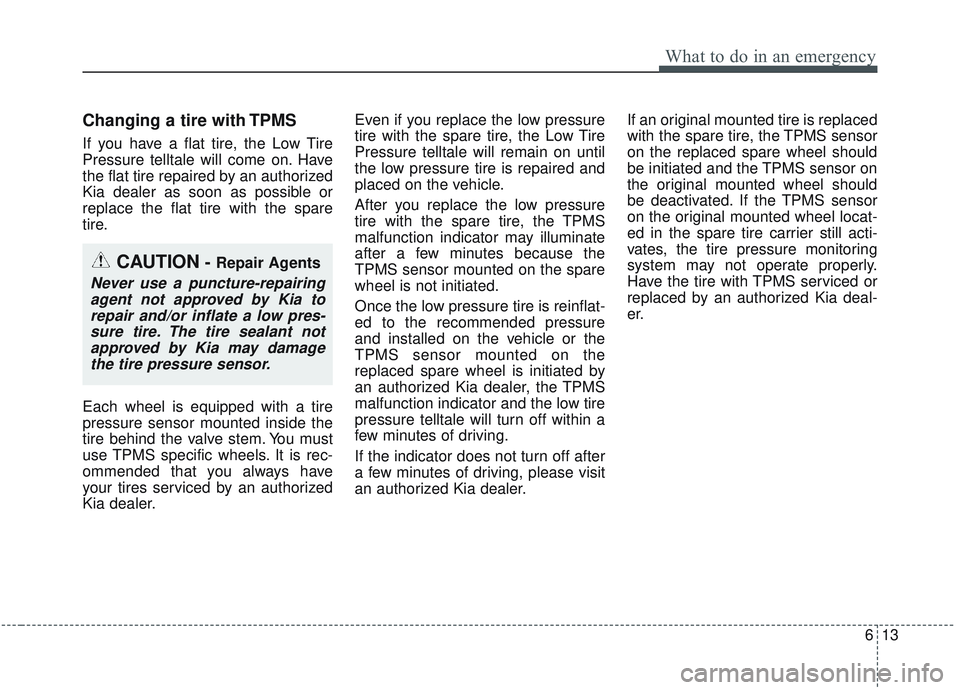
Changing a tire with TPMS
If you have a flat tire, the Low Tire
Pressure telltale will come on. Have
the flat tire repaired by an authorized
Kia dealer as soon as possible or
replace the flat tire with the spare
tire.
Each wheel is equipped with a tire
pressure sensor mounted inside the
tire behind the valve stem. You must
use TPMS specific wheels. It is rec-
ommended that you always have
your tires serviced by an authorized
Kia dealer.Even if you replace the low pressure
tire with the spare tire, the Low Tire
Pressure telltale will remain on until
the low pressure tire is repaired and
placed on the vehicle.
After you replace the low pressure
tire with the spare tire, the TPMS
malfunction indicator may illuminate
after a few minutes because the
TPMS sensor mounted on the spare
wheel is not initiated.
Once the low pressure tire is reinflat-
ed to the recommended pressure
and installed on the vehicle or the
TPMS sensor mounted on the
replaced spare wheel is initiated by
an authorized Kia dealer, the TPMS
malfunction indicator and the low tire
pressure telltale will turn off within a
few minutes of driving.
If the indicator does not turn off after
a few minutes of driving, please visit
an authorized Kia dealer.
If an original mounted tire is replaced
with the spare tire, the TPMS sensor
on the replaced spare wheel should
be initiated and the TPMS sensor on
the original mounted wheel should
be deactivated. If the TPMS sensor
on the original mounted wheel locat-
ed in the spare tire carrier still acti-
vates, the tire pressure monitoring
system may not operate properly.
Have the tire with TPMS serviced or
replaced by an authorized Kia deal-
er.
CAUTION- Repair Agents
Never use a puncture-repairing
agent not approved by Kia torepair and/or inflate a low pres-sure tire. The tire sealant notapproved by Kia may damagethe tire pressure sensor.
Page 430 of 573
What to do in an emergency
14
6
You may not be able to identify a low
tire by simply looking at it. Always
use a good quality tire pressure
gauge to measure the tire's inflation
pressure. Please note that a tire that
is hot (from being driven) will have a
higher pressure measurement than a
tire that is cold (from sitting station-
ary for at least 3 hours and driven
less than 1.6 km (1 mile) during that
3 hour period).
Allow the tire to cool before measur-
ing the inflation pressure. Always be
sure the tire is cold before inflating to
the recommended pressure.
A cold tire means the vehicle has
been sitting for 3 hours and driven for
less than 1.6 km (1 mile) in that 3
hour period.
Do not use any tire sealant if your
vehicle is equipped with a Tire
Pressure Monitoring System. The liq-
uid sealant can damage the tire
pressure sensors. The TPMS cannot alert you to
severe and sudden tire damage
caused by external factors such as
nails or road debris.
If you feel any vehicle instability, immediately take your foot off the
accelerator, apply the brakes grad-
ually and with light force, and slow-
ly move to a safe position off the
road.✽ ✽ NOTICE - Protecting TPMS
Tampering with, modifying, or dis-
abling the Tire Pressure Monitoring
System (TPMS) components may
interfere with the system's ability to
warn the driver of low tire pressure
conditions and/or TPMS malfunc-
tions. Tampering with, modifying,
or disabling the Tire Pressure
Monitoring System (TPMS) compo-
nents may void the warranty for
that portion of the vehicle.
Page 442 of 573

What to do in an emergency
26
6
TOWING
Towing service
If emergency towing is necessary,
we recommend having it done by an
authorized Kia dealer or a commer-
cial tow-truck service. Proper lifting
and towing procedures are neces-
sary to prevent damage to the vehi-
cle. The use of wheel dollies or
flatbed is recommended.
For trailer towing guidelines informa-
tion, refer to “Trailer towing” in sec-tion 5.
On AWD vehicles, your vehicle must
be towed with a wheel lift and dollies
or flatbed equipment with all the
wheels off the ground.
On FWD vehicles, it is acceptable to
tow the vehicle with the rear wheels
on the ground (without dollies) and
the front wheels off the ground.
If any of the loaded wheels or sus-
pension components are damaged
or the vehicle is being towed with the
front wheels on the ground, use a
towing dolly under the front wheels. When being towed by a commercial
tow truck and wheel dollies are not
used, the front of the vehicle should
always be lifted, not the rear.
OUM064022
dolly
dolly
WARNING - Side and
curtain Air bag
If your vehicle is equipped with
side and curtain air bag, set the
ignition switch to LOCK or ACC
position when the vehicle is
being towed.
The side and curtain air bag
may deploy when the ignition is
ON, and the rollover sensor
detects the situation as a
rollover.
CAUTION
The AWD vehicle should never be towed with the wheels on theground. This can cause seriousdamage to the transmission orthe AWD system.
Page 471 of 573
Maintenance
28
7
Replace the filter according to the
Maintenance Schedule.
If the vehicle is operated in extreme-
ly dusty or sandy areas, replace theelement more often than the usualrecommended intervals. (Refer to“Maintenance under severe usageconditions” in this chapter.)
CAUTION -Air filter main-
tenance
Do not drive with the air clean- er removed; this will result inexcessive engine wear.
When removing the air cleaner filter, be careful that dust ordirt does not enter the airintake, or damage may result.
Use a Kia genuine part. Use of non-genuine parts could dam-age the air flow sensor.
Page 502 of 573
759
Maintenance
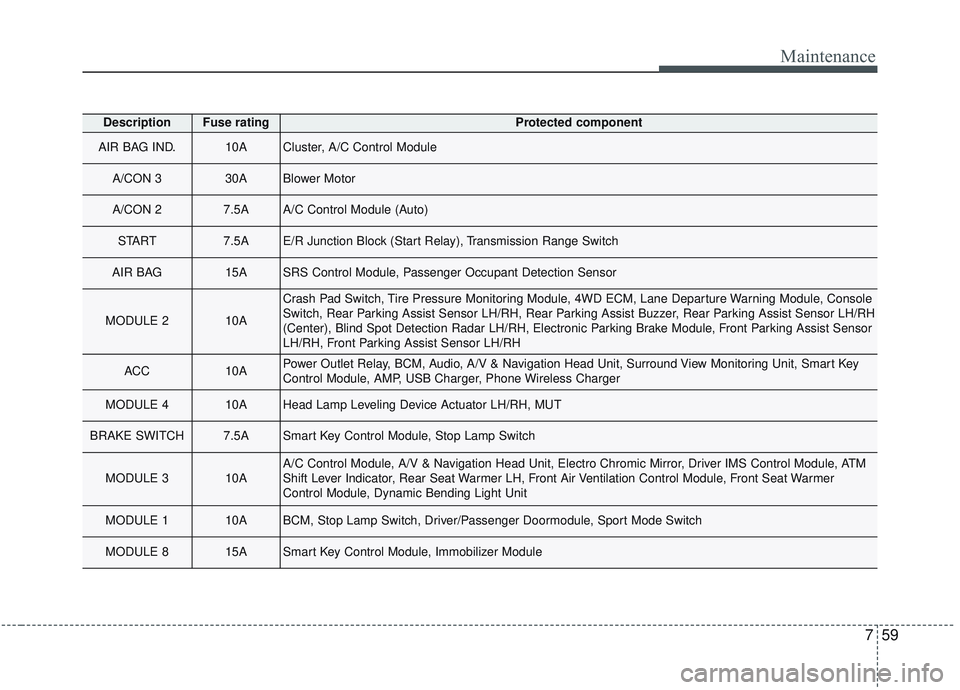
DescriptionFuse ratingProtected component
AIR BAG IND.10ACluster, A/C Control Module
A/CON 3 30ABlower Motor
A/CON 2 7.5AA/C Control Module (Auto)
START 7.5AE/R Junction Block (Start Relay), Transmission Range Switch
AIR BAG 15ASRS Control Module, Passenger Occupant Detection Sensor
MODULE 2 10A
Crash Pad Switch, Tire Pressure Monitoring Module, 4WD ECM, Lane Departure Warning Module, Console
Switch, Rear Parking Assist Sensor LH/RH, Rear Parking Assist Buzzer, Rear Parking Assist Sensor LH/RH
(Center), Blind Spot Detection Radar LH/RH, Electronic Parking Brake Module, Front Parking Assist Sensor
LH/RH, Front Parking Assist Sensor LH/RH
ACC 10APower Outlet Relay, BCM, Audio, A/V & Navigation Head Unit, Surround View Monitoring Unit, Smart Key
Control Module, AMP, USB Charger, Phone Wireless Charger
MODULE 4 10AHead Lamp Leveling Device Actuator LH/RH, MUT
BRAKE SWITCH 7.5ASmart Key Control Module, Stop Lamp Switch
MODULE 3 10AA/C Control Module, A/V & Navigation Head Unit, Electro Chromic Mirror, Driver IMS Control Module, ATM
Shift Lever Indicator, Rear Seat Warmer LH, Front Air Ventilation Control Module, Front Seat Warmer
Control Module, Dynamic Bending Light Unit
MODULE 1 10ABCM, Stop Lamp Switch, Driver/Passenger Doormodule, Sport Mode Switch
MODULE 815ASmart Key Control Module, Immobilizer Module
Page 503 of 573
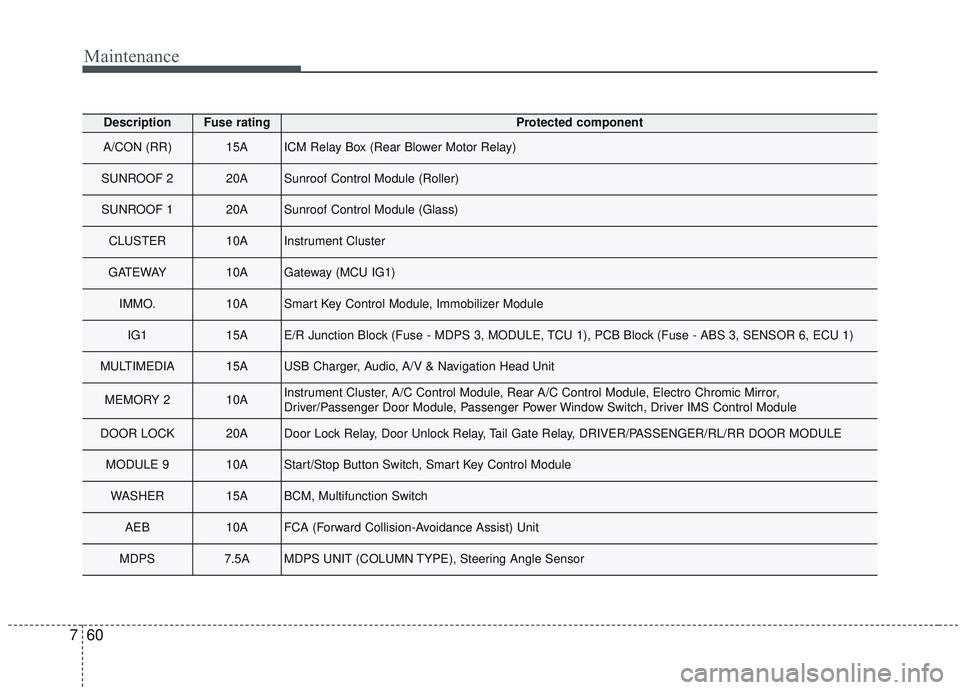
Maintenance
60
7
DescriptionFuse ratingProtected component
A/CON (RR) 15AICM Relay Box (Rear Blower Motor Relay)
SUNROOF 2 20ASunroof Control Module (Roller)
SUNROOF 1 20ASunroof Control Module (Glass)
CLUSTER 10AInstrument Cluster
GATEWAY10AGateway (MCU IG1)
IMMO.10ASmart Key Control Module, Immobilizer Module
IG1 15AE/R Junction Block (Fuse - MDPS 3, MODULE, TCU 1), PCB Block (Fuse - ABS 3, SENSOR 6, ECU 1)
MULTIMEDIA 15AUSB Charger, Audio, A/V & Navigation Head Unit
MEMORY 2 10AInstrument Cluster, A/C Control Module, Rear A/C Control Module, Electro Chromic Mirror,
Driver/Passenger Door Module, Passenger Power Window Switch, Driver IMS Control Module
DOOR LOCK 20ADoor Lock Relay, Door Unlock Relay, Tail Gate Relay, DRIVER/PASSENGER/RL/RR DOOR MODULE
MODULE 910AStart/Stop Button Switch, Smart Key Control Module
WASHER 15ABCM, Multifunction Switch
AEB10AFCA (Forward Collision-Avoidance Assist) Unit
MDPS 7.5AMDPS UNIT (COLUMN TYPE), Steering Angle Sensor
Page 505 of 573
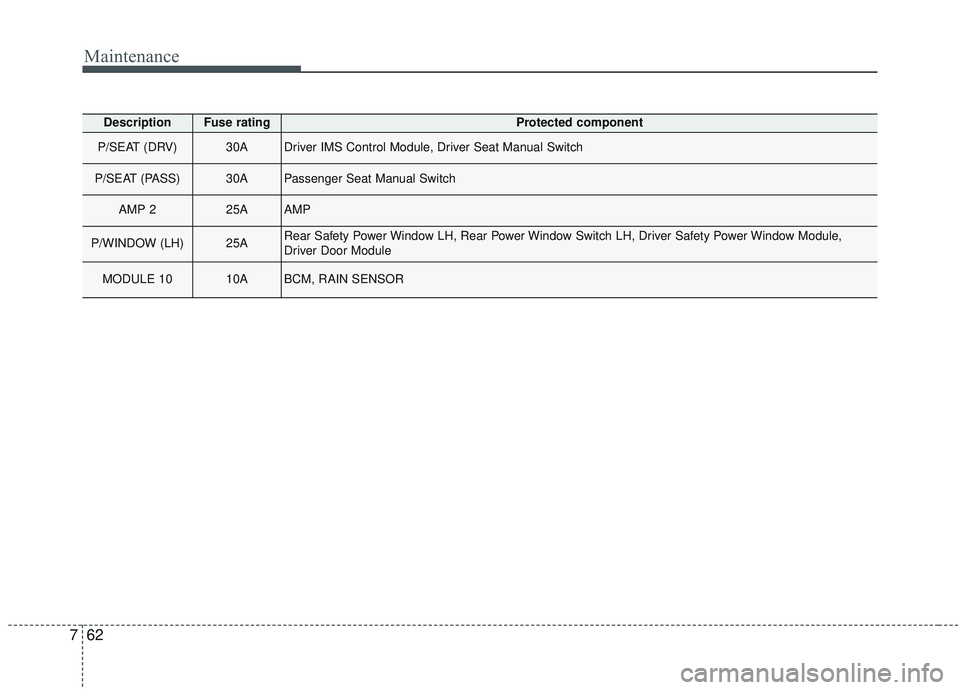
Maintenance
62
7
DescriptionFuse ratingProtected component
P/SEAT (DRV) 30ADriver IMS Control Module, Driver Seat Manual Switch
P/SEAT (PASS) 30APassenger Seat Manual Switch
AMP 2 25AAMP
P/WINDOW (LH) 25ARear Safety Power Window LH, Rear Power Window Switch LH, Driver Safety Power Window Module,
Driver Door Module
MODULE 1010ABCM, RAIN SENSOR
Page 508 of 573
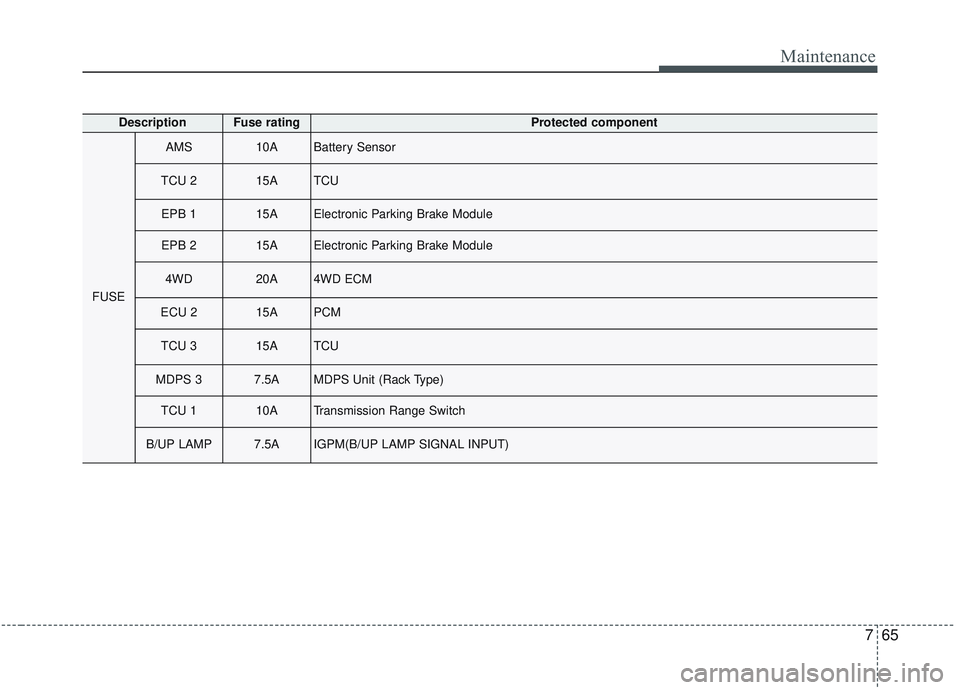
765
Maintenance
DescriptionFuse ratingProtected component
FUSE
AMS10ABattery Sensor
TCU 215ATCU
EPB 115AElectronic Parking Brake Module
EPB 215AElectronic Parking Brake Module
4WD20A4WD ECM
ECU 215APCM
TCU 315ATCU
MDPS 37.5AMDPS Unit (Rack Type)
TCU 110ATransmission Range Switch
B/UP LAMP7.5AIGPM(B/UP LAMP SIGNAL INPUT)
Page 509 of 573
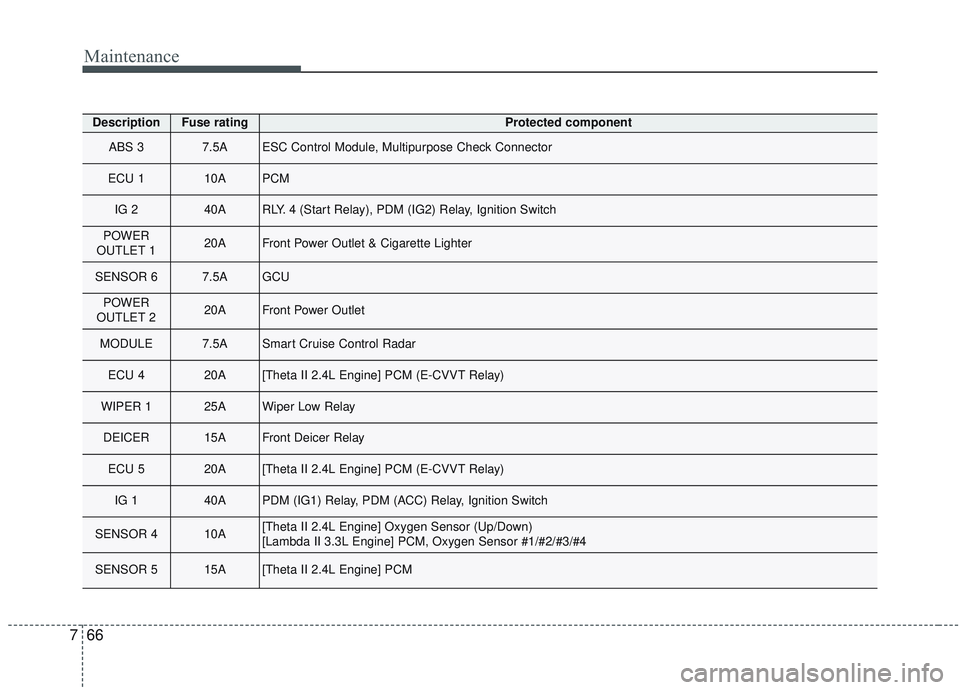
Maintenance
66
7
DescriptionFuse ratingProtected component
ABS 3 7.5AESC Control Module, Multipurpose Check Connector
ECU 1 10APCM
IG 2 40ARLY. 4 (Start Relay), PDM (IG2) Relay, Ignition Switch
POWER
OUTLET 1 20AFront Power Outlet & Cigarette Lighter
SENSOR 6 7.5AGCU
POWER
OUTLET 2 20AFront Power Outlet
MODULE7.5ASmart Cruise Control Radar
ECU 4 20A[Theta II 2.4L Engine] PCM (E-CVVT Relay)
WIPER 125AWiper Low Relay
DEICER 15AFront Deicer Relay
ECU 5 20A[Theta II 2.4L Engine] PCM (E-CVVT Relay)
IG 1 40APDM (IG1) Relay, PDM (ACC) Relay, Ignition Switch
SENSOR 4 10A[Theta II 2.4L Engine] Oxygen Sensor (Up/Down)
[Lambda II 3.3L Engine] PCM, Oxygen Sensor #1/#2/#3/#4
SENSOR 5 15A[Theta II 2.4L Engine] PCM
Page 510 of 573
![KIA SORENTO 2019 Workshop Manual 767
Maintenance
DescriptionFuse ratingProtected component
WIPER 27.5AWiper Parking Signal
POWER
OUTLET 3 20ARear Power Outlet
SENSOR 1 20A[Theta II 2.4L Engine] Ignition Coil #1/#2/#3/#4 [Lambda II KIA SORENTO 2019 Workshop Manual 767
Maintenance
DescriptionFuse ratingProtected component
WIPER 27.5AWiper Parking Signal
POWER
OUTLET 3 20ARear Power Outlet
SENSOR 1 20A[Theta II 2.4L Engine] Ignition Coil #1/#2/#3/#4 [Lambda II](/img/2/40476/w960_40476-509.png)
767
Maintenance
DescriptionFuse ratingProtected component
WIPER 27.5AWiper Parking Signal
POWER
OUTLET 3 20ARear Power Outlet
SENSOR 1 20A[Theta II 2.4L Engine] Ignition Coil #1/#2/#3/#4 [Lambda II 3.3L Engine]\
Ignition Coil #1/#2/#3/#4/#5/#6,
Condecser #1/#2
SENSOR 3 10A[Theta II 2.4L Engine] Fuel Pump Relay [Lambda II 3.3L Engine] Fuel Pump Relay, PCM
POWER
OUTLET 4 20ALuggage Power Outlet
REAR
HEATED 40ARear Defogger Relay
SENSOR 2 10A
[Theta II 2.4L Engine] E/R Junction Block (Cooling Fan 1 Relay), Oil Control Valve (Exhaust), Purge Control
Solenoid Valve, Canister Close Valve, Variable Intake Solenoid Valve
[Lambda II 3.3L Engine] E/R Junction Block (Cooling Fan 1 Relay), Variable Intake Solenoid Valve #1/#2, Purge
Control Solenoid Valve, Oil Control Valve #1/#2/#3/#4 (Intake/Exhaust), PCM, Canister close valve, A/CON
Compressor Relay
FUEL PUMP 20AFuel Pump Relay
HORN 15AHorn Relay
B/ALARM HORN 15ABurglar Alarm Horn Relay
A/C10AA/CON Compressor
SPARE 115ADUMMY
SENSOR 720ANOx SENSOR