parking brake KIA SOUL 2009 User Guide
[x] Cancel search | Manufacturer: KIA, Model Year: 2009, Model line: SOUL, Model: KIA SOUL 2009Pages: 328, PDF Size: 29.57 MB
Page 178 of 328
Driving your vehicle
8
5
During cold weather, shifting may be
difficult until the transaxle lubricant has
warmed up. This is normal and not
harmful to the transaxle.
If you've come to a complete stop and it's hard to shift into 1st or R(Reverse),
put the shift lever in N(Neutral) position
and release the clutch. Press the
clutch pedal back down, and then shift
into 1st or R(Reverse) gear position. E050101AUNUsing the clutch
The clutch should be pressed all the way
to the floor before shifting, then released
slowly. The clutch pedal should always be
fully released while driving. Do not rest
your foot on the clutch pedal while driv-
ing. This can cause unnecessary wear.
Do not partially engage the clutch to hold
the car on an incline. This causes unnec-
essary wear. Use the foot brake or park-
ing brake to hold the car on an incline. Do
not operate the clutch pedal rapidly and
repeatedly.
E050102AUN
Downshifting
When you must slow down in heavy traf-
fic or while driving up steep hills, down-
shift before the engine starts to labor.
Downshifting reduces the chance of
stalling and gives better acceleration
when you again need to increase your
speed. When the vehicle is traveling
down steep hills, downshifting helps
maintain safe speed and prolongs brake
life.
CAUTION
To avoid premature clutch wear
and damage, do not drive withyour foot resting on the clutch pedal. Also, don’t use the clutchto hold the vehicle stopped on an
uphill grade, while waiting for atraffic light, etc.
Do not use the shift lever as a handrest during driving, as this
can result in premature wear ofthe transaxle shift forks.
WARNING
Before leaving the driver’s seat, always set the parking brake fully
and shut the engine off. Thenmake sure the transaxle is shifted
into 1st gear when the vehicle is
parked on a level or uphill grade,
and shifted into R (Reverse) on a
downhill grade. Unexpected and
sudden vehicle movement canoccur if these precautions are not
followed in the order identified.
If your vehicle has a manual transaxle not equipped with a
ignition lock switch, it may moveand cause a serious accident
when starting the engine without
depressing the clutch pedal whilethe parking brake is released and
the shift lever not in the N (neu-tral) position.
Page 181 of 328
511
Driving your vehicle
For smooth operation, depress the brakepedal when shifting from N (Neutral) to aforward or reverse gear.E060101ASA
Transaxle ranges
P (Park)
Always come to a complete stop before
shifting into P (Park). This position locks
the transaxle and prevents the frontwheels from rotating.
WARNING - Automatic
transaxle
Always check the surrounding areas near your vehicle for peo-
ple, especially children, beforeshifting a car into D (Drive) or R
(Reverse).
Before leaving the driver’s seat, always make sure the shift lever
is in the P (Park) position; then
set the parking brake fully and
shut the engine off. Unexpected
and sudden vehicle movementcan occur if these precautions
are not followed in the order iden-tified.
CAUTION
To avoid damage to your
transaxle, do not accelerate theengine in R (Reverse) or any for-ward gear position with the
brakes on.
When stopped on an upgrade, do not hold the vehicle with enginepower. Use the service brake orthe parking brake.
Do not shift from N (Neutral) or P (Park) into D (Drive), or R(Reverse) when the engine is above idle speed.
WARNING
Shifting into P (Park) while the vehicle is in motion will cause the
drive wheels to lock which will
cause you to lose control of the
vehicle.
Do not use the P (Park) position in place of the parking brake.
Always make sure the shift lever
is latched in the P (Park) position
and set the parking brake fully.
Never leave a child unattended in a vehicle.
CAUTION
The transaxle may be damaged if
you shift into P (Park) while the
vehicle is in motion.
Page 182 of 328
Driving your vehicle
12
5
R (Reverse)
Use this position to drive the vehicle
backward. N (Neutral)
The wheels and transaxle are not locked.
The vehicle will roll freely even on the
slightest incline unless the parking brake
or service brakes are applied. D (Drive)
This is the normal forward driving posi-
tion. The transaxle will automatically shift
through a 4-gear sequence, providing the
best fuel economy and power.
For extra power when passing another
vehicle or climbing grades, depress the
accelerator fully, at which time the
transaxle will automatically downshift to
the next lower gear.
✽✽
NOTICE
Always ensure vehicle is stationary, at a
complete stop, before selecting D (Drive).
2 (Second Gear)
Use 2 (Second Gear) for more power
when climbing hills and for increased
braking when going down hills. This posi-tion also helps reduce wheel spin on slip-
pery surfaces. When the shift lever is
placed in 2 (Second Gear), the transaxlewill automatically shift from first to sec-
ond gear.
CAUTION
Always come to a complete stop before shifting into or out of R(Reverse); you may damage the transaxle if you shift into R while
the vehicle is in motion, except asexplained in “Rocking the vehicle”in this section.
Page 184 of 328
Driving your vehicle
14
5
E060102AAM
Shift lock system (if equipped)
For your safety, the automatic transaxle
has a shift lock system which prevents
shifting the transaxle from P (Park) into R
(Reverse) unless the brake pedal isdepressed.
To shift the transaxle from P (Park) into R
(Reverse):
1. Depress and hold the brake pedal.
2. Depress the lock release button and
move the shift lever.
If the brake pedal is repeatedly depressed and released with the shift
lever in the P (Park) position, a chattering
noise near the shift lever may be heard.
This is a normal condition. E060103AUN
Ignition key interlock system
(if equipped)
The ignition key cannot be removed
unless the shift lever is in the P (Park)
position. If the ignition switch is in any
other position, the key cannot be
removed.
E060200AUN-U1 Good driving practices
Never move the shift lever from P (Park) or N (Neutral) to any other posi-
tion with the accelerator pedaldepressed.
Never move the gear selector lever into P (Park) when the vehicle is in motion.
Be sure the car is completely stopped before you attempt to shift into R
(Reverse) or D (Drive).
Never take the vehicle out of gear and coast down a hill. This may be
extremely hazardous. Always leave the
car in gear when moving.
Do not "ride" the brakes. This can cause them to overheat and malfunc-
tion. Instead, when you are driving
down a long hill, slow down and shift to
a lower gear. When you do this, engine
braking will help slow down the vehicle. Slow down before shifting to a lower
gear. Otherwise, the lower gear maynot be engaged.
Always use the parking brake. Do not depend on placing the transaxle in P
(Park) to keep the vehicle from moving.
Exercise extreme caution when driving on a slippery surface. Be especially
careful when braking, accelerating or
shifting gears. On a slippery surface,
an abrupt change in vehicle speed can
cause the drive wheels to lose traction
and the vehicle to go out of control.
Optimum vehicle performance and economy is obtained by smoothly
depressing and releasing the accelera-tor pedal.
WARNING
Always fully depress the brake
pedal before and while shifting out
of the P (Park) position into anoth-
er position to avoid inadvertent
motion of the vehicle which could
injure persons in or around the car.
Page 185 of 328
515
Driving your vehicle
E060203AUN
Moving up a steep grade from a stand-ing start
To move up a steep grade from a stand-
ing start, depress the brake pedal, shift
the shift lever to D (Drive). Select the
appropriate gear depending on load
weight and steepness of the grade, and
release the parking brake. Depress the
accelerator gradually while releasing the
service brakes.
When accelerating from a stop on a
steep hill, the vehicle may have a ten-
dency to roll backwards. Shifting the
shift lever into 2 (Second Gear) will
help prevent the vehicle from rolling
backwards.
WARNING
Always buckle-up! In a collision, an unbelted occupant is signifi-
cantly more likely to be seriously
injured or killed than a properlybelted occupant.
Avoid high speeds when corner- ing or turning.
Do not make quick steering wheel movements, such as sharp
lane changes or fast, sharp turns.
The risk of rollover is greatly increased if you lose control of
your vehicle at highway speeds.
Loss of control often occurs if two or more wheels drop off the
roadway and the driver over-
steers to reenter the roadway.
In the event your vehicle leaves the roadway, do not steer sharply.
Instead, slow down before pulling
back into the travel lanes.
Never exceed posted speed lim- its.WARNING
If your vehicle becomes stuck in
snow, mud, sand, etc., then you
may attempt to rock the vehicle free
by moving it forward and backward.
Do not attempt this procedure if
people or objects are anywhere
near the vehicle. During the rocking
operation the vehicle may suddenly
move forward of backward as it
becomes unstuck, causing injury
or damage to nearby people orobjects.
Page 186 of 328
Driving your vehicle
16
5
E070100AUN
Power brakes
Your vehicle has power-assisted brakes
that adjust automatically through normal
usage.
In the event that the power-assisted
brakes lose power because of a stalled
engine or some other reason, you can
still stop your vehicle by applying greater
force to the brake pedal than you nor-
mally would. The stopping distance, how-
ever, will be longer.
When the engine is not running, the
reserve brake power is partially depleted
each time the brake pedal is applied. Do
not pump the brake pedal when the
power assist has been interrupted.
Pump the brake pedal only when neces-
sary to maintain steering control on slip-
pery surfaces. E070101AUN
In the event of brake failure
If service brakes fail to operate while the
vehicle is in motion, you can make an
emergency stop with the parking brake.
The stopping distance, however, will be
much greater than normal.
BRAKE SYSTEM
WARNING
- Brakes
Do not drive with your foot rest- ing on the brake pedal. This will create abnormal high brake tem-
peratures, excessive brake lining
and pad wear, and increasedstopping distances.
When descending a long or steep hill, shift to a lower gear and
avoid continuous application of
the brakes. Continuous brakeapplication will cause the brakes
to overheat and could result in a
temporary loss of braking per-
formance.
Wet brakes may impair the vehi- cle’s ability to safely slow down;
the vehicle may also pull to oneside when the brakes are applied.
Applying the brakes lightly will
indicate whether they have been
affected in this way. Always test
your brakes in this fashion after
driving through deep water. To
dry the brakes, apply them lightly
while maintaining a safe forward
speed until brake performancereturns to normal.
WARNING - Parking brake
Applying the parking brake while
the vehicle is moving at normal
speeds can cause a sudden loss of
control of the vehicle. If you mustuse the parking brake to stop the
vehicle, use great caution in apply-
ing the brake.
Page 187 of 328
517
Driving your vehicle
E070102AUN-C1
Disc brakes wear indicator
Your vehicle has disc brakes.
When your brake pads are worn and new
pads are required, you will hear a high-
pitched warning sound from your front
brakes or rear brakes (if equipped). You
may hear this sound come and go or it
may occur whenever you depress the
brake pedal.
Please remember that some driving con-
ditions or climates may cause a brake
squeal when you first apply (or lightly
apply) the brakes. This is normal and does
not indicate a problem with your brakes.E070106APB
Rear drum brakes (if equipped)
Your rear drum brakes do not have wear
indicators. Therefore, have the rear brake
linings inspected if you hear a rubbing
noise. Also have your rear brakes
inspected each time you change or
rotate your tires and when you have the
front brakes replaced.
Parking brake E070201AFD-SA
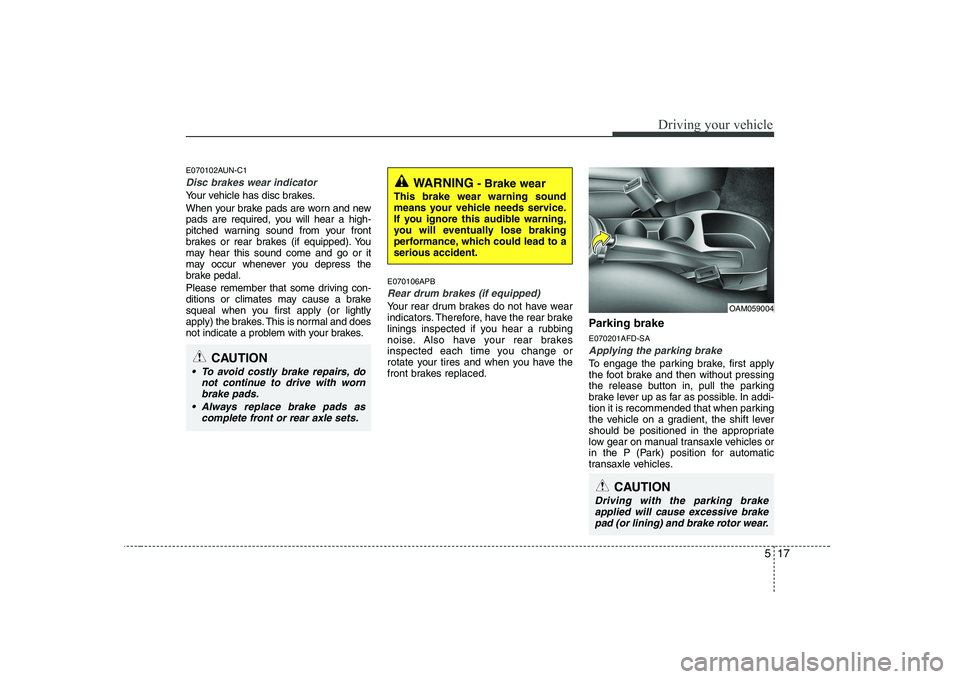
Applying the parking brake
To engage the parking brake, first apply
the foot brake and then without pressing
the release button in, pull the parking
brake lever up as far as possible. In addi-
tion it is recommended that when parking
the vehicle on a gradient, the shift lever
should be positioned in the appropriate
low gear on manual transaxle vehicles or
in the P (Park) position for automatic
transaxle vehicles.
WARNING
- Brake wear
This brake wear warning sound
means your vehicle needs service.
If you ignore this audible warning,
you will eventually lose braking
performance, which could lead to aserious accident.
CAUTION
To avoid costly brake repairs, do not continue to drive with wornbrake pads.
Always replace brake pads as complete front or rear axle sets.
CAUTION
Driving with the parking brakeapplied will cause excessive brakepad (or lining) and brake rotor wear.
OAM059004
Page 188 of 328
Driving your vehicle
18
5
E070202AFD-U1
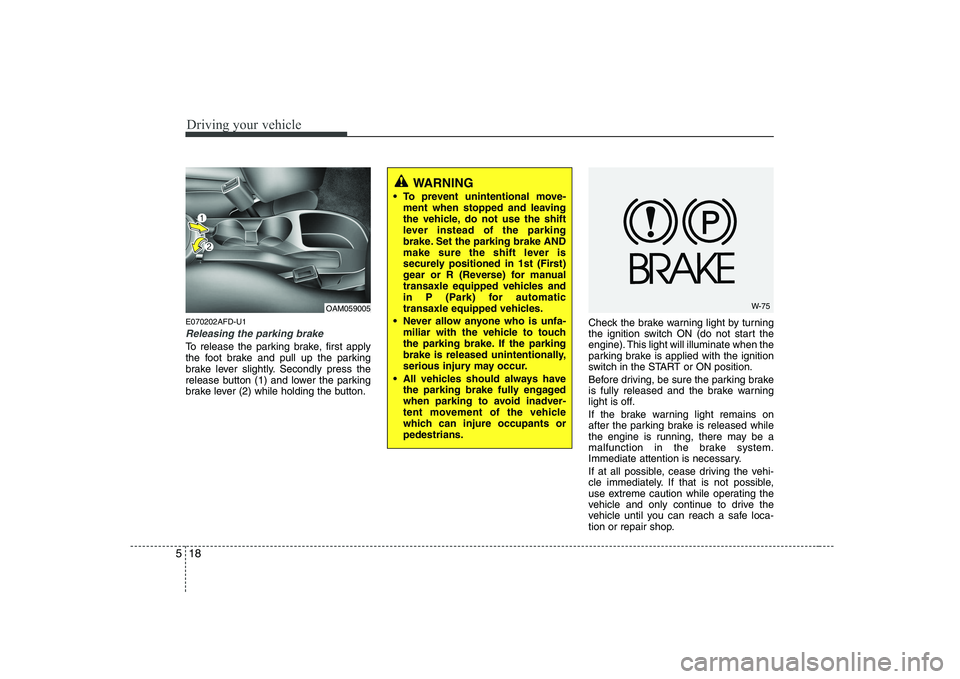
Releasing the parking brake
To release the parking brake, first apply
the foot brake and pull up the parking
brake lever slightly. Secondly press the
release button (1) and lower the parking
brake lever (2) while holding the button. Check the brake warning light by turning
the ignition switch ON (do not start the
engine). This light will illuminate when the
parking brake is applied with the ignition
switch in the START or ON position.
Before driving, be sure the parking brake
is fully released and the brake warning
light is off.
If the brake warning light remains on
after the parking brake is released while
the engine is running, there may be a
malfunction in the brake system.
Immediate attention is necessary.
If at all possible, cease driving the vehi-
cle immediately. If that is not possible,
use extreme caution while operating the
vehicle and only continue to drive the
vehicle until you can reach a safe loca-
tion or repair shop.
WARNING
To prevent unintentional move- ment when stopped and leaving
the vehicle, do not use the shift
lever instead of the parking
brake. Set the parking brake AND
make sure the shift lever is
securely positioned in 1st (First)
gear or R (Reverse) for manual
transaxle equipped vehicles and
in P (Park) for automatic
transaxle equipped vehicles.
Never allow anyone who is unfa- miliar with the vehicle to touch
the parking brake. If the parking
brake is released unintentionally,
serious injury may occur.
All vehicles should always have the parking brake fully engaged
when parking to avoid inadver-
tent movement of the vehicle
which can injure occupants orpedestrians.
OAM059005W-75
Page 194 of 328
Driving your vehicle
24
5
E070600AUN-U1 Good braking practices
Check to be sure the parking brake is
not engaged and that the parking
brake indicator light is out before driv-
ing away.
Driving through water may get the brakes wet. They can also get wet
when the vehicle is washed. Wet
brakes can be dangerous! Your vehicle
will not stop as quickly if the brakes are
wet. Wet brakes may cause the vehicle
to pull to one side.
To dry the brakes, apply the brakes
lightly until the braking action returns to
normal, taking care to keep the vehicle
under control at all times. If the braking
action does not return to normal, stop
as soon as it is safe to do so and call
an authorized KIA dealer for assis-
tance.
Don't coast down hills with the vehicle out of gear. This is extremely haz-
ardous. Keep the vehicle in gear at all
times, use the brakes to slow down,
then shift to a lower gear so that
engine braking will help you maintain a
safe speed. Don't "ride" the brake pedal. Resting
your foot on the brake pedal while driv-ing can be dangerous because the
brakes might overheat and lose their
effectiveness. It also increases the
wear of the brake components.
If a tire goes flat while you are driving, apply the brakes gently and keep the
vehicle pointed straight ahead while
you slow down. When you are moving
slowly enough for it to be safe to do so,
pull off the road and stop in a safe
place.
If your vehicle is equipped with an automatic transaxle, don't let your vehi-
cle creep forward. To avoid creeping
forward, keep your foot firmly on the
brake pedal when the vehicle isstopped.
Be cautious when parking on a hill. Firmly engage the parking brake and
place the shift lever in P (automatic
transaxle) or in first or reverse gear
(manual transaxle). If your vehicle is
facing downhill, turn the front wheels
into the curb to help keep the vehicle
from rolling. If your vehicle is facing
uphill, turn the front wheels away from
the curb to help keep the vehicle from
rolling. If there is no curb or if it is
required by other conditions to keep the
vehicle from rolling, block the wheels. Under some conditions your parking
brake can freeze in the engaged posi-
tion. This is most likely to happen when
there is an accumulation of snow or ice
around or near the rear brakes or if the
brakes are wet. If there is a risk that the
parking brake may freeze, apply it only
temporarily while you put the shift lever
in P (automatic transaxle) or in first or
reverse gear (manual transaxle) and
block the rear wheels so the vehicle
cannot roll. Then release the parking
brake.
Do not hold the vehicle on the upgrade with the accelerator pedal. This can
cause the transaxle to overheat.
Always use the brake pedal or parking
brake.
Page 206 of 328
Driving your vehicle
36
5
E120102AUN
Tire chains
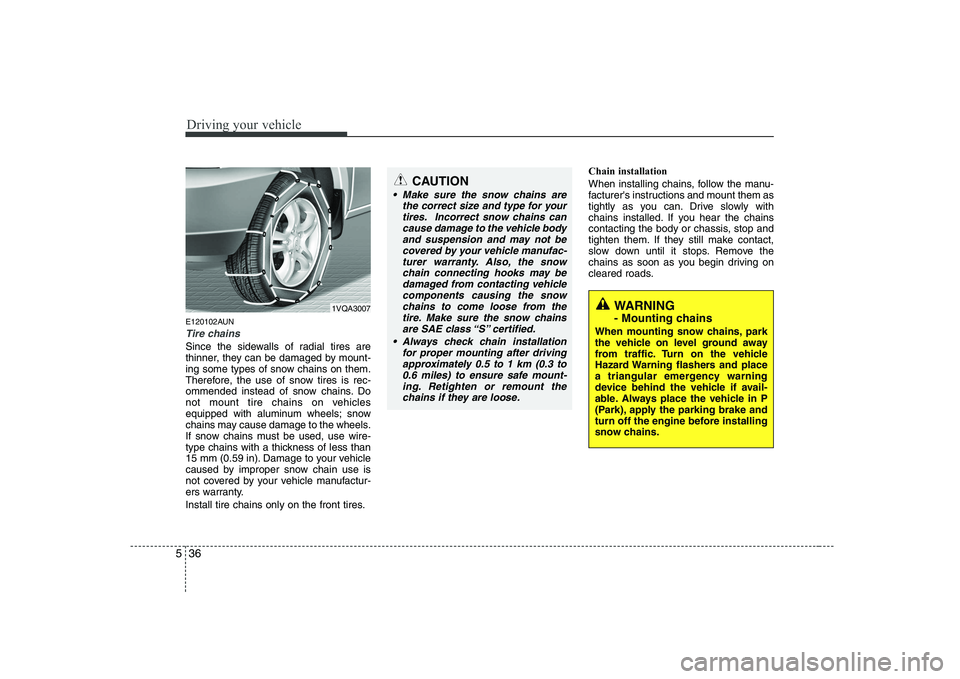
Since the sidewalls of radial tires are
thinner, they can be damaged by mount-
ing some types of snow chains on them.
Therefore, the use of snow tires is rec-
ommended instead of snow chains. Do
not mount tire chains on vehicles
equipped with aluminum wheels; snow
chains may cause damage to the wheels.
If snow chains must be used, use wire-
type chains with a thickness of less than
15 mm (0.59 in). Damage to your vehicle
caused by improper snow chain use is
not covered by your vehicle manufactur-
ers warranty.
Install tire chains only on the front tires. Chain installation
When installing chains, follow the manu-
facturer's instructions and mount them as
tightly as you can. Drive slowly with
chains installed. If you hear the chains
contacting the body or chassis, stop and
tighten them. If they still make contact,
slow down until it stops. Remove the
chains as soon as you begin driving on
cleared roads.
CAUTION
Make sure the snow chains are
the correct size and type for yourtires. Incorrect snow chains cancause damage to the vehicle body
and suspension and may not be covered by your vehicle manufac-turer warranty. Also, the snow chain connecting hooks may be
damaged from contacting vehicle components causing the snowchains to come loose from the tire. Make sure the snow chains
are SAE class “S” certified.
Always check chain installation for proper mounting after drivingapproximately 0.5 to 1 km (0.3 to
0.6 miles) to ensure safe mount- ing. Retighten or remount thechains if they are loose.
WARNING
- Mounting chains
When mounting snow chains, park
the vehicle on level ground away
from traffic. Turn on the vehicle
Hazard Warning flashers and place
a triangular emergency warning
device behind the vehicle if avail-
able. Always place the vehicle in P
(Park), apply the parking brake and
turn off the engine before installing
snow chains.1VQA3007