steering wheel KIA SOUL 2009 User Guide
[x] Cancel search | Manufacturer: KIA, Model Year: 2009, Model line: SOUL, Model: KIA SOUL 2009Pages: 328, PDF Size: 29.57 MB
Page 97 of 328
425
Features of your vehicle
D130200APB-U1
Electric power steering (if equipped)
Power steering uses the motor to assist
you in steering the vehicle. If the engine
is off or if the power steering system
becomes inoperative, the vehicle may
still be steered, but it will require
increased steering effort.
The motor driven power steering is con-
trolled by the power steering control unit
which senses the steering wheel torque
and vehicle speed to command the
motor.
The steering effort becomes heavier as
the vehicle’s speed increases and
becomes lighter as the vehicle’s speed
decreases for better control of the steer-ing wheel.
Should you notice any change in the
effort required to steer during normal
vehicle operation, have the power steer-
ing checked by an authorized KIA dealer.✽✽NOTICE
The following symptoms may occur dur- ing normal vehicle operation:
Page 98 of 328
Features of your vehicle
26
4
To change the steering wheel angle, pull
down the lock-release lever (1), adjust
the steering wheel to the desired angle
(2), then pull up the lock-release lever to
lock the steering wheel in place. Be sure
to adjust the steering wheel to the
desired position before driving. D130500AUN Horn
To sound the horn, press the horn sym-
bol on your steering wheel.
Check the horn regularly to be sure it
operates properly.
✽✽
NOTICE
To sound the horn, press the area indi-
cated by the horn symbol on your steer-
ing wheel (see illustration). The horn
will operate only when this area is
pressed.
OAM049021L
CAUTION
Do not strike the horn severely to operate it, or hit it with your fist. Do not press on the horn with a sharp-pointed object.
OAM049022
(if equipped)
Page 115 of 328
443
Features of your vehicle
D150331AAM
Low tire pressure telltale
The low tire pressure comes on for 3 sec-
onds after the ignition key is turned to the"ON" position.
If the warning light does not come on, the
Tire Pressure Monitoring System is not
working properly. If this occurs, have your
vehicle checked by an authorized KIA
dealer as soon as possible.
This warning lights will also illuminate if
one or more of your tires is significantlyunder-inflated.
You should stop and check your tires as
soon as possible. If the warning lights
illuminate while driving, reduce vehicle
speed immediately and stop the vehicle.
Avoid hard braking and overcorrecting at
the steering wheel. Inflate the tires to the
proper pressure as indicated on the vehi-
cle’s tire information placard.
TPMS (Tire pressure monitoring system) malfunction indicator
(if equipped)
The TPMS malfunction indicator illumi-
nates for 3 seconds after the ignition key
is turned to the "ON" position.
If the warning light does not come on, or
continuously remains on after the 3-sec-
ond bulb check when you turned the igni-
tion key to the "ON" position, the Tire
Pressure Monitoring System is not work-
ing properly. If this occurs, have your
vehicle checked by an authorized KIA
dealer as soon as possible.
The warning light also comes on and
stays on when there is a problem with the
Tire Pressure Monitoring System.
If this happens, the system may not mon-
itor the tire pressure. Have the system
checked by an authorized KIA dealer as
soon as possible. D150327AUN
Key reminder warning chime
(if equipped)
If the driver’s door is opened while the
ignition key is left in the ignition switch
(ACC or LOCK position), the key
reminder warning chime will sound. This
is to prevent you from locking your keys
in the vehicle. The chime sounds until the
key is removed from the ignition switch or
the driver’s door is closed.
TPMS
WARNING
Significantly low tire pressure
makes the vehicle unstable and can
contribute to loss of vehicle controland increased braking distances.
Continued driving on low pressure
tires will cause the tires to overheatand fail.
WARNING - Safe stopping
The TPMS cannot alert you to severe and sudden tire damage
caused by external factors.
If you feel any vehicle instability, immediately take your foot off the
accelerator, apply the brakes
gradually and with light force,
and slowly move to a safe posi-
tion off the road.
Page 150 of 328
Features of your vehicle
78
4
Antenna
D300102AUN-SA
Roof antenna
Your vehicle uses a roof antenna to
receive both AM and FM broadcast sig-
nals. This antenna can be removed. To
remove the antenna, turn it counterclock-
wise. To install the antenna, turn it clock-
wise. D300200BUN-AM
Audio remote control (if equipped)
The steering wheel audio remote control
button is installed to promote safe driv-ing.
AUDIO SYSTEM
OAM049093
CAUTION
• Before entering a place with a low
height clearance, be sure that theantenna is fully folded down or removed.
Be sure to remove the antenna before washing the car in an auto-matic car wash or it may be dam- aged.
it is important that it is fully tight-
ened to ensure proper reception.
When cargo is loaded on the roof rack, do not place the cargo nearthe antenna pole to ensure proper
reception.
OAM049084
CAUTION
Do not operate the audio remote control buttons simultaneously.
Page 174 of 328
Driving your vehicle
4
5
E030100AEN
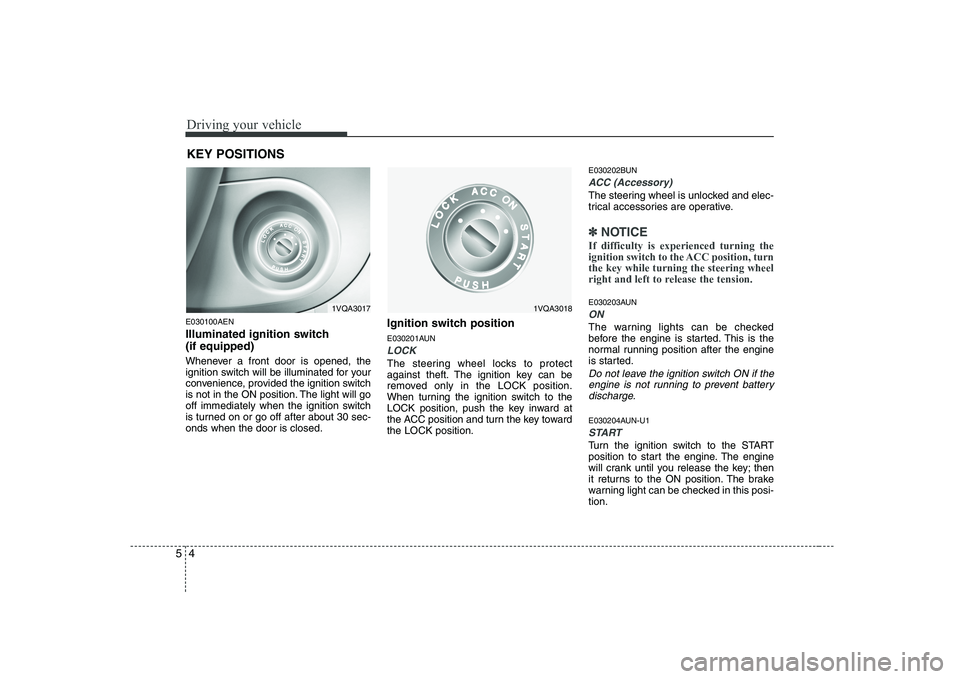
Illuminated ignition switch (if equipped)
Whenever a front door is opened, the
ignition switch will be illuminated for your
convenience, provided the ignition switch
is not in the ON position. The light will go
off immediately when the ignition switch
is turned on or go off after about 30 sec-onds when the door is closed. Ignition switch position
E030201AUN
LOCK
The steering wheel locks to protect
against theft. The ignition key can be
removed only in the LOCK position.
When turning the ignition switch to the
LOCK position, push the key inward at
the ACC position and turn the key towardthe LOCK position.E030202BUN
ACC (Accessory)
The steering wheel is unlocked and elec-
trical accessories are operative.
✽✽
NOTICE
If difficulty is experienced turning the
ignition switch to the ACC position, turnthe key while turning the steering wheel
right and left to release the tension.
E030203AUN
ON
The warning lights can be checked
before the engine is started. This is the
normal running position after the engine
is started.
Do not leave the ignition switch ON if the engine is not running to prevent batterydischarge.
E030204AUN-U1
START
Turn the ignition switch to the START
position to start the engine. The engine
will crank until you release the key; then
it returns to the ON position. The brake
warning light can be checked in this posi-tion.
KEY POSITIONS
1VQA30181VQA3017
Page 175 of 328
55
Driving your vehicle
E040000AUN
E040100AUN
Starting the engine
1. Make sure the parking brake isapplied.
2. Manual Transaxle - Depress the
clutch pedal fully and shift the
transaxle into Neutral. Keep the clutch
pedal and brake pedal depressed
while turning the ignition switch to the
start position.
Automatic Transaxle - Place the
transaxle shift lever in P (Park).
Depress the brake pedal fully.
You can also start the engine when
the shift lever is in the N (Neutral)position.
3. Turn the ignition switch to START and hold it there until the engine starts (a
maximum of 10 seconds), then
release the key. 4. In extremely cold weather (below
-18°C / 0°F) or after the vehicle has
not been operated for several days, let
the engine warm up without depress-
ing the accelerator.
Whether the engine is cold or warm, it
should be started without depressing
the accelerator.
WARNING
Always wear appropriate shoes
when operating your vehicle.
Unsuitable shoes (high heels, ski
boots,etc.) may interfere with yourability to use the brake and acceler-
ator pedal, and the clutch (ifequipped).
CAUTION
If the engine stalls while you are in motion, do not attempt to move theshift lever to the P (Park) position. If traffic and road conditions permit,you may put the shift lever in the N
(Neutral) position while the vehicleis still moving and turn the ignition switch to the START position in anattempt to restart the engine.
CAUTION
Do not engage the starter for more
than 10 seconds. If the engine stalls or fails to start, wait 5 to 10 secondsbefore re-engaging the starter. Improper use of the starter may
damage it.
STARTING THE ENGINE
WARNING - Ignition switch
Never turn the ignition switch to LOCK or ACC while the vehicle is
moving. This would result in loss
of directional control and braking
function, which could cause anaccident.
The anti-theft steering column lock is not a substitute for the parking
brake. Before leaving the driver’s
seat, always make sure the shift
lever is engaged in 1 st
gear for the
manual transaxle or P (Park) for
the automatic transaxle, set the
parking brake fully and shut the
engine off. Unexpected and sud-
den vehicle movement may occurif these precautions are not taken.
Never reach for the ignition switch, or any other controls through the
steering wheel while the vehicle is
in motion. The presence of yourhand or arm in this area could
cause a loss of vehicle control, an
accident and serious bodily injuryor death.
Do not place any movable objects around the driver’s seat as they
may move while driving, interferewith the driver and lead to an acci-dent.
Page 179 of 328
59
Driving your vehicle
E050200AUN-C1 Good driving practices
Never take the vehicle out of gear andcoast down a hill. This is extremely
hazardous. Always leave the vehicle in
gear.
Don't "ride" the brakes. This can cause them to overheat and malfunction.
Instead, when you are driving down a
long hill, slow down and shift to a lower
gear. When you do this, engine braking
will help slow down the vehicle.
Slow down before shifting to a lower gear. This will help avoid over-revving
the engine, which can cause damage.
Slow down when you encounter cross winds. This gives you much better con-
trol of your vehicle.
Be sure the vehicle is completely stopped before you attempt to shift into
reverse. The transaxle can be dam-
aged if you do not. To shift into reverse,
depress the clutch, move the shift lever
to neutral, then shift to the reverseposition. Exercise extreme caution when driving
on a slippery surface. Be especially
careful when braking, accelerating or
shifting gears. On a slippery surface,
an abrupt change in vehicle speed can
cause the drive wheels to lose traction
and the vehicle to go out of control.
WARNING
Always buckle-up! In a collision, an unbelted occupant is signifi-
cantly more likely to be seriously
injured or killed than a properlybelted occupant.
Avoid high speeds when corner- ing or turning.
Do not make quick steering wheel movements, such as sharp
lane changes or fast, sharp turns.
The risk of rollover is greatly increased if you lose control of
your vehicle at highway speeds.
Loss of control often occurs if two or more wheels drop off the
roadway and the driver over-
steers to reenter the roadway.
In the event your vehicle leaves the roadway, do not steer sharply.
Instead, slow down before pulling
back into the travel lanes.
Never exceed posted speed lim- its.
Page 185 of 328
515
Driving your vehicle
E060203AUN
Moving up a steep grade from a stand-ing start
To move up a steep grade from a stand-
ing start, depress the brake pedal, shift
the shift lever to D (Drive). Select the
appropriate gear depending on load
weight and steepness of the grade, and
release the parking brake. Depress the
accelerator gradually while releasing the
service brakes.
When accelerating from a stop on a
steep hill, the vehicle may have a ten-
dency to roll backwards. Shifting the
shift lever into 2 (Second Gear) will
help prevent the vehicle from rolling
backwards.
WARNING
Always buckle-up! In a collision, an unbelted occupant is signifi-
cantly more likely to be seriously
injured or killed than a properlybelted occupant.
Avoid high speeds when corner- ing or turning.
Do not make quick steering wheel movements, such as sharp
lane changes or fast, sharp turns.
The risk of rollover is greatly increased if you lose control of
your vehicle at highway speeds.
Loss of control often occurs if two or more wheels drop off the
roadway and the driver over-
steers to reenter the roadway.
In the event your vehicle leaves the roadway, do not steer sharply.
Instead, slow down before pulling
back into the travel lanes.
Never exceed posted speed lim- its.WARNING
If your vehicle becomes stuck in
snow, mud, sand, etc., then you
may attempt to rock the vehicle free
by moving it forward and backward.
Do not attempt this procedure if
people or objects are anywhere
near the vehicle. During the rocking
operation the vehicle may suddenly
move forward of backward as it
becomes unstuck, causing injury
or damage to nearby people orobjects.
Page 191 of 328
521
Driving your vehicle
E070500AUN-EE
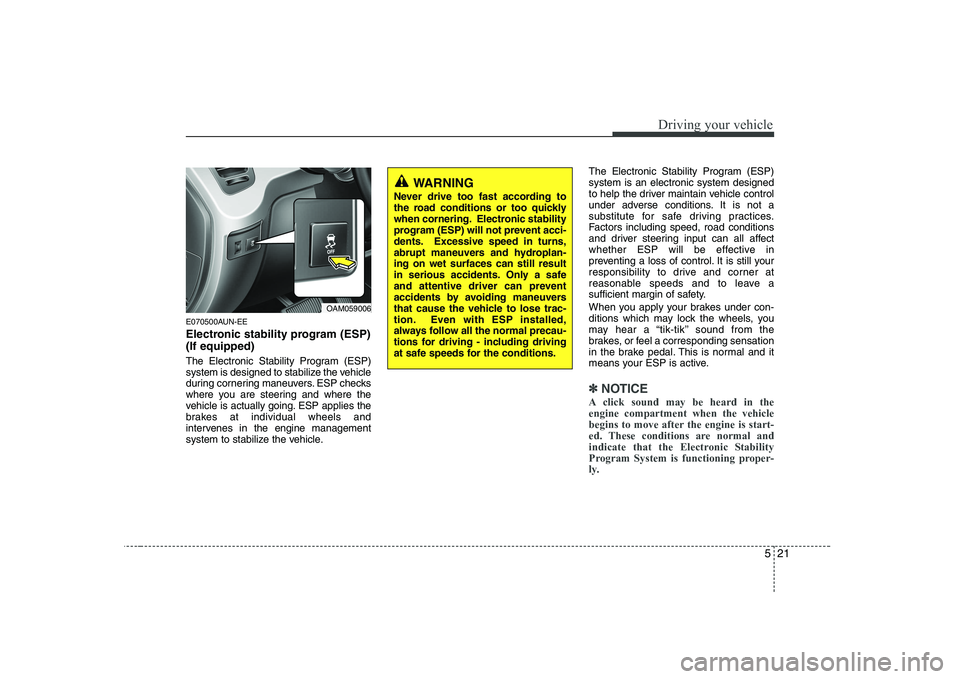
Electronic stability program (ESP) (If equipped)
The Electronic Stability Program (ESP)
system is designed to stabilize the vehicle
during cornering maneuvers. ESP checks
where you are steering and where the
vehicle is actually going. ESP applies the
brakes at individual wheels and
intervenes in the engine management
system to stabilize the vehicle.The Electronic Stability Program (ESP)system is an electronic system designed
to help the driver maintain vehicle control
under adverse conditions. It is not a
substitute for safe driving practices.
Factors including speed, road conditions
and driver steering input can all affect
whether ESP will be effective in
preventing a loss of control. It is still your
responsibility to drive and corner at
reasonable speeds and to leave a
sufficient margin of safety.
When you apply your brakes under con-
ditions which may lock the wheels, you
may hear a “tik-tik’’ sound from the
brakes, or feel a corresponding sensation
in the brake pedal. This is normal and it
means your ESP is active.
✽✽
NOTICE
A click sound may be heard in the engine compartment when the vehicle
begins to move after the engine is start-
ed. These conditions are normal and
indicate that the Electronic Stability
Program System is functioning proper-
ly.
WARNING
Never drive too fast according to
the road conditions or too quickly
when cornering. Electronic stability
program (ESP) will not prevent acci-
dents. Excessive speed in turns,
abrupt maneuvers and hydroplan-ing on wet surfaces can still result
in serious accidents. Only a safe
and attentive driver can prevent
accidents by avoiding maneuvers
that cause the vehicle to lose trac-
tion. Even with ESP installed,
always follow all the normal precau-
tions for driving - including driving
at safe speeds for the conditions.
OAM059006
Page 196 of 328
Driving your vehicle
26
5
E090100AUN-KM
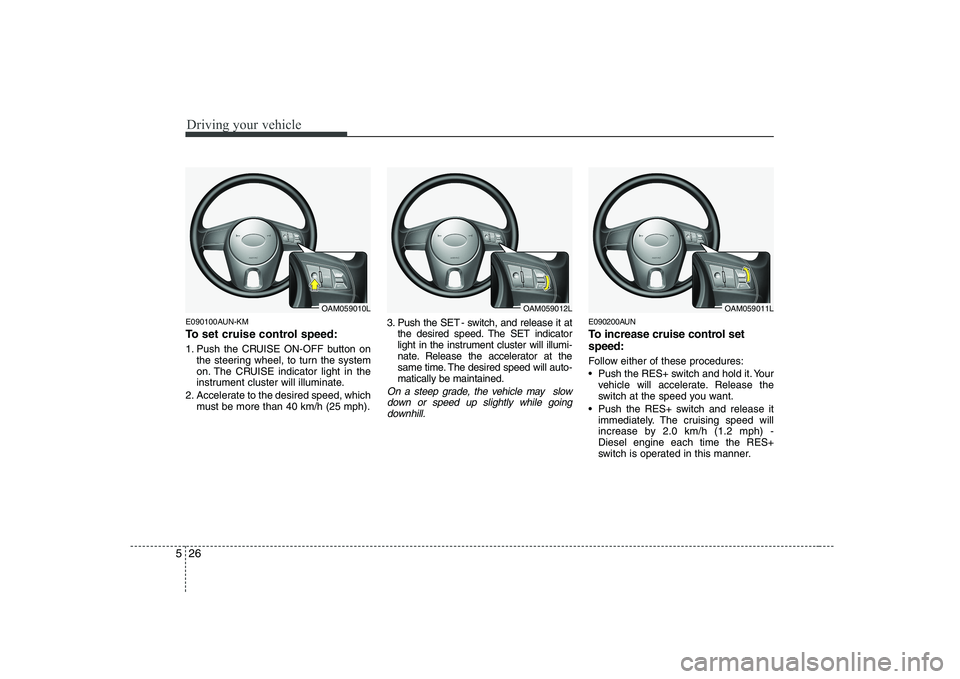
To set cruise control speed:
1. Push the CRUISE ON-OFF button on
the steering wheel, to turn the system
on. The CRUISE indicator light in the
instrument cluster will illuminate.
2. Accelerate to the desired speed, which must be more than 40 km/h (25 mph). 3. Push the SET - switch, and release it at
the desired speed. The SET indicator
light in the instrument cluster will illumi-
nate. Release the accelerator at the
same time. The desired speed will auto-matically be maintained.
On a steep grade, the vehicle may slow
down or speed up slightly while goingdownhill.
E090200AUN
To increase cruise control set speed:
Follow either of these procedures:
Push the RES+ switch and hold it. Your vehicle will accelerate. Release the
switch at the speed you want.
Push the RES+ switch and release it immediately. The cruising speed will
increase by 2.0 km/h (1.2 mph) -Diesel engine each time the RES+
switch is operated in this manner.
OAM059012LOAM059011LOAM059010L