AUX KIA SOUL 2009 Owners Manual
[x] Cancel search | Manufacturer: KIA, Model Year: 2009, Model line: SOUL, Model: KIA SOUL 2009Pages: 328, PDF Size: 29.57 MB
Page 146 of 328
Features of your vehicle
74
4
D280500AUN
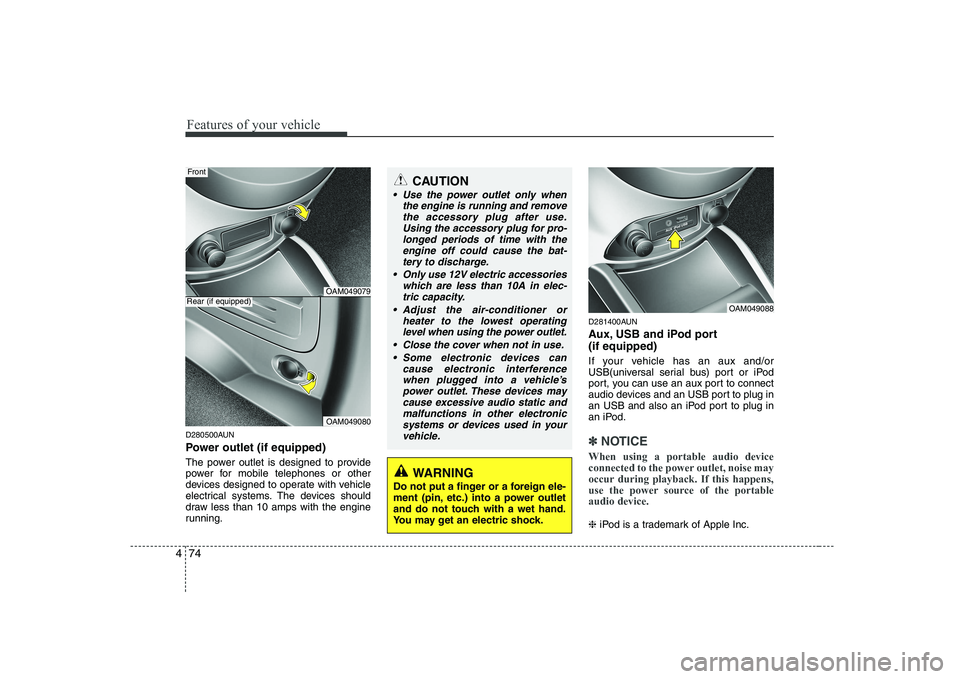
Power outlet (if equipped)
The power outlet is designed to provide
power for mobile telephones or other
devices designed to operate with vehicle
electrical systems. The devices should
draw less than 10 amps with the engine
running. D281400AUN
Aux, USB and iPod port (if equipped)
If your vehicle has an aux and/or
USB(universal serial bus) port or iPod
port, you can use an aux port to connect
audio devices and an USB port to plug in
an USB and also an iPod port to plug in
an iPod.✽✽
NOTICE
When using a portable audio device
connected to the power outlet, noise may
occur during playback. If this happens,
use the power source of the portableaudio device.
❈ iPod is a trademark of Apple Inc.
OAM049079
OAM049080
Rear (if equipped)
CAUTION
Use the power outlet only when
the engine is running and removethe accessory plug after use.Using the accessory plug for pro-
longed periods of time with the engine off could cause the bat-tery to discharge.
Only use 12V electric accessories which are less than 10A in elec-
tric capacity.
Adjust the air-conditioner or heater to the lowest operatinglevel when using the power outlet.
Close the cover when not in use. Some electronic devices can cause electronic interferencewhen plugged into a vehicle’s power outlet. These devices maycause excessive audio static and
malfunctions in other electronicsystems or devices used in your vehicle.
OAM049088
WARNING
Do not put a finger or a foreign ele-
ment (pin, etc.) into a power outlet
and do not touch with a wet hand.
You may get an electric shock.
Front
Page 155 of 328
483
Features of your vehicle
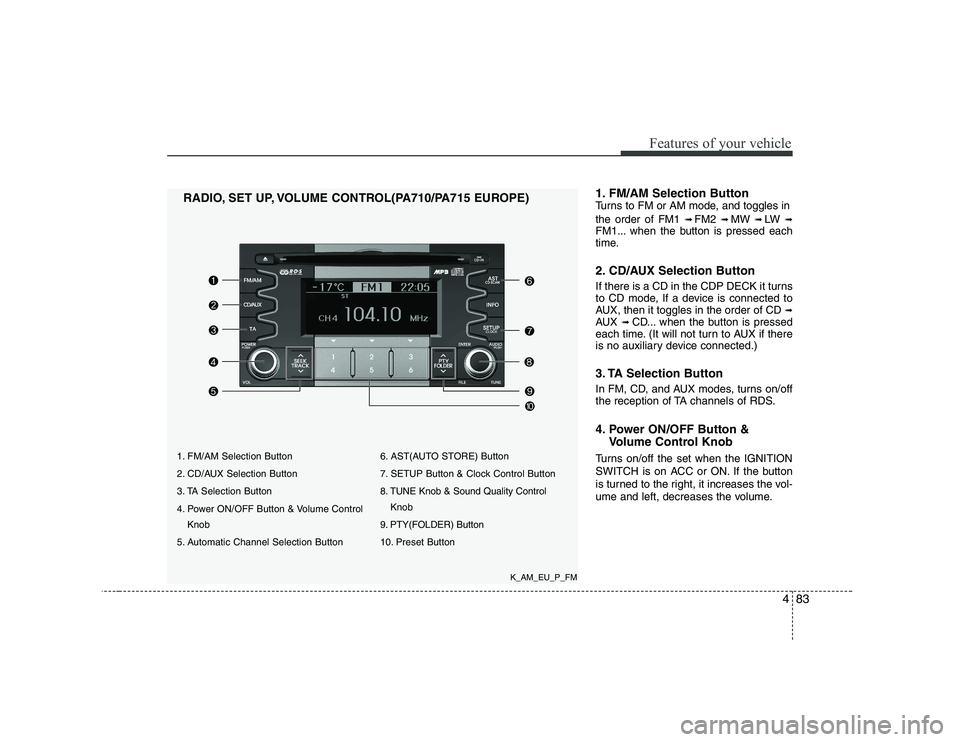
1. FM/AM Selection Button
2. CD/AUX Selection Button
3. TA Selection Button
4. Power ON/OFF Button & Volume ControlKnob
5. Automatic Channel Selection Button 6. AST(AUTO STORE) Button
7. SETUP Button & Clock Control Button
8. TUNE Knob & Sound Quality Control
Knob
9. PTY(FOLDER) Button
10. Preset Button
RADIO, SET UP, VOLUME CONTROL(PA710/PA715 EUROPE)
1. FM/AM Selection Button
Turns to FM or AM mode, and toggles in the order of FM1
➟ FM2 ➟ MW ➟ LW ➟
FM1... when the button is pressed each
time.
2. CD/AUX Selection Button
If there is a CD in the CDP DECK it turns
to CD mode, If a device is connected to
AUX, then it toggles in the order of CD ➟
AUX ➟CD... when the button is pressed
each time. (It will not turn to AUX if there
is no auxiliary device connected.)
3. TA Selection Button
In FM, CD, and AUX modes, turns on/off
the reception of TA channels of RDS.
4. Power ON/OFF Button &
Volume Control Knob
Turns on/off the set when the IGNITION
SWITCH is on ACC or ON. If the button
is turned to the right, it increases the vol-
ume and left, decreases the volume.
K_AM_EU_P_FM
Page 156 of 328
![KIA SOUL 2009 Owners Manual Features of your vehicle
84
4
5. Automatic Channel Selection
Button
] button is pressed, it reduces the band frequency by 50kHz
to automatically select a channel. Stops
at the previous frequency if KIA SOUL 2009 Owners Manual Features of your vehicle
84
4
5. Automatic Channel Selection
Button
] button is pressed, it reduces the band frequency by 50kHz
to automatically select a channel. Stops
at the previous frequency if](/img/2/40388/w960_40388-155.png)
Features of your vehicle
84
4
5. Automatic Channel Selection
Button
] button is pressed, it reduces the band frequency by 50kHz
to automatically select a channel. Stops
at the previous frequency if no channel
is found.
] button is pressed, it increases the band frequency by50kHz to automatically select a chan-
nel. Stops at the previous frequency if
no channel is found.
6. AST(AUTO STORE) Button When AST is pressed, frequency is stored
on the preset memory [1]~[6] and auto-
matically plays the channel stored on the
Preset [1]. If no channels have been stored
because there was no channel received,
will return to the previous channel.
7. SETUP Button & Clock Control Button
Press this button to turn to the RDS
option and the other adjustment mode.
If no action is taken for 5 seconds after
pressing the button, it will return to the
play mode. (After entering SETUP mode,
move between items using the left, right
and PUSH functions of the [TUNE] knob.) ■
PA710 MODEL
The setup changes in the order of TIME ↔
RDS ↔ SCROLL ↔ P.BASS ↔ TEMP ↔
SDVC... ■ PA715 MODEL
The setup changes in the order of TIME ↔ RDS ↔ SCROLL ↔ RETURN ↔TEMP
↔ SDVC...
If the vehicle has a center speaker and
woofer, then the AUDIO is PA715.
If the vehicle does not, then the AUDIO is
PA710.
Press the [SETUP] button for longer than 0.8 second to adjust the hour/min setting
on the clock. Adjust the hour and press the [ENTER]
button to set. Use the same method to
adjust the minute and press the [ENTER]
button to complete and exit from clock
adjustment mode.
The clock setting can be changed to dis-
play in 12 hour or 24 hour settings.
RDS OPTION (NEWS, AF, REGION,
TIME, TA VOL) can be selected.
This function is used to display charac-
ters longer than the LCD text display and
can be turned ON/OFF through the vol-
ume controller.
This function displays the previous MODE screen. This function is used to change the tem-
perature display setting.
This function automatically adjusts the
volume level according to the speed of
the vehicle and can be turned ON/OFF
through the volume controller.
Based on psychoacoustic technology, this
technology overcomes BASS limitations
which may occur due to the limited num-
ber and size of speakers to offer dynamic
BASS sound quality. It is possible to adjust
in 3 levels of LOW/MID/HIGH. OFF
➟
LOW ➟MID ➟HIGH
Modes: CD/FM/AUX/IPOD/USB (exclud-
ing MW, LW Mode)
Page 157 of 328
485
Features of your vehicle
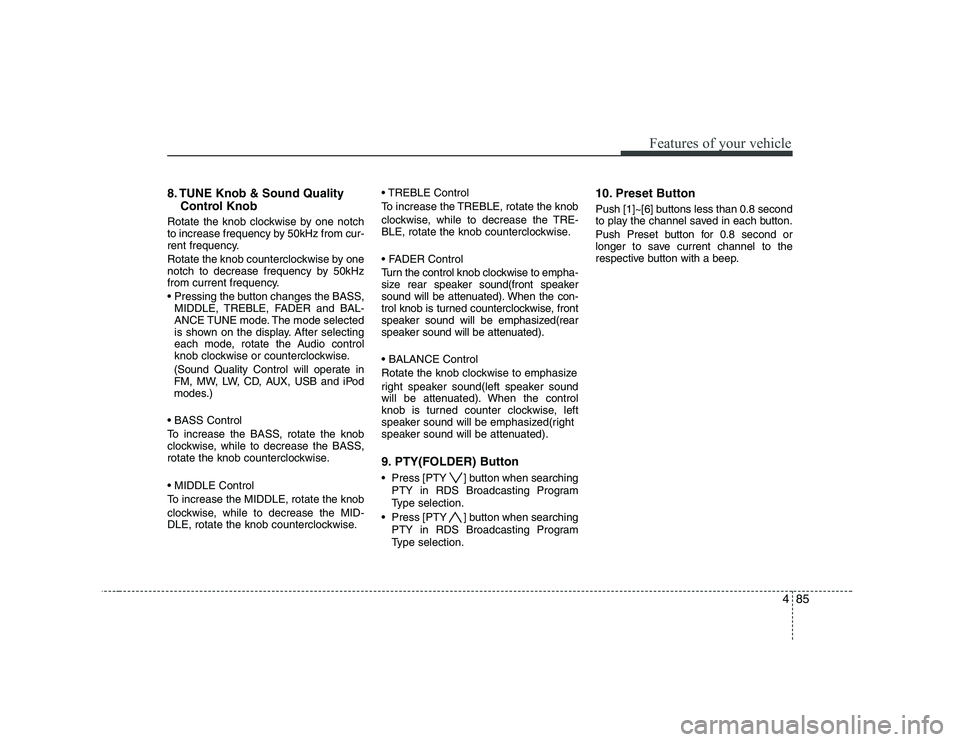
8. TUNE Knob & Sound QualityControl Knob
Rotate the knob clockwise by one notch
to increase frequency by 50kHz from cur-
rent frequency.
Rotate the knob counterclockwise by one
notch to decrease frequency by 50kHz
from current frequency.
MIDDLE, TREBLE, FADER and BAL-
ANCE TUNE mode. The mode selected
is shown on the display. After selecting
each mode, rotate the Audio control
knob clockwise or counterclockwise.
(Sound Quality Control will operate in
FM, MW, LW, CD, AUX, USB and iPod
modes.)
To increase the BASS, rotate the knob
clockwise, while to decrease the BASS,
rotate the knob counterclockwise.
To increase the MIDDLE, rotate the knob
clockwise, while to decrease the MID-
DLE, rotate the knob counterclockwise. Control
To increase the TREBLE, rotate the knob
clockwise, while to decrease the TRE-
BLE, rotate the knob counterclockwise.
Turn the control knob clockwise to empha-
size rear speaker sound(front speaker
sound will be attenuated). When the con-
trol knob is turned counterclockwise, front
speaker sound will be emphasized(rear
speaker sound will be attenuated).
Rotate the knob clockwise to emphasize
right speaker sound(left speaker sound
will be attenuated). When the control
knob is turned counter clockwise, left
speaker sound will be emphasized(right
speaker sound will be attenuated).
9. PTY(FOLDER) Button
Press [PTY ] button when searching
PTY in RDS Broadcasting Program
Type selection.
Press [PTY ] button when searching PTY in RDS Broadcasting Program
Type selection. 10. Preset Button
Push [1]~[6] buttons less than 0.8 second
to play the channel saved in each button.
Push Preset button for 0.8 second or
longer to save current channel to the
respective button with a beep.
Page 158 of 328
Features of your vehicle
86
4
1. FM Selection Button
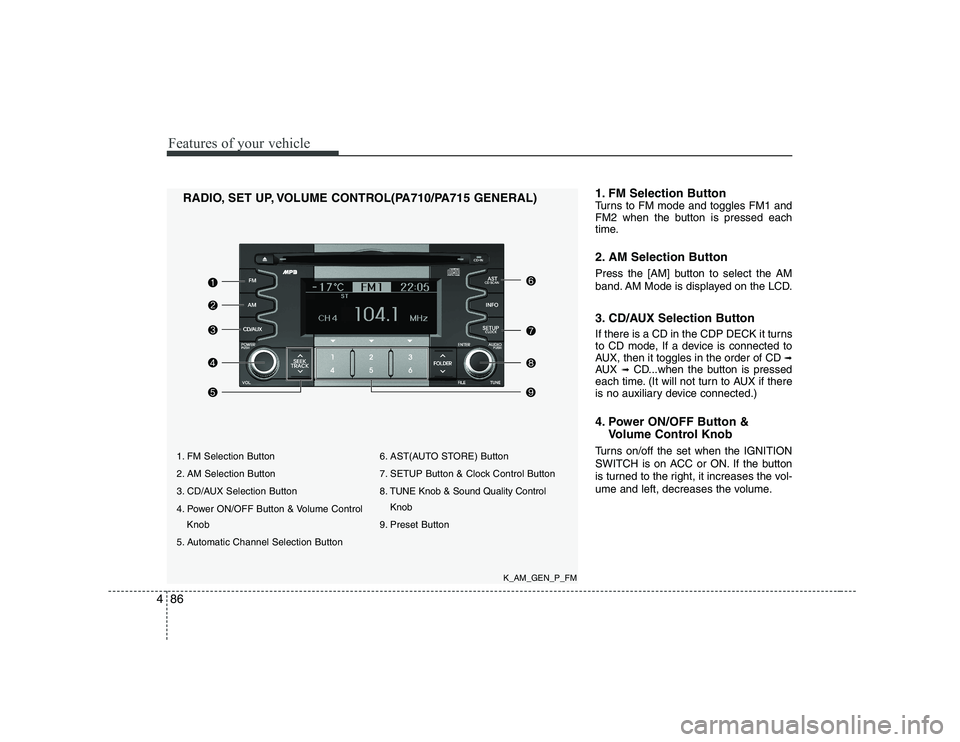
2. AM Selection Button
3. CD/AUX Selection Button
4. Power ON/OFF Button & Volume Control
Knob
5. Automatic Channel Selection Button 6. AST(AUTO STORE) Button
7. SETUP Button & Clock Control Button
8. TUNE Knob & Sound Quality Control
Knob
9. Preset Button
RADIO, SET UP, VOLUME CONTROL(PA710/PA715 GENERAL)
1. FM Selection Button
Turns to FM mode and toggles FM1 and
FM2 when the button is pressed each
time.
2. AM Selection Button
Press the [AM] button to select the AM
band. AM Mode is displayed on the LCD.
3. CD/AUX Selection Button
If there is a CD in the CDP DECK it turns
to CD mode, If a device is connected to
AUX, then it toggles in the order of CD
➟
AUX ➟CD...when the button is pressed
each time. (It will not turn to AUX if there
is no auxiliary device connected.)
4. Power ON/OFF Button &
Volume Control Knob
Turns on/off the set when the IGNITION
SWITCH is on ACC or ON. If the button
is turned to the right, it increases the vol-
ume and left, decreases the volume.
K_AM_GEN_P_FM
Page 159 of 328
![KIA SOUL 2009 Owners Manual 487
Features of your vehicle
5. Automatic Channel SelectionButton
] button is pressed, it reduces the band frequency by 200kHz to automatically select a chan-
nel. Stops at the previous frequency if
KIA SOUL 2009 Owners Manual 487
Features of your vehicle
5. Automatic Channel SelectionButton
] button is pressed, it reduces the band frequency by 200kHz to automatically select a chan-
nel. Stops at the previous frequency if](/img/2/40388/w960_40388-158.png)
487
Features of your vehicle
5. Automatic Channel SelectionButton
] button is pressed, it reduces the band frequency by 200kHz to automatically select a chan-
nel. Stops at the previous frequency if
no channel is found.
] button is pressed, it increases the band frequency by200kHz to automatically select a chan-
nel. Stops at the previous frequency if no
channel is found.
6. AST(AUTO STORE) Button When AST is pressed, frequency is stored
on the preset memory [1]~[6] and auto-
matically plays the channel stored on the
Preset [1]. If no channels have been stored
because there was no channel received,
will return to the previous channel.
7. SETUP Button & Clock Control Button
Press this button to turn to the SETUP
adjustment mode. If no action is taken for
5 seconds after pressing the button, it will
return to the play mode. (After entering
SETUP mode, move between items
using the left, right and PUSH functions
of the [TUNE] knob.) ■
PA710 MODEL
The setup changes in the order of CLOCK
↔ SCROLL ↔ P.BASS ↔ RETURN ↔
TEMP ↔ SDVC...
■ PA715 MODEL
The setup changes in the order of CLOCK
↔ SCROLL ↔ TEMP ↔ SDVC...
Press the [SETUP] button. Use the vol-
ume controller to adjust the clock in the
following order: CLOCK ➟ENTER ➟
hour or minute. Adjust the hour and press the [ENTER]
button to set. Use the same method to
adjust the minute and press the [ENTER]
button to complete and exit from clock
adjustment mode.
Pressing the [SETUP] button while in
POWER OFF screen will allow the user to
make immediate adjustments to the clock.
This function is used to display charac-
ters longer than the LCD text display and
can be turned ON/OFF through the vol-
ume controller.
This function displays the previous MODE screen. This function is used to change the tem-
perature display setting.
This function automatically adjusts the
volume level according to the speed of
the vehicle and can be turned ON/OFF
through the volume controller.
Based on psychoacoustic technology, this
technology overcomes BASS limitations
which may occur due to the limited num-
ber and size of speakers to offer dynamic
BASS sound quality. It is possible to adjust
in 3 levels of LOW/MID/HIGH. OFF
➟
LOW ➟MID ➟HIGH
Modes: CD/FM/AUX/IPOD/USB (exclud- ing AM Mode)
Page 160 of 328
Features of your vehicle
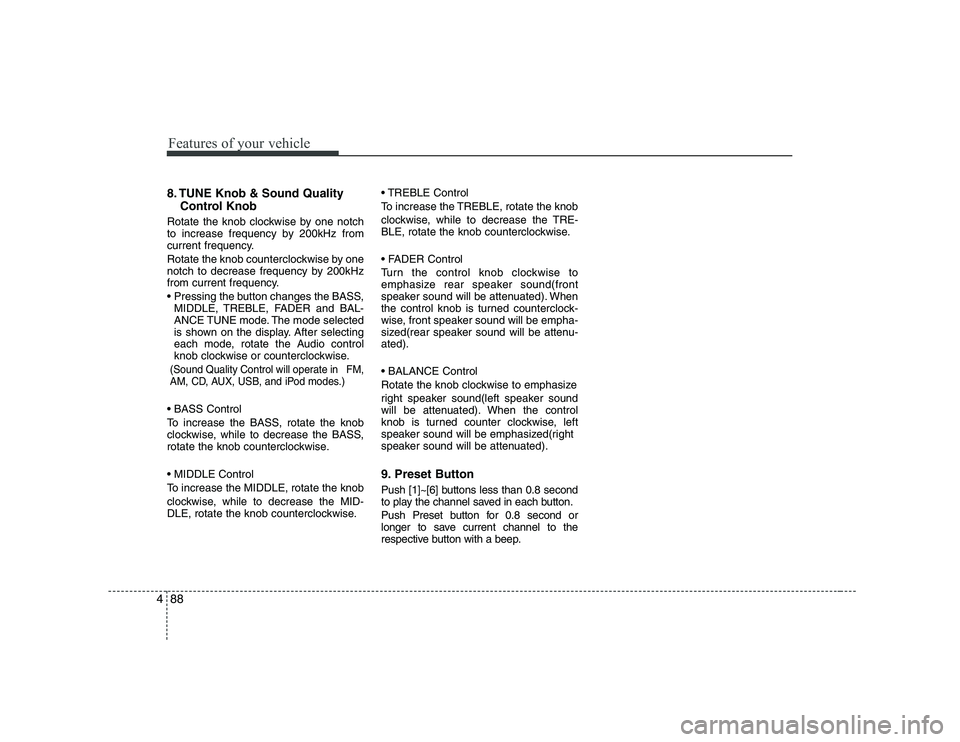
88
4
8. TUNE Knob & Sound Quality
Control Knob
Rotate the knob clockwise by one notch
to increase frequency by 200kHz from
current frequency.
Rotate the knob counterclockwise by one
notch to decrease frequency by 200kHz
from current frequency.
MIDDLE, TREBLE, FADER and BAL-
ANCE TUNE mode. The mode selected
is shown on the display. After selecting
each mode, rotate the Audio control
knob clockwise or counterclockwise.
(Sound Quality Control will operate in FM,
AM, CD, AUX, USB, and iPod modes.)
To increase the BASS, rotate the knob
clockwise, while to decrease the BASS,
rotate the knob counterclockwise.
To increase the MIDDLE, rotate the knob
clockwise, while to decrease the MID-
DLE, rotate the knob counterclockwise. Control
To increase the TREBLE, rotate the knob
clockwise, while to decrease the TRE-
BLE, rotate the knob counterclockwise.
Turn the control knob clockwise to
emphasize rear speaker sound(front
speaker sound will be attenuated). When
the control knob is turned counterclock-
wise, front speaker sound will be empha-
sized(rear speaker sound will be attenu-ated).
Rotate the knob clockwise to emphasize
right speaker sound(left speaker sound
will be attenuated). When the control
knob is turned counter clockwise, left
speaker sound will be emphasized(right
speaker sound will be attenuated).
9. Preset Button
Push [1]~[6] buttons less than 0.8 second
to play the channel saved in each button.
Push Preset button for 0.8 second or
longer to save current channel to the
respective button with a beep.
Page 161 of 328
489
Features of your vehicle
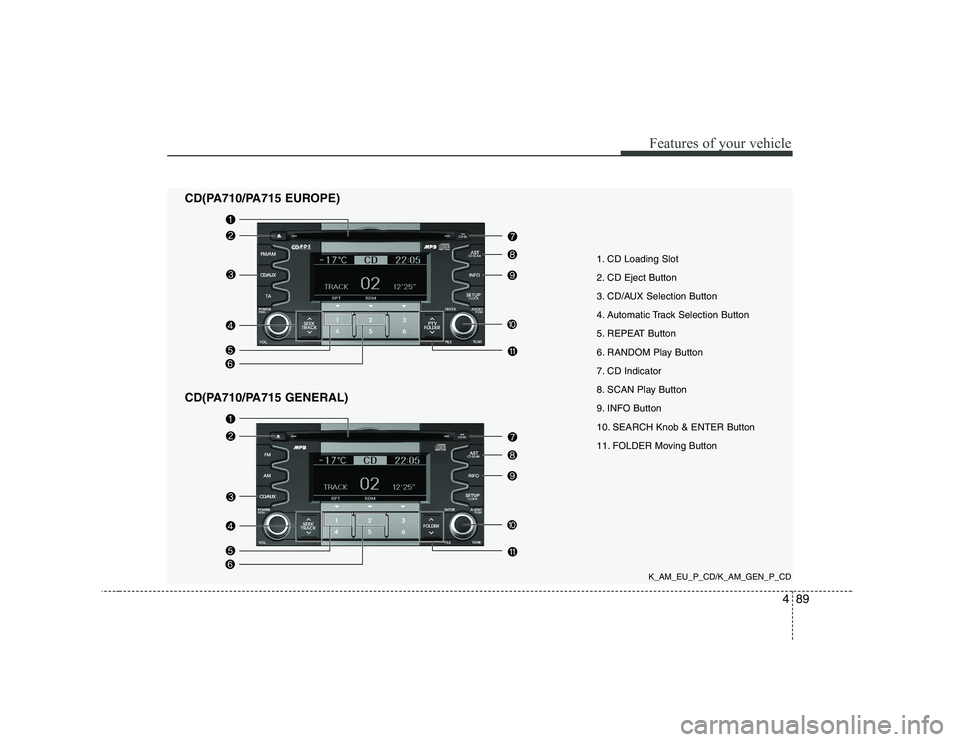
1. CD Loading Slot
2. CD Eject Button
3. CD/AUX Selection Button
4. Automatic Track Selection Button
5. REPEAT Button
6. RANDOM Play Button
7. CD Indicator
8. SCAN Play Button
9. INFO Button
10. SEARCH Knob & ENTER Button
11. FOLDER Moving Button
CD(PA710/PA715 EUROPE)
CD(PA710/PA715 GENERAL)
K_AM_EU_P_CD/K_AM_GEN_P_CD
Page 162 of 328
Features of your vehicle
90
4
1. CD Loading Slot
Please face printed side upward and gen-
tly push in. When the ignition switch is on
ACC or ON and power is off, power is auto-
matically turned on if the CD is loaded.
This CDP supports only 12cm CD. If VCDor Data CD are loaded, a "Reading Error"
message will be displayed and the CD willbe ejected.
2. CD Eject Button
Push button to eject the CD during
CD playback. This button is enabled
when ignition switch is off.
3. CD/AUX Selection Button
switches to AUX mode from the other
mode to play the sounds from the aux-
iliary player.
If the CD is loaded, turns to CD mode, and if a device is connected to AUX then
it toggles in the order of. CD ➟
AUX ➟
CD... when the button is pressed each
time.(It will not turn to AUX if the auxil-
iary device is not connected.)
then it displays the message "No
Media" for 3 seconds and returns to the
previous mode. 4. Automatic Track Selection
Button
] button for less than 0.8 second to play from the beginningof current song.
] button for less than 0.8 second and press again within 1
seconds to play the previous song.
] button to initiate reverse direction highspeed sound search of current song.
] button for less than 0.8 second to play the next song.
] button to initiate high speed soundsearch of current song.
5. REPEAT Button
Repeats current song when the button is
pressed for less than 0.8 second.
Repeats the entire DISC when the button
is pressed for 0.8 second or longer. (In the case of MP3, the Repeat function
will operate only within folder.) 6. RANDOM Play Button
Press this button for less than 0.8 second
to activate ‘RDM’ mode and longer than
0.8 second to activate ‘A.RDM’ mode.
Only files/tracks in a folder/disc
are played back in random sequence.
All files in a disc are played back in random
sequence.
7. CD Indicator
When car ignition switch is ACC or ON and if the CD is loaded, this indicator is
lighted. If the CD is ejected, the light is
turned off.
8. SCAN Play Button Scans first 10 seconds of each song in
the DISC. To cancel the mode, press the
button once again.
Page 165 of 328
493
Features of your vehicle
1. USB Selection Button
If USB is connected, it switches to the
USB mode from the other mode to play
the song files stored in the USB. If no CD
and auxiliary device is not connected, it
displays "NO Media" for 3 seconds and
returns to the previous mode.
2. TRACK Moving Button
] button for lessthan 0.8 second to play from the begin-
ning of the song currently played.
Press the button for less than 0.8 second and press it again within 1 seconds to
move to and play the previous track.
Press the button for 0.8 second or
longer to play the song in reverse direc-
tion in fast speed.
] button for less
than 0.8 second to move to the next
track. Press the button for 0.8 second or
longer to play the song in forward direc-
tion in fast speed. 3. REPEAT Button
Press this button for less than 0.8 second
to activate 'RPT' mode and longer than
0.8 second to activate ' ' mode.
Only the current file is repeatedly
played back.
: All files in a folder are repeat- edly played back.
4. RANDOM Playback Button
Press this button for less than 0.8 second
to activate 'RDM' mode and longer than
0.8 second to activate 'A.RDM' mode.
All files in a folder are played back in random sequence.
All files in a USB memory are played back in random sequence.
5. SCAN Selection Button Scans 10 seconds of each song in the
USB device.
Press the button once again to cancel scanning. 6. INFO Button
Displays the information of the currently
played file in the order of File Name
➟
Title ➟ Artist ➟ Album ➟ Folder ➟ Total
File ➟Normal Display ➟ File Name ➟…
(Displays no information if the file has no
song information.)
7. SEARCH Knob & ENTER
Button
Rotate the knob clockwise to display the
songs after the currently played song.
Rotate the knob counterclockwise to dis-
play the songs before the currently
played song.
Press the button to skip and play the selected song.
8. FOLDER Moving Button
] button to move child folder of the current folder and dis-
play the first song in the folder. Press
TUNE/ENTER knob to move to the fold-
er displayed. It will play the first song in
the folder.
] button to move parent folder and display the first song
in the folder. Press TUNE/ENTER knob
to move to the folder displayed.