clock KIA Soul 2010 1.G Owner's Manual
[x] Cancel search | Manufacturer: KIA, Model Year: 2010, Model line: Soul, Model: KIA Soul 2010 1.GPages: 314, PDF Size: 6.39 MB
Page 91 of 314
419
Features of your vehicle
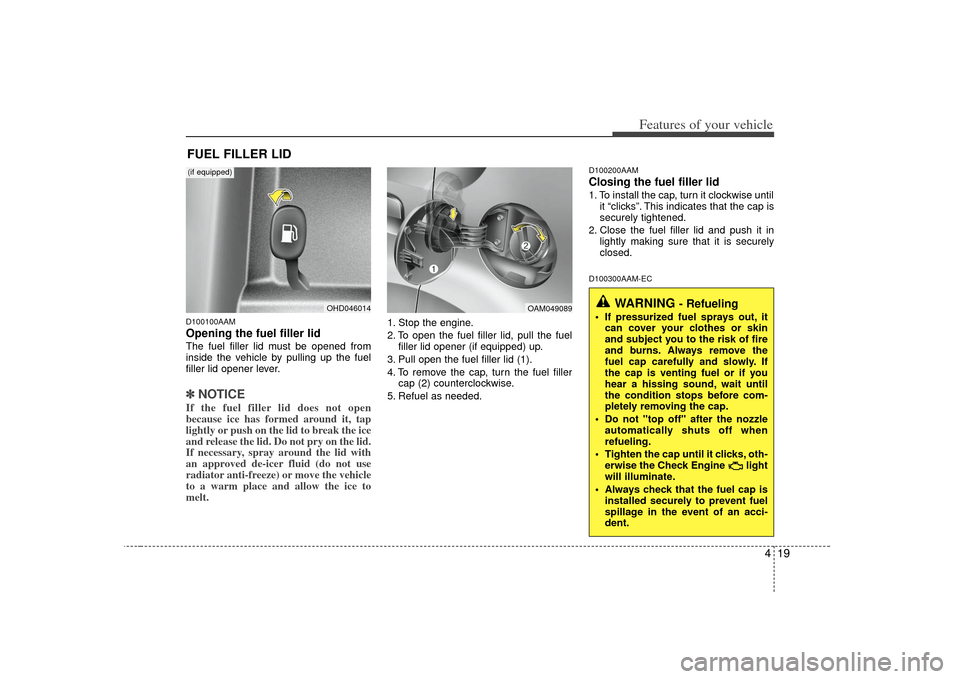
D100100AAMOpening the fuel filler lidThe fuel filler lid must be opened from
inside the vehicle by pulling up the fuel
filler lid opener lever.✽ ✽NOTICEIf the fuel filler lid does not open
because ice has formed around it, tap
lightly or push on the lid to break the ice
and release the lid. Do not pry on the lid.
If necessary, spray around the lid with
an approved de-icer fluid (do not use
radiator anti-freeze) or move the vehicle
to a warm place and allow the ice to
melt.
1. Stop the engine.
2. To open the fuel filler lid, pull the fuel
filler lid opener (if equipped) up.
3. Pull open the fuel filler lid (1).
4. To remove the cap, turn the fuel filler cap (2) counterclockwise.
5. Refuel as needed.
D100200AAMClosing the fuel filler lid1. To install the cap, turn it clockwise until it “clicks”. This indicates that the cap is
securely tightened.
2. Close the fuel filler lid and push it in lightly making sure that it is securely
closed.D100300AAM-EC
FUEL FILLER LID
WARNING
- Refueling
If pressurized fuel sprays out, itcan cover your clothes or skin
and subject you to the risk of fire
and burns. Always remove the
fuel cap carefully and slowly. If
the cap is venting fuel or if you
hear a hissing sound, wait until
the condition stops before com-
pletely removing the cap.
Do not "top off" after the nozzle automatically shuts off when
refueling.
Tighten the cap until it clicks, oth- erwise the Check Engine light
will illuminate.
Always check that the fuel cap is installed securely to prevent fuel
spillage in the event of an acci-
dent.
OHD046014
OAM049089
(if equipped)
Page 147 of 314
475
Features of your vehicle
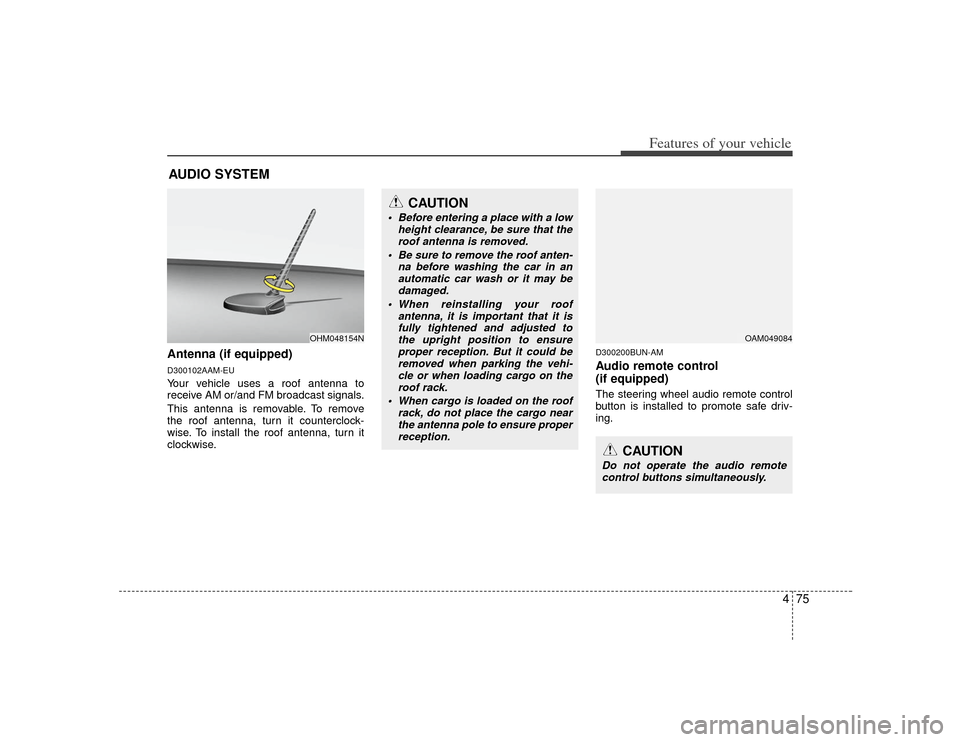
Antenna (if equipped)D300102AAM-EUYour vehicle uses a roof antenna to
receive AM or/and FM broadcast signals.
This antenna is removable. To remove
the roof antenna, turn it counterclock-
wise. To install the roof antenna, turn it
clockwise.
D300200BUN-AMAudio remote control
(if equipped) The steering wheel audio remote control
button is installed to promote safe driv-
ing.
AUDIO SYSTEM
CAUTION
• Before entering a place with a lowheight clearance, be sure that theroof antenna is removed.
Be sure to remove the roof anten- na before washing the car in anautomatic car wash or it may bedamaged.
When reinstalling your roof antenna, it is important that it isfully tightened and adjusted to the upright position to ensureproper reception. But it could be removed when parking the vehi-cle or when loading cargo on the roof rack.
When cargo is loaded on the roof rack, do not place the cargo nearthe antenna pole to ensure proper reception.
OHM048154N
OAM049084
CAUTION
Do not operate the audio remotecontrol buttons simultaneously.
Page 153 of 314
481
Features of your vehicle
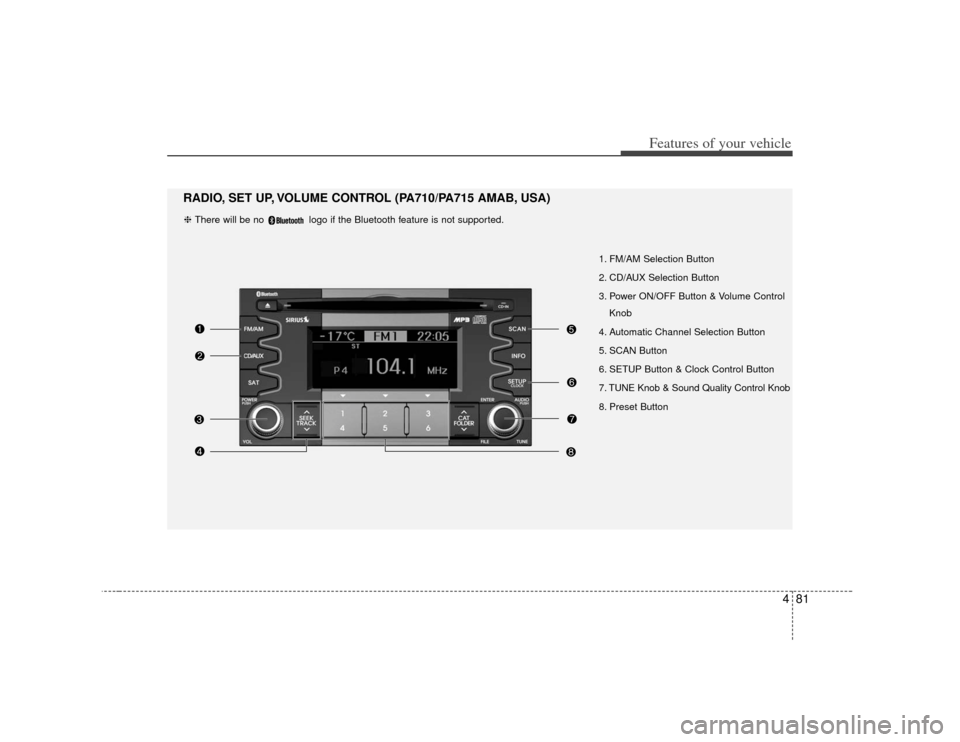
1. FM/AM Selection Button
2. CD/AUX Selection Button
3. Power ON/OFF Button & Volume ControlKnob
4. Automatic Channel Selection Button
5. SCAN Button
6. SETUP Button & Clock Control Button
7. TUNE Knob & Sound Quality Control Knob
8. Preset Button
RADIO, SET UP, VOLUME CONTROL (PA710/PA715 AMAB, USA)❈ There will be no logo if the Bluetooth feature is not supported.
Page 154 of 314
Features of your vehicle82
41. FM/AM Selection ButtonTurns to FM or AM mode, and toggles in
the order of FM1
➟ FM2
➟ AM
➟ FM1...
when the button is pressed each time.
2. CD/AUX Selection ButtonIf there is a CD in the CDP DECK it turns
to CD mode. If a device is connected to
AUX, then it toggles in the order of CD
➟
AUX
➟CD... when the button is pressed
each time. (It will not turn to AUX if there
is no auxiliary device connected.)
3. Power ON/OFF Button & Volume Control KnobTurns on/off the set when the IGNITION
SWITCH is on ACC or ON. If the button
is turned to the right, it increases the vol-
ume and left, decreases the volume.4. Automatic Channel SelectionButton ] button is pressed,
it reduces the band frequency by
200kHz to automatically select a chan-
nel. Stops at the previous frequency if
no channel is found. ] button is pressed,
it increases the band frequency by
200kHz to automatically select a chan-
nel. Stops at the previous frequency if no
channel is found.
5. SCAN ButtonIf this button is pressed, the frequencies
will become increased and receive the
corresponding broadcasts. This function
will play the frequencies for 5 seconds
(SIRIUS MODE:10 seconds) each and
find other broadcasts as the frequency
increases. Press the button again when
desiring to continue listening to the cur-
rently playing broadcast.6. SETUP Button & Clock Control ButtonPress this button to turn to the SIRIUS
option and the other adjustment mode.
If no action is taken for 5 seconds after
pressing the button, it will return to the
play mode. (After entering SETUP mode,
move between items using the left, right
and PUSH functions of the [TUNE]
knob.)
■ PA710 AMAB is an internal AMP
MODEL with Bluetooth feature.
The setup changes in the order of
CLOCK
↔
SAT
↔
SCROLL
↔
P.BASS
↔
RETURN
↔
TEMP
↔
PHONE
↔
SDVC
↔
CLOCK...
■ PA710 AMA is an internal AMP MODEL
without Bluetooth feature.
The setup changes in the order of
CLOCK
↔
SAT
↔
SCROLL
↔
P.BASS
↔
TEMP
↔
SDVC
↔
CLOCK...
■ PA715 AMAB is an external AMP
MODEL with Bluetooth feature.
The setup changes in the order of
CLOCK
↔ SAT
↔ SCROLL
↔ TEMP
↔
PHONE
↔
SDVC
↔
CLOCK...
■ PA715 AMA is an external AMP MODEL
without Bluetooth feature.
The setup changes in the order of
CLOCK
↔ SAT
↔ SCROLL
↔ RETURN
↔
TEMP
↔
SDVC
↔
CLOCK...
Page 155 of 314
![KIA Soul 2010 1.G Owners Manual 483
Features of your vehicle
Press the [SETUP] button. Use the vol-
ume controller to adjust the clock in the
following order: CLOCK
➟
ENTER
➟
hour or minute.
Adjust the hour and press the [ENT KIA Soul 2010 1.G Owners Manual 483
Features of your vehicle
Press the [SETUP] button. Use the vol-
ume controller to adjust the clock in the
following order: CLOCK
➟
ENTER
➟
hour or minute.
Adjust the hour and press the [ENT](/img/2/2920/w960_2920-154.png)
483
Features of your vehicle
Press the [SETUP] button. Use the vol-
ume controller to adjust the clock in the
following order: CLOCK
➟
ENTER
➟
hour or minute.
Adjust the hour and press the [ENTER]
button to set. Use the same method to
adjust the minute and press the [ENTER]
button to complete and exit from clock
adjustment mode.
Pressing the [SETUP] button while in
POWER OFF screen will allow the user
to make immediately adjustments to the
clock.
This function is used to display charac-
ters longer than the LCD text display and
can be turned ON/OFF through the vol-
ume controller.
This function displays the previous
MODE screen.
This function is used to change the tem-
perature display setting.
This function automatically adjusts the
volume level according to the speed of
the vehicle and can be turned ON/OFF
through the volume controller.
Based on psychoacoustic technology, this
technology overcomes BASS limitations
which may occur due to the limited num-
ber and size of speakers to offer dynamic
BASS sound quality. It is possible to adjust
in 3 levels of LOW/MID/HIGH.
OFF
➟LOW
➟MID
➟HIGH
Modes: CD/FM/AUX/IPOD/USB (exclud-
ing AM Mode)
7. TUNE Knob & Sound Quality Control KnobRotate the knob clockwise by one notch
to increase frequency by 200kHz from
current frequency.
Rotate the knob counterclockwise by one
notch to decrease frequency by 200kHz
from current frequency.
MIDDLE, TREBLE, FADER and BAL-
ANCE TUNE mode. The mode selected
is shown on the display. After selecting
each mode, rotate the Audio control
knob clockwise or counterclockwise. (Sound Quality Control will operate in FM,
AM, CD, AUX, USB, iPod and SAT
modes.)
To increase the BASS, rotate the knob
clockwise, while to decrease the BASS,
rotate the knob counterclockwise.
To increase the MIDDLE, rotate the knob
clockwise, while to decrease the MID-
DLE, rotate the knob counterclockwise.
Control
To increase the TREBLE, rotate the knob
clockwise, while to decrease the TRE-
BLE, rotate the knob counterclockwise.
Turn the control knob clockwise to
emphasize rear speaker sound(front
speaker sound will be attenuated). When
the control knob is turned counterclock-
wise, front speaker sound will be empha-
sized(rear speaker sound will be attenu-
ated).
Page 156 of 314
Features of your vehicle84
4
Rotate the knob clockwise to emphasize
right speaker sound(left speaker sound
will be attenuated). When the control
knob is turned counter clockwise, left
speaker sound will be emphasized(right
speaker sound will be attenuated).8. Preset ButtonPush [1]~[6] buttons less than 0.8 second
to play the channel saved in each button.
Push Preset button for 0.8 second or
longer to save current channel to the
respective button with a beep.
Page 159 of 314
487
Features of your vehicle
File Name
➟ Title
➟Artist
➟ Album
➟ Folder Name
➟Total File...
(not displayed if the information is not
available on the DISC.)
10. SEARCH Knob & ENTER ButtonRotate the knob clockwise to display the
songs after the currently played song.
Rotate the knob counterclockwise to dis-
play the songs before the currently
played song. Press the button to skip and
play the selected song.11. FOLDER Moving Button ] button to move
child folder of the current folder and dis-
play the first song in the folder. Press
TUNE/ ENTER knob to move to the
folder displayed. It will play the first
song in the folder.
] button to move parent folder and display the first song
in the folder. Press TUNE/ENTER knob
to move to the folder displayed.
Page 161 of 314
489
Features of your vehicle
1. USB Selection ButtonIf USB is connected, it switches to the
USB mode from the other mode to play
the song files stored in the USB. If no CD
and auxiliary device is not connected, it
displays "NO Media" for 3 seconds and
returns to the previous mode.2. TRACK Moving Button ] button for lessthan 0.8 second to play from the begin-
ning of the song currently played.
Press the button for less than 0.8 second
and press it again within 1 second to
move to and play the previous track.
Press the button for 0.8 second or
longer to play the song in reverse direc-
tion in fast speed.
] button for less
than 0.8 second to move to the next
track. Press the button for 0.8 second or
longer to play the song in forward direc-
tion in fast speed.
3. REPEAT ButtonPress this button for less than 0.8 second
to activate 'RPT' mode and longer than
0.8 second to activate ' ' mode.
Only the current file is repeatedly played back.
: All files in a folder are repeat- edly played back.4. RANDOM Playback ButtonPress this button for less than 0.8 second
to activate 'RDM' mode and longer than
0.8 second to activate 'A.RDM' mode.
All files in a folder are playedback in random sequence.
All files in a USB memory are played back in random sequence.5. SCAN Selection ButtonScan 10 seconds of each song in the USB
device.
Press the button once again to cancel
scanning.
6. INFO ButtonDisplays the information of the currently
played file in the order of File Name
➟
Title
➟
Artist
➟
Album
➟
Folder
➟
Total
File
➟Normal Display
➟ File Name
➟…
(Displays no information if the file has no
song information.)
7. SEARCH Knob & ENTER ButtonRotate the knob clockwise to display the
songs after the currently played song.
Rotate the knob counterclockwise to dis-
play the songs before the currently
played song.
Press the button to skip and play the
selected song.8. FOLDER Moving Button ] button to move
child folder of the current folder and dis-
play the first song in the folder. Press
TUNE/ENTER knob to move to the fold-
er displayed. It will play the first song in
the folder.
] button to move parent folder and display the first song
in the folder. Press TUNE/ENTER knob
to move to the folder displayed.
Page 165 of 314
493
Features of your vehicle
1. iPod
®Selection Button
If iPod is connected, it switches to the
iPod mode from the current mode to play
the song files stored in the iPod. If there
is no iPod connected, it displays "No
Media" for 3 seconds and returns to the
previous mode.2. TRACK Moving Button ] button for less
than 0.8 second to play from the begin-
ning of the song currently played.
Press the button for less than 0.8 second
and press it again within 1 second to
move to and play the previous track.
Press the button for 0.8 second or
longer to play the song in reverse direc-
tion in fast speed.
] button for less
than 0.8 second to move to the next
track. Press the button for 0.8 second or
longer to play the song in forward direc-
tion in fast speed.3. REPEAT ButtonRepeats the song currently played.
4. RANDOM Playback ButtonPress the button for less than 0.8 second
to start or stop the random playback of
the songs within the current category.
Press the button for longer than 0.8 sec-
ond to randomly play all songs in the
entire album of the iPod.
Press the button once again to cancel the
mode.5. INFO ButtonDisplays the information of the file cur-
rently played in the order of Title
➟ Artist
➟ Album
➟… (Displays no information if
the file has no song information.)
6. SEARCH Knob & ENTER ButtonWhen you rotate the knob clockwise, it
will display the songs (category) next to
the song currently played (category in
the same level).
Also, when you rotate the knob counter-
clockwise, it will display the songs (cate-
gory) before the song currently played
(category in the same level).
To listen to the song displayed in the
song category, press the button to skip to
and play the selected song.
7. CATEGORY Selection ButtonMoves to the upper category from cur-
rently played category of the iPod.
To move to (play) the category (song)
displayed, press TUNE/ENTER knob.
You will be able to search through the
lower category of the selected category.
The order of iPod’s category is Playlist,
Albums, Artists, Genres, songs, com-
posers.
Page 232 of 314
613
What to do in an emergency
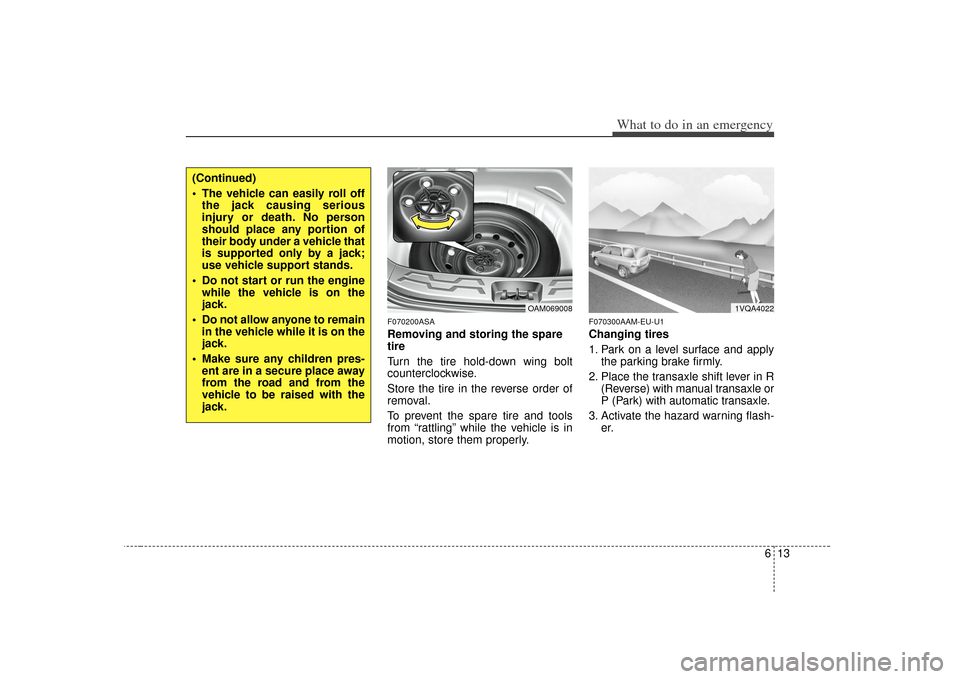
F070200ASARemoving and storing the spare
tire
Turn the tire hold-down wing bolt
counterclockwise.
Store the tire in the reverse order of
removal.
To prevent the spare tire and tools
from “rattling” while the vehicle is in
motion, store them properly.
F070300AAM-EU-U1Changing tires
1. Park on a level surface and applythe parking brake firmly.
2. Place the transaxle shift lever in R (Reverse) with manual transaxle or
P (Park) with automatic transaxle.
3. Activate the hazard warning flash- er.
(Continued)
The vehicle can easily roll offthe jack causing serious
injury or death. No person
should place any portion of
their body under a vehicle that
is supported only by a jack;
use vehicle support stands.
Do not start or run the engine while the vehicle is on the
jack.
Do not allow anyone to remain in the vehicle while it is on the
jack.
Make sure any children pres- ent are in a secure place away
from the road and from the
vehicle to be raised with the
jack.
OAM069008
1VQA4022