reset KIA Soul 2010 1.G Owner's Manual
[x] Cancel search | Manufacturer: KIA, Model Year: 2010, Model line: Soul, Model: KIA Soul 2010 1.GPages: 314, PDF Size: 6.39 MB
Page 17 of 314
Safety features of your vehicle43
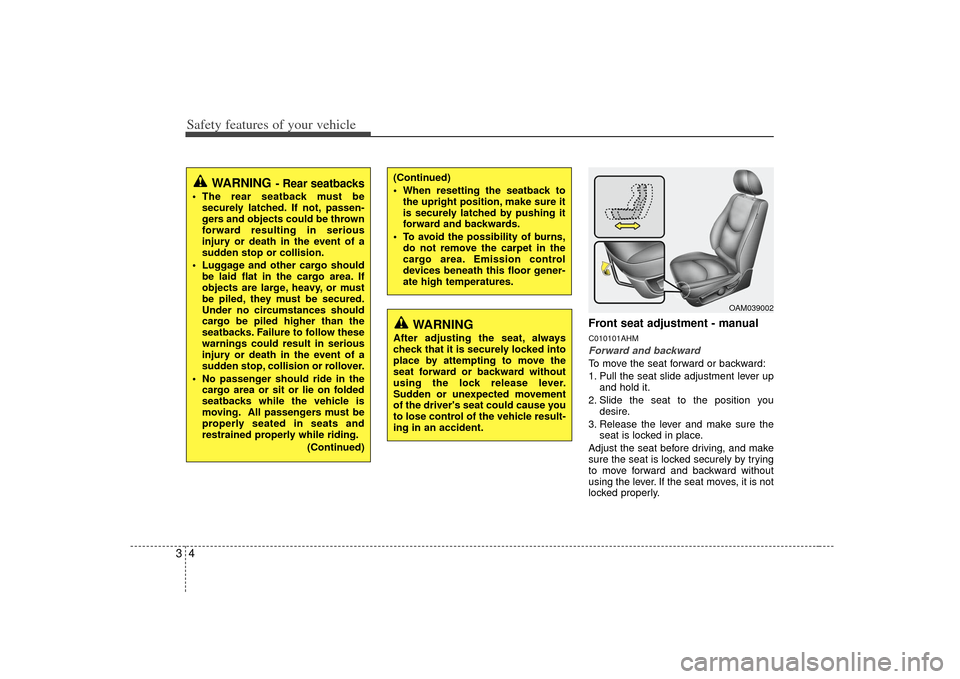
Front seat adjustment - manualC010101AHMForward and backwardTo move the seat forward or backward:
1. Pull the seat slide adjustment lever upand hold it.
2. Slide the seat to the position you desire.
3. Release the lever and make sure the seat is locked in place.
Adjust the seat before driving, and make
sure the seat is locked securely by trying
to move forward and backward without
using the lever. If the seat moves, it is not
locked properly.
(Continued)
When resetting the seatback to the upright position, make sure it
is securely latched by pushing it
forward and backwards.
To avoid the possibility of burns, do not remove the carpet in the
cargo area. Emission control
devices beneath this floor gener-
ate high temperatures.
WARNING
- Rear seatbacks
The rear seatback must besecurely latched. If not, passen-
gers and objects could be thrown
forward resulting in serious
injury or death in the event of a
sudden stop or collision.
Luggage and other cargo should be laid flat in the cargo area. If
objects are large, heavy, or must
be piled, they must be secured.
Under no circumstances should
cargo be piled higher than the
seatbacks. Failure to follow these
warnings could result in serious
injury or death in the event of a
sudden stop, collision or rollover.
No passenger should ride in the cargo area or sit or lie on folded
seatbacks while the vehicle is
moving. All passengers must be
properly seated in seats and
restrained properly while riding.
(Continued)
WARNING
After adjusting the seat, always
check that it is securely locked into
place by attempting to move the
seat forward or backward without
using the lock release lever.
Sudden or unexpected movement
of the driver's seat could cause you
to lose control of the vehicle result-
ing in an accident.
OAM039002
Page 97 of 314
425
Features of your vehicle
D110500AAM-EEResetting the sunroofWhenever the vehicle battery is discon-
nected or discharged, you must reset
your sunroof system as follows:
1. Turn the ignition switch to the ONposition.
2. According to the position of the sun- roof, do the following.
1) In case the sunroof is closed com-pletely or tilted:
Push the sunroof control lever
upward until the sunroof tilts com-
pletely upward.
2) In case the sunroof is open: Push the sunroof control lever for-
ward until the sunroof closes com-
pletely. Push the sunroof control
lever upward until the sunroof tilts
completely upward.
3. Release the sunroof control lever.
4. Push the sunroof control lever upward (for about 10 seconds) until the sun-
roof has returned to the original tilt
position after it is raised a little higher
than the maximum tilt position. Then,
release the lever. 5. Push the sunroof control lever upward
(for about 6 seconds) until the sunroof
operates as follows;
TILT DOWN → SLIDE OPEN →
SLIDE CLOSED
Then release the lever.
When this is complete, the sunroof sys-
tem has been reset.
Page 108 of 314
Features of your vehicle36
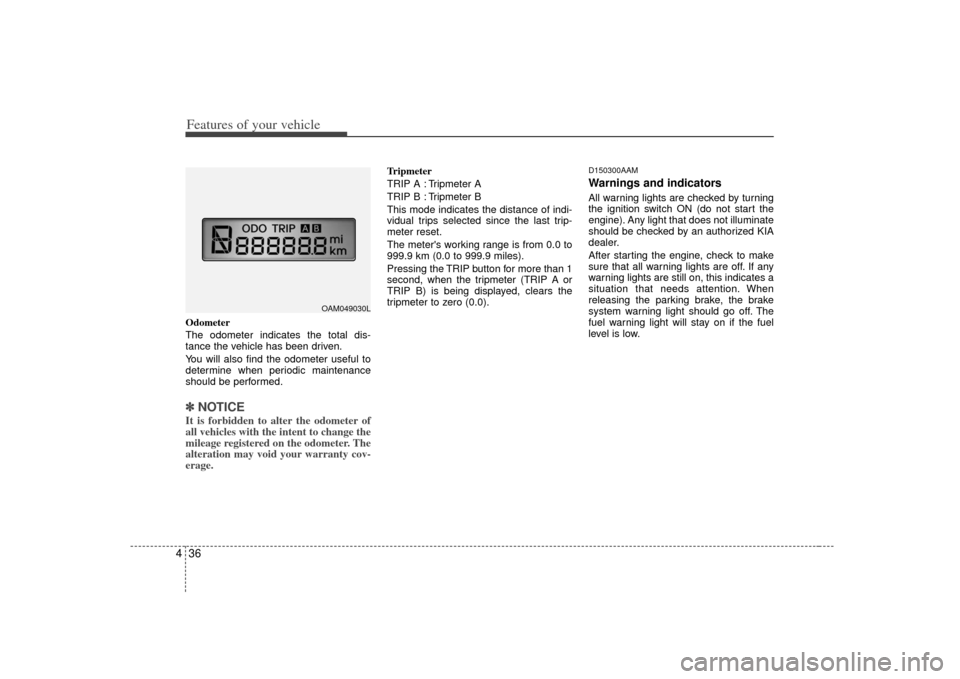
4Odometer
The odometer indicates the total dis-
tance the vehicle has been driven.
You will also find the odometer useful to
determine when periodic maintenance
should be performed.✽ ✽
NOTICEIt is forbidden to alter the odometer of
all vehicles with the intent to change the
mileage registered on the odometer. The
alteration may void your warranty cov-
erage.
Tripmeter
TRIP A : Tripmeter A
TRIP B : Tripmeter B
This mode indicates the distance of indi-
vidual trips selected since the last trip-
meter reset.
The meter's working range is from 0.0 to
999.9 km (0.0 to 999.9 miles).
Pressing the TRIP button for more than 1
second, when the tripmeter (TRIP A or
TRIP B) is being displayed, clears the
tripmeter to zero (0.0).
D150300AAMWarnings and indicatorsAll warning lights are checked by turning
the ignition switch ON (do not start the
engine). Any light that does not illuminate
should be checked by an authorized KIA
dealer.
After starting the engine, check to make
sure that all warning lights are off. If any
warning lights are still on, this indicates a
situation that needs attention. When
releasing the parking brake, the brake
system warning light should go off. The
fuel warning light will stay on if the fuel
level is low.
OAM049030L
Page 139 of 314
467
Features of your vehicle
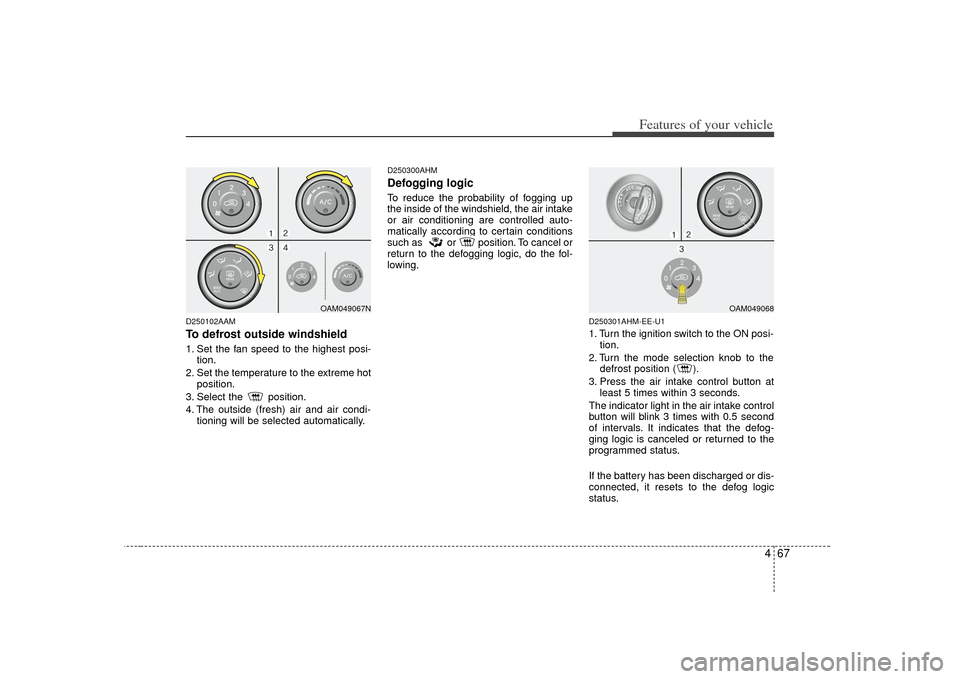
D250102AAMTo defrost outside windshield1. Set the fan speed to the highest posi-tion.
2. Set the temperature to the extreme hot position.
3. Select the position.
4. The outside (fresh) air and air condi- tioning will be selected automatically.
D250300AHMDefogging logicTo reduce the probability of fogging up
the inside of the windshield, the air intake
or air conditioning are controlled auto-
matically according to certain conditions
such as or position. To cancel or
return to the defogging logic, do the fol-
lowing.
D250301AHM-EE-U11. Turn the ignition switch to the ON posi-tion.
2. Turn the mode selection knob to the defrost position ( ).
3. Press the air intake control button at least 5 times within 3 seconds.
The indicator light in the air intake control
button will blink 3 times with 0.5 second
of intervals. It indicates that the defog-
ging logic is canceled or returned to the
programmed status.
If the battery has been discharged or dis-
connected, it resets to the defog logic
status.
OAM049067N
OAM049068
Page 148 of 314
Features of your vehicle76
4VOLUME ( / ) (1)• Push up the lever to increase volume.
Push down the lever to decrease vol-
ume.SEEK/PRESET ( / ) (2)If the SEEK/PRESET button is pressed
for 0.8 second or more, it will work as fol-
lows in each mode.
RADIO mode
It will function as the AUTO SEEK select
button.
CDP mode
It will function as the FF/REW button.
CDC mode
It will function as the DISC UP/DOWN
button.
If the SEEK/PRESET button is pressed
for less than 0.8 second, it will work as
follows in each mode.
RADIO mode
It will function as the PRESET STATION
select buttons. CDP mode
It will function as the TRACK UP/DOWN
button.
CDC mode
It will function as the TRACK UP/DOWN
button.
MODE (3)Press the button to select Radio or CD
(compact disc).MUTE (4) Press the MUTE button to cancel the
sound.
Press the MUTE button again to acti- vate the sound.
Detailed information for audio control
buttons is described in the following
pages in this section.
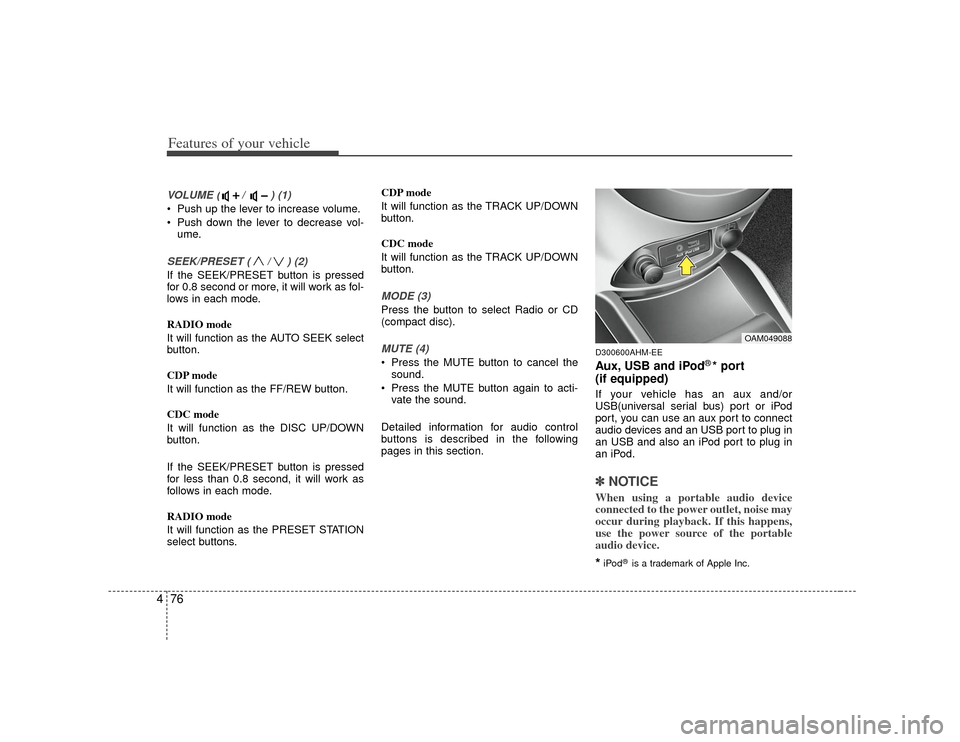
D300600AHM-EEAux, USB and iPod
®* port
(if equipped)
If your vehicle has an aux and/or
USB(universal serial bus) port or iPod
port, you can use an aux port to connect
audio devices and an USB port to plug in
an USB and also an iPod port to plug in
an iPod.✽ ✽ NOTICEWhen using a portable audio device
connected to the power outlet, noise may
occur during playback. If this happens,
use the power source of the portable
audio device.*iPod
®is a trademark of Apple Inc.
OAM049088
Page 153 of 314
481
Features of your vehicle
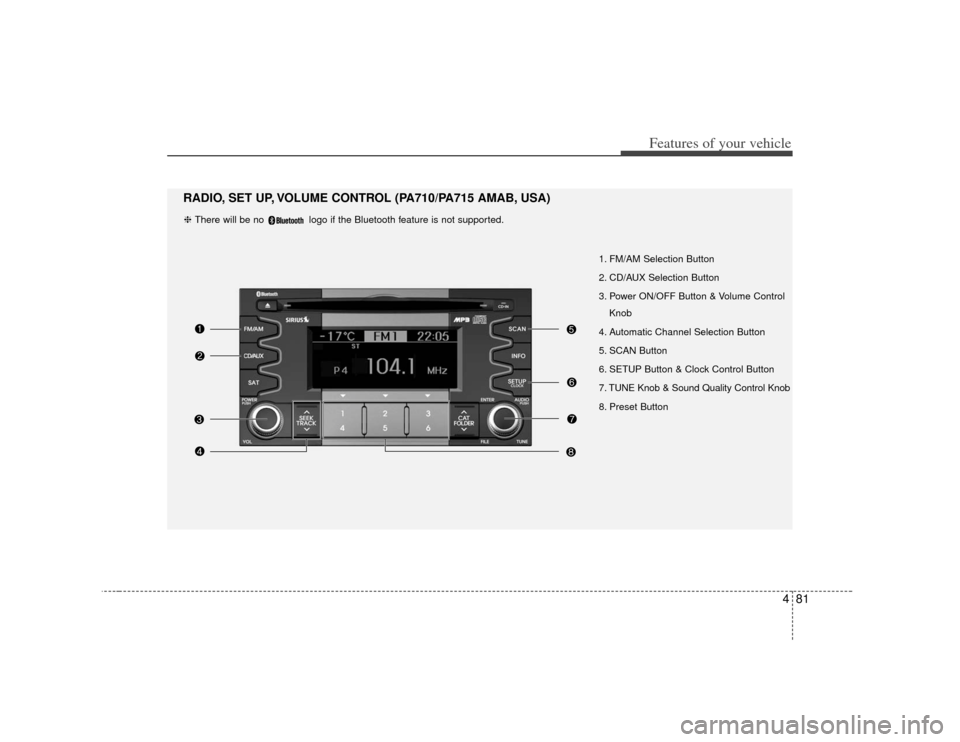
1. FM/AM Selection Button
2. CD/AUX Selection Button
3. Power ON/OFF Button & Volume ControlKnob
4. Automatic Channel Selection Button
5. SCAN Button
6. SETUP Button & Clock Control Button
7. TUNE Knob & Sound Quality Control Knob
8. Preset Button
RADIO, SET UP, VOLUME CONTROL (PA710/PA715 AMAB, USA)❈ There will be no logo if the Bluetooth feature is not supported.
Page 156 of 314
Features of your vehicle84
4
Rotate the knob clockwise to emphasize
right speaker sound(left speaker sound
will be attenuated). When the control
knob is turned counter clockwise, left
speaker sound will be emphasized(right
speaker sound will be attenuated).8. Preset ButtonPush [1]~[6] buttons less than 0.8 second
to play the channel saved in each button.
Push Preset button for 0.8 second or
longer to save current channel to the
respective button with a beep.
Page 166 of 314
Features of your vehicle94
4✽
✽
NOTICE FOR USING iPod
®
DEVICE
• Some iPod models might not sup-
port the communication protocol
and the files will not be played.
(iPod models supported: Mini, 4G,
Photo, Nano, 5G)
• The order of search or playback of songs in the iPod can be different
from the order searched in the
audio system.
• If the iPod crashes due to its own malfunction, reset the iPod. (Reset:
Refer to iPod manual)
• An iPod may not operate normally on low battery.
CAUTION IN USING
iPod
®DEVICE
You need the power cable exclu-
sive for an iPod in order to oper-ate an iPod with the buttons on the audio system. The PC cableprovided by Apple may cause a malfunction and do not use it forvehicle use.
When connecting the device with an iPod cable, push in the jackfully not to interfere with commu- nication.
When adjusting the sound effects of an iPod and the audio system,the sound effects of both devices will overlap and might reduce ordistort the quality of the sound.
Deactivate (turn off) the equalizer function of an iPod when adjust-ing the audio system’s volume,and turn off the equalizer of theaudio system when using theequalizer of an iPod.
(Continued)
(Continued) When the iPod cable is connected, the system can be switched to theAUX mode even without the iPoddevice and can cause noise. Disconnect the iPod cable whenyou are not using the iPod device.
When the iPod is not used for the audio system, the iPod cable hasto be separate from iPod devices.Original display of iPod may not be displayed.
Page 167 of 314
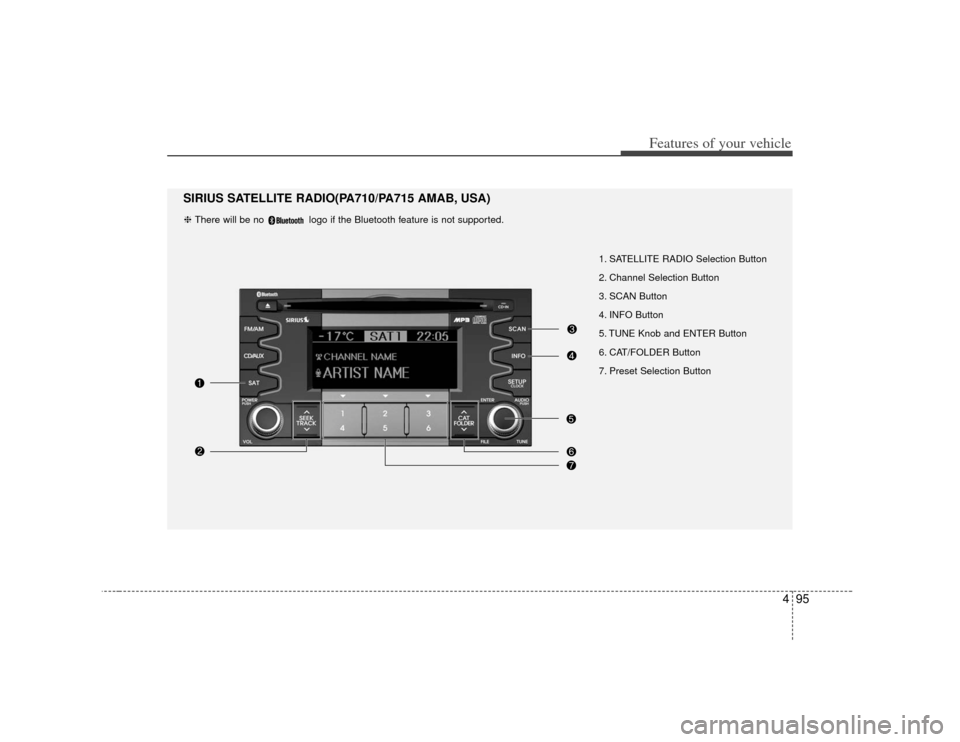
495
Features of your vehicle
1. SATELLITE RADIO Selection Button
2. Channel Selection Button
3. SCAN Button
4. INFO Button
5. TUNE Knob and ENTER Button
6. CAT/FOLDER Button
7. Preset Selection Button
SIRIUS SATELLITE RADIO(PA710/PA715 AMAB, USA)❈ There will be no logo if the Bluetooth feature is not supported.
Page 169 of 314
![KIA Soul 2010 1.G Owners Manual 497
Features of your vehicle
6. CAT/FOLDER Button ] or [FOLDER ] buttonto enter the Category List Mode, it dis-
plays category items and highlights the
category that currently tuned channel
belongs KIA Soul 2010 1.G Owners Manual 497
Features of your vehicle
6. CAT/FOLDER Button ] or [FOLDER ] buttonto enter the Category List Mode, it dis-
plays category items and highlights the
category that currently tuned channel
belongs](/img/2/2920/w960_2920-168.png)
497
Features of your vehicle
6. CAT/FOLDER Button ] or [FOLDER ] buttonto enter the Category List Mode, it dis-
plays category items and highlights the
category that currently tuned channel
belongs to.
buttons to navigate category list.
Press [ENTER] button to select the low- est channel in highlighted category.
gory "CATEGORY" Icon is displayed at
the top of the screen.7. Preset Selection Buttonond to play the channel saved in each
button.
second or longer to save current chan-
nel. An audible beep will play to confirm
the preset is stored.
✽ ✽ Troubleshooting1. Antenna Error
If this message is displayed, the anten-
na or antenna cable is broken or
unplugged. Please consult with your
Kia dealership.
2. Acquiring Signal If this message is displayed, it means
that the antenna is covered and that
the SIRIUS Satellite Radio signal is
not available. Ensure the antenna is
uncovered and has a clear view of the
sky.