instrument cluster KIA Soul 2012 1.G User Guide
[x] Cancel search | Manufacturer: KIA, Model Year: 2012, Model line: Soul, Model: KIA Soul 2012 1.GPages: 393, PDF Size: 8.76 MB
Page 236 of 393
Driving your vehicle
14
5
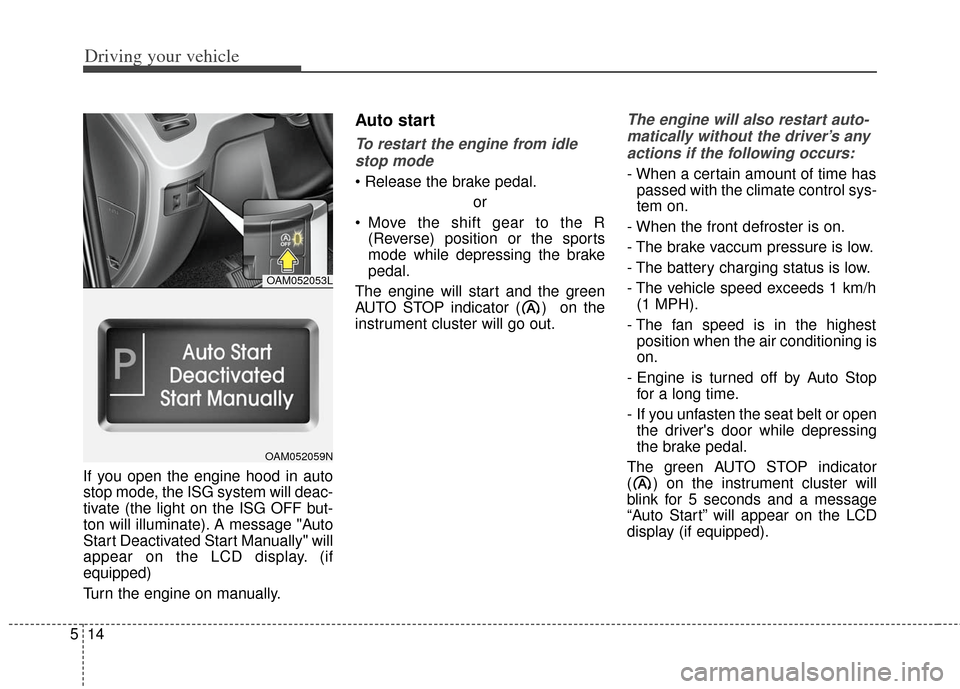
If you open the engine hood in auto
stop mode, the ISG system will deac-
tivate (the light on the ISG OFF but-
ton will illuminate). A message "Auto
Start Deactivated Start Manually" will
appear on the LCD display. (if
equipped)
Turn the engine on manually.
Auto start
To restart the engine from idle
stop mode
or
Move the shift gear to the R (Reverse) position or the sports
mode while depressing the brake
pedal.
The engine will start and the green
AUTO STOP indicator ( ) on the
instrument cluster will go out.
The engine will also restart auto- matically without the driver’s anyactions if the following occurs:
- When a certain amount of time has passed with the climate control sys-
tem on.
- When the front defroster is on.
- The brake vaccum pressure is low.
- The battery charging status is low.
- The vehicle speed exceeds 1 km/h (1 MPH).
- The fan speed is in the highest position when the air conditioning is
on.
- Engine is turned off by Auto Stop for a long time.
- If you unfasten the seat belt or open the driver's door while depressing
the brake pedal.
The green AUTO STOP indicator
( ) on the instrument cluster will
blink for 5 seconds and a message
“Auto Start” will appear on the LCD
display (if equipped).
OAM052053L
OAM052059N
Page 243 of 393
521
Driving your vehicle
For smooth operation, depress thebrake pedal when shifting from N(Neutral) to a forward or reversegear.
When stopped on an upgrade, do not
hold the vehicle with engine power.
Use the service brake or the parking
brake.
Transaxle ranges
The indicator light in the instrument
cluster displays the shift lever posi-
tion when the ignition switch is in the
ON position.
P (Park)
Always come to a complete stop
before shifting into P (Park). This
position locks the transaxle and pre-
vents the front wheels from rotating.
Shifting into P (Park) while the vehi-
cle is in motion will cause the drive
wheels to lock which will cause you
to lose control of the vehicle.
WARNING - Automatic transaxle
Before leaving the driver’s seat,
always make sure the shift lever
is in the P (Park) position; then
set the parking brake fully and
shut the engine off. Do not use
the P position in place of the
parking brake. Always make
sure the shift lever is latched in
the P position and set the park-
ing brake fully. Unexpected and
sudden vehicle movement can
occur if these precautions are
not followed.
CAUTION - Transaxle
To avoid damage to your
transaxle, do not acceleratethe engine in R (Reverse) orany forward gear position withthe brakes on.
The transaxle may be dam- aged if you shift into P (Park)while the vehicle is in motion.
Page 256 of 393
Driving your vehicle
34
5
Vehicle stability management
(VSM) (if equipped)
This system provides further
enhancements to vehicle stability
and steering responses when a vehi-
cle is driving on a slippery road or a
vehicle detected changes in coeffi-
cient of friction between right wheels
and left wheels when braking.
VSM operation
When the VSM is in operation, ESC
indicator light ( ) blinks.
When the vehicle stability manage-
ment is operating properly, you can
feel a slight pulsation in the vehicle.
This is only the effect of brake control
and indicates nothing unusual.
The VSM does not operate when:
Driving on bank road such as gra-
dient or incline
Driving rearward
ESC OFF indicator light ( ) remains on the instrument cluster
EPS indicator light remains on the instrument cluster
VSM operation off
If you press the ESC OFF button to
turn off the ESC, the VSM will also
cancel and the ESC OFF indicator
light ( ) illuminates.
To turn on the VSM, press the button
again. The ESC OFF indicator light
goes out.
Malfunction indicator
The VSM can be deactivated even if
you don’t cancel the VSM operation
by pressing the ESC OFF button. It
indicates that a malfunction has
been detected somewhere in the
Electric Power Steering system or
VSM system. If the ESC indicator
light ( ) or EPS warning light
remains on, take your vehicle to an
authorized Kia dealer and have the
system checked.
The VSM is designed to functionabove approximately 15 km/h (9
mph) on curves. The VSM is designed to function
above approximately 30 km/h (18
mph) when a vehicle is braking on
a split-mu road. The split-mu road
is made of surfaces which have dif-
ferent friction forces.
The Vehicle Stability Management system is not a substitute for safe
driving practices but a supplemen-
tary function only. It is the respon-
sibility of the driver to always check
the speed and the distance to the
vehicle ahead. Always hold the
steering wheel firmly while driving.
Your vehicle is designed to activate according to the driver’s intention,
even with installed VSM. Always
follow all the normal precautions
for driving at safe speeds for the
conditions – including driving
inclement weather and on a slip-
pery road.
Page 259 of 393

537
Driving your vehicle
CRUISE CONTROL SYSTEM (IF EQUIPPED)
The cruise control system allows you
to program the vehicle to maintain a
constant speed without pressing the
accelerator pedal.
This system is designed to function
above approximately 40 km/h (25
mph).
If the cruise control is left on(CRUISE indicator light in the
instrument cluster illuminated), the
cruise control can be switched on
accidentally. Keep the cruise con-
trol system off (CRUISE indicator
light OFF) when the cruise control
is not in use, to avoid inadvertently
setting a speed.
Use the cruise control system only when traveling on open highways
in good weather.
Do not use the cruise control when driving in heavy or varying traffic,
or on slippery (rainy, icy or snow-
covered) or winding roads or over
6% up-hill or down-hill roads.✽ ✽ NOTICE
During normal cruise control opera-
tion, when the SET switch is activat-
ed or reactivated after applying the
brakes, the cruise control will ener-
gize after approximately 3 seconds.
The delay is normal.
To set cruise control speed:
1. Push the CRUISE ON-OFF button
on the steering wheel, to turn the
system on. The CRUISE indicator
light in the instrument cluster will
illuminate.
2. Accelerate to the desired speed, which must be more than 40 km/h
(25 mph).
OAM059010L
WARNING - Misuse
cruise control
Do not use cruise control if the
traffic situation does not allow
you to drive safely at a constant
speed and with sufficient dis-
tance to the vehicle in front.
Page 260 of 393

Driving your vehicle
38
5
3. Push the SET - switch, and
release it at the desired speed.
The SET indicator light in the
instrument cluster will illuminate.
Release the accelerator at the
same time. The desired speed will
automatically be maintained.
On a steep grade, the vehicle mayslow down or speed up slightly whilegoing downhill.
To increase cruise control set
speed:
Follow either of these procedures:
Push the RES + switch and hold it. Your vehicle will accelerate. Release
the switch at the speed you want.
Push the RES + switch and release it immediately. The cruising speed
will increase by 1.6 km/h (1.0 mph)
each time the RES + switch is oper-
ated in this manner.
To decrease the cruising
speed:
Follow either of these procedures:
Push the SET - switch and hold it.
Your vehicle will gradually slow
down. Release the switch at the
speed you want to maintain.
Push the SET - switch and release it immediately. The cruising speed
will decrease by 1.6 km/h (1.0
mph) each time the SET - switch is
operated in this manner.
OAM059012LOAM059011LOAM059012L
Page 262 of 393
Driving your vehicle
40
5
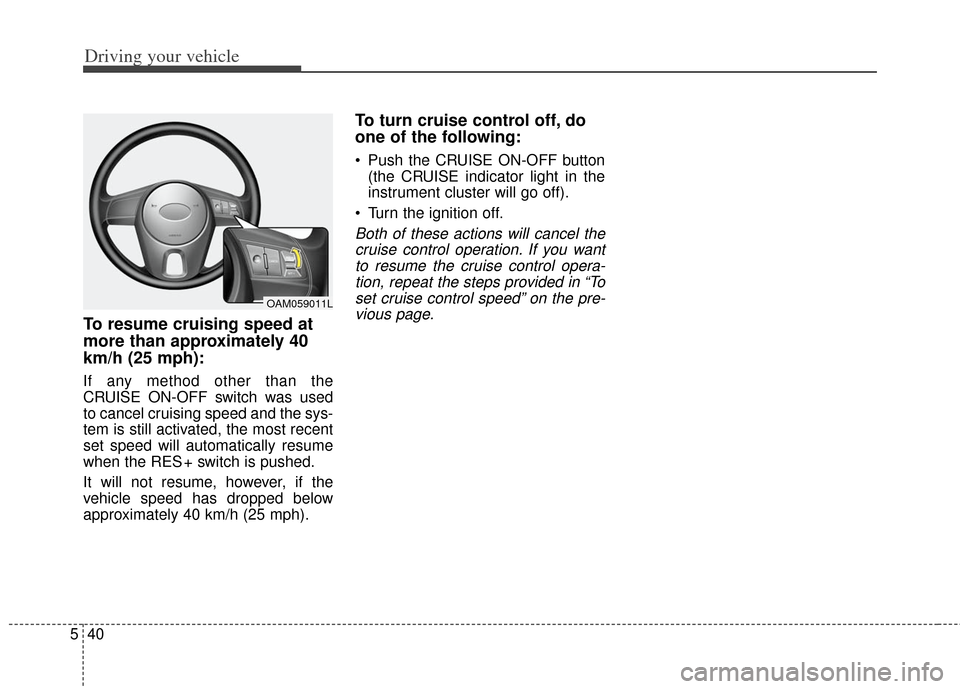
To resume cruising speed at
more than approximately 40
km/h (25 mph):
If any method other than the
CRUISE ON-OFF switch was used
to cancel cruising speed and the sys-
tem is still activated, the most recent
set speed will automatically resume
when the RES + switch is pushed.
It will not resume, however, if the
vehicle speed has dropped below
approximately 40 km/h (25 mph).
To turn cruise control off, do
one of the following:
Push the CRUISE ON-OFF button
(the CRUISE indicator light in the
instrument cluster will go off).
Turn the ignition off.
Both of these actions will cancel the cruise control operation. If you wantto resume the cruise control opera-tion, repeat the steps provided in “Toset cruise control speed” on the pre-vious page.
OAM059011L
Page 369 of 393

759
Maintenance
Description Fuse ratingProtected component
P/WDW LH 25A Power Window Main Switch, Rear Power Window Switch LH
P/WDW RH 25A Power Window Main Switch, Passenger Power Window Switch, Rear Power Window Switch RH
PDM 2 10A PDM,Start/Stop Button Switch, Fob Holder
HAZARD 15A Hazard Relay, Hazard Switch, One Touch Flasher Unit
TAIL LP LH 10A Rear Combination Lamp LH, Head Lamp LH, License Lamp
TAIL LP RH 10ARear Combination Lamp RH, Head Lamp RH, Audio, Passenger Power Window Switch, Rheostat,
Power Window Main Switch, Hazard Switch, Instrument Cluster, Mood Lamp Switch,
AUX & USB Jack, ESC Switch, A/C Control Module, Multifunction Switch,
Driver/Passenger Seat Warmer Switch, ATM Shift Lever Indicator, Glove Box Lamp,
A/V & Navigation Head Unit, Telltale Lamp, ISG Switch, Active ECO Switch,
/V & Navigation Touch, AUX Jack
IG 2 10A BCM, Sunroof Motor
WIPER RR 15A Rear Wiper Relay, Rear Wiper Motor, Multifunction Switch (Wiper)
WIPER FRT 25A E/R Fuse & Relay Box (Wiper Relay), Front Wiper Motor, Multifunction Switch (Wiper)
AMP 25A AMP, ISG Low DC - DC Converter (AMP)
SUNROOF 20A Sunroof Motor
(FOG LP FRT) 15A Front Fog Lamp Relay
T/GATE OPEN 15A Tail Gate Relay, Data Link Connector, DRL Relay
(FOG LP RR) 10A -
A/CON 10AA/C Control Module, E/R Fuse & Relay Box (H/LP HI Relay, Blower Relay), Active Incar Sensor,
A/V & Navigation Touch
PDM 1 10A PDM
ACC 10AAudio, Mood Lamp Module, Power Outside Mirror Switch, Smart Key Control Module, PDM,
ATM Key Lock Control Module, A/V & Navigation Head Unit, BCM, AMP, A/V & Navigation Touch,
ISG Low DC - DC Converter (Audio/AMP)
C/LIGHTER 20A Cigarette Lighter, Rear Power Outlet
Page 370 of 393

Maintenance
60
7
Description Fuse rating Protected component
HTD MIRR 10A ECM/PCM, Driver/Passenger Power Outside Mirror, A/C Control Module, A/V & Navigation Touch
DR LOCK 20A Door Lock Relay, Door Unlock Relay, 2 Turn Lock Relay
STOP LP 15AStop Lamp Switch, Multipurpose Check Connector, HAC Relay, Stop Lamp Relay,
Sport Mode Switch, Key Solenoid
TCU 10AVehicle Speed Sensor (M/T), ATM Shift Lever Indicator, ATM Key Lock Control Module,
Transaxle Range Switch
ABS 10A ESC Module, ESC Switch, E/R Fuse & Relay Box (Multipurpose Check Connector)
IG 1 10ATire Pressure Monitoring Module, ISG Low DC - DC Converter (Audio/AMP),
Driver/Passenger Seat Warmer Switch, Driver/Passenger Seat Warmer, ISG Switch,
Electro Chromic Mirror, Oil Pump Invertor, Stop Lamp Switch, HAC Relay
P/OUTLET FRT 15A Front Power Outlet
A/BAG 15A SRS Control Module, Weight Classification Module, Telltale Lamp
IGN COIL 15A G4FD : Condenser, Ignition Coil #1 ~ #4
T/SIG 10A Hazard Switch, Multifunction Switch (Light)
CLUSTER 10A BCM, Instrument Cluster (IND.), A/C Control Module, Smart Key Control Module, PDM
ECU 10A ECM, PCM
START 10AE/R Fuse & Relay Box (Start Relay), PDM, Transaxle Range Switch, Ignition Lock Switch,
PCM/ECM
B/UP LP 10A Back-up Lamp Switch (M/T)
A/BAG IND 10A Instrument Cluster (Air Bag IND.)
POWER
CONNECTOR MODULE 15A
Audio, RF Receiver, A/V & Navigation Touch, ISG Low DC - DC Converter (Audio),
A/V & Navigation Head Unit
ROOM LP 10A BCM, Instrument Cluster (IND.), A/C Control Module, Tire Pressure Monitoring Module,
Center Room Lamp, Luggage Lamp,
Overhead Console Assembly (Map Lamp), Ignition Key ILL. & Door Warning Switch,
Vanity Lamp LH/RH
Page 373 of 393

763
Maintenance
DescriptionFuse rating Protected component
FUSE DEDICATE DRL 10A BCM
BLOWER 2
10A A/C Control Module (Auto)
SENSOR 1 10A -
SENSOR 2 10AC/Fan HI/Low Relay, PCM/ECM, Purge Control Solenoid Valve, Variable Intake Solenoid Valve,
Canister Close Valve, Immobilizer Module, A/Con Relay
IGN COIL 15A -
ECU 3 20A -
SENSOR 3 15A Oxygen Sensor (Up/Down), F/Pump Relay, Oil Control Valve #1/#2, PCM/ECM
H/LP LH 10A Head Lamp LH
H/LP RH 10A Head Lamp RH
HTD STRG 15A -
WIPER 10A PCM
B/UP LP (AP) 10AElectro Chromic Mirror, Rear Combination Lamp LH/RH, Instrument Cluster,
A/V & Navigation Head Unit, Audio
MDPS 2 10A EPS Control Module
A/CON 10A A/Con Relay
Page 375 of 393

765
Maintenance
DescriptionFuse rating Protected component
FUSE DEDICATE DRL 10A BCM
BLOWER 2
10A A/C Control Module (Auto)
SENSOR 1 10ACamshaft Position Sensor #1/#2, Oil Control Valve #1/#2, Canister Control Valve, A/Con Relay,
Immobilizer Module
SENSOR 2 10A C/Fan HI/Low Relay, Injector #1 ~ #4
IGN COIL 15A Ignition Coil #1 ~ #4, Condenser
ECU 3 20A PCM/ECM
SENSOR 3 15AOxygen Sensor (Up/Down), F/Pump Relay, Purge Control Solenoid Valve,
Variable Intake Solenoid Valve
H/LP LH 10A Head Lamp LH
H/LP RH 10A Head Lamp RH
HTD STRG 15A -
WIPER 10A PCM
B/UP LP (AP) 10AElectro Chromic Mirror, Rear Combination Lamp LH/RH, Instrument Cluster,
A/V & Navigation Head Unit, Audio
MDPS 2 10A EPS Control Module
A/CON 10A A/Con Relay