lock KIA SOUL 2015 Features and Functions Guide
[x] Cancel search | Manufacturer: KIA, Model Year: 2015, Model line: SOUL, Model: KIA SOUL 2015Pages: 46, PDF Size: 5.49 MB
Page 32 of 46
30
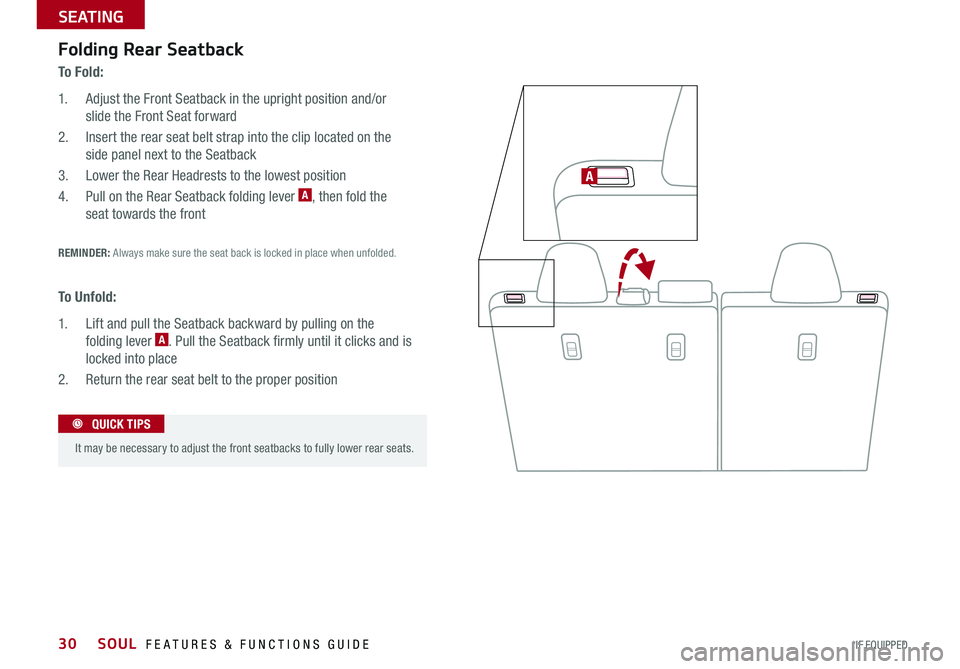
Folding Rear Seatback
To F o l d :
1 Adjust the Front Seatback in the upright position and/or
slide the Front Seat forward
2 Insert the rear seat belt strap into the clip located on the
side panel next to the Seatback
3 Lower the Rear Headrests to the lowest position
4 Pull on the Rear Seatback folding lever A, then fold the
seat towards the front
REMINDER: Always make sure the seat back is locked in place when unfolded
To U n f o l d :
1 Lift and pull the Seatback backward by pulling on the
folding lever A Pull the Seatback firmly until it clicks and is
locked into place
2 Return the rear seat belt to the proper position
A
It may be necessary to adjust the front seatbacks to fully lower rear seats
QUICK TIPS
SOUL FEATURES & FUNCTIONS GUIDE
*IF EQUIPPED
SEATING
Page 33 of 46
31
REMINDER: Remote button configuration may vary depending on vehicle options
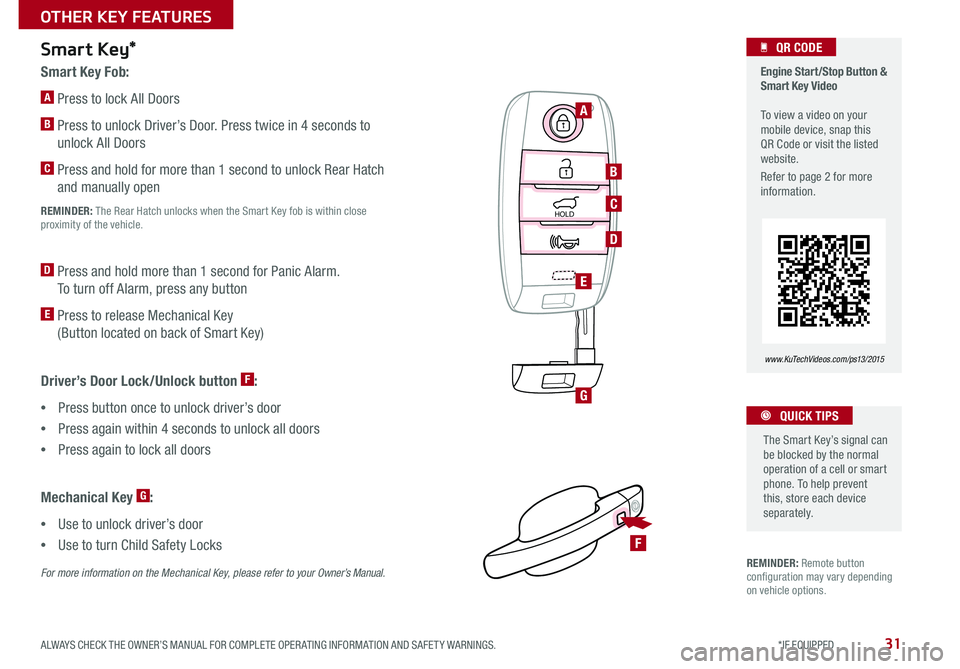
Smart Key Fob:
A Press to lock All Doors
B Press to unlock Driver’s Door Press twice in 4 seconds to
unlock All Doors
C Press and hold for more than 1 second to unlock Rear Hatch
and manually open
REMINDER: The Rear Hatch unlocks when the Smart Key fob is within close proximity of the vehicle
D Press and hold more than 1 second for Panic Alarm
To turn off Alarm, press any button
E Press to release Mechanical Key
(Button located on back of Smart Key)
Smart Key*
HOLD
HOLD
Driver’s Door Lock/Unlock button F:
•Press button once to unlock driver’s door
•Press again within 4 seconds to unlock all doors
•Press again to lock all doors
Mechanical Key G:
•Use to unlock driver’s door
•Use to turn Child Safety Locks
For more information on the Mechanical Key, please refer to your Owner’s Manual.
Engine Start/Stop Button & Smart Key Video To view a video on your mobile device, snap this QR Code or visit the listed website
Refer to page 2 for more information
www. KuTechVideo s.c om/p s13/2015
A
B
C
D
E
G
F
QR CODE
The Smart Key’s signal can be blocked by the normal operation of a cell or smart phone To help prevent this, store each device separately
QUICK TIPS
ALWAYS CHECK THE OWNER’S MANUAL FOR COMPLETE OPER ATING INFORMATION AND SAFET Y WARNINGS. *IF EQUIPPED
OTHER KEY FEATURES
Page 34 of 46
32
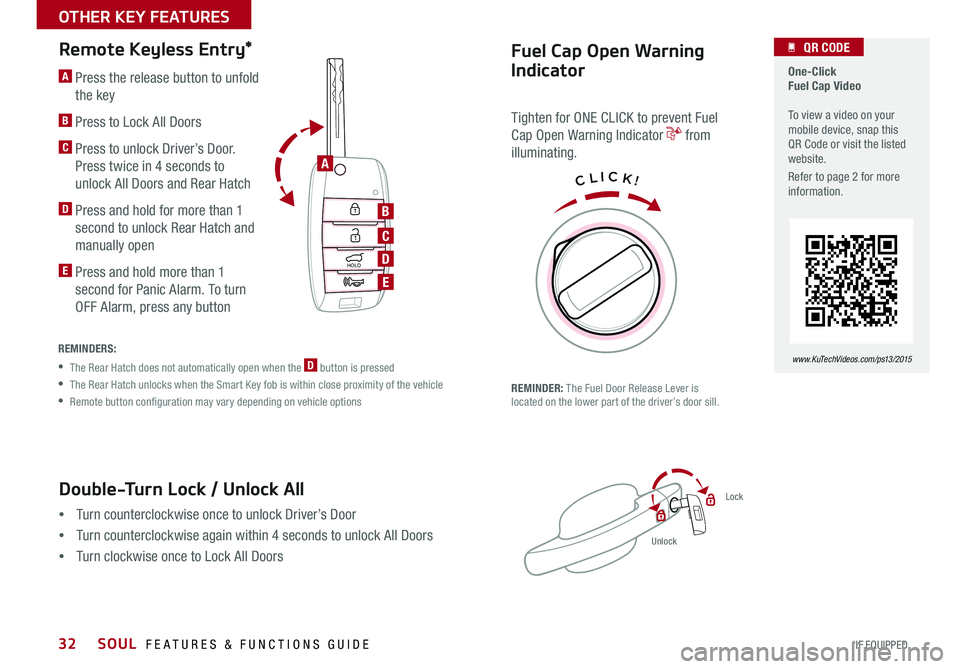
Remote Keyless Entry*
•Turn counterclockwise once to unlock Driver’s Door
•Turn counterclockwise again within 4 seconds to unlock All Doors
•Turn clockwise once to Lock All Doors
HOLD
HOLD
A Press the release button to unfold
the key
B Press to Lock All Doors
C Press to unlock Driver’s Door
Press twice in 4 seconds to
unlock All Doors and Rear Hatch
D Press and hold for more than 1
second to unlock Rear Hatch and
manually open
E Press and hold more than 1
second for Panic Alarm To turn
OFF Alarm, press any button
REMINDERS:
•The Rear Hatch does not automatically open when the D button is pressed
•The Rear Hatch unlocks when the Smart Key fob is within close proximity of the vehicle
•Remote button configuration may vary depending on vehicle options
Double-Turn Lock / Unlock All
One-Click Fuel Cap Video To view a video on your mobile device, snap this QR Code or visit the listed website
Refer to page 2 for more information
www. KuTechVideo s.c om/p s13/2015
A
B
C
D
E
QR CODEFuel Cap Open Warning
Indicator
Tighten for ONE CLICK to prevent Fuel
Cap Open Warning Indicator from
illuminating
REMINDER: The Fuel Door Release Lever is located on the lower part of the driver’s door sill
Lock
Unlock
CLICK!
SOUL FEATURES & FUNCTIONS GUIDE
*IF EQUIPPED
OTHER KEY FEATURES
Page 35 of 46
33
Map/Room Lamps
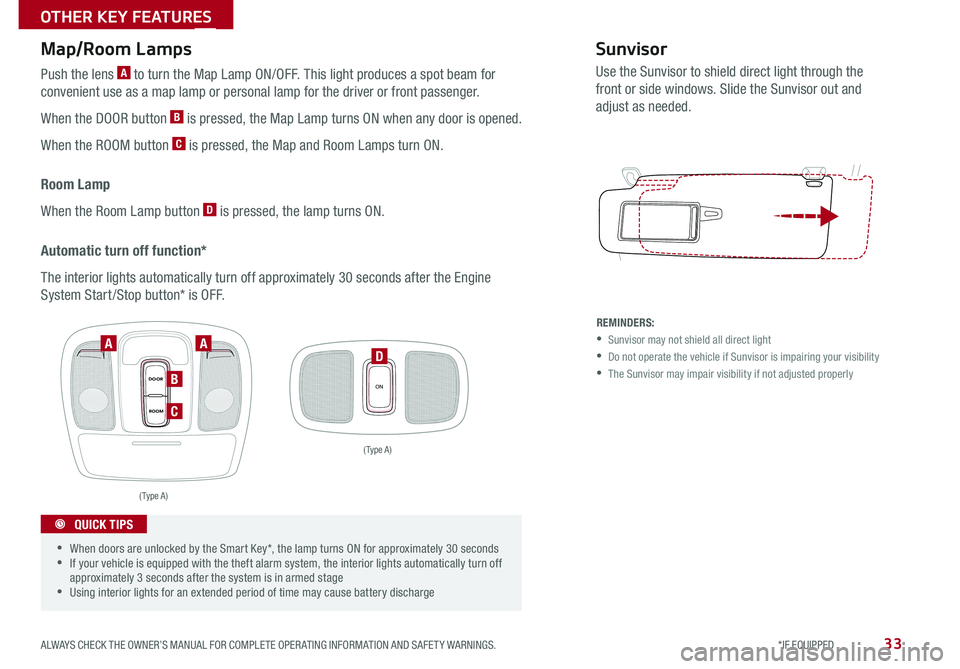
Push the lens A to turn the Map Lamp ON/OFF This light produces a spot beam for
convenient use as a map lamp or personal lamp for the driver or front passenger
When the DOOR button B is pressed, the Map Lamp turns ON when any door is opened
When the ROOM button C is pressed, the Map and Room Lamps turn ON
Room Lamp
When the Room Lamp button D is pressed, the lamp turns ON
Automatic turn off function*
The interior lights automatically turn off approximately 30 seconds after the Engine
System Start /Stop button* is OFF
ONDOOR
ROOM
ROOMDOOR
OPENCLOSE
Sunvisor
Use the Sunvisor to shield direct light through the
front or side windows Slide the Sunvisor out and
adjust as needed
REMINDERS:
•Sunvisor may not shield all direct light
•Do not operate the vehicle if Sunvisor is impairing your visibility
•The Sunvisor may impair visibility if not adjusted properly
( Type A )
( Type A )
AA
B
C
D
•
•When doors are unlocked by the Smart Key*, the lamp turns ON for approximately 30 seconds •If your vehicle is equipped with the theft alarm system, the interior lights automatically turn off approximately 3 seconds after the system is in armed stage •Using interior lights for an extended period of time may cause battery discharge
QUICK TIPS
ALWAYS CHECK THE OWNER’S MANUAL FOR COMPLETE OPER ATING INFORMATION AND SAFET Y WARNINGS. *IF EQUIPPED
OTHER KEY FEATURES
Page 38 of 46
36
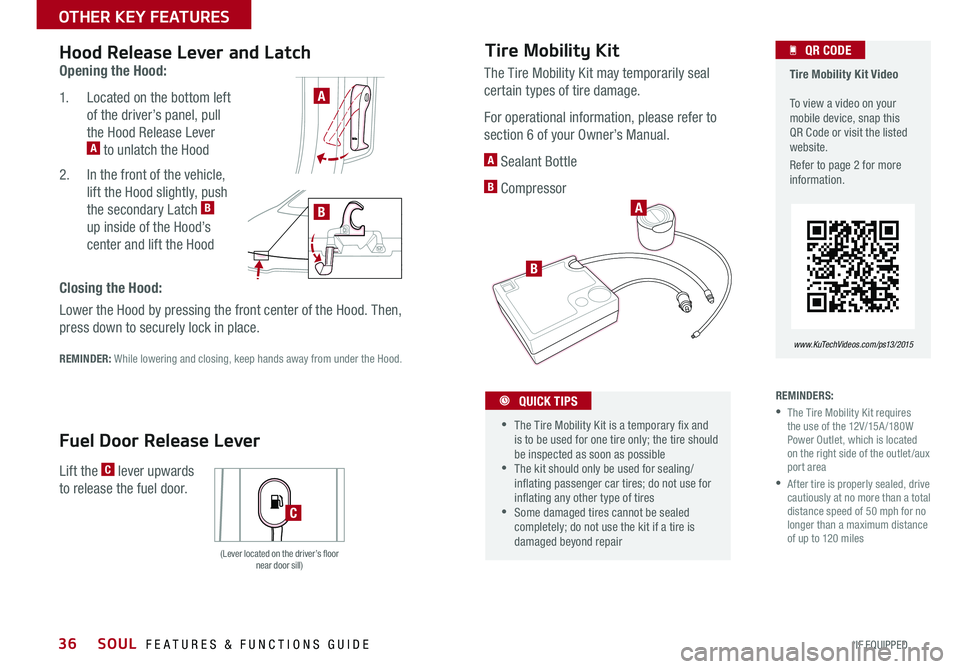
Opening the Hood:
1 Located on the bottom left
of the driver’s panel, pull
the Hood Release Lever A to unlatch the Hood
2 In the front of the vehicle,
lift the Hood slightly, push
the secondary Latch B
up inside of the Hood’s
center and lift the Hood
REMINDER: While lowering and closing, keep hands away from under the Hood
Hood Release Lever and Latch
Lift the C lever upwards
to release the fuel door
Fuel Door Release Lever
Closing the Hood:
Lower the Hood by pressing the front center of the Hood Then,
press down to securely lock in place
(Lever located on the driver’s floor near door sill)
A
B
C
Tire Mobility Kit Video To view a video on your mobile device, snap this QR Code or visit the listed website
Refer to page 2 for more information
www. KuTechVideo s.c om/p s13/2015
QR CODETire Mobility Kit
REMINDERS:
• The Tire Mobility Kit requires the use of the 12V/15A /180W Power Outlet, which is located on the right side of the outlet /aux port area
• After tire is properly sealed, drive cautiously at no more than a total distance speed of 50 mph for no longer than a maximum distance of up to 120 miles
The Tire Mobility Kit may temporarily seal
certain types of tire damage
For operational information, please refer to
section 6 of your Owner’s Manual
A Sealant Bottle
B Compressor
•
•The Tire Mobility Kit is a temporary fix and is to be used for one tire only; the tire should be inspected as soon as possible •The kit should only be used for sealing/inflating passenger car tires; do not use for inflating any other type of tires •Some damaged tires cannot be sealed completely; do not use the kit if a tire is damaged beyond repair
QUICK TIPS
B
A
SOUL FEATURES & FUNCTIONS GUIDE
*IF EQUIPPED
OTHER KEY FEATURES
Page 39 of 46
37
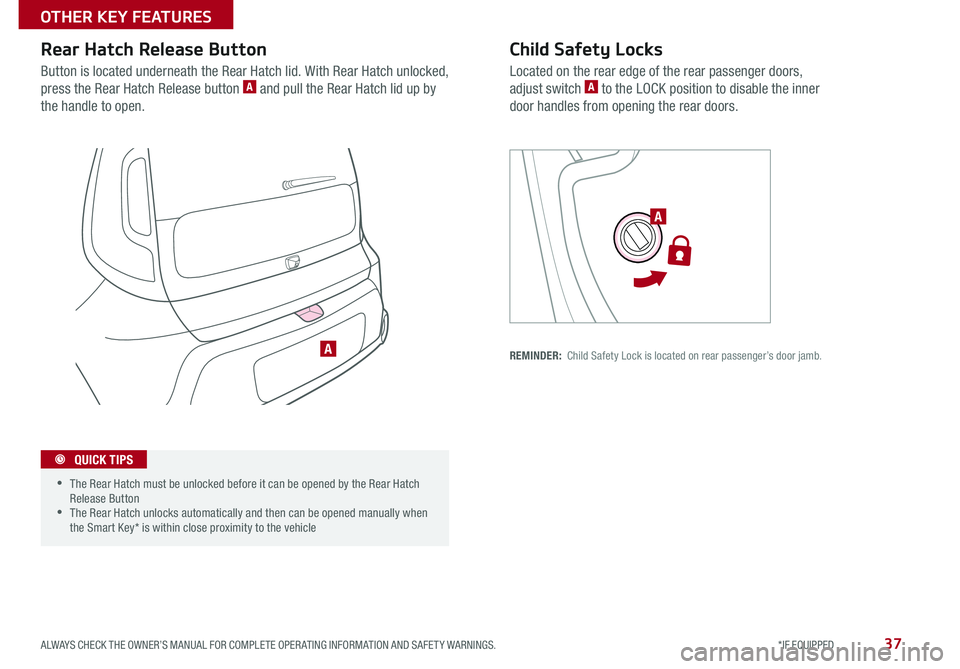
Child Safety Locks
Located on the rear edge of the rear passenger doors,
adjust switch A to the LOCK position to disable the inner
door handles from opening the rear doors
REMINDER: Child Safety Lock is located on rear passenger’s door jamb
Button is located underneath the Rear Hatch lid With Rear Hatch unlocked,
press the Rear Hatch Release button A and pull the Rear Hatch lid up by
the handle to open
Rear Hatch Release Button
•
•The Rear Hatch must be unlocked before it can be opened by the Rear Hatch Release Button •The Rear Hatch unlocks automatically and then can be opened manually when the Smart Key* is within close proximity to the vehicle
A
A
QUICK TIPS
ALWAYS CHECK THE OWNER’S MANUAL FOR COMPLETE OPER ATING INFORMATION AND SAFET Y WARNINGS. *IF EQUIPPED
OTHER KEY FEATURES
Page 40 of 46
38
Seat Belts
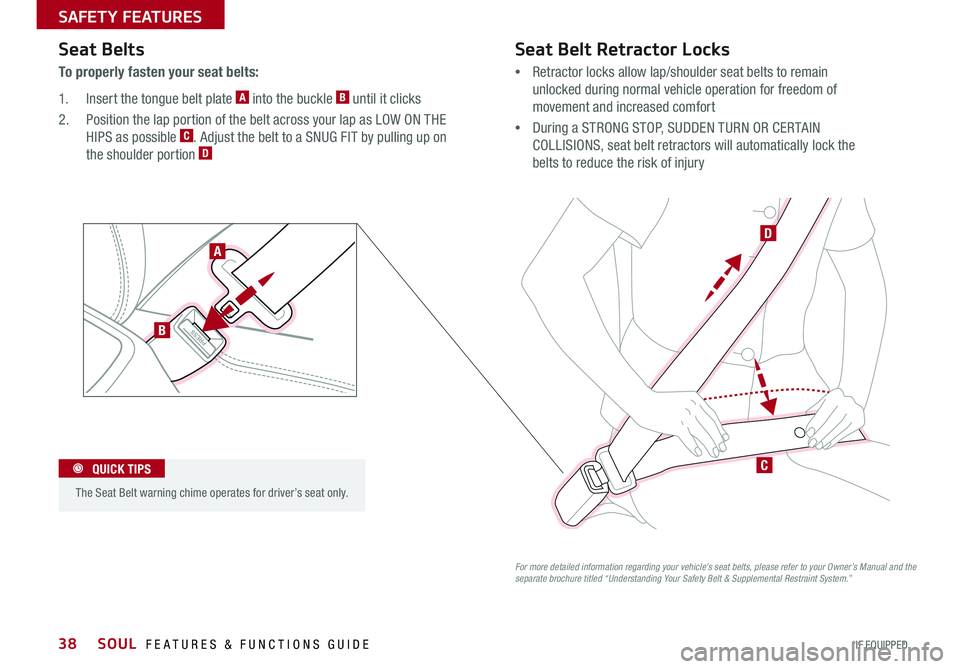
To properly fasten your seat belts:
1 Insert the tongue belt plate A into the buckle B until it clicks
2 Position the lap portion of the belt across your lap as LOW ON THE
HIPS as possible C Adjust the belt to a SNUG FIT by pulling up on
the shoulder portion D
Seat Belt Retractor Locks
•Retractor locks allow lap/shoulder seat belts to remain
unlocked during normal vehicle operation for freedom of
movement and increased comfort
•During a STRONG STOP, SUDDEN TURN OR CERTAIN
COLLISIONS, seat belt retractors will automatically lock the
belts to reduce the risk of injury
For more detailed information regarding your vehicle’s seat belts, please refer to your Owner’s Manual and the separate brochure titled “Understanding Your Safety Belt & Supplemental Restraint System.”
PRESS
A
B
D
C The Seat Belt warning chime operates for driver’s seat only
QUICK TIPS
SOUL FEATURES & FUNCTIONS GUIDE
*IF EQUIPPED
SAFETY FEATURES
Page 44 of 46
*IF EQUIPPED
See your Owner’s Manual for more details and complete maintenance information, including severe maintenance schedule. Warranty may be voided if maintenance schedule is not followed. Call 1-800-333-4KIA (4542) for Roadside Assistance.
* and, if necessary, adjust, clean, replace or correct** If equipped* * * Check and adjust level and check for leaks. Inspect regularlyCheck tire pressure once a month or more. Transfer case oil and rear differential oil should be changed anytime they have been submerged in water.
1 When adding coolant, use only deionized water or soft water for your vehicle and never mix hard water in the coolant filled at the factory. An improper coolant mixture can result in serious malfunction or engine damage.2 If TOP TIER detergent gasoline is not available, one bottle of additive is recommended. Additives are available from your authorized Kia dealer along with information on how to use them. Do not mix other additives.
3 lnspect “Water Pump” when replacing the drive belt or timing belt. Fuel filter & fuel tank air filter are considered to be maintenance free but periodic inspection is recommended for this maintenance schedule depends on fuel quality. If there are some important safety matters like fuel flow restriction, surging, loss of power, hard starting problem etc, replace the fuel filter immediately regardless of maintenance schedule and consult an authorized Kia dealer for details. The drive belt should be replaced when cracks occur or tension is reduced excessively. 4 Inspect for excessive tappet noise and/or engine vibration and adjust if necessary.5 When replacing coolant, use only a qualified coolant additive for your vehicle and never mix hard water in the coolant filled at the factory. An improper coolant mixture can result in serious malfunction or engine damage.
© 2014 Kia Motors America, Inc. All rights reserved. Part Number: UG150-PS-004
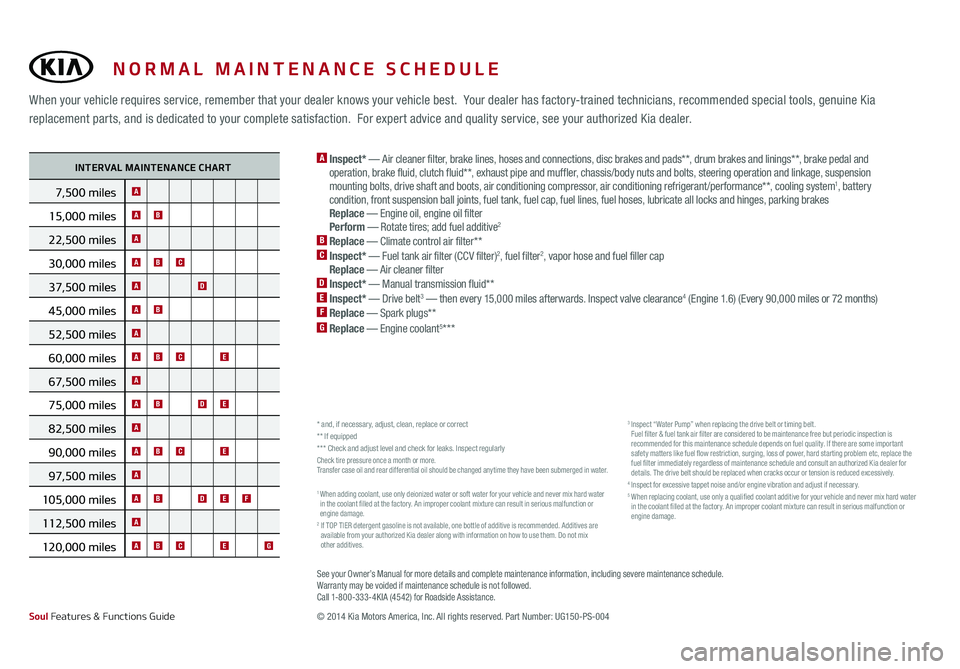
INTERVAL MAINTENANCE CHART
7,500 miles A
15,000 milesAB
22,500 milesA
30,000 milesABC
37,500 milesAD
45,000 milesAB
52,500 milesA
60,000 milesABCE
67,500 milesA
75,000 milesABDE
82,500 milesA
90,000 miles ABCE
97,500 miles A
105,000 miles ABDEF
112,500 miles A
120,000 miles ABCEG
A Inspect* — Air cleaner filter, brake lines, hoses and connections, disc brakes and pads* *, drum brakes and linings* *, brake pedal and operation, brake fluid, clutch fluid* *, exhaust pipe and muffler, chassis/body nuts and bolts, steering operation and linkage, suspension mounting bolts, drive shaft and boots, air conditioning compressor, air conditioning refrigerant /performance* *, cooling system1, battery condition, front suspension ball joints, fuel tank, fuel cap, fuel lines, fuel hoses, lubricate all locks and hinges, parking brakes Replace — Engine oil, engine oil filter Perform — Rotate tires; add fuel additive2
B Replace — Climate control air filter* *C Inspect* — Fuel tank air filter (CCV filter)2, fuel filter2, vapor hose and fuel filler cap Replace — Air cleaner filterD Inspect* — Manual transmission fluid* *E Inspect* — Drive belt3 — then every 15,000 miles afterwards. Inspect valve clearance4 (Engine 1.6) (Every 90,000 miles or 72 months)F Replace — Spark plugs**G Replace — Engine coolant5***
NORMAL MAINTENANCE SCHEDULE
When your vehicle requires service, remember that your dealer knows your vehicle best. Your dealer has factory-trained technicians, recommended special tools, genuine Kia
replacement parts, and is dedicated to your complete satisfaction. For expert advice and quality service, see your authorized Kia dealer.
Soul Features & Functions Guide
Page 46 of 46
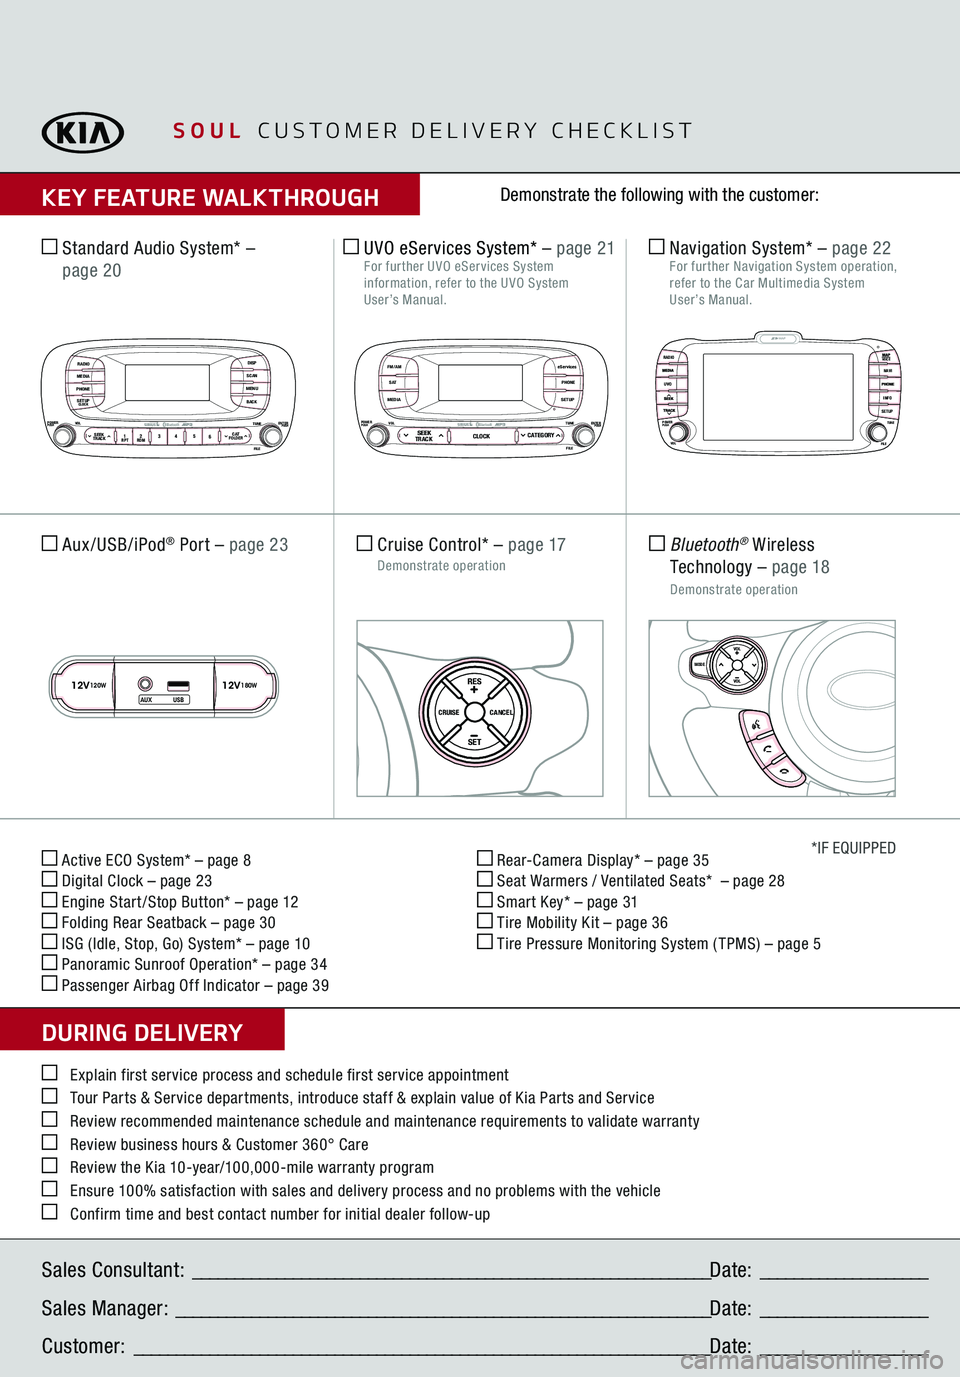
Active ECO System* – page 8 Digital Clock – page 23 Engine Start /Stop Button* – page 12 Folding Rear Seatback – page 30 ISG (Idle, Stop, Go) System* – page 10 Panoramic Sunroof Operation* – page 34 Passenger Airbag Off Indicator – page 39
Rear-Camera Display* – page 35 Seat Warmers / Ventilated Seats* – page 28 Smart Key* – page 31 Tire Mobility Kit – page 36 Tire Pressure Monitoring System ( TPMS) – page 5
*IF EQUIPPED
Explain first service process and schedule first service appointment Tour Parts & Service departments, introduce staff & explain value of Kia Parts and Service Review recommended maintenance schedule and maintenance requirements to validate warranty Review business hours & Customer 360° Care Review the Kia 10-year/100,000-mile warranty program Ensure 100% satisfaction with sales and delivery process and no problems with the vehicle Confirm time and best contact number for initial dealer follow-up Standard Audio System*
–
page 20Sales Consultant:
______________________________________________________________
Date:
____________________
Sales Manager:
________________________________________________________________
Date:
____________________
Customer:
_____________________________________________________________________
Date:
____________________
Cruise Control*
– page 17
Demonstrate operation
RADIOMEDIAPHONESETUPCLOCK
DISPSCANMENUBACK
1 2 34
56RPT RDM
SEEKTRACK
C ATFOLDER
VOL
POWERPUSH
PUSHENTER
TUNEFILE
Bluetooth®
SET
CRUISE
RESCANCEL
MODE
VOL
VOL
Aux/USB/iPod
® Port
– page 23
SETCRUISERESCANCEL
MODE
VOL
VOL
MODE
Bluetooth
® Wireless
Technology
– page 18
Demonstrate operation Navigation System*
– page 22
For further Navigation System operation, refer to the Car Multimedia System User’s Manual.
UVO eServices System*
– page 21
For further UVO eServices System information, refer to the UVO System
User’s Manual.
MAP
UVORADIO
NAVIINFOSETUP
POWER VOL TUNE
FILEPUSH
VOICE
eServicesPHONESETUP
SEEKTRACK CLOCK
CATEGORY
VOL
POWERPUSH
PUSHENTER
TUNEFILE
B
luetooth®
FM/AMS ATMEDIA
SOUL
CUSTOMER DELIVERY CHECKLIST
KEY FEATURE WALKTHROUGHDURING DELIVERY
Demonstrate the following with the customer:
12V120W
12V180W
AUX USB