change time KIA SOUL 2015 Owners Manual
[x] Cancel search | Manufacturer: KIA, Model Year: 2015, Model line: SOUL, Model: KIA SOUL 2015Pages: 544, PDF Size: 19.81 MB
Page 2 of 544
Kia, THE COMPANY
Thank you for becoming the owner of a new Kia vehicle.
As a global car manufacturer focused on building high-quality vehi-
cles with exceptional value, Kia Motors is dedicated to providing you
with a customer service experience that exceeds your expectations.
All information contained in this Owner’s Manual is accurate at the
time of publication. However, Kia reserves the right to make changes
at any time so that our policy of continual product improvement can
be carried out.
This manual applies to all models of this vehicle and includes descrip-
tions and explanations of optional as well as standard equipment. As a
result, you may encounter material in this manual that is not applica-
ble to your specific Kia vehicle.Drive safely and enjoy your Kia!
Page 3 of 544
i
Thank you for choosing a Kia vehicle.
When you require service, remember that your Kia dealer
knows your vehicle best. Your dealer has factory-trained tech-
nicians, recommended special tools and genuine Kia replace-
ment parts. It is dedicated to your complete customer satisfac-
tion.
Because subsequent owners require this important information
as well, this publication should remain with the vehicle if it is
sold.
This manual will familiarize you with operational, mainte-
nance and safety information about your new vehicle. It is sup-
plemented by a Warranty and Consumer Information manual
that provides important information on all warranties regarding
your vehicle.
We urge you to read these publications carefully and follow the
recommendations to help assure enjoyable and safe operation
of your new vehicle.
Kia offers a great variety of options, components and features
for its various models. Therefore, some of the equipment
described in this manual, along with the various illustrations,
may not be applicable to your particular vehicle.
The information and specifications provided in this manual
were accurate at the time of printing. Kia reserves the right to
discontinue or change specifications or design at any time
without notice and without incurring any obligation. If you
have questions, always check with your Kia dealer.
We assure you of our continuing interest in your motoring
pleasure and satisfaction in your Kia vehicle.
© 2014 Kia MOTORS AMERICA, Inc.
All rights reserved. May not be reproduced or translated in
whole or in part without the written consent of Kia Motors
America, Inc.
Printed in Korea
Foreword
Page 22 of 544
35
Safety features of your vehicle
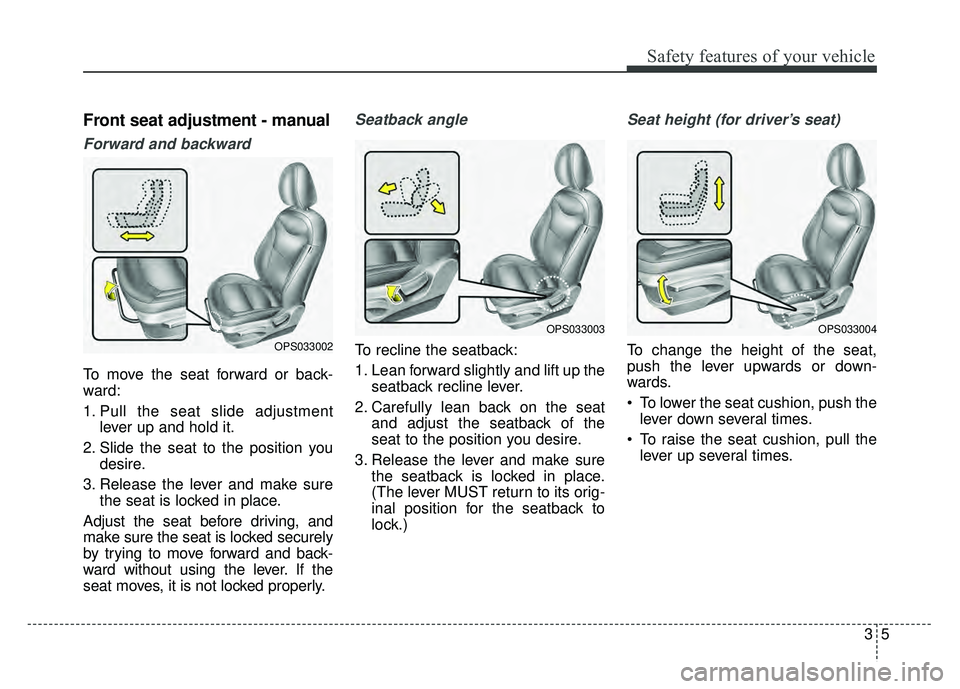
Front seat adjustment - manual
Forward and backward
To move the seat forward or back-
ward:
1. Pull the seat slide adjustmentlever up and hold it.
2. Slide the seat to the position you desire.
3. Release the lever and make sure the seat is locked in place.
Adjust the seat before driving, and
make sure the seat is locked securely
by trying to move forward and back-
ward without using the lever. If the
seat moves, it is not locked properly.
Seatback angle
To recline the seatback:
1. Lean forward slightly and lift up the seatback recline lever.
2. Carefully lean back on the seat and adjust the seatback of the
seat to the position you desire.
3. Release the lever and make sure the seatback is locked in place.
(The lever MUST return to its orig-
inal position for the seatback to
lock.)
Seat height (for driver’s seat)
To change the height of the seat,
push the lever upwards or down-
wards.
To lower the seat cushion, push thelever down several times.
To raise the seat cushion, pull the lever up several times.OPS033002
OPS033003OPS033004
Page 117 of 544
Features of your vehicle
40
4
Electric power steering (EPS)
The power steering uses a motor to
assist you in steering the vehicle. If
the engine is off or if the power steer-
ing system becomes inoperative, the
vehicle may still be steered, but it will
require increased steering effort.
The motor driven power steering is
controlled by a power steering con-
trol unit which senses the steering
wheel torque and vehicle speed to
command the motor.
The steering becomes heavier as
the vehicle’s speed increases and
becomes lighter as the vehicle’s
speed decreases for optimum steer-
ing control.
Should you notice any change in the
effort required to steer during normal
vehicle operation, have the power
steering checked by an authorized
Kia dealer. If the Electric Power Steering
System does not operate normally,
the warning light will illuminate on
the instrument cluster. The steering
wheel may require increased
steering effort. Take your vehicle to
an authorized Kia dealer and have
the vehicle checked as soon as
possible.
When you operate the steering wheel in low temperature, noise
may occur. If temperature rises, the
noise will likely disappear. This is a
normal condition.
When the vehicle is stationary, when the steering wheel is turned
all the way to the left or right con-
tinuously, the steering wheel
becomes harder to turn. The power
assist is limited to protect the
motor from overheating.
As time passes, the steering wheel
return to its normal condition.
✽ ✽ NOTICE
The following symptoms may occur
during normal vehicle operation:
• The EPS warning light does not
illuminate.
• The steering gets heavy immedi- ately after turning the ignition
switch on. This happens as the sys-
tem performs the EPS system
diagnostics. When the diagnostics
are completed, the steering wheel
will return to its normal condition.
• A click noise may be heard from the EPS relay after the ignition
switch is turned to the ON or
LOCK (OFF) position.
• A motor noise may be heard when the vehicle is at a stop or at a low
driving speed.
• If the Electric Power Steering System does not operate normally,
the warning light will illuminate on
the instrument cluster. The steer-
ing wheel may become difficult to
control or operate abnormally.
Take your vehicle to an authorized
Kia dealer and have the vehicle
checked as soon as possible. (Continued)
STEERING WHEEL
Page 132 of 544
455
Features of your vehicle
Odometer
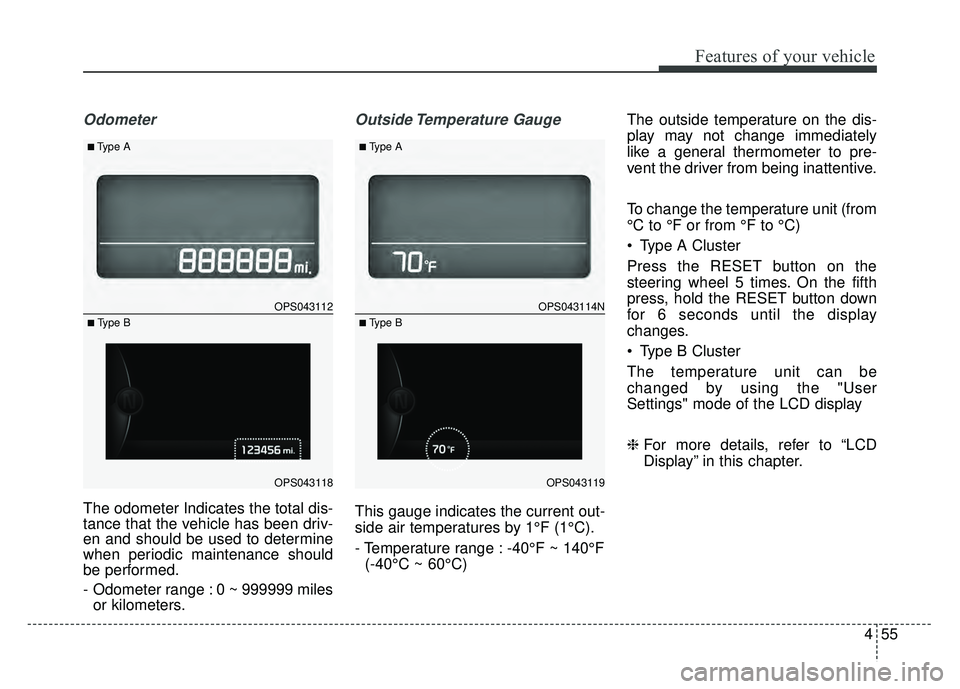
The odometer Indicates the total dis-
tance that the vehicle has been driv-
en and should be used to determine
when periodic maintenance should
be performed.
- Odometer range : 0 ~ 999999 milesor kilometers.
Outside Temperature Gauge
This gauge indicates the current out-
side air temperatures by 1°F (1°C).
- Temperature range : -40°F ~ 140°F
(-40°C ~ 60°C) The outside temperature on the dis-
play may not change immediately
like a general thermometer to pre-
vent the driver from being inattentive.
To change the temperature unit (from
°C to °F or from °F to °C)
Type A Cluster
Press the RESET button on the
steering wheel 5 times. On the fifth
press, hold the RESET button down
for 6 seconds until the display
changes.
Type B Cluster
The temperature unit can be
changed by using the "User
Settings" mode of the LCD display
❈
For more details, refer to “LCD
Display” in this chapter.
OPS043112
OPS043118
■Type A
■ Type B
OPS043114N
OPS043119
■Type A
■ Type B
Page 136 of 544
459
Features of your vehicle
Service Mode
Service Interval
Service in
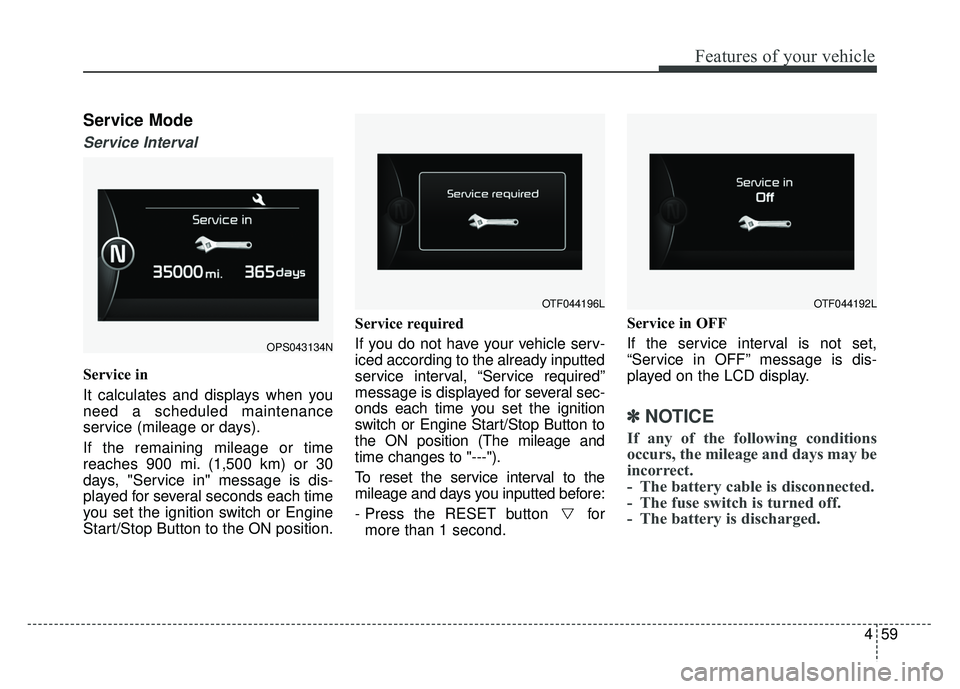
It calculates and displays when you
need a scheduled maintenance
service (mileage or days).
If the remaining mileage or time
reaches 900 mi. (1,500 km) or 30
days, "Service in" message is dis-
played for several seconds each time
you set the ignition switch or Engine
Start/Stop Button to the ON position.Service required
If you do not have your vehicle serv-
iced according to the already inputted
service interval, “Service required”
message is displayed for several sec-
onds each time you set the ignition
switch or Engine Start/Stop Button to
the ON position (The mileage and
time changes to "---").
To reset the service interval to the
mileage and days you inputted before:
- Press the RESET button for
more than 1 second. Service in OFF
If the service interval is not set,
“Service in OFF” message is dis-
played on the LCD display.
✽ ✽
NOTICE
If any of the following conditions
occurs, the mileage and days may be
incorrect.
- The battery cable is disconnected.
- The fuse switch is turned off.
- The battery is discharged.
OPS043134N
OTF044196LOTF044192L
Page 137 of 544
Features of your vehicle
60
4
Master Warning Mode
(if equipped)
This warning light informs the driv- er the following situations
- TPMS (if equipped)
- Service reminder (if equipped)
The Master Warning Light illumi-
nates when more than one of the
above warning situations occur. At
this time, the LCD Modes Icon will
change from ( ) to ( ).
If the warning situation is solved, the
LCD Modes Icon will be changed back
to its previous icon ( ).
User Settings Mode
Description
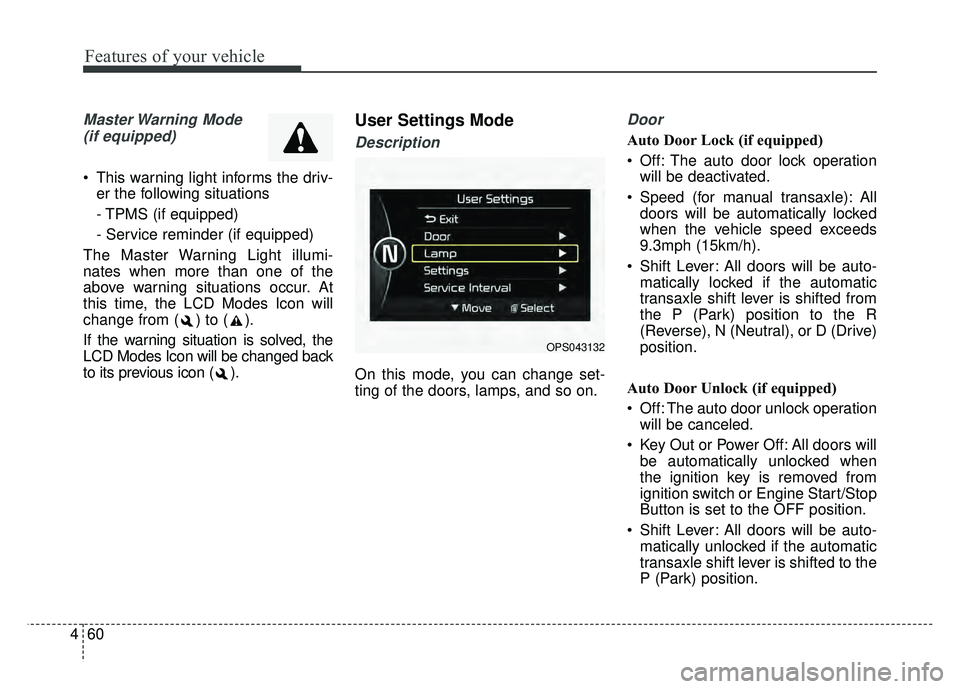
On this mode, you can change set-
ting of the doors, lamps, and so on.
Door
Auto Door Lock (if equipped)
Off: The auto door lock operation will be deactivated.
Speed (for manual transaxle): All doors will be automatically locked
when the vehicle speed exceeds
9.3mph (15km/h).
Shift Lever: All doors will be auto- matically locked if the automatic
transaxle shift lever is shifted from
the P (Park) position to the R
(Reverse), N (Neutral), or D (Drive)
position.
Auto Door Unlock (if equipped)
Off: The auto door unlock operation will be canceled.
Key Out or Power Off: All doors will be automatically unlocked when
the ignition key is removed from
ignition switch or Engine Start/Stop
Button is set to the OFF position.
Shift Lever: All doors will be auto- matically unlocked if the automatic
transaxle shift lever is shifted to the
P (Park) position.
OPS043132
Page 138 of 544
461
Features of your vehicle
Two Press Unlock (if equipped)
Off:The two press unlock function will
be deactivated. Therefore, all doors
will unlock if the door is unlocked.
On: The driver’s door will unlock if the
door is unlocked. When the door is
unlocked again within 4 seconds,
all doors will unlock.
Horn Feedback (if equipped)
Off: The Horn feedback operation will
be deactivated.
On: After locking the door by pressing
the lock button on the transmitter, if
you press the lock button again
within 4 seconds, the warning
sound will operate once to indicate
that all doors are locked.Lamp
One Touch Turn Lamp (if equipped)
If this item is checked, the lane
change signals will blink 3, 5 or 7
times when the turn signal lever is
moved slightly.
Head Lamp Delay (if equipped)
If this item is checked, the headlamp
delay function will be activated.
Settings
Language
Choose the language you prefer
within the LCD.
Temperature Unit
Convert the temperature unit from °C
to °F or from °F to °C.
Welcome Sound
If this item is checked, the welcome
sound function will be activated.
AVG Fuel Eco Reset
Auto Reset:The average fuel economy will
reset automatically when refueling.
Manual Reset: The average fuel economy will not
reset automatically whenever refu-
eling.
For more details, refer to “Trip
Computer” in this chapter.
Page 140 of 544
463
Features of your vehicle
Warning Messages
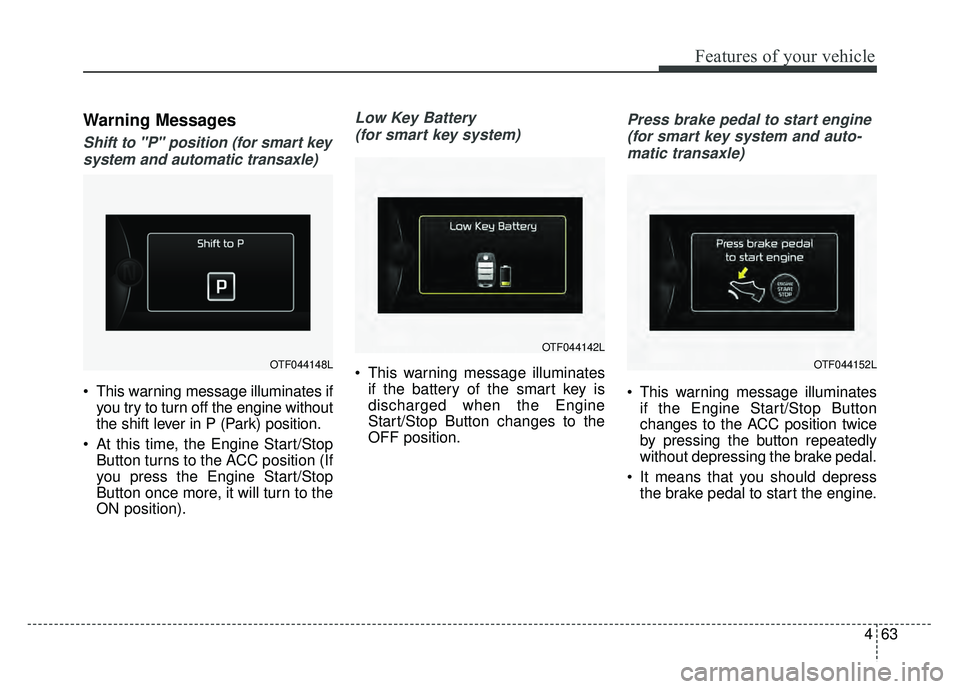
Shift to "P" position (for smart keysystem and automatic transaxle)
This warning message illuminates if you try to turn off the engine without
the shift lever in P (Park) position.
At this time, the Engine Start/Stop Button turns to the ACC position (If
you press the Engine Start/Stop
Button once more, it will turn to the
ON position).
Low Key Battery
(for smart key system)
This warning message illuminates if the battery of the smart key is
discharged when the Engine
Start/Stop Button changes to the
OFF position.
Press brake pedal to start engine
(for smart key system and auto-matic transaxle)
This warning message illuminates if the Engine Start/Stop Button
changes to the ACC position twice
by pressing the button repeatedly
without depressing the brake pedal.
It means that you should depress the brake pedal to start the engine.
OTF044148L
OTF044142L
OTF044152L
Page 145 of 544
Features of your vehicle
68
4
Overview
Description
The trip computer is a microcomput-
er-controlled driver information sys-
tem that displays information related
to driving.
✽ ✽
NOTICE
Some driving information stored in
the trip computer (for example
Average Vehicle Speed) resets if the
battery is disconnected.
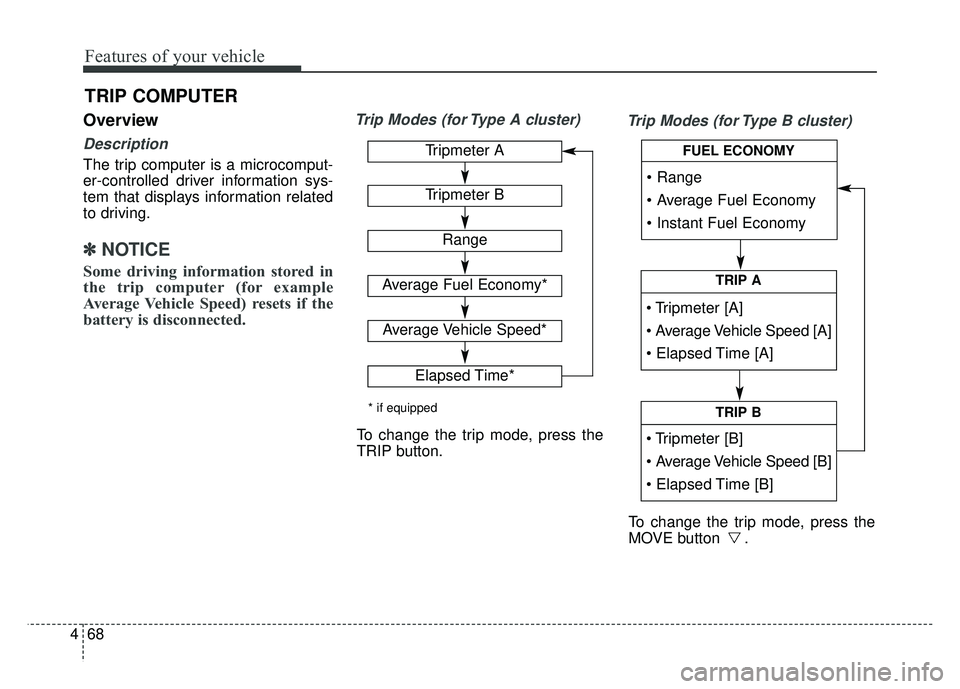
Trip Modes (for Type A cluster)
Trip Modes (for Type B cluster)
TRIP COMPUTER
TRIP A
TRIP B
FUEL ECONOMYTripmeter A
Tripmeter B
Range
Average Fuel Economy*
Average Vehicle Speed*
Elapsed Time*
* if equipped
To change the trip mode, press the
TRIP button.
To change the trip mode, press the
MOVE button .