display KIA SOUL 2017 Features and Functions Guide
[x] Cancel search | Manufacturer: KIA, Model Year: 2017, Model line: SOUL, Model: KIA SOUL 2017Pages: 50, PDF Size: 4.9 MB
Page 3 of 50
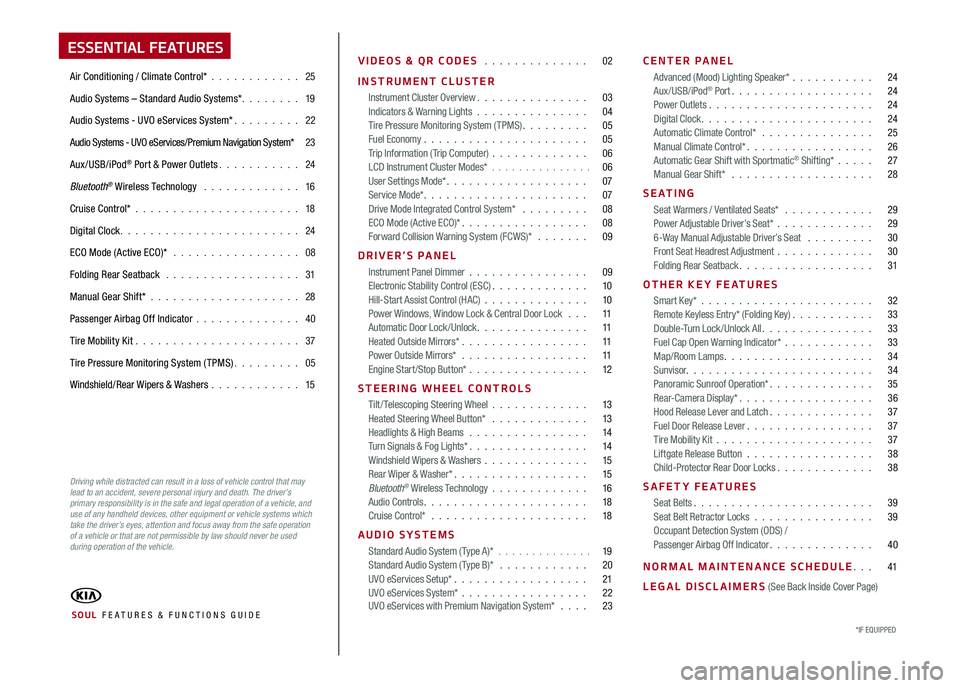
ESSENTIAL FEATURES
Air Conditioning / Climate Control* 25
Audio Systems – Standard Audio Systems* 19
Audio Systems - UVO eServices System* 22
Audio Systems - UVO eServices/Premium Navigation System* 23
Aux/USB/iPod® Port & Power Outlets 24
Bluetooth® Wireless Technology 16
Cruise Control* 18
Digital Clock 24
ECO Mode (Active ECO)* 08
Folding Rear Seatback 31
Manual Gear Shift* 28
Passenger Airbag Off Indicator 40
Tire Mobility Kit 37
Tire Pressure Monitoring System (TPMS) 05
Windshield/Rear Wipers & Washers 15
VIDEOS & QR CODES 02
INSTRUMENT CLUSTER
Instrument Cluster Overview 03Indicators & Warning Lights 04Tire Pressure Monitoring System (TPMS) 05Fuel Economy 05Trip Information ( Trip Computer) 06LCD Instrument Cluster Modes* 06User Settings Mode* 07Service Mode* 07Drive Mode Integrated Control System* 08ECO Mode (Active ECO)* 08Forward Collision Warning System (FCWS)* 09
DRIVER’S PANEL
Instrument Panel Dimmer 09Electronic Stability Control (ESC) 10Hill-Start Assist Control (HAC) 10Power Windows, Window Lock & Central Door Lock 11Automatic Door Lock /Unlock 11Heated Outside Mirrors* 11Power Outside Mirrors* 11Engine Start/Stop Button* 12
STEERING WHEEL CONTROLS
Tilt/ Telescoping Steering Wheel 13Heated Steering Wheel Button* 13Headlights & High Beams 14Turn Signals & Fog Lights* 14Windshield Wipers & Washers 15Rear Wiper & Washer* 15Bluetooth® Wireless Technology 16Audio Controls 18Cruise Control* 18
AUDIO SYSTEMS
Standard Audio System ( Type A)* 19Standard Audio System ( Type B)* 20UVO eServices Setup* 21UVO eServices System* 22 UVO eServices with Premium Navigation System* 23
CENTER PANEL
Advanced (Mood) Lighting Speaker* 24Aux/USB/iPod® Port 24Power Outlets 24Digital Clock 24Automatic Climate Control* 25Manual Climate Control* 26Automatic Gear Shift with Sportmatic® Shifting* 27Manual Gear Shift* 28
S E AT I N G
Seat Warmers / Ventilated Seats* 29Power Adjustable Driver’s Seat* 296-Way Manual Adjustable Driver’s Seat 30Front Seat Headrest Adjustment 30Folding Rear Seatback 31
OTHER KEY FEATURES
Smart Key* 32Remote Keyless Entry* (Folding Key) 33Double-Turn Lock /Unlock All 33Fuel Cap Open Warning Indicator* 33Map/Room Lamps 34Sunvisor 34Panoramic Sunroof Operation* 35Rear-Camera Display* 36Hood Release Lever and Latch 37Fuel Door Release Lever 37Tire Mobility Kit 37Liftgate Release Button 38Child-Protector Rear Door Locks 38
SAFETY FEATURES
Seat Belts 39Seat Belt Retractor Locks 39Occupant Detection System (ODS) /Passenger Airbag Off Indicator 40
NORMAL MAINTENANCE SCHEDULE 41
LEGAL DISCLAIMERS (See Back Inside Cover Page)
*IF EQUIPPED SOUL FE ATURES & FUNCTIONS GUIDE
Driving while distracted can result in a loss of vehicle control that may lead to an accident, severe personal injury and death. The driver’s primary responsibility is in the safe and legal operation of a vehicle, and use of any handheld devices, other equipment or vehicle systems which take the driver’s eyes, attention and focus away from the safe operation of a vehicle or that are not permissible by law should never be used during operation of the vehicle.
Page 6 of 50
4
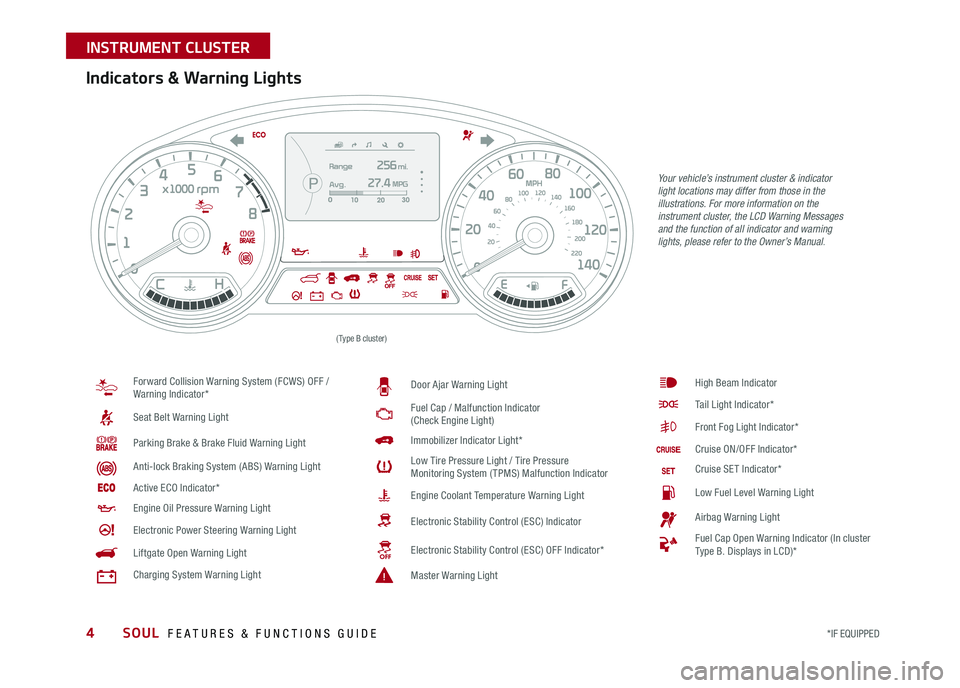
Your vehicle’s instrument cluster & indicator light locations may differ from those in the illustrations. For more information on the instrument cluster, the LCD Warning Messages and the function of all indicator and warning lights, please refer to the Owner’s Manual.
Indicators & Warning Lights
Forward Collision Warning System (FCWS) OFF / Warning Indicator*
Seat Belt Warning Light
Parking Brake & Brake Fluid Warning Light
Anti-lock Braking System (ABS) Warning Light
Active ECO Indicator*
Engine Oil Pressure Warning Light
Electronic Power Steering Warning Light
Liftgate Open Warning Light
Charging System Warning Light
Door Ajar Warning Light
Fuel Cap / Malfunction Indicator (Check Engine Light)
Immobilizer Indicator Light*
Low Tire Pressure Light / Tire Pressure Monitoring System (TPMS) Malfunction Indicator
Engine Coolant Temperature Warning Light
Electronic Stability Control (ESC) Indicator
Electronic Stability Control (ESC) OFF Indicator*
Master Warning Light
High Beam Indicator
Tail Light Indicator*
Front Fog Light Indicator*
Cruise ON/OFF Indicator*
Cruise SET Indicator*
Low Fuel Level Warning Light
Airbag Warning Light
Fuel Cap Open Warning Indicator (In cluster Type B Displays in LCD)*
(Type B cluster)
SOUL FEATURES & FUNCTIONS GUIDE
*IF EQUIPPED
INSTRUMENT CLUSTER
Page 8 of 50
6
Trip Information (Trip Computer)
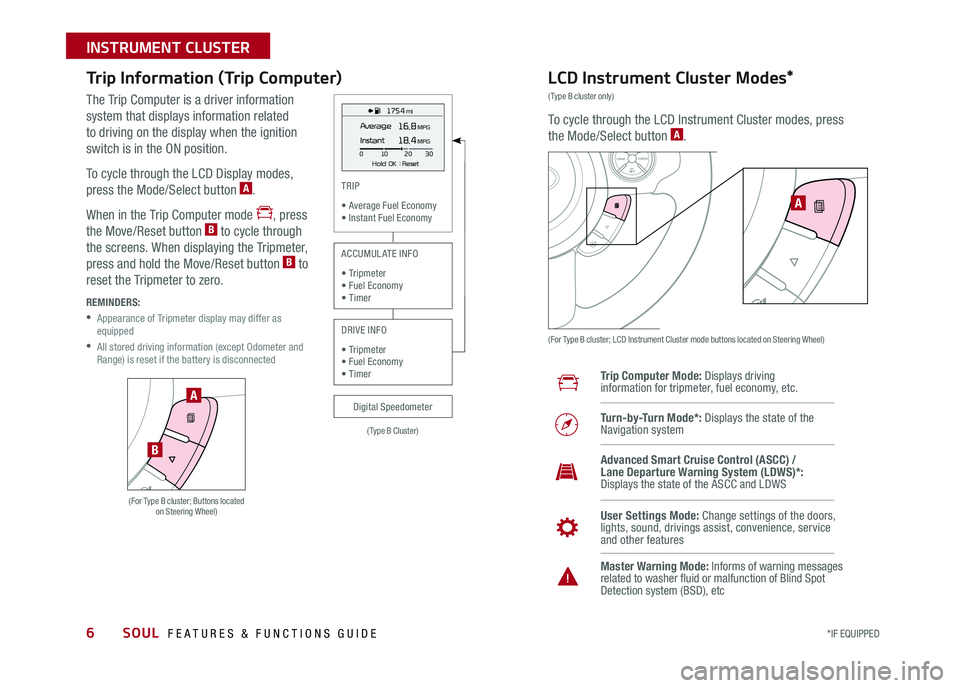
The Trip Computer is a driver information
system that displays information related
to driving on the display when the ignition
switch is in the ON position
To cycle through the LCD Display modes,
press the Mode/Select button A
When in the Trip Computer mode , press
the Move/Reset button B to cycle through
the screens When displaying the Tripmeter,
press and hold the Move/Reset button B to
reset the Tripmeter to zero
REMINDERS:
•
Appearance of Tripmeter display may differ as equipped
•
All stored driving information (except Odometer and Range) is reset if the battery is disconnected
LCD Instrument Cluster Modes*
(Type B cluster only)
To cycle through the LCD Instrument Cluster modes, press
the Mode/Select button A
(For Type B cluster; LCD Instrument Cluster mode buttons located on Steering Wheel)
Trip Computer Mode: Displays driving information for tripmeter, fuel economy, etc
Turn-by-Turn Mode*: Displays the state of the Navigation system
User Settings Mode: Change settings of the doors, lights, sound, drivings assist, convenience, service and other features
Master Warning Mode: Informs of warning messages related to washer fluid or malfunction of Blind Spot Detection system (BSD), etc
Advanced Smart Cruise Control (ASCC) / Lane Departure Warning System (LDWS)*: Displays the state of the ASCC and LDWS
SETCRUISERESCANCELMODEVOL
VOL
A
1 75 4 mi
16.8 MPGAverage
0 10
Hold OK : Reset20
30
Instant18.4 MPG
(For Type B cluster; Buttons located on Steering Wheel)
A
B
(Type B Cluster)
TRIP
• Average Fuel Economy• Instant Fuel Economy
Digital Speedometer
ACCUMULATE INFO
• Tripmeter• Fuel Economy• Timer
DRIVE INFO
• Tripmeter • Fuel Economy • Timer
SOUL FEATURES & FUNCTIONS GUIDE
*IF EQUIPPED
INSTRUMENT CLUSTER
Page 9 of 50
7
User Settings Mode*Service Mode*
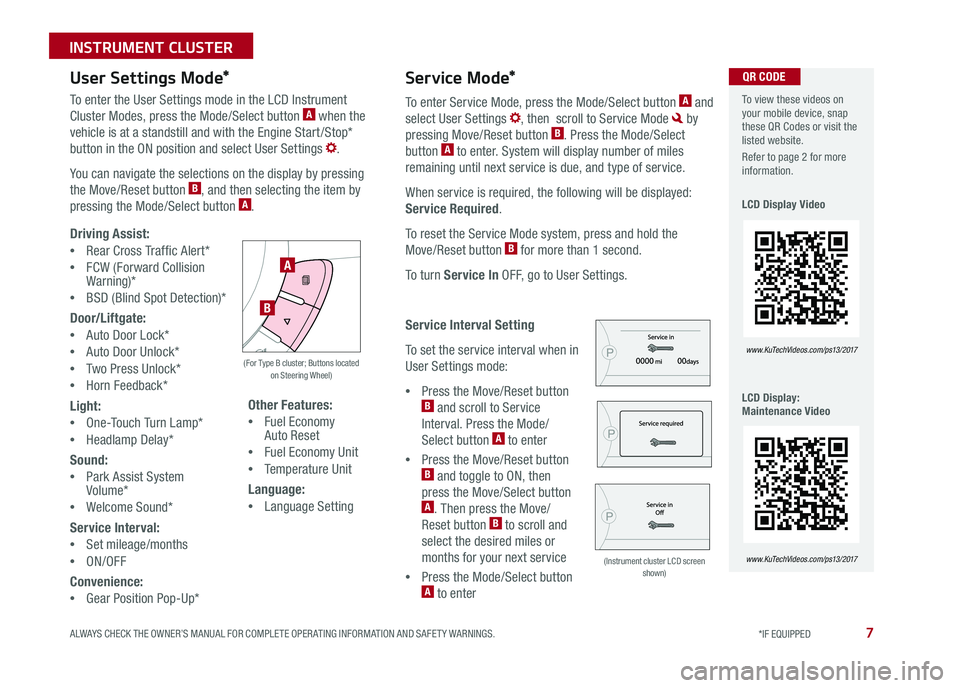
To enter the User Settings mode in the LCD Instrument
Cluster Modes, press the Mode/Select button A when the
vehicle is at a standstill and with the Engine Start /Stop*
button in the ON position and select User Settings
You can navigate the selections on the display by pressing
the Move/Reset button B, and then selecting the item by
pressing the Mode/Select button A
Driving Assist:
•Rear Cross Traffic Alert*
•FCW (Forward Collision Warning)*
•BSD (Blind Spot Detection)*
Door/Liftgate:
•Auto Door Lock*
•Auto Door Unlock*
•Two Press Unlock*
•Horn Feedback*
Light:
•One-Touch Turn Lamp*
•Headlamp Delay*
Sound:
•Park Assist System Volume*
•Welcome Sound*
Service Interval:
•Set mileage/months
•ON/OFF
Convenience:
•Gear Position Pop-Up*
Other Features:
•Fuel Economy Auto Reset
•Fuel Economy Unit
•Temperature Unit
Language:
•Language Setting
To enter Service Mode, press the Mode/Select button A and
select User Settings , then scroll to Service Mode by
pressing Move/Reset button B Press the Mode/Select
button A to enter System will display number of miles
remaining until next service is due, and type of service
When service is required, the following will be displayed:
Service Required
To reset the Service Mode system, press and hold the
Move/Reset button B for more than 1 second
To turn Service In OFF, go to User Settings
Service Interval Setting
To set the service interval when in
User Settings mode:
•Press the Move/Reset button B and scroll to Service
Interval Press the Mode/
Select button A to enter
•Press the Move/Reset button B and toggle to ON, then
press the Move/Select button A Then press the Move/
Reset button B to scroll and
select the desired miles or
months for your next service
•Press the Mode/Select button A to enter
A
B
(For Type B cluster; Buttons located on Steering Wheel)
(Instrument cluster LCD screen shown)
To view these videos on your mobile device, snap these QR Codes or visit the listed website
Refer to page 2 for more information
LCD Display Video
LCD Display: Maintenance Video
www. KuTechVideo s.c om/p s13/2017
www. KuTechVideo s.c om/p s13/2017
QR CODE
ALWAYS CHECK THE OWNER’S MANUAL FOR COMPLETE OPER ATING INFORMATION AND SAFET Y WARNINGS. *IF EQUIPPED
INSTRUMENT CLUSTER
Page 10 of 50
SOUL FEATURES & FUNCTIONS GUIDE8*IF EQUIPPED
INSTRUMENT CLUSTER
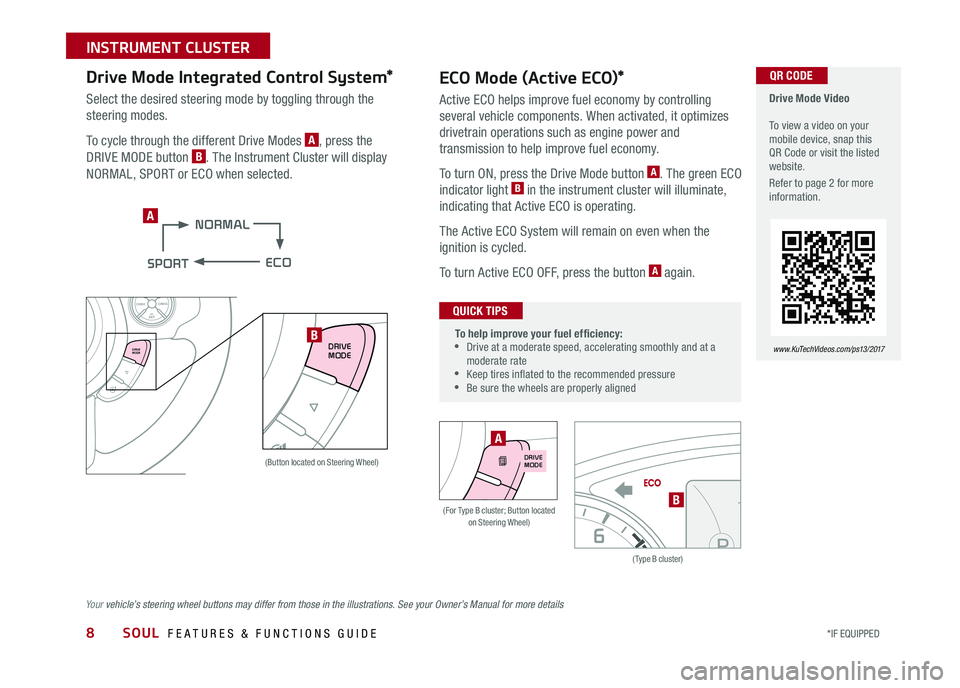
ECO Mode (Active ECO)*
Active ECO helps improve fuel economy by controlling
several vehicle components When activated, it optimizes
drivetrain operations such as engine power and
transmission to help improve fuel economy
To turn ON, press the Drive Mode button A The green ECO
indicator light B in the instrument cluster will illuminate,
indicating that Active ECO is operating
The Active ECO System will remain on even when the
ignition is cycled
To turn Active ECO OFF, press the button A again
(Type B cluster)
B(For Type B cluster; Button located on Steering Wheel)
To help improve your fuel efficiency: •
Drive at a moderate speed, accelerating smoothly and at a moderate rate •
Keep tires inflated to the recommended pressure •Be sure the wheels are properly aligned
QUICK TIPS
Drive Mode Video To view a video on your mobile device, snap this QR Code or visit the listed website
Refer to page 2 for more information
www. KuTechVideo s.c om/p s13/2017
QR CODE
A
DRIVE MODE
SETCRUISERESCANCELMODEVOL
VOL
Drive Mode Integrated Control System*
Select the desired steering mode by toggling through the
steering modes
To cycle through the different Drive Modes A, press the
DRIVE MODE button B The Instrument Cluster will display
NORMAL, SPORT or ECO when selected
(Button located on Steering Wheel)
B
Your vehicle’s steering wheel buttons may differ from those in the illustrations. See your Owner’s Manual for more details
DRIVE MODEDRIVE MODE
A
Page 11 of 50
9ALWAYS CHECK THE OWNER’S MANUAL FOR COMPLETE OPER ATING INFORMATION AND SAFET Y WARNINGS *IF EQUIPPED
INSTRUMENT CLUSTER / DRIVER'S PANEL
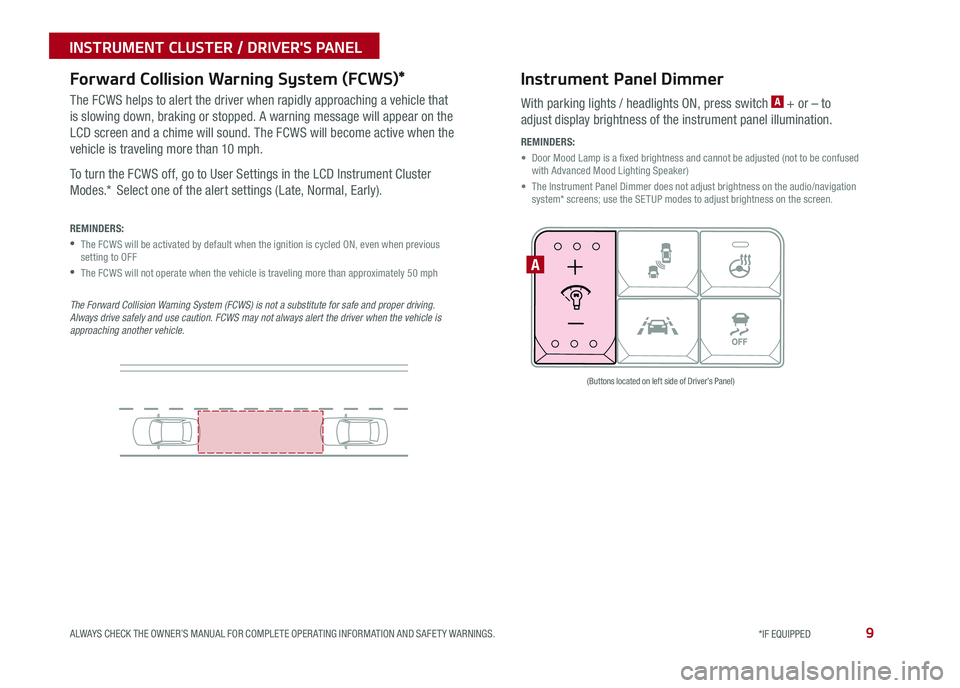
Instrument Panel Dimmer
With parking lights / headlights ON, press switch A + or – to
adjust display brightness of the instrument panel illumination
REMINDERS:
•
Door Mood Lamp is a fixed brightness and cannot be adjusted (not to be confused with Advanced Mood Lighting Speaker)
•
The Instrument Panel Dimmer does not adjust brightness on the audio/navigation system* screens; use the SETUP modes to adjust brightness on the screen
A
(Buttons located on left side of Driver’s Panel)
Forward Collision Warning System (FCWS)*
The FCWS helps to alert the driver when rapidly approaching a vehicle that
is slowing down, braking or stopped A warning message will appear on the
LCD screen and a chime will sound The FCWS will become active when the
vehicle is traveling more than 10 mph
To turn the FCWS off, go to User Settings in the LCD Instrument Cluster
Modes * Select one of the alert settings (Late, Normal, Early)
REMINDERS:
•
The FCWS will be activated by default when the ignition is cycled ON, even when previous setting to OFF
•The FCWS will not operate when the vehicle is traveling more than approximately 50 mph
The Forward Collision Warning System (FCWS) is not a substitute for safe and proper driving. Always drive safely and use caution. FCWS may not always alert the driver when the vehicle is approaching another vehicle.
Page 18 of 50
16
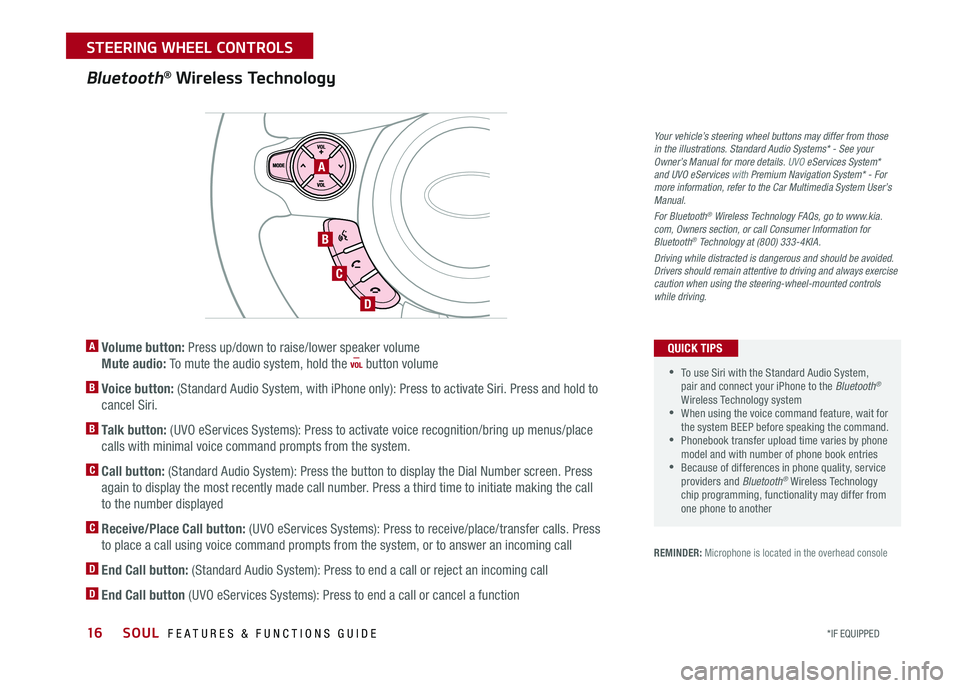
A Volume button: Press up/down to raise/lower speaker volume
Mute audio: To mute the audio system, hold the button volume
B Voice button: (Standard Audio System, with iPhone only): Press to activate Siri Press and hold to
cancel Siri
B Talk button: (UVO eServices Systems): Press to activate voice recognition/bring up menus/place
calls with minimal voice command prompts from the system
C Call button: (Standard Audio System): Press the button to display the Dial Number screen Press
again to display the most recently made call number Press a third time to initiate making the call
to the number displayed
C Receive/Place Call button: (UVO eServices Systems): Press to receive/place/transfer calls Press
to place a call using voice command prompts from the system, or to answer an incoming call
D End Call button: (Standard Audio System): Press to end a call or reject an incoming call
D End Call button (UVO eServices Systems): Press to end a call or cancel a function
Bluetooth® Wireless Technology
REMINDER: Microphone is located in the overhead console
A
B
C
D
•To use Siri with the Standard Audio System, pair and connect your iPhone to the Bluetooth® Wireless Technology system •When using the voice command feature, wait for the system BEEP before speaking the command • Phonebook transfer upload time varies by phone model and with number of phone book entries •Because of differences in phone quality, service providers and Bluetooth® Wireless Technology chip programming, functionality may differ from one phone to another
QUICK TIPS
Your vehicle’s steering wheel buttons may differ from those in the illustrations. Standard Audio Systems* - See your Owner’s Manual for more details. UVO eServices System* and UVO eServices with Premium Navigation System* - For more information, refer to the Car Multimedia System User’s Manual.
For Bluetooth® Wireless Technology FAQs, go to www.kia.com, Owners section, or call Consumer Information for Bluetooth® Technology at (800) 333-4KIA.
Driving while distracted is dangerous and should be avoided. Drivers should remain attentive to driving and always exercise caution when using the steering-wheel-mounted controls while driving.
SOUL FEATURES & FUNCTIONS GUIDE
*IF EQUIPPED
STEERING WHEEL CONTROLS
Page 19 of 50
17
Voice Recognition* and Phone Contact Tips (UVO eServices / UVO eServices with Premium Navigation systems)
The Kia Voice Recognition System may
have difficulty understanding some accents
or uncommon names When using Voice
Recognition to place a call, speak in a
moderate tone, with clear pronunciation
Help your Bluetooth® Wireless Technology
Voice Recognition performance by making a
few simple changes to your phone contacts:
• Use full names vs short or single syllable
names (“John Smith” vs “Dad”, “Smith
Residence” vs “Home”)
• Avoid using special characters or hyphens
(@, &, #, /, -, *, +, etc )
• Avoid using acronyms (“In Case
Emergency” vs “ICE”)
• Spell words completely, no abbreviations
(“Doctor Goodman” vs “Dr Goodman”)
Bluetooth® Wireless Technology (continued)
Pairing a Phone
For instructions on how to pair a phone, refer to the audio system’s user’s
guide or your vehicle’s Quick Start Guide
How to Place a Call
Below are methods for placing a call using the Steering Wheel controls:
Standard Audio System*
•Option 1: Press the Talk button B to activate Siri* (iPhone only)
•Option 2: Press the Call button C to display the dial number screen
Press again to display the most recently made call number Press a
third time to initiate making the call to the number displayed
UVO eServices System / UVO eServices with Premium Navigation*
When using the voice command feature, waiting for the system BEEP
before speaking the command
•Option 1: Press the Receive/Place Call button C (displays the phone
screen with number keypad)
•Option 2: Press the Talk button B Then say the command “Call
{name}” or Dial {number}
Voice Recognition Tips Video To view a video on your mobile device, snap this QR Code or visit the listed website
Refer to page 2 for more information
www. KuTechVideo s.c om/p s13/2017
During the pairing process, be sure to accept the connection requests on the phone for phonebook download and to allow acceptance of all future Bluetooth® connection requests
QUICK TIP
QR CODE
•To use Siri with the Standard Audio System, Type B, pair and connect your iPhone to the Bluetooth® Wireless Technology system •Bluetooth® Music Streaming – If the Bluetooth®
music is inaudible or too low, turn up the volume on the connected phone
QUICK TIPS
ALWAYS CHECK THE OWNER’S MANUAL FOR COMPLETE OPER ATING INFORMATION AND SAFET Y WARNINGS. *IF EQUIPPED
STEERING WHEEL CONTROLS
Page 21 of 50
19ALWAYS CHECK THE OWNER’S MANUAL FOR COMPLETE OPER ATING INFORMATION AND SAFET Y WARNINGS *IF EQUIPPED
AUDIO SYSTEMS
SETUPCLOCK
Standard Audio System (Type A) Videos To view a video on your mobile device, snap this QR Code or visit the listed website
Refer to page 2 for more information
KuTechVideos.com/audio/base_system
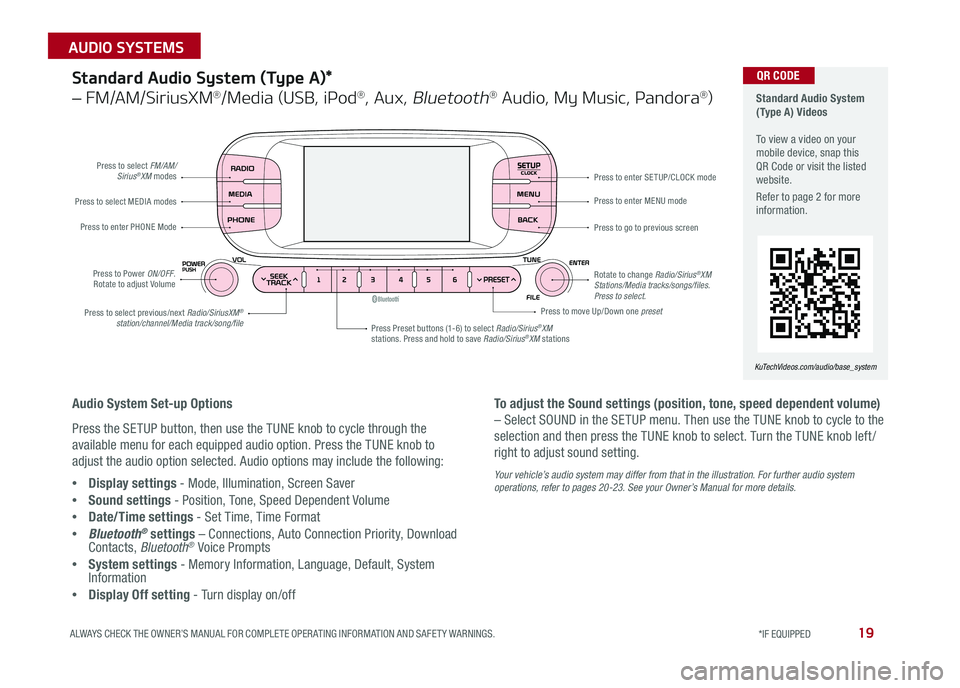
QR CODEStandard Audio System (Type A)*
– FM/AM/SiriusXM®/Media (USB, iPod®, Aux, Bluetooth® Audio, My Music, Pandora®)
Audio System Set-up Options
Press the SETUP button, then use the TUNE knob to cycle through the
available menu for each equipped audio option Press the TUNE knob to
adjust the audio option selected Audio options may include the following:
•Display settings - Mode, Illumination, Screen Saver
•Sound settings - Position, Tone, Speed Dependent Volume
•Date/Time settings - Set Time, Time Format
•Bluetooth® settings – Connections, Auto Connection Priority, Download Contacts, Bluetooth® Voice Prompts
•System settings - Memory Information, Language, Default, System Information
•Display Off setting - Turn display on/off
To adjust the Sound settings (position, tone, speed dependent volume)
– Select SOUND in the SETUP menu Then use the TUNE knob to cycle to the
selection and then press the TUNE knob to select Turn the TUNE knob left /
right to adjust sound setting
Your vehicle’s audio system may differ from that in the illustration. For further audio system operations, refer to pages 20-23. See your Owner’s Manual for more details.
Press to select FM/AM/Sirius®XM modes
Press to Power ON/OFF Rotate to adjust Volume
Press Preset buttons (1-6) to select Radio/Sirius®XM stations Press and hold to save Radio/Sirius®XM stations
Press to select MEDIA modes
Press to enter PHONE Mode
Press to select previous/next Radio/SiriusXM® station/channel/Media track/song/file
Press to enter MENU mode
Press to go to previous screen
Rotate to change Radio/Sirius®XM Stations/Media tracks/songs/files. Press to select.
Press to move Up/Down one preset
Press to enter SE TUP/CLOCK mode
Page 22 of 50
SOUL FEATURES & FUNCTIONS GUIDE20*IF EQUIPPED
AUDIO SYSTEMS
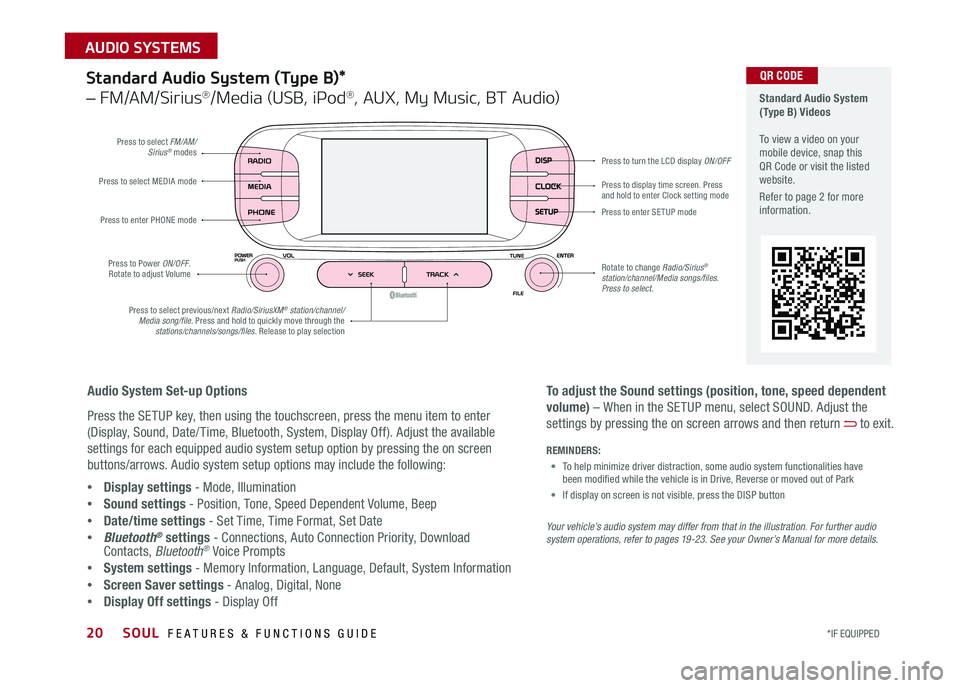
Standard Audio System (Type B)*
– FM/AM/Sirius®/Media (USB, iPod®, AUX, My Music, BT Audio)
DISP
CLOCK
SETUP
Press to select FM/AM/Sirius® modes
Press to Power ON/OFF Rotate to adjust Volume
Press to display time screen Press and hold to enter Clock setting modePress to select MEDIA mode
Press to enter PHONE mode
Press to select previous/next Radio/SiriusXM® station/channel/Media song/file. Press and hold to quickly move through the stations/channels/songs/files. Release to play selection
Press to enter SE TUP mode
Rotate to change Radio/Sirius® station/channel/Media songs/files.Press to select.
Press to turn the LCD display ON/OFF
Standard Audio System (Type B) Videos To view a video on your mobile device, snap this QR Code or visit the listed website
Refer to page 2 for more information
Audio System Set-up Options
Press the SETUP key, then using the touchscreen, press the menu item to enter
(Display, Sound, Date/ Time, Bluetooth, System, Display Off) Adjust the available
settings for each equipped audio system setup option by pressing the on screen
buttons/arrows Audio system setup options may include the following:
•Display settings - Mode, Illumination
•Sound settings - Position, Tone, Speed Dependent Volume, Beep
•Date/time settings - Set Time, Time Format, Set Date
•Bluetooth® settings - Connections, Auto Connection Priority, Download Contacts, Bluetooth® Voice Prompts
•System settings - Memory Information, Language, Default, System Information
•Screen Saver settings - Analog, Digital, None
•Display Off settings - Display Off
QR CODE
To adjust the Sound settings (position, tone, speed dependent
volume) – When in the SETUP menu, select SOUND Adjust the
settings by pressing the on screen arrows and then return to exit
Your vehicle’s audio system may differ from that in the illustration. For further audio system operations, refer to pages 19 -23. See your Owner’s Manual for more details.
REMINDERS:
• To help minimize driver distraction, some audio system functionalities have been modified while the vehicle is in Drive, Reverse or moved out of Park
• If display on screen is not visible, press the DISP button