buttons KIA SOUL 2021 Features and Functions Guide
[x] Cancel search | Manufacturer: KIA, Model Year: 2021, Model line: SOUL, Model: KIA SOUL 2021Pages: 54, PDF Size: 4.43 MB
Page 8 of 54
INSTRUMENT CLUSTER
INSTRUMENT CLUSTER
6SOUL FEATURES & FUNCTIONS GUIDE*IF EQUIPPED
Drive Mode Integrated Control System Video
To view a video on your mobile device, snap this QR Code or visit the listed website.
Refer to the inside cover for more information.
www.youtube.com/KiaFeatureVideos
QR CODEDrive Mode Integrated Control System*
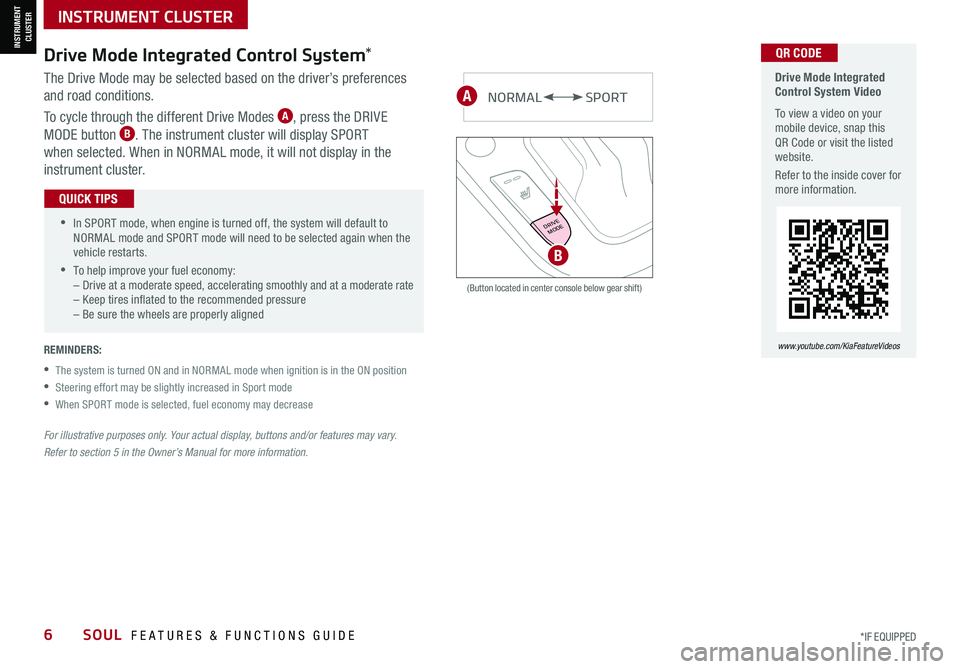
The Drive Mode may be selected based on the driver’s preferences
and road conditions.
To cycle through the different Drive Modes A, press the DRIVE
MODE button B. The instrument cluster will display SPORT
when selected. When in NORMAL mode, it will not display in the
instrument cluster.
(Button located in center console below gear shift)
NORMALSPORT
DRIVEMODE
B
A
•
•In SPORT mode, when engine is turned off, the system will default to NORMAL mode and SPORT mode will need to be selected again when the vehicle restarts.
•To help improve your fuel economy:–
Drive at a moderate speed, accelerating smoothly and at a moderate rate– Keep tires inflated to the recommended pressure – Be sure the wheels are properly aligned
QUICK TIPS
REMINDERS:
•
The system is turned ON and in NORMAL mode when ignition is in the ON position
•Steering effort may be slightly increased in Sport mode
•When SPORT mode is selected, fuel economy may decrease
For illustrative purposes only. Your actual display, buttons and/or features may vary.
Refer to section 5 in the Owner’s Manual for more information.
Page 9 of 54
VEHICLESETTINGS
VEHICLE SETTINGS
ALWAYS CHECK THE OWNER’S MANUAL FOR COMPLETE OPER ATING INFORMATION AND SAFET Y WARNINGS. *IF EQUIPPED 7
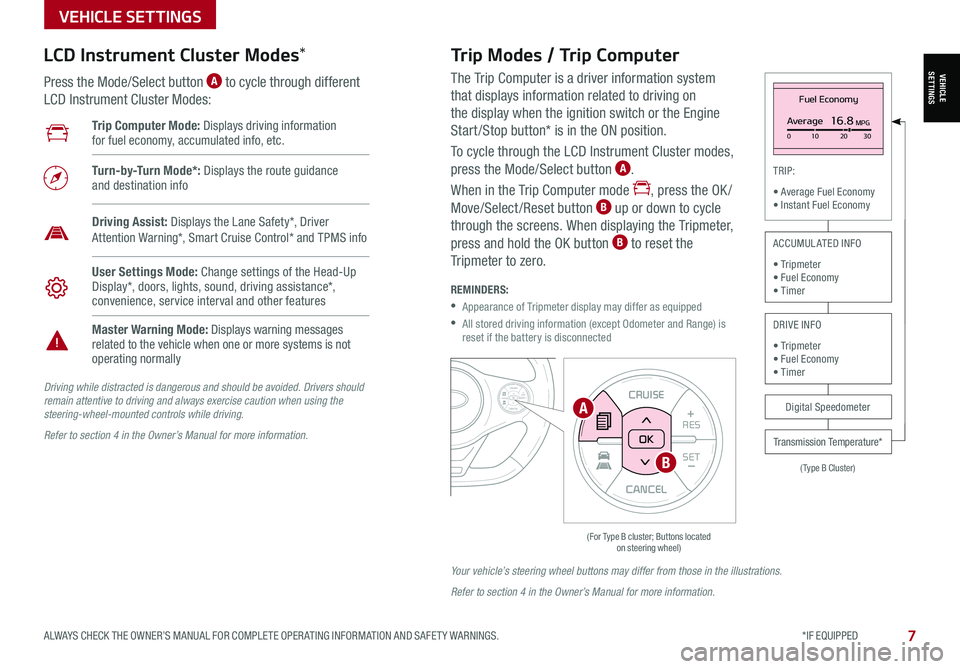
The Trip Computer is a driver information system
that displays information related to driving on
the display when the ignition switch or the Engine
Start /Stop button* is in the ON position.
To cycle through the LCD Instrument Cluster modes,
press the Mode/Select button A.
When in the Trip Computer mode , press the OK /
Move/Select /Reset button B up or down to cycle
through the screens. When displaying the Tripmeter,
press and hold the OK button B to reset the
Tripmeter to zero.
REMINDERS:
•
Appearance of Tripmeter display may differ as equipped
•
All stored driving information (except Odometer and Range) is reset if the battery is disconnected
CANCEL
RES
SET+ _CRUISE
RES
SET+ _<<+>>-MODE
+>>-
MODE
CRUISE
CANCELOK
<
Fuel Economy
Average16.8MPG0 10 2030
(Type B Cluster)
TRIP:
• Average Fuel Economy• Instant Fuel Economy
Digital Speedometer
Transmission Temperature*
ACCUMULATED INFO
• Tripmeter• Fuel Economy• Timer
DRIVE INFO
• Tripmeter • Fuel Economy • Timer
Trip Computer Mode: Displays driving information for fuel economy, accumulated info, etc.
Turn-by-Turn Mode*: Displays the route guidance and destination info
User Settings Mode: Change settings of the Head-Up Display*, doors, lights, sound, driving assistance*, convenience, service interval and other features
Master Warning Mode: Displays warning messages related to the vehicle when one or more systems is not operating normally
Driving Assist: Displays the Lane Safety*, Driver Attention Warning*, Smart Cruise Control* and TPMS info
LCD Instrument Cluster Modes*
Press the Mode/Select button A to cycle through different
LCD Instrument Cluster Modes:
Trip Modes / Trip Computer
Driving while distracted is dangerous and should be avoided. Drivers should remain attentive to driving and always exercise caution when using the steering-wheel-mounted controls while driving.
Refer to section 4 in the Owner’s Manual for more information.
Your vehicle’s steering wheel buttons may differ from those in the illustrations.
Refer to section 4 in the Owner’s Manual for more information.
CANCEL
RES
SET+ _
CRUISE
RES
SET+ _<
<+>>-
MODE
+>
>-
MODE
CRUISE
CANCEL
OK
<
<
OK
A
B
Page 10 of 54
VEHICLESETTINGS
VEHICLE SETTINGS
8SOUL FEATURES & FUNCTIONS GUIDE*IF EQUIPPED
CANCEL
RESSET+ _
CRUISE
RES
SET+ _<<+>>-
MODE
+>
>-
MODE
CRUISE
CANCELOK
<
<
OK
CANCEL
RES SET+ _
CRUISE
RES
SET+ _<
<+>>-
MODE
+>
>-
MODE
CRUISE
CANCEL
OK
<
<
OK
(For Type B cluster; Buttons located on steering wheel)
User Settings Mode*
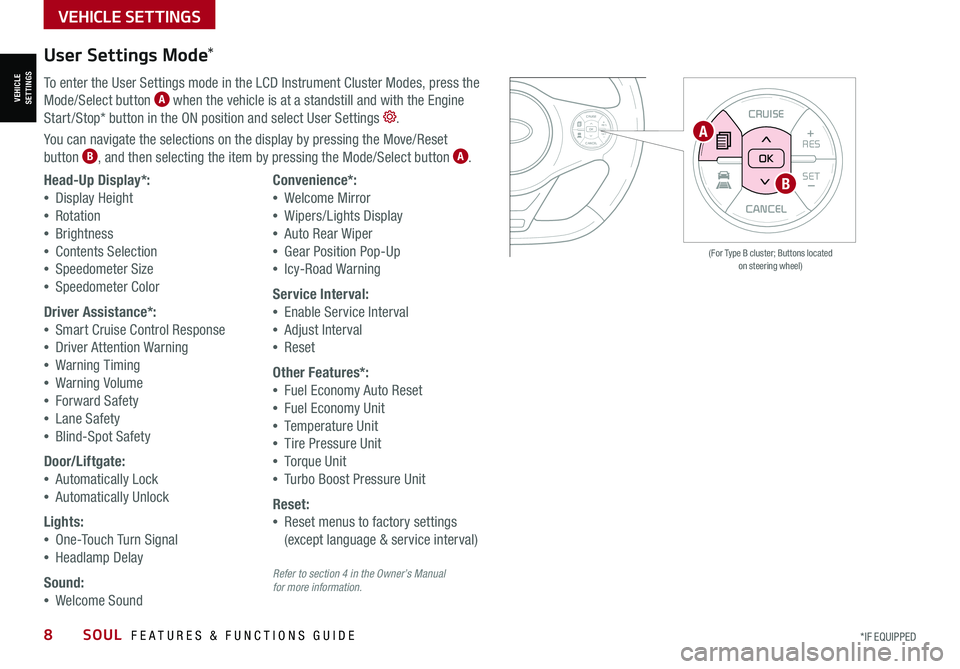
To enter the User Settings mode in the LCD Instrument Cluster Modes, press the
Mode/Select button A when the vehicle is at a standstill and with the Engine
Start /Stop* button in the ON position and select User Settings .
You can navigate the selections on the display by pressing the Move/Reset
button B, and then selecting the item by pressing the Mode/Select button A.
Head-Up Display*:
•Display Height
•Rotation
•Brightness
•Contents Selection
•Speedometer Size
•Speedometer Color
Driver Assistance*:
•Smart Cruise Control Response
•Driver Attention Warning
•Warning Timing
•Warning Volume
•Forward Safety
•Lane Safety
•Blind-Spot Safety
Door/Liftgate:
•Automatically Lock
•Automatically Unlock
Lights:
•One-Touch Turn Signal
•Headlamp Delay
Sound:
•Welcome Sound
Convenience*:
•Welcome Mirror
•Wipers/Lights Display
•Auto Rear Wiper
•Gear Position Pop-Up
•Icy-Road Warning
Service Interval:
•Enable Service Interval
•Adjust Interval
•Reset
Other Features*:
•Fuel Economy Auto Reset
•Fuel Economy Unit
•Temperature Unit
•Tire Pressure Unit
•Torque Unit
•Turbo Boost Pressure Unit
Reset:
•Reset menus to factory settings
(except language & service interval)
A
B
Refer to section 4 in the Owner’s Manual for more information.
Page 11 of 54
To view these videos on your mobile device, snap these QR Codes or visit the listed website.
Refer to the inside cover for more information.
LCD Display Video
LCD Display: Maintenance Video
www.youtube.com/KiaFeatureVideos
QR CODEService Interval Mode*
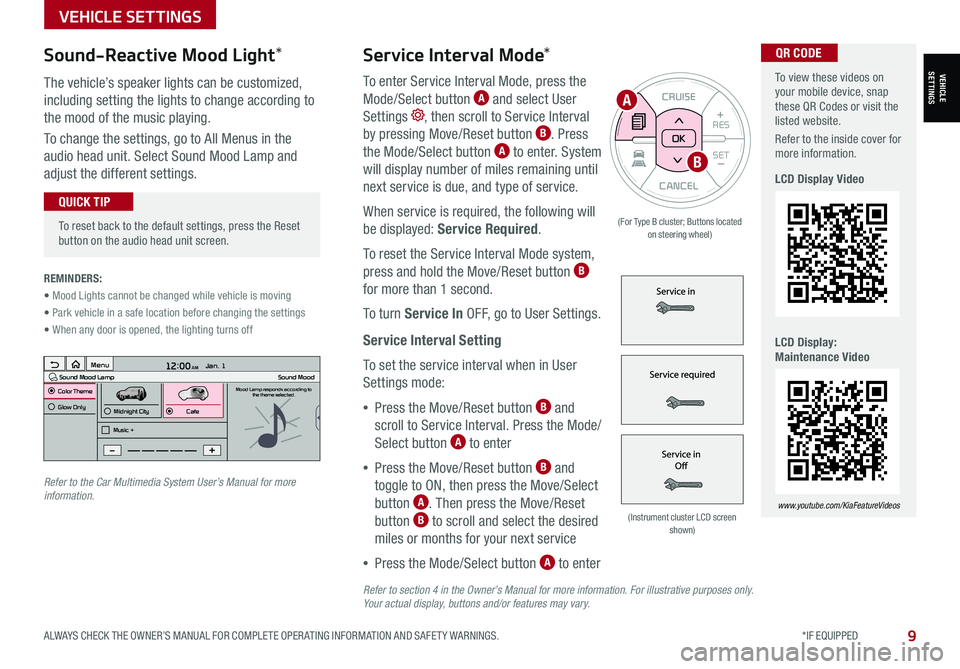
To enter Service Interval Mode, press the
Mode/Select button A and select User
Settings , then scroll to Service Interval
by pressing Move/Reset button B. Press
the Mode/Select button A to enter. System
will display number of miles remaining until
next service is due, and type of service.
When service is required, the following will
be displayed: Service Required.
To reset the Service Interval Mode system,
press and hold the Move/Reset button B
for more than 1 second.
To turn Service In OFF, go to User Settings.
Service Interval Setting
To set the service interval when in User
Settings mode:
•Press the Move/Reset button B and
scroll to Service Interval. Press the Mode/
Select button A to enter
•Press the Move/Reset button B and
toggle to ON, then press the Move/Select
button A. Then press the Move/Reset
button B to scroll and select the desired
miles or months for your next service
•Press the Mode/Select button A to enter
3 6 days1,10 0 mi
VEHICLESETTINGS
VEHICLE SETTINGS
ALWAYS CHECK THE OWNER’S MANUAL FOR COMPLETE OPER ATING INFORMATION AND SAFET Y WARNINGS. *IF EQUIPPED9
CANCEL
RES
SET+ _
CRUISE
RES
SET+ _<
<+>>-
MODE
+>
>-
MODE
CRUISE
CANCELOK
<
<
OK
(For Type B cluster; Buttons located on steering wheel)
•
To reset back to the default settings, press the Reset button on the audio head unit screen.
QUICK TIP
REMINDERS:
• Mood Lights cannot be changed while vehicle is moving
• Park vehicle in a safe location before changing the settings
• When any door is opened, the lighting turns off
Sound-Reactive Mood Light*
The vehicle’s speaker lights can be customized,
including setting the lights to change according to
the mood of the music playing.
To change the settings, go to All Menus in the
audio head unit. Select Sound Mood Lamp and
adjust the different settings.
(Instrument cluster LCD screen shown)
12:00 AM Jan. 1
MenuSound Mood LampColor ThemeSound MoodMood Lamp responds according to
the theme selected.
Glow Only
Music +Midnight CityCafe
A
B
Refer to the Car Multimedia System User’s Manual for more information.
Refer to section 4 in the Owner’s Manual for more information. For illustrative purposes only. Your actual display, buttons and/or features may vary.
Page 14 of 54
ADAS
ADVANCED DRIVER ASSISTANCE SYSTEMS (ADAS)
12SOUL FEATURES & FUNCTIONS GUIDE*IF EQUIPPED †LEGAL DISCL AIMERS ON BACK INSIDE COVER
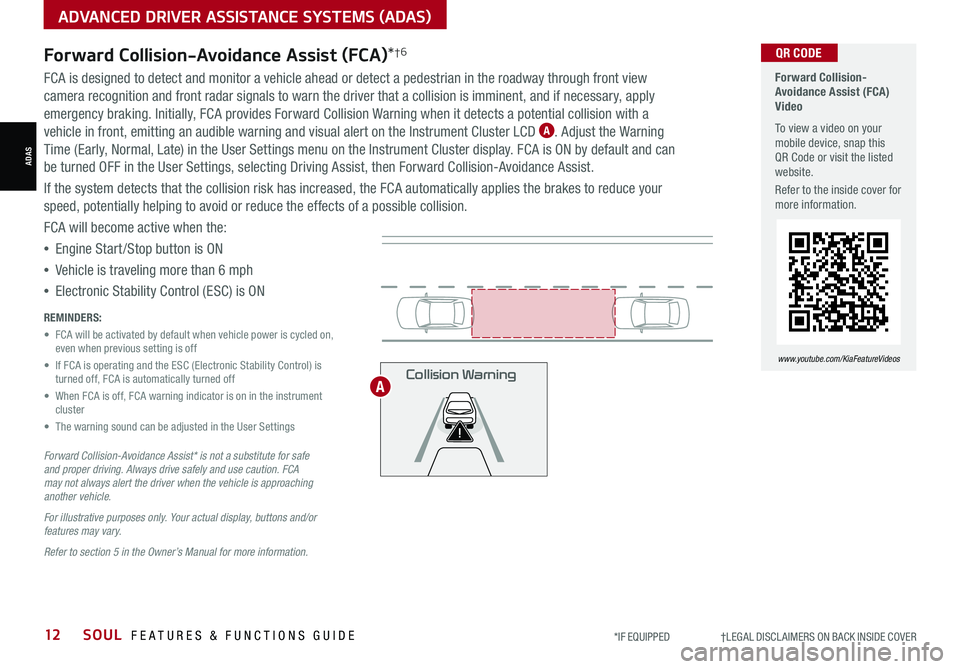
Forward Collision-Avoidance Assist (FCA)*†6
FCA is designed to detect and monitor a vehicle ahead or detect a pedestrian in the roadway through front view
camera recognition and front radar signals to warn the driver that a collision is imminent, and if necessary, apply
emergency braking. Initially, FCA provides Forward Collision Warning when it detects a potential collision with a
vehicle in front, emitting an audible warning and visual alert on the Instrument Cluster LCD A. Adjust the Warning
Time (Early, Normal, Late) in the User Settings menu on the Instrument Cluster display. FCA is ON by default and can
be turned OFF in the User Settings, selecting Driving Assist, then Forward Collision-Avoidance Assist.
If the system detects that the collision risk has increased, the FCA automatically applies the brakes to reduce your
speed, potentially helping to avoid or reduce the effects of a possible collision.
FCA will become active when the:
•Engine Start /Stop button is ON
•Vehicle is traveling more than 6 mph
•Electronic Stability Control (ESC) is ON
Forward Collision-Avoidance Assist* is not a substitute for safe and proper driving. Always drive safely and use caution. FCA may not always alert the driver when the vehicle is approaching another vehicle.
For illustrative purposes only. Your actual display, buttons and/or features may vary.
Refer to section 5 in the Owner’s Manual for more information.
REMINDERS:
• FCA will be activated by default when vehicle power is cycled on, even when previous setting is off
• If FCA is operating and the ESC (Electronic Stability Control) is turned off, FCA is automatically turned off
• When FCA is off, FCA warning indicator is on in the instrument cluster
• The warning sound can be adjusted in the User Settings
Forward Collision-Avoidance Assist (FCA)Video
To view a video on your mobile device, snap this QR Code or visit the listed website.
Refer to the inside cover for more information.
www.youtube.com/KiaFeatureVideos
QR CODE
Collision WarningA
Page 21 of 54

ALWAYS CHECK THE OWNER’S MANUAL FOR COMPLETE OPER ATING INFORMATION AND SAFET Y WARNINGS. *IF EQUIPPED19
CENTER PANEL
CENTER PANEL
•The power outlets are inactive when ignition is in the OFF position
•The USB data port (Multimedia USB Port) A is located next to the Power Outlets. USB Charger Ports do not support data transfer
•The power outlets are inactive when ignition is in the OFF position
QUICK TIPS
Multimedia USB Port A: Use the Multimedia USB Port to connect USB audio
and smartphone devices.
USB Charger Port B: Use the USB Charger Port on the right to charge devices.
One USB Charger Port is located in the back of the center console*.
Power Outlets C: Use the power outlets for mobile phones and other devices
designed to operate on a 12V (180W max) power outlet.
(Ports and power outlets located on lower part of Center Panel; If equipped, an additional Power Outlet is located in the rear cargo area of the vehicle)
Press the SETUP key, then the DATE / TIME button to display the Clock Settings screen. Then use the onscreen buttons to navigate through setup and return to exit.
•
•When needed, Daylight Savings must be enabled in the Clock Settings screen (UVO link with Navigation*)
•To access manual date and time setting, turn GPS Time OFF in the Clock Settings (UVO link with Navigation*)
QUICK TIPS
Digital ClockMultimedia USB Port, Power Outlets
& USB Charger Ports*
REMINDERS:
•
Kia recommends that you only use USB cables made by your device’s manufacturer. Third-party USB cables may cause damage to your device
•
Using the Power Outlet (accessory plug) for prolonged period time with the Engine Start /Stop button in the ACC position (Engine OFF ) could cause the battery to discharge.
•
The Multimedia USB Port A in the center panel charges slower than the USB Charger Ports B throughout the vehicle
ACB
Refer to section 4 in the Owner’s Manual for more information.
For more information, refer to the Car Infotainment System Quick Reference Guide.
Page 24 of 54
22SOUL FEATURES & FUNCTIONS GUIDE*IF EQUIPPED
CENTER PANEL
CENTER PANEL
REMINDERS:
•
Cold or warm ambient air may flow in through vents if Recirculated Air button is not pressed ON (LED lit)
•
Pressing any button during AUTO operation will deactivate the AUTO function and switch to manual mode, except for Temperature Control
•
When in AUTO mode, Air Flow Mode and Fan Speed do not display on the Climate Control Display Your Automatic Climate Control system may differ from those in the illustrations. See your Owner’s Manual for more details.
Defog Inside Windshield:
1. Set Fan Speed to highest position
2. Set Temperature to highest position
3. Press the Front Defrost button
Defrost Outside Windshield:
1. Set Fan Speed to the highest position
2. Set Temperature to Hot
3. Press the Front Defrost button
Auto Defogging System (ADS):
Auto defogging is designed to
reduce the fogging up of the inside
of the windshield by automatically
sensing the moisture of the inside
of the windshield. The system will
automatically change to defrost mode
when needed.
Auto Defogging is set ON by default.
To cancel Auto Defogging, press the
Front Defrost button for three
seconds, when the ignition is in on
(ADS OFF icon will illuminate). To
turn Auto Defogging on again, press
the Front Defrost button for three
seconds.
Climate Control Auto Function:
1. Press AUTO to select Full Auto Operation - The
Auto setting automatically controls the airflow
modes, fan speeds, air intake and air conditioning
according to the temperature setting selected
2. Set desired Temperature
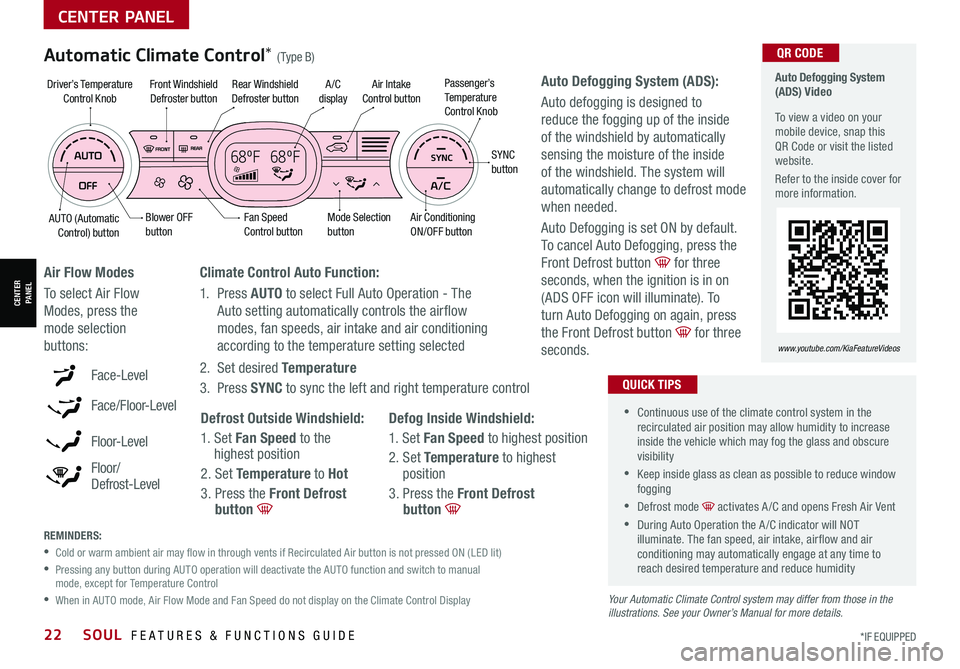
3. Press SYNC to sync the left and right temperature controlFace-Level
Face/Floor-Level
F lo o r- L evel
Floor/ Defrost-Level
Air Flow Modes
To select Air Flow
Modes, press the
mode selection
buttons:
Automatic Climate Control* (Type B)
•
•Continuous use of the climate control system in the recirculated air position may allow humidity to increase inside the vehicle which may fog the glass and obscure visibility
•Keep inside glass as clean as possible to reduce window fogging
•Defrost mode activates A /C and opens Fresh Air Vent
•During Auto Operation the A /C indicator will NOT illuminate. The fan speed, air intake, air flow and air conditioning may automatically engage at any time to reach desired temperature and reduce humidity
QUICK TIPS
68ºF 68ºFSYNC
Fan Speed Control buttonMode Selection button
A /C displayRear Windshield Defroster button
AUTO (Automatic Control) button
Air Intake Control buttonFront Windshield Defroster button
Air ConditioningON/OFF button
SYNC button
Driver’s TemperatureControl KnobPassenger’s Temp e r a t u r eControl Knob
Blower OFF button
Auto Defogging System (ADS) Video
To view a video on your mobile device, snap this QR Code or visit the listed website.
Refer to the inside cover for more information.
www.youtube.com/KiaFeatureVideos
QR CODE
Page 25 of 54
ALWAYS CHECK THE OWNER’S MANUAL FOR COMPLETE OPER ATING INFORMATION AND SAFET Y WARNINGS. *IF EQUIPPED23
CENTER PANEL
CENTER PANEL
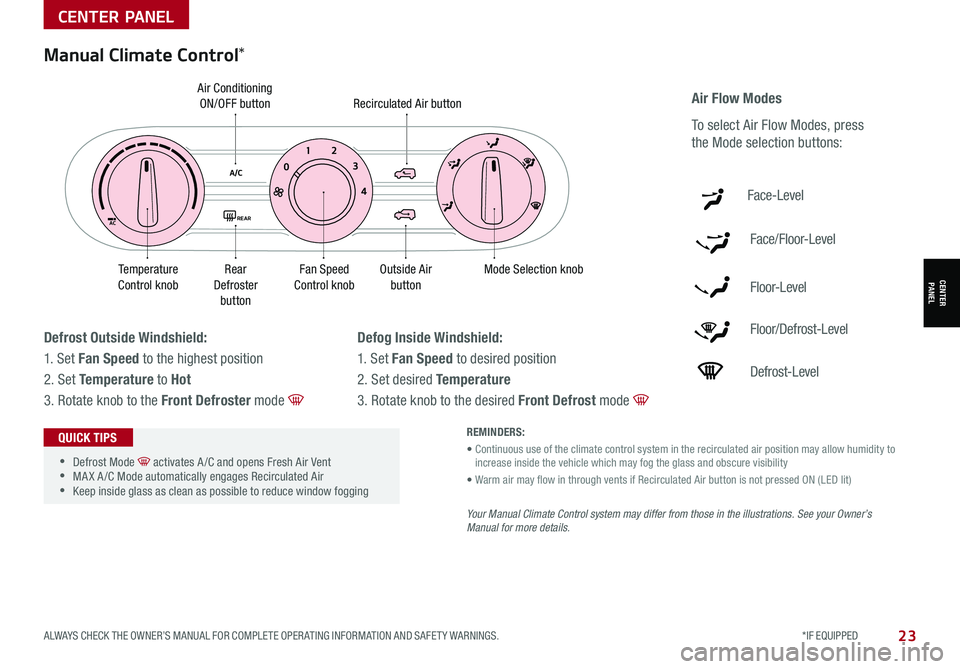
Fan Speed Control knobOutside Airbutton
Recirculated Air button
Mode Selection knobRear Defroster button
Temp e r a t u r e Control knob
Air Conditioning ON/OFF button
Face-Level
Face/Floor-Level
F lo o r- L evel
Floor/Defrost-Level
Defrost-Level
Air Flow Modes
To select Air Flow Modes, press
the Mode selection buttons:
REMINDERS:
• Continuous use of the climate control system in the recirculated air position may allow humidity to increase inside the vehicle which may fog the glass and obscure visibility
• Warm air may flow in through vents if Recirculated Air button is not pressed ON (LED lit)
Your Manual Climate Control system may differ from those in the illustrations. See your Owner’s Manual for more details.
•
•Defrost Mode activates A /C and opens Fresh Air Vent •MA X A /C Mode automatically engages Recirculated Air •Keep inside glass as clean as possible to reduce window fogging
QUICK TIPS
Defrost Outside Windshield:
1. Set Fan Speed to the highest position
2. Set Temperature to Hot
3. Rotate knob to the Front Defroster mode
Defog Inside Windshield:
1. Set Fan Speed to desired position
2. Set desired Temperature
3. Rotate knob to the desired Front Defrost mode
Manual Climate Control*
AC
A/C0 1
2
3
4
REAR
Page 29 of 54
ALWAYS CHECK THE OWNER’S MANUAL FOR COMPLETE OPER ATING INFORMATION AND SAFET Y WARNINGS. *IF EQUIPPED27
STEERING WHEEL CONTROLS
STEERING WHEEL CONTROLS
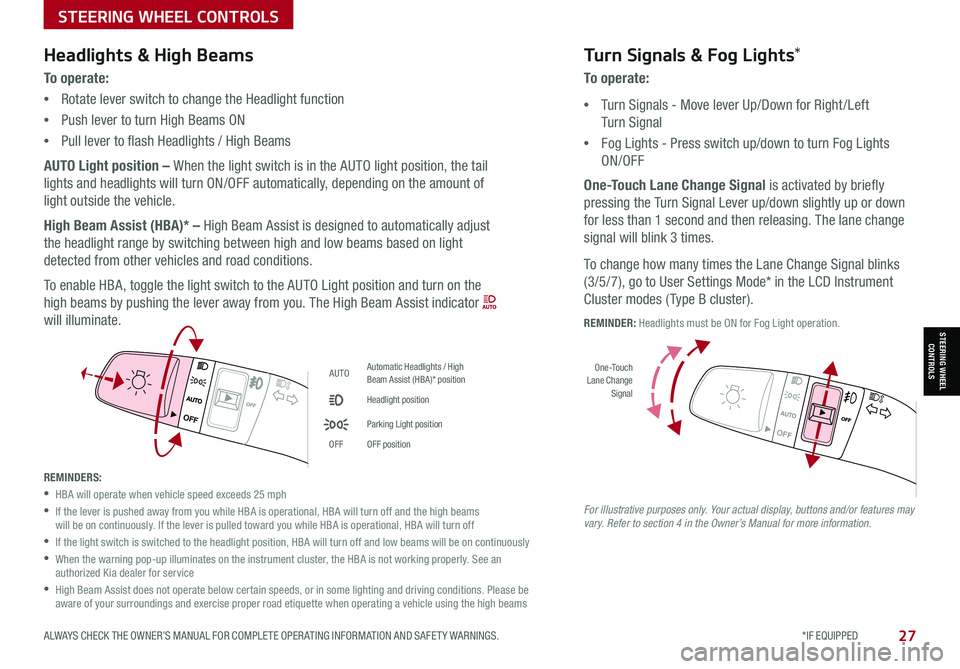
AUTOAutomatic Headlights / High Beam Assist (HBA)* position
Headlight position
Parking Light position
OFFOFF position
OFF
OFF
Headlights & High Beams
To operate:
•Rotate lever switch to change the Headlight function
•Push lever to turn High Beams ON
•Pull lever to flash Headlights / High Beams
AUTO Light position – When the light switch is in the AUTO light position, the tail
lights and headlights will turn ON/OFF automatically, depending on the amount of
light outside the vehicle.
High Beam Assist (HBA)* – High Beam Assist is designed to automatically adjust
the headlight range by switching between high and low beams based on light
detected from other vehicles and road conditions.
To enable HBA, toggle the light switch to the AUTO Light position and turn on the
high beams by pushing the lever away from you. The High Beam Assist indicator
will illuminate.
Turn Signals & Fog Lights*
To operate:
•Turn Signals - Move lever Up/Down for Right /Left
Turn Signal
•Fog Lights - Press switch up/down to turn Fog Lights
ON/OFF
One-Touch Lane Change Signal is activated by briefly
pressing the Turn Signal Lever up/down slightly up or down
for less than 1 second and then releasing. The lane change
signal will blink 3 times.
To change how many times the Lane Change Signal blinks
(3/5/7), go to User Settings Mode* in the LCD Instrument
Cluster modes ( Type B cluster).
REMINDER: Headlights must be ON for Fog Light operation.
REMINDERS:
•HBA will operate when vehicle speed exceeds 25 mph
•
If the lever is pushed away from you while HBA is operational, HBA will turn off and the high beams will be on continuously. If the lever is pulled toward you while HBA is operational, HBA will turn off
•
If the light switch is switched to the headlight position, HBA will turn off and low beams will be on continuously
•
When the warning pop-up illuminates on the instrument cluster, the HBA is not working properly. See an authorized Kia dealer for service
•
High Beam Assist does not operate below certain speeds, or in some lighting and driving conditions. Please be aware of your surroundings and exercise proper road etiquette when operating a vehicle using the high beams
OFF
OFF
O ne -Touch Lane Change Signal
For illustrative purposes only. Your actual display, buttons and/or features may vary. Refer to section 4 in the Owner’s Manual for more information.
Page 30 of 54
28SOUL FEATURES & FUNCTIONS GUIDE*IF EQUIPPED †LEGAL DISCL AIMERS ON BACK INSIDE COVER
STEERING WHEEL CONTROLS
STEERING WHEEL CONTROLS
Images are for illustrative purposes only and may vary on actual vehicle.
SCC is a supplemental system and is not a substitute for safe driving. It is the responsibility of the driver to always check the speed and distance to the vehicle ahead.
Refer to section 5 in the Owner’s Manual for more information.
Smart Cruise Control Video
To view a video on your mobile device, snap this QR Code or visit the listed website.
Refer to the inside cover for more information.
www.youtube.com/KiaFeatureVideos
QR CODE
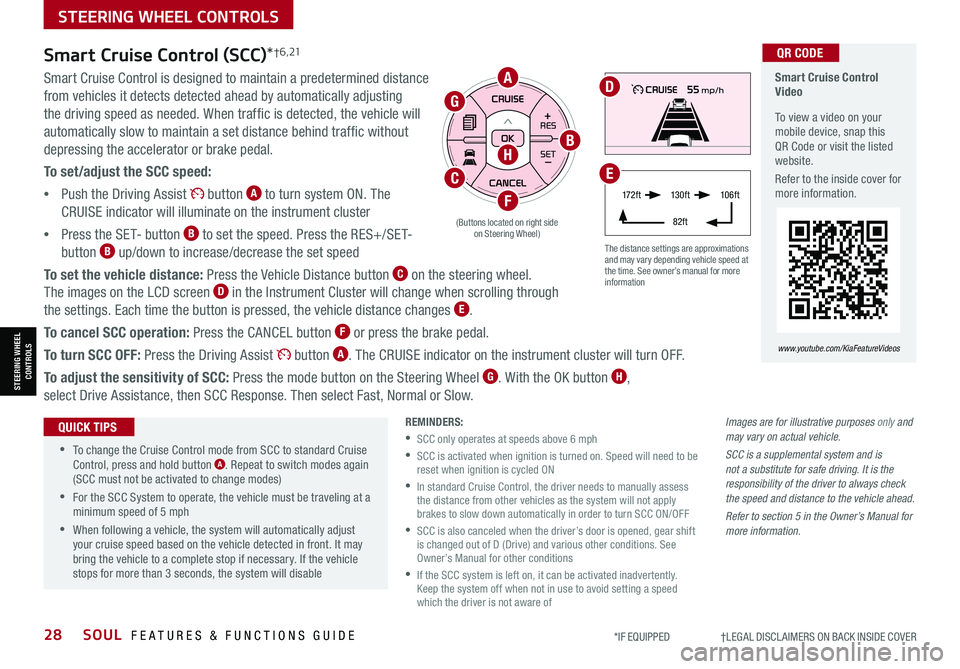
The distance settings are approximations and may vary depending vehicle speed at the time. See owner’s manual for more information
Smart Cruise Control (SCC)*† 6 , 21
Smart Cruise Control is designed to maintain a predetermined distance
from vehicles it detects detected ahead by automatically adjusting
the driving speed as needed. When traffic is detected, the vehicle will
automatically slow to maintain a set distance behind traffic without
depressing the accelerator or brake pedal.
To set/adjust the SCC speed:
•Push the Driving Assist button A to turn system ON. The
CRUISE indicator will illuminate on the instrument cluster
•Press the SET- button B to set the speed. Press the RES+/SET-
button B up/down to increase/decrease the set speed
To set the vehicle distance: Press the Vehicle Distance button C on the steering wheel.
The images on the LCD screen D in the Instrument Cluster will change when scrolling through
the settings. Each time the button is pressed, the vehicle distance changes E.
To cancel SCC operation: Press the CANCEL button F or press the brake pedal.
To turn SCC OFF: Press the Driving Assist button A. The CRUISE indicator on the instrument cluster will turn OFF.
To adjust the sensitivity of SCC: Press the mode button on the Steering Wheel G. With the OK button H,
select Drive Assistance, then SCC Response. Then select Fast, Normal or Slow.
•
•To change the Cruise Control mode from SCC to standard Cruise Control, press and hold button A. Repeat to switch modes again (SCC must not be activated to change modes)
•For the SCC System to operate, the vehicle must be traveling at a minimum speed of 5 mph
•When following a vehicle, the system will automatically adjust your cruise speed based on the vehicle detected in front. It may bring the vehicle to a complete stop if necessary. If the vehicle stops for more than 3 seconds, the system will disable
QUICK TIPSREMINDERS:
•SCC only operates at speeds above 6 mph
•
SCC is activated when ignition is turned on. Speed will need to be reset when ignition is cycled ON
•
In standard Cruise Control, the driver needs to manually assess the distance from other vehicles as the system will not apply brakes to slow down automatically in order to turn SCC ON/OFF
•
SCC is also canceled when the driver’s door is opened, gear shift is changed out of D (Drive) and various other conditions. See Owner’s Manual for other conditions
•
If the SCC system is left on, it can be activated inadvertently. Keep the system off when not in use to avoid setting a speed which the driver is not aware of
17 2 f t13 0 f t
82ft
10 6 f t
(Buttons located on right side on Steering Wheel)
A
CE
F
H
G
B
D