AUDIO SYSTEMS
26*IF EQUIPPED SOUL EV FEATURES & FUNCTIONS GUIDE
MAP
UVO
SEEK
TRACK
RADIO
MEDIA
NAVI
PHONE
INFO
SETUP
POWER
VOL TUNE
FILEPUSH
VOICE MAP
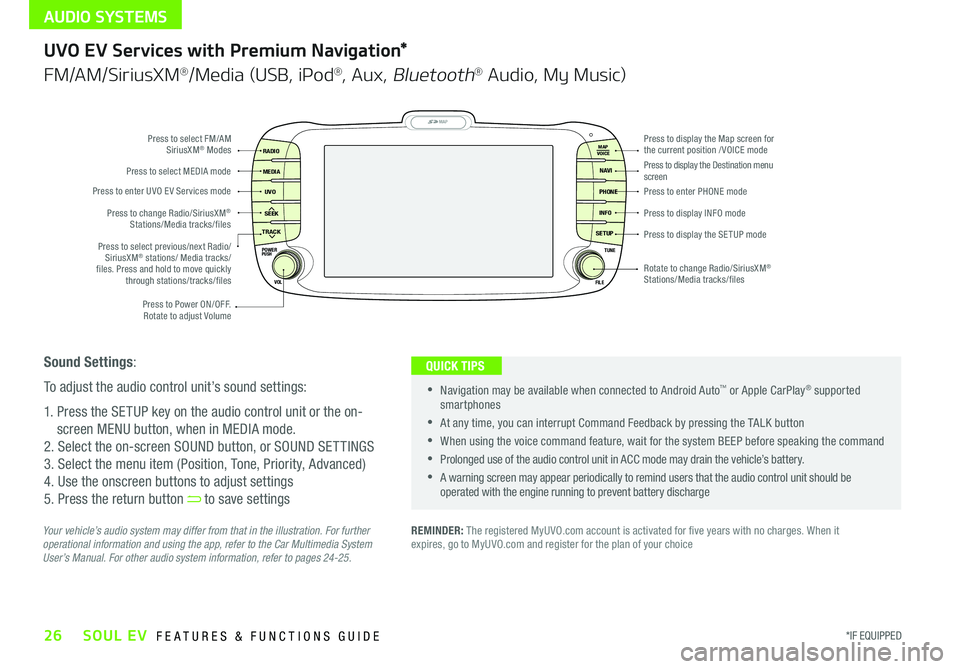
Press to Power ON/OFF
Rotate to adjust Volume
Press to enter UVO E V Services mode
Press to select FM/AM SiriusXM® Modes
Press to select MEDIA mode
Rotate to change Radio/SiriusXM® Stations/Media tracks/files
Press to display the Map screen for the current position / VOICE modePress to display the Destination menu screenPress to enter PHONE mode
Press to display the SE TUP mode
Press to display INFO mode Press to change Radio/SiriusXM® Stations/Media tracks/files
Press to select previous/next Radio/SiriusXM® stations/ Media tracks/ files Press and hold to move quickly through stations/tracks/files
UVO EV Services with Premium Navigation*
FM/AM/SiriusXM®/Media (USB, iPod®, Aux, Bluetooth® Audio, My Music)
REMINDER: The registered MyUVO com account is activated for five years with no charges When it expires, go to MyUVO com and register for the plan of your choice Your vehicle’s audio system may differ from that in the illustration. For further operational information and using the app, refer to the Car Multimedia System User’s Manual. For other audio system information, refer to pages 24-25.
•
•Navigation may be available when connected to Android Auto™ or Apple CarPlay® supported smartphones
•At any time, you can interrupt Command Feedback by pressing the TALK button
•When using the voice command feature, wait for the system BEEP before speaking the command
•Prolonged use of the audio control unit in ACC mode may drain the vehicle’s battery
•A warning screen may appear periodically to remind users that the audio control unit should be operated with the engine running to prevent battery discharge
QUICK TIPSSound Settings:
To adjust the audio control unit’s sound settings:
1 Press the SETUP key on the audio control unit or the on-
screen MENU button, when in MEDIA mode
2 Select the on-screen SOUND button, or SOUND SET TINGS
3 Select the menu item (Position, Tone, Priority, Advanced)
4 Use the onscreen buttons to adjust settings
5 Press the return button to save settings
