trunk KIA SPECTRA5 2007 User Guide
[x] Cancel search | Manufacturer: KIA, Model Year: 2007, Model line: SPECTRA5, Model: KIA SPECTRA5 2007Pages: 312, PDF Size: 3.42 MB
Page 190 of 312

Driving your vehicle58
4
1
2
3
4
5
6
7
8
910
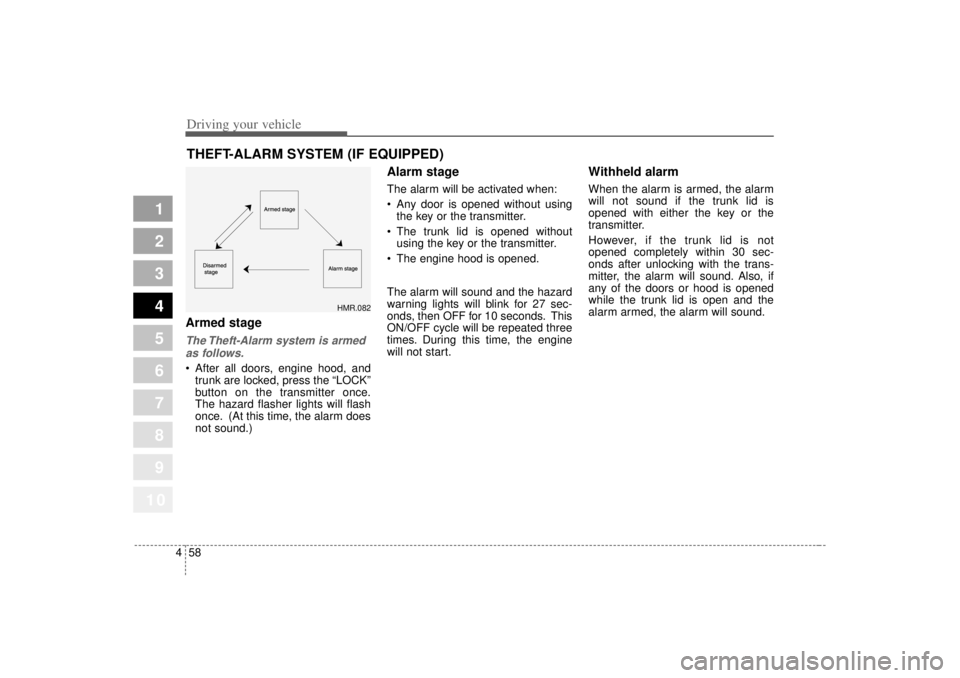
Armed stageThe Theft-Alarm system is armed
as follows. After all doors, engine hood, and
trunk are locked, press the “LOCK”
button on the transmitter once.
The hazard flasher lights will flash
once. (At this time, the alarm does
not sound.)
Alarm stageThe alarm will be activated when:
Any door is opened without using
the key or the transmitter.
The trunk lid is opened without
using the key or the transmitter.
The engine hood is opened.
The alarm will sound and the hazard
warning lights will blink for 27 sec-
onds, then OFF for 10 seconds. This
ON/OFF cycle will be repeated three
times. During this time, the engine
will not start.
Withheld alarmWhen the alarm is armed, the alarm
will not sound if the trunk lid is
opened with either the key or the
transmitter.
However, if the trunk lid is not
opened completely within 30 sec-
onds after unlocking with the trans-
mitter, the alarm will sound. Also, if
any of the doors or hood is opened
while the trunk lid is open and the
alarm armed, the alarm will sound.
THEFT-ALARM SYSTEM (IF EQUIPPED)
HMR.082
Page 191 of 312

459
1
2
3
4
5
6
7
8
910
Driving your vehicle
Disarmed stageThe armed stage will be deactivated
when:
The “ ”button on the transmit-
ter is pressed (hazard lamps will
flash twice).
But, after depressing unlock but-
ton, unless you open the doors
within 30 seconds all doors will be
locked and into armed stage auto-
matically.
The ignition switch is in the “ON”
position.
Unlock the doors with the ignition
key. The alarm will be deactivated when:
The lock ( ), unlock ( ) or trunk
lid open ( ) button on the
transmitter is pressed.
The ignition switch is in the “ON”
position for 30 seconds or more.
Unlock the doors with the ignition
key.
✽ ✽
NOTICEIf the ignition key is in the ignition
switch, the transmitter will not func-
tion. Avoid trying to start the engine
with the alarm activated.
Page 207 of 312

Driving tips16
5
The label will help you decide how
much cargo and installed equipment
your vehicle can carry.
If you carry items inside your vehicle
- like suitcases, tools, packages, or
anything else - they are moving as
fast as the vehicle. If you have to stop
or turn quickly, or if there is a crash,
the items will keep going and can
cause an injury if they strike the driv-
er or a passenger.
1
2
3
4
5
6
7
8
910
WARNING -
Over loading
Never exceed the GVWR for your vehicle, the GAWR for
either the front or rear axle
and vehicle capacity weight.
Exceeding these ratings can
cause an accident or vehicle
damage. You can calculate the
weight of your load by weigh-
ing the items (or people)
before putting them in the
vehicle. Be careful not to over-
load your vehicle.
If you overload your vehicle, the tires can suddenly and
without warning fail. The over-
loading can also make your
vehicle unstable and dramati-
cally increase braking dis-
tance. This could cause you
to lose control and crash.
WARNING -
Loose cargo
Items you carry inside your
vehicle can strike and injure
occupants in a sudden stop or
sharp turn, or in a crash.
Put items in the trunk of your vehicle. Try to spread the
weight evenly.
Never stack items, like suit- cases, inside the occupant
compartment.
Do not leave an unsecured child restraint in your vehicle,
since it can injure occupants
in a crash.
When you carry something inside the vehicle, secure it.
CAUTION
Overloading your vehicle may cause damage. Repairs wouldnot be covered by your war-ranty. Do not overload yourvehicle.
Using heavier suspension components to get addeddurability might not changeyour weight ratings. Ask yourdealer to help you load yourvehicle the right way.ignored.
Page 234 of 312

In case of an emergency16
6
1
2
3
4
5
6
7
8
910
Description Fuse rating Protected component
ATM 20A Automatic transaxle control
ECU1 10A Engine control unit
STOP 15A Stop light
F/WIPER 20A Front wiper
R/FOG 10A Rear fog light
F/FOG 15A Front fog light
LO HDLP 15A Headlight (low)
HI HDLP 15A Headlight (high)
A/CON 10A Air conditioner
F/PUMP 15A Fuel pump
T/OPEN 10A Trunk lid opener
FOLD 10A Outside rearview mirror folding
HORN 10A Horn
DEICE 15A Deicer
INJ 15A Injection
SNSR 10A O2 sensor
ECU2 30A Engine control unit
SPARE 10A spare fuse
SPARE 15A spare fuse
SPARE 20A spare fuse
SPARE 30A spare fuse
ABS2 30A Anti-lock brake system
ABS1 30A Anti-lock brake system
IP B+ 50A In panel B+
Description Fuse rating Protected component
BLOWER30A Blower
IGN2 30A Ignition
IGN1 30A Ignition
RAD 30A Radiator fan
COND 20A Condenser fan
ALT 120A Alternater
ATM - Automatic transaxle control relay
WIPER - Wiper relay
F/FOG - Front fog light relay
LO HDLP - Headlight relay (low)
HI HDLP - Headlight relay (high)
A/CON - Air conditioner relay
F/PUMP - Fuel pump
DRL - Daytime running light relay
COND2 - Condenser fan relay
HORN - Horn relay
MAIN - Main relay
START - Start motor relay
RAD - Radiator fan relay
COND - Condenser fan relay
Engine compartment
Page 242 of 312

In case of an emergency24
6
1
2
3
4
5
6
7
8
910
IF YOU HAVE A FLAT TIRE The spare tire, jack, jack handle,
wheel lug nut wrench are stored in
the trunk compartment. Move the
carpeting out of the way to reach this
equipment.
Removing the spare tire Turn the tire hold-down wing bolt
counterclockwise.
Store the tire in the reverse order of
removal.
To prevent the spare tire and tools
from “rattling” while the vehicle is in
motion, store them properly.
Important - use of compact
spare tireyour vehicle is equipped with a com-
pact spare tire. This compact spare
tire takes up less space than a regu-
lar-size tire. This tire is smaller than a
conventional tire and is designed for
temporary use only.
1LDN4009
1LDA4010
CAUTION
- Compact
spare
You should drive carefully when the compact spare is inuse. The compact spareshould be replaced by theproper conventional tire andrim at the first opportunity.
The operation of this vehicle is not recommended withmore than one compact sparetire in use at the same time.
Page 293 of 312

Maintenance46
7
1
2
3
4
5
6
7
8
910
Interior lights bulb replace-
ment1. Using a flat-blade screwdriver,
gently pry the lens from the interi-
or light housing.
2. Remove the bulb by pulling it straight out.
3. Install a new bulb.
4. Align the lens tabs with the interior light housing notches and snap
the lens into place.
CAUTION
- Interior lights
Prior to working on the InteriorLights, ensure that the “OFF”button is depressed to avoidburning your fingers or receiv-ing an electric shock.
1LDA50441LDA50421LDE5041
Door courtesy lampGlove box lampTrunk room lamp (5 Door)
1LDA50391LDA50401LDA5041
Front map lampCenter dome lampTrunk room lamp (4 Door)
Page 294 of 312

747
Maintenance
1
2
3
4
5
6
7
8
910
License plate lights bulb
replacement 1. Loosen the lens retaining screwswith a cross-tip screwdriver.
2. Remove the lens.
3. Remove the bulb by pulling it straight out.
4. Install a new bulb.
5. Reinstall the lens securely with the lens retaining screws.
Rear combination light bulb
replacement(1) Stop and tail light
(2) Rear turn signal light
(3) Back-up light
(4) Rear side mark light 1. Open the trunk lid or rear hatch.
2. Remove the service cover by turn-
ing the plastic screw counterclock-
wise and removing the cover.
1LDA5043
OLD056035
OLD056034
Page 295 of 312

Maintenance48
7
1
2
3
4
5
6
7
8
910
3. Remove the socket from the
assembly by turning the socket
counterclockwise until the tabs on
the socket align with the slots on
the assembly. 4. Remove the bulb from the socket
by pressing it in and rotating it until
the tabs on the bulb align with the
slots in the socket. Pull the bulb
out of the socket.
5. Insert a new bulb by inserting it into the socket and rotating it until
it locks into place.
6. Install the socket in the assembly by aligning the tabs on the socket
with the slots in the assembly.
Push the socket into the assembly
and turn the socket clockwise.
7. Replace the service cover and tighten the screws.
High mounted stop light bulb
replacementType AIf the light bulb is not operating, have
the vehicle checked by an authorized
Kia Dealer.Type B1. Open the trunk lid.Type A
• 4 Door Type B
1LDE5038/1LDE5040/1LDA5038
• 5 Door
OLD056037
OLD056036
Page 304 of 312

83
1
2
3
4
5
6
7
8
910
Specifications
Light Bulb Wattage
Headlights (Low/High) 55/60
Front turn signal lights 27
Position lights 5
Front fog lights* 27
Stop and tail lights 27/8
Rear turn signal lights 27
Back-up lights 17
Rear side mark light 5
High mounted stop light* 27 or LED
License plate lights 5
Front map lamp 10
Center dome lamp 10
Door courtesy lamps 5
Trunk room lamp 5
Glove box lamp 5
Light bulbs* : if equipped