oil KIA Sportage 2007 JE_ / 2.G Owner's Guide
[x] Cancel search | Manufacturer: KIA, Model Year: 2007, Model line: Sportage, Model: KIA Sportage 2007 JE_ / 2.GPages: 350, PDF Size: 3.58 MB
Page 306 of 350
719
Maintenance
1
2
3
4
5
6
7
8
9
✽ ✽NOTICEDo not allow brake/clutch fluid to
contact the vehicle's body paint, as
paint damage will result.
Brake/clutch fluid, which has been
exposed to open air for an extended
time should never be used as its
quality cannot be guaranteed. It
should be thrown out. Don't put in
the wrong kind of fluid. A few drops
of mineral-based oil, such as engine
oil, in your brake clutch system can
damage brake clutch system parts.
Checking the parking brake Check the stroke of the parking
brake by counting the number of
“clicks’’ heard while fully applying it
from the released position. Also, the
parking brake alone should securely
hold the vehicle on a fairly steep
grade. If the stroke is more or less
than specified, have the parking
brake adjusted by an Authorized Kia
Dealer.
Stroke : 7~8 “clicks’’ at a force of
20 kg (44 lbs, 196 N).
1KMA3050
PARKING BRAKE
Page 308 of 350
721
Maintenance
1
2
3
4
5
6
7
8
9
POWER STEERING Checking the power steering
fluid level With the vehicle on level ground,
check the fluid level in the power
steering reservoir periodically. The
fluid should be between MAX and
MIN marks on the side of the reser-
voir at the normal temperature.
Before adding power steering fluid,
thoroughly clean the area around the
reservoir cap to prevent power steer-
ing fluid contamination.
If the level is low, add fluid to the
MAX level.In the event the power steering sys-
tem requires frequent addition of
fluid, the vehicle should be inspected
by an Authorized Kia Dealer.
✽ ✽
NOTICE• To avoid damage to the power
steering pump, do not operate the
vehicle for prolonged periods with
a low power steering fluid level.
• Never start the engine when the reservoir tank is empty.
• When adding fluid, be careful that dirt does not get into the tank.
• Too little fluid can make the steer- ing wheel heavier or strange noise
can be generated.
• The use of the non-specified fluid could reduce the effectiveness of
the power steering wheel and
cause damage to it.Use only the specified power steer-
ing fluid. (Refer to "RecommendedLubricants" later in this section.)
Power steering hoseCheck the connections for oil leaks,
severe damage and the twists in the
power steering hose before driving.
1KMN5018
Page 311 of 350
Maintenance24
7
1
2
3
4
5
6
7
8
9
✽ ✽
NOTICE“COLD” scale is for reference only
and should NOT be used to deter-
mine transaxle fluid level.✽ ✽NOTICENew automatic transaxle fluid
should be red. The red dye is added
so the assembly plant can identify it
as automatic transaxle fluid and dis-
tinguish it from engine oil or
antifreeze. The red dye, which is not
an indicator of fluid quality, is not
permanent. As the vehicle is driven,
the automatic transaxle fluid will
begin to look darker. The color may
eventually appear light brown.
Therefore, have an Authorized Kia
dealer change the automatic
transaxle fluid according to the
Scheduled Maintenance at the
beginning of this section.
Changing the automatic
transaxle fluidHave automatic transaxle fluid
changed by an Authorized Kia
Dealer according to the Maintenance
Schedule at the beginning of this
section.
Use only the specified automatic
transaxle fluid. (Refer to
"Recommended Lubricants" later in
this section.)
CAUTION
Low fluid level causes
transaxle slippage. Overfillingcan cause foaming, loss of fluidand transaxle malfunction.
The use of a non-specified fluid could result in transaxle mal-function and failure.
WARNING
- Parking brake
To avoid sudden movement of
the vehicle, apply parking brake
and depress the brake pedal
before moving the shift lever.
WARNING
- Transaxle
fluid
The transaxle fluid level should
be checked when the engine is at
normal operating temperature.
This means that the engine, radi-
ator, radiator hose and exhaust
system etc., are very hot.
Exercise great care not to burn
yourself during this procedure.
Page 313 of 350
Maintenance26
7
1
2
3
4
5
6
7
8
9
LUBRICANTS AND FLUIDS Checking the washer fluid
level The reservoir is translucent so that
you can check the level with a quick
visual inspection.
Check the fluid level in the washer
fluid reservoir and add fluid if neces-
sary. Plain water may be used if
washer fluid is not available.
However, use washer solvent with
antifreeze characteristics in cold cli-
mates to prevent freezing.
Body lubrication All moving points of the body, such
as door hinges, hood hinges, and
locks, should be lubricated each time
the engine oil is changed. Use a non-
freezing lubricant on locks during
cold weather.
Make sure the engine hood sec-
ondary latch keeps the hood from
opening when the primary latch is
released.
1KMA5021
WARNING -
Coolant
Do not use radiator coolant or antifreeze in the washer fluid
reservoir.
Radiator coolant can severely obscure visibility when
sprayed on the windshield
and may cause loss of vehicle
control or damage to paint
and body trim.
Windshield Washer fluid agents contain some amounts
of alcohol and can be flamma-
ble under certain circum-
stances. Do not allow sparks
or flame to contact the washer
fluid or the washer fluid reser-
voir. Damage to the vehicle or
it's occupants could occur.
Windshield washer fluid is poisonous to humans and ani-
mals. Do not drink and avoid
contacting windshield washer
fluid. Serious injury or death
could occur.
Page 320 of 350
733
Maintenance
1
2
3
4
5
6
7
8
9
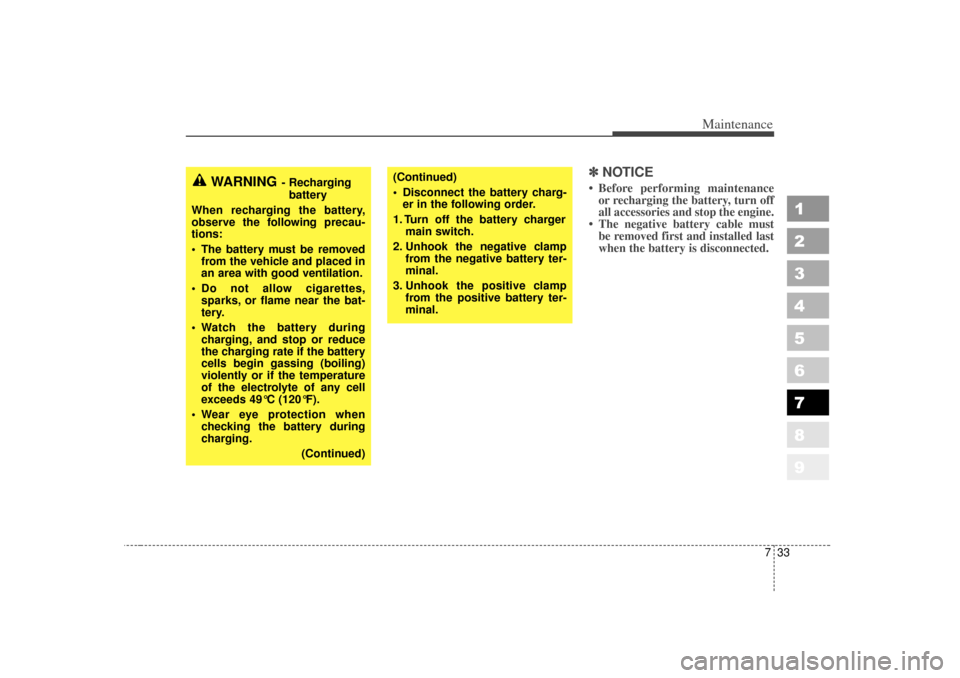
✽ ✽NOTICE• Before performing maintenance
or recharging the battery, turn off
all accessories and stop the engine.
• The negative battery cable must be removed first and installed last
when the battery is disconnected.
WARNING
- Recharging
battery
When recharging the battery,
observe the following precau-
tions:
The battery must be removed from the vehicle and placed in
an area with good ventilation.
Do not allow cigarettes, sparks, or flame near the bat-
tery.
Watch the battery during charging, and stop or reduce
the charging rate if the battery
cells begin gassing (boiling)
violently or if the temperature
of the electrolyte of any cell
exceeds 49°C (120°F).
Wear eye protection when checking the battery during
charging.
(Continued)
(Continued)
Disconnect the battery charg-er in the following order.
1. Turn off the battery charger main switch.
2. Unhook the negative clamp from the negative battery ter-
minal.
3. Unhook the positive clamp from the positive battery ter-
minal.
Page 331 of 350
Maintenance44
7
1
2
3
4
5
6
7
8
9
Tire terminology and defini-
tionsAir Pressure: The amount of air
inside the tire pressing outward on
the tire. Air pressure is expressed in
kilopascal (kPa) or pounds per
square inch (psi).
Accessory Weight: This means the
combined weight of optional acces-
sories. Some examples of optional
accessories are, automatic transmis-
sion, power seats, and air condition-
ing.
Aspect Ratio: The relationship of a
tire's height to its width.
Belt: A rubber coated layer of cords
that is located between the plies and
the tread. Cords may be made from
steel or other reinforcing materials.
Bead: The tire bead contains steel
wires wrapped by steel cords that
hold the tire onto the rim. Bias Ply Tire: A pneumatic tire in
which the plies are laid at alternate
angles less than 90 degrees to the
centerline of the tread.
Cold Tire Pressure: The amount of
air pressure in a tire, measured in
kilopascals (kPa) or pounds per
square inch (psi) before a tire has
built up heat from driving.
Curb Weight: This means the weight
of a motor vehicle with standard and
optional equipment including the
maximum capacity of fuel, oil and
coolant, but without passengers and
cargo.
DOT Markings: The DOT code
includes the Tire Identification
Number (TIN), an alphanumeric des-
ignator which can also identify the
tire manufacturer, production plant,
brand and date of production.
GVWR: Gross Vehicle Weight Rating
GAWR FRT: Gross Axle Weight
Rating for the front Axle.
GAWR RR: Gross Axle Weight
Rating for the rear axle.
Page 335 of 350
Maintenance48
7
1
2
3
4
5
6
7
8
9
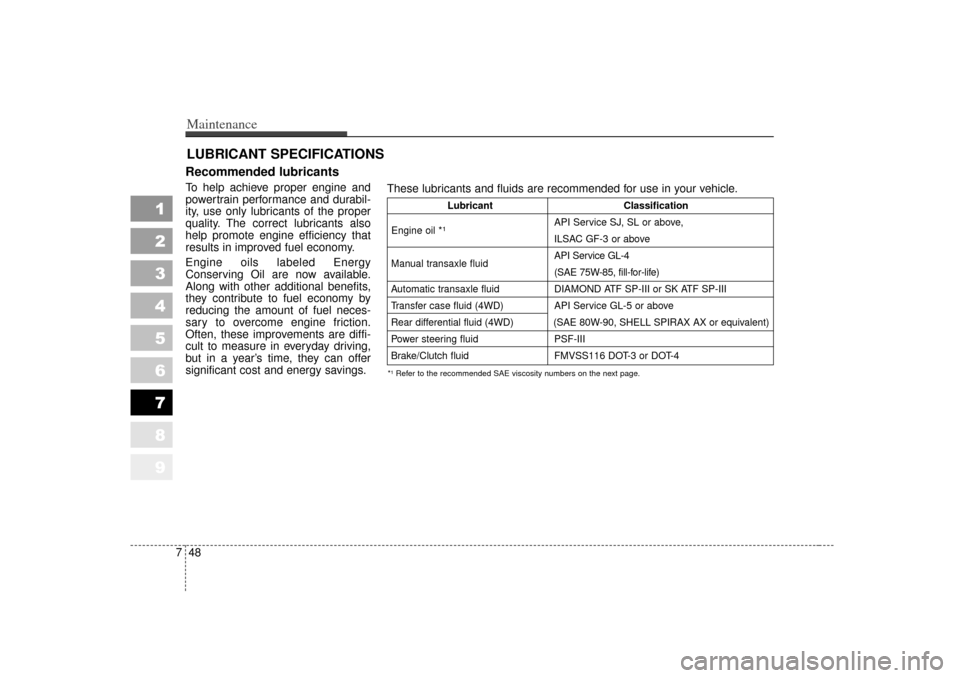
LUBRICANT SPECIFICATIONSRecommended lubricants To help achieve proper engine and
powertrain performance and durabil-
ity, use only lubricants of the proper
quality. The correct lubricants also
help promote engine efficiency that
results in improved fuel economy.
Engine oils labeled Energy
Conserving Oil are now available.
Along with other additional benefits,
they contribute to fuel economy by
reducing the amount of fuel neces-
sary to overcome engine friction.
Often, these improvements are diffi-
cult to measure in everyday driving,
but in a year’s time, they can offer
significant cost and energy savings.
*¹ Refer to the recommended SAE viscosity numbers on the next page.These lubricants and fluids are recommended for use in your vehicle.
Lubricant Classification
API Service SJ, SL or above,
ILSAC GF-3 or above
Manual transaxle fluid API Service GL-4
(SAE 75W-85, fill-for-life)
Automatic transaxle fluid DIAMOND ATF SP-III or SK ATF SP-III
Transfer case fluid (4WD) API Service GL-5 or above
Rear differential fluid (4WD) (SAE 80W-90, SHELL SPIRAX AX or equivalent)
Power steering fluid PSF-III
Brake/Clutch fluid FMVSS116 DOT-3 or DOT-4
Engine oil
*¹
Page 336 of 350
749
Maintenance
1
2
3
4
5
6
7
8
9
Recommended SAE viscosity
number ✽ ✽NOTICEAlways be sure to clean the area
around any filler plug, drain plug,
or dipstick before checking or drain-
ing any lubricant. This is especially
important in dusty or sandy areas
and when the vehicle is used on
unpaved roads. Cleaning the plug
and dipstick areas will prevent dirt
and grit from entering the engine
and other mechanisms that could be
damaged.
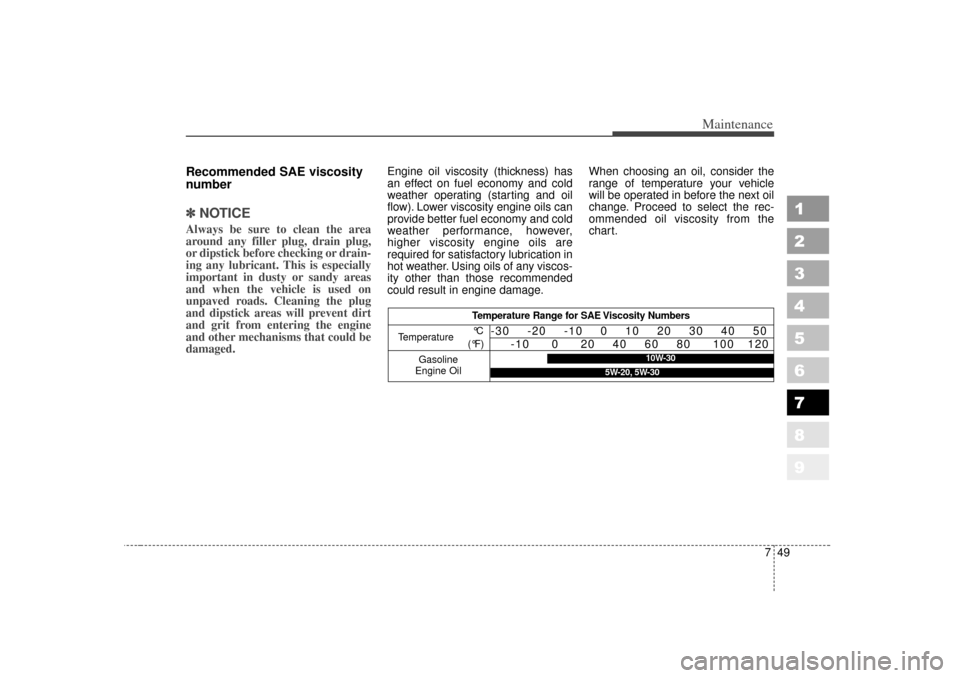
Engine oil viscosity (thickness) has
an effect on fuel economy and cold
weather operating (starting and oil
flow). Lower viscosity engine oils can
provide better fuel economy and cold
weather performance, however,
higher viscosity engine oils are
required for satisfactory lubrication in
hot weather. Using oils of any viscos-
ity other than those recommended
could result in engine damage. When choosing an oil, consider the
range of temperature your vehicle
will be operated in before the next oil
change. Proceed to select the rec-
ommended oil viscosity from the
chart.
Temperature Range for SAE Viscosity Numbers
Temperature
Gasoline
Engine Oil °C
(°F)
-30 -20 -10 0 10 20 30 40 50 -10 0 20 40 60 80 100 120
10W-30
5W-20, 5W-30
Page 338 of 350
751
Maintenance
1
2
3
4
5
6
7
8
9
WaxingWax the vehicle when water will no
longer bead on the paint.
Always wash and dry the vehicle
before waxing. Use a good quality
liquid or paste wax, and follow the
manufacturer’s instructions. Wax all
metal trim to protect it and to main-
tain its luster.
Removing oil, tar, and similar materi-
als with a spot remover will usually
strip the wax from the finish. Be sure
to re-wax these areas even if the rest
of the vehicle does not yet need wax-
ing.✽ ✽NOTICE• Wiping dust or dirt off the body
with a dry cloth will scratch the
finish.
• Do not use steel wool, abrasive cleaners, or strong detergents con-
taining highly alkaline or caustic
agents on chrome-plated or
anodized aluminum parts. This
may result in damage to the pro-
tective coating and cause discol-
oration or paint deterioration.
Finish damage repair Deep scratches or stone chips in the
painted surface must be repaired
promptly. Exposed metal will quickly
rust and may develop into a major
repair expense.✽ ✽ NOTICEIf your vehicle is damaged and
requires any metal repair or
replacement, be sure the body shop
applies anti-corrosion materials to
the parts repaired or replaced.
Bright-metal maintenance To remove road tar and insects,
use a tar remover, not a scraper or
other sharp object.
To protect the surfaces of bright- metal parts from corrosion, apply a
coating of wax or chrome preserv-
ative and rub to a high luster.
During winter weather or in coastal areas, cover the bright metal parts
with a heavier coating of wax or
preservative. If necessary, coat the
parts with non-corrosive petroleum
jelly or other protective compound.
Page 340 of 350
753
Maintenance
1
2
3
4
5
6
7
8
9
INTERIOR CARE Interior general precautions Prevent caustic solutions such as
perfume and cosmetic oil from con-
tacting the dashboard because they
may cause damage or discoloration.
If they do contact the dashboard,
wipe them off immediately. See the
instructions that follow for the proper
way to clean vinyl.✽ ✽NOTICENever allow water or other liquids to
come in contact with electrical/elec-
tronic components inside the vehicle
as this may damage them.
Cleaning the upholstery and
interior trim Vinyl Remove dust and loose dirt from
vinyl with a whisk broom or vacuum
cleaner. Clean vinyl surfaces with a
vinyl cleaner.Fabric Remove dust and loose dirt from fab-
ric with a whisk broom or vacuum
cleaner. Clean with a mild soap solu-
tion recommended for upholstery or
carpets. Remove fresh spots imme-
diately with a fabric spot cleaner. If
fresh spots do not receive immediate
attention, the fabric can be stained
and its color can be affected. Also, its
fire-resistant properties can be
reduced if the material is not proper-
ly maintained.✽ ✽NOTICEUsing anything but recommended
cleaners and procedures may affect
the fabric’s appearance and fire-
resistant properties.
Cleaning the lap/shoulder belt
webbing Clean the belt webbing with any mild
soap solution recommended for
cleaning upholstery or carpet. Follow
the instructions provided with the
soap. Do not bleach or re-dye the
webbing because this may weaken
it.Cleaning the interior window
glass If the interior glass surfaces of the
vehicle become fogged (that is, cov-
ered with an oily, greasy or waxy
film), they should be cleaned with
glass cleaner. Follow the directions
on the glass cleaner container.✽ ✽NOTICEDo not scrape or scratch the inside
of the rear window. This may result
in damage to the rear window
defroster grid.