automatic KIA Sportage 2007 JE_ / 2.G Workshop Manual
[x] Cancel search | Manufacturer: KIA, Model Year: 2007, Model line: Sportage, Model: KIA Sportage 2007 JE_ / 2.GPages: 350, PDF Size: 3.58 MB
Page 221 of 350
511
Driving tips
1
2
3
4
5
6
7
8
9
Use antifreeze-formulated wind-shield washer fluid. (Do not use
engine coolant antifreeze.)
Do not use the parking brake if it might freeze. When parking, shift
to 1 (First) or R (Reverse) with a
manual transaxle or P (Park) with
an automatic transaxle and block
the rear wheels.
Snow tires If you mount snow tires on your Kia,
make sure they are radial tires of the
same size and load range as the
original tires. Mount snow tires on all
four wheels to balance your vehicle’s
handling in all weather conditions.
Keep in mind that the traction provid-
ed by snow tires on dry roads may
not be as high as your vehicle's orig-
inal equipment tires. You should drive
cautiously even when the roads are
clear. Check with the tire dealer for
maximum speed recommendations.
Do not install studded tires withoutfirst checking local, state and munic-ipal regulations for possible restric-tions against their use.
WARNING
- Snow tire
size
Snow tires should be equivalent
in size and type to the vehicle's
standard tires. Otherwise, the
safety and handling of your
vehicle may be adversely affect-
ed.
Page 233 of 350
523
Driving tips
1
2
3
4
5
6
7
8
9
Stalling while driving uphillWhat should I do if my vehicle stalls,or is about to stall, and I can’t makeit up the hill?If your vehicle stalls, or is about to
stall while driving uphill, there are
some things you should do, and
there are some things you must not
do. First, here’s what you should do:
Push the brake pedal to stop the vehicle and keep it from rolling
backwards. Also, apply the parking
brake.
If your engine is still running, shift the transaxle into reverse, release
the parking brake, and slowly back
down the hill in reverse. If your engine has stopped run-
ning, you’ll need to restart it. With
the brake pedal depressed and the
parking brake still applied, shift a
manual transaxle to N (Neutral), or
an automatic transaxle to P (Park)
and restart the engine. Then, shift
to reverse, release the parking
brake, and slowly back down the
hill in reverse.
As you are backing down the hill, put your left hand on the steering
wheel at the 12 o’clock position.
This way, you’ll be able to tell if
your wheels are straight or turned
to the left or right as you back
down. Here are some things you must not
do if you stall, or are about to stall,
when going up a hill.
Never attempt to prevent a stall by
depressing the clutch or shifting to
N (Neutral) to “rev-up” the engine
and regain forward momentum.
This won’t work. Your vehicle will
roll backwards very quickly and
you could go out of control or roll
over.
Instead, apply the brake to stop the
vehicle. Then apply the parking
brake. Shift into reverse, release the
parking brake, and slowly back
down.
Page 234 of 350
Driving tips24
5
1
2
3
4
5
6
7
8
9
Stalled on a steep uphillIf your vehicle stalls and you can’t
back down the hill, try this: Set the
parking brake, put your transaxle in 1
(First) gear or P (Park), and turn the
engine off. Leave the vehicle and get
some help. If your vehicle is at an
angle to the slope of the hill, exit the
vehicle on the uphill side and stay
clear of the path the vehicle would
take if it rolled downhill. Leave it in 1
(First) gear for manual transaxle or P
(Park) for automatic transaxle.
CAUTION -
Stalling
Never attempt to turn around if
you are about to stall whengoing up a hill. If the hill is steepenough to stall your vehicle, it’ssteep enough to cause you toroll over if you turn around. Ifyou can’t make it up, you mustback down the hill.
WARNING
- Exiting vehicle
Getting out on the downhill
(low) side of a vehicle stopped
across an incline is dangerous.
If the vehicle rolls over, you
could be crushed or fatally
injured. Always get out on the
uphill (high) side of the vehicle
and stay well clear of the
rollover path.
Page 235 of 350
525
Driving tips
1
2
3
4
5
6
7
8
9
Driving downhillGoing downhill can be considerably
more dangerous than driving uphill.
When off-roading takes you downhill,
you’ll want to consider many of the
same things you thought about
before you went uphill. As a brief
reminder, those include:
How steep is the downhill? Will I beable to maintain vehicle control?
What’s the surface like? Smooth? Rough? Slippery? Hard-packed
dirt? Gravel?
Are there hidden surface obsta- cles? Ruts? Logs? Boulders?
What’s at the bottom of the hill? Is there a hidden creek bank or even
a river bottom with large rocks?
Have changes in the weather con- ditions and their effect on the ter-
rain since you went uphill made
your task more difficult? Once you have decided that you can
go down a hill safely, try to keep your
vehicle headed straight down, and
use a low gear. This way, engine
braking can help your brakes so they
won’t have to do all the work.
Descend slowly, keeping your vehi-
cle under control at all times.
WARNING
- Leaving vehi-
cle
If you are going to leave your
vehicle, set the parking brake
and shift a manual transaxle to
1(First), or an automatic
transaxle to P (Park).
Page 237 of 350
527
Driving tips
1
2
3
4
5
6
7
8
9
Stalling downhillStalling is much more likely to hap-
pen going uphill. But if it happens
going downhill, here’s what to do.
Stop your vehicle by applying thebrakes. Then apply the parking
brake.
Move the shift lever to P (Park) in automatic transaxle or shift to N
(Neutral) in manual transaxle and,
while still braking, restart the
engine.
Shift back to a low gear, release the parking brake, and drive
straight down.
If the engine won’t start, get out and seek help. Exit on the uphill
side of the vehicle and stay clear of
the path the vehicle would take if it
rolled downhill.
Driving across an inclineSooner or later, an off-road trail will
probably go across the incline of a
hill. If this happens, you have to
decide whether or not to try to drive
across the incline. Here are some
things to consider:
A hill that can be driven straight upor down may be too steep to drive
across. When you go straight up or
down a hill, the length of the wheel
base (the distance from the front
wheels to the rear wheels) reduces
the likelihood the vehicle will tum-
ble end over end. But when you
drive across an incline, the much
narrower track width (the distance
between the left and right wheels)
may not prevent the vehicle from
tilting and rolling over. Also, driving
across an incline puts more weight
on the downhill wheels. This could
cause a downhill slide or a rollover. Surface conditions can be a prob-
lem when you drive across a hill.
Loose gravel, muddy spots, or
even wet grass can cause your
tires to slip sideways. If the vehicle
slips sideways, it can hit something
that will tip it (a rock, a rut, etc.) and
cause it to roll over.
Hidden obstacles can make the steepness of the incline even
worse. If you drive across a rock
with the uphill wheels, or if the
downhill wheels drop into a rut or
depression, your vehicle can tilt
even more.
For reasons like these, you need to
decide carefully whether or not to try
to drive across an incline. Just
because the trail goes across the
incline doesn’t mean you have to
drive it.
Page 249 of 350
539
Driving tips
1
2
3
4
5
6
7
8
9
Parking on hills Generally, you should not park your
vehicle, with a trailer attached, on a
hill. People can be seriously or fatal-
ly injured, and both your vehicle and
the trailer can be damaged if they
begin a downhill trajectory.However, if you ever have to park
your trailer on a hill, here’s how to do
it:
1. Apply your brakes, but don’t shift
into gear.
2. Have someone place chocks under the trailer wheels.
3. When the wheel chocks are in place, release the brakes until the
chocks absorb the load.
4. Reapply the brakes. Apply your parking brake, and then shift to R
(Reverse) for a manual transaxle
or P (Park) for an automatic
transaxle.
5. Release the brakes.
When you are ready to leave after parking on a hill 1. With the manual transaxle in Neutral or automatic transaxle in P
(Park), apply your brakes and hold
the brake pedal down while you:
Start your engine;
Shift into gear; and
Release the parking brake.
2. Slowly remove your foot from the brake pedal.
3. Drive slowly until the trailer is clear of the chocks.
4. Stop and have someone pick up and store the chocks.
WARNING
- Parking brake
It can be dangerous to get out of
your vehicle if the parking brake
is not firmly set.
If you have left the engine run-
ning, the vehicle can move sud-
denly. You or others could be
seriously or fatally injured.
WARNING
- Parking on a hill
Parking your vehicle on a hill
with a trailer attached could
cause serious injury or death,
should the trailer break lose.
Page 259 of 350
549
Driving tips
1
2
3
4
5
6
7
8
9
Reprogramming a single
HomeLink buttonTo program a device to HomeLink
using a HomeLink button previously
trained, follow these steps:
1. Press and hold the desiredHomeLink button. Do NOT release
until step 4 has been completed.
2. When the indicator light begins to flash slowly (after 20 seconds),
position the hand-held transmitter
1 to 3 inches away from the
HomeLink surface.
3. Press and hold the hand-held transmitter button (or press and
“cycle” - as described in
“Canadian Programming ”above).
4. The HomeLink indicator light will flash, first slowly and then rapidly.
When the indicator light begins to
flash rapidly, release both buttons.
The previous device has now been
erased and the new device can be
activated by pushing the HomeLink
button that has just been pro-
grammed. This procedure will not
affect any other programmed
HomeLink buttons.
Gate operator programming &
canadian programmingDuring programming, your hand-held
transmitter may automatically stop
transmitting. Continue to press and
hold the HomeLink button (note
steps 2 through 4 in the
“Programming” portion of this text)
while you press and re-press
(“cycle”) your handheld transmitter
every two seconds until the frequen-
cy signal has been learned. The indi-
cator light will flash slowly and then
rapidly after several seconds upon
successful training.✽ ✽ NOTICEIf programming a garage door open-
er or gate, it is advised to unplug the
device during the “cycling” process
to prevent possible motor burn-up.
AccessoriesIf you would like additional informa-
tion on the HomeLink Wireless
Control System, HomeLink compati-
ble products, or to purchase other
accessories such as the HomeLink®
Lighting Package, please contact
HomeLink at 1-800-355-3515 or on
the internet at www.homelink.com.
Page 265 of 350
63
In case of an emergency
OVERHEATING If your temperature gauge indicates
overheating, if you experience a loss
of power, or if you hear a loud knock-
ing or pinging noise, the engine has
probably overheated. Should any of
these symptoms occur, use the fol-
lowing procedure:
1. Turn on the hazard warning flash-er, then drive to the nearest safe
location and stop your vehicle; set
the automatic transaxle in P
(Park), or shift the manual
transaxle to N (Neutral) and apply
the parking brake.
2. Make sure the air conditioner is off.
3. If coolant or steam is boiling out of the radiator, stop the engine and
call an Authorized Kia Dealer for
assistance. If coolant is not boiling out, allow
the engine to idle and open the
hood to permit the engine to cool
gradually.
If the temperature does not go
down with the engine idling, stop
the engine and allow sufficient
time for it to cool.
4. The coolant level should then be checked. If the level in the reser-
voir is low, look for leaks at the
radiator hoses and connections,
heater hoses and connections,
radiator, and water pump. If you
find a major leak or another prob-
lem that may have caused the
engine to overheat, do not operate
the engine until it has been cor-
rected. Call an Authorized Kia
Dealer for assistance. If you do not
find a leak or other problem, care-
fully add coolant to the reservoir.
If the engine frequently overheats,have the cooling system checkedand repaired by an Authorized KiaDealer.
1
2
3
4
5
6
7
8
9
WARNING
- Removing
radiator cap
Do not remove the radiator cap
when the engine and radiator
are hot. Scalding hot coolant
and steam may blow out under
pressure. This could cause seri-
ous injury.
Page 268 of 350
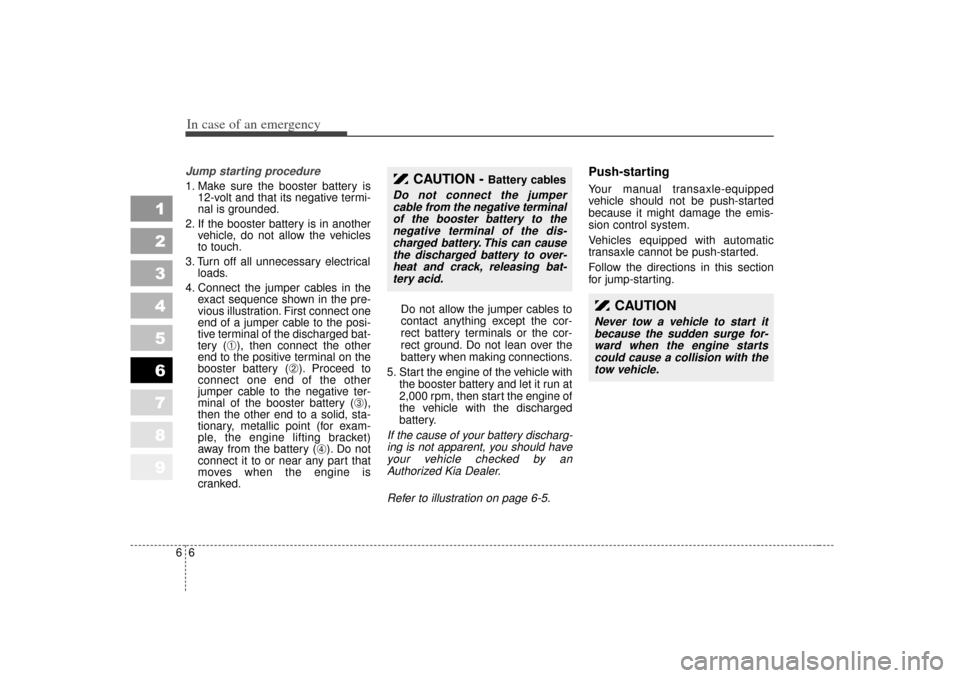
In case of an emergency66Jump starting procedure 1. Make sure the booster battery is12-volt and that its negative termi-
nal is grounded.
2. If the booster battery is in another vehicle, do not allow the vehicles
to touch.
3. Turn off all unnecessary electrical loads.
4. Connect the jumper cables in the exact sequence shown in the pre-
vious illustration. First connect one
end of a jumper cable to the posi-
tive terminal of the discharged bat-
tery (
➀), then connect the other
end to the positive terminal on the
booster battery (
➁). Proceed to
connect one end of the other
jumper cable to the negative ter-
minal of the booster battery (
➂),
then the other end to a solid, sta-
tionary, metallic point (for exam-
ple, the engine lifting bracket)
away from the battery (
➃). Do not
connect it to or near any part that
moves when the engine is
cranked. Do not allow the jumper cables to
contact anything except the cor-
rect battery terminals or the cor-
rect ground. Do not lean over the
battery when making connections.
5. Start the engine of the vehicle with the booster battery and let it run at
2,000 rpm, then start the engine of
the vehicle with the discharged
battery.
If the cause of your battery discharg-ing is not apparent, you should haveyour vehicle checked by anAuthorized Kia Dealer.
Refer to illustration on page 6-5.
Push-starting Your manual transaxle-equipped
vehicle should not be push-started
because it might damage the emis-
sion control system.
Vehicles equipped with automatic
transaxle cannot be push-started.
Follow the directions in this section
for jump-starting.
1
2
3
4
5
6
7
8
9
CAUTION
Never tow a vehicle to start itbecause the sudden surge for-ward when the engine startscould cause a collision with thetow vehicle.
CAUTION -
Battery cables
Do not connect the jumpercable from the negative terminalof the booster battery to thenegative terminal of the dis-charged battery. This can causethe discharged battery to over-heat and crack, releasing bat-tery acid.
Page 274 of 350
In case of an emergency12
6
1
2
3
4
5
6
7
8
9
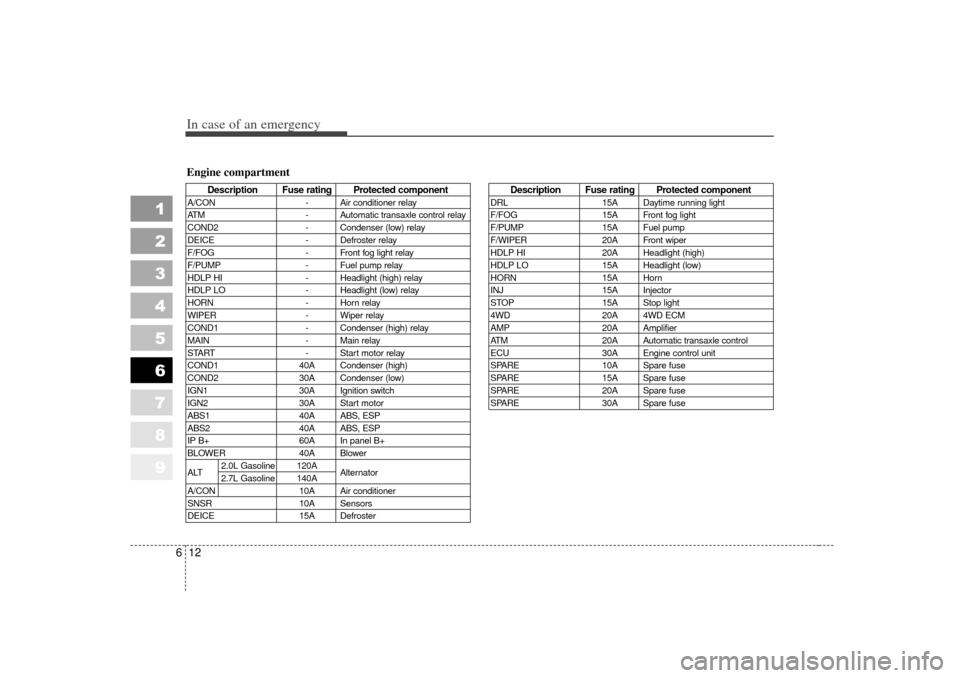
Engine compartment
Description Fuse rating Protected component
A/CON - Air conditioner relay
ATM - Automatic transaxle control relay
COND2 - Condenser (low) relay
DEICE - Defroster relay
F/FOG - Front fog light relay
F/PUMP - Fuel pump relay
HDLP HI - Headlight (high) relay
HDLP LO - Headlight (low) relay
HORN - Horn relay
WIPER - Wiper relay
COND1 - Condenser (high) relay
MAIN - Main relay
START - Start motor relay
COND1 40A Condenser (high)
COND2 30A Condenser (low)
IGN1 30A Ignition switch
IGN2 30A Start motor
ABS1 40A ABS, ESP
ABS2 40A ABS, ESP
IP B+ 60A In panel B+
BLOWER 40A Blower
ALT 2.0L Gasoline 120A
Alternator
2.7L Gasoline 140A
A/CON 10A Air conditioner
SNSR 10A Sensors
DEICE 15A Defroster
Description Fuse rating Protected component
DRL15A Daytime running light
F/FOG 15A Front fog light
F/PUMP 15A Fuel pump
F/WIPER 20A Front wiper
HDLP HI 20A Headlight (high)
HDLP LO 15A Headlight (low)
HORN 15A Horn
INJ 15A Injector
STOP 15A Stop light
4WD 20A 4WD ECM
AMP 20A Amplifier
ATM 20A Automatic transaxle control
ECU 30A Engine control unit
SPARE 10A Spare fuse
SPARE 15A Spare fuse
SPARE 20A Spare fuse
SPARE 30A Spare fuse