automatic KIA Sportage 2007 JE_ / 2.G Owner's Manual
[x] Cancel search | Manufacturer: KIA, Model Year: 2007, Model line: Sportage, Model: KIA Sportage 2007 JE_ / 2.GPages: 350, PDF Size: 3.58 MB
Page 16 of 350
37
Knowing your vehicle
1
2
3
4
5
6
7
8
9
Your vehicle is equipped with an
electronic engine immobilizer system
to reduce the risk of unauthorized
vehicle use.
Your immobilizer system is com-
prised of a small transponder in the
ignition key, and antenna coil in the
key cylinder and Immobilizer Control
Unit (or Smartra Unit).
With this system, whenever you
insert your ignition key into the igni-
tion switch and turn it to ON, the
antenna coil in the ignition switch
receives a signal from the transpon-
der in the ignition key and then sends
the signal to the ECU (Engine
Control Unit).
The ECU checks the signal whether
the ignition key is valid.
If the key is determined to be valid,
the engine will start.
If the key is determined to be invalid,
the engine will not start.To deactivate the immobilizer sys-
tem:
Insert the ignition key into the key
cylinder and turn it to the ON posi-
tion.
To activate the immobilizer sys-
tem:
Turn the ignition key to the OFF posi-
tion. The immobilizer system acti-
vates automatically. Without a valid
ignition key for your vehicle, the
engine will not start.
✽ ✽
NOTICEWhen starting the engine, do not use
the key with other immobilizer keys
around. Otherwise the engine may
not start or may stop soon after it
starts. Keep each key separately not
to have any malfunction after you
receive your new vehicle.
Limp home (override) proce-
dureWhen you turn the ignition key to the
ON position, if the IMMO indicator
goes off after blinking 5 times, your
transponder equipped in the ignition
key is out of order. You cannot start
the engine without the lime home pro-
cedure. To start the engine, you have
to input your password by using the
ignition switch.
The following procedure is how to
input your password of “2345” as an
example.
1. Turn the ignition key to the ON posi-
tion. The IMMO indicator ( ) will
blink 5 times and go off indicating
the beginning of the limp home pro-
cedure.
2. Turn the ignition key to the ACC position.
3. To enter the first digit (in this example “2”), turn the ignition key
to the ON and ACC position twice.
Perform the same procedure for
the next digits between 3 seconds
and 10 seconds (for example, for
“3”, turn the ignition ON and ACC
3 times).
IMMOBILIZER SYSTEM (IF EQUIPPED)
Page 19 of 350
Knowing your vehicle10
3
1
2
3
4
5
6
7
8
9
✽ ✽
NOTICEIf the door is locked/unlocked multi-
ple times in rapid succession with
either the vehicle key or door lock
switch, the system may stop operat-
ing temporarily in order to protect
the circuit and prevent damage to
system components.
Operating door locks from
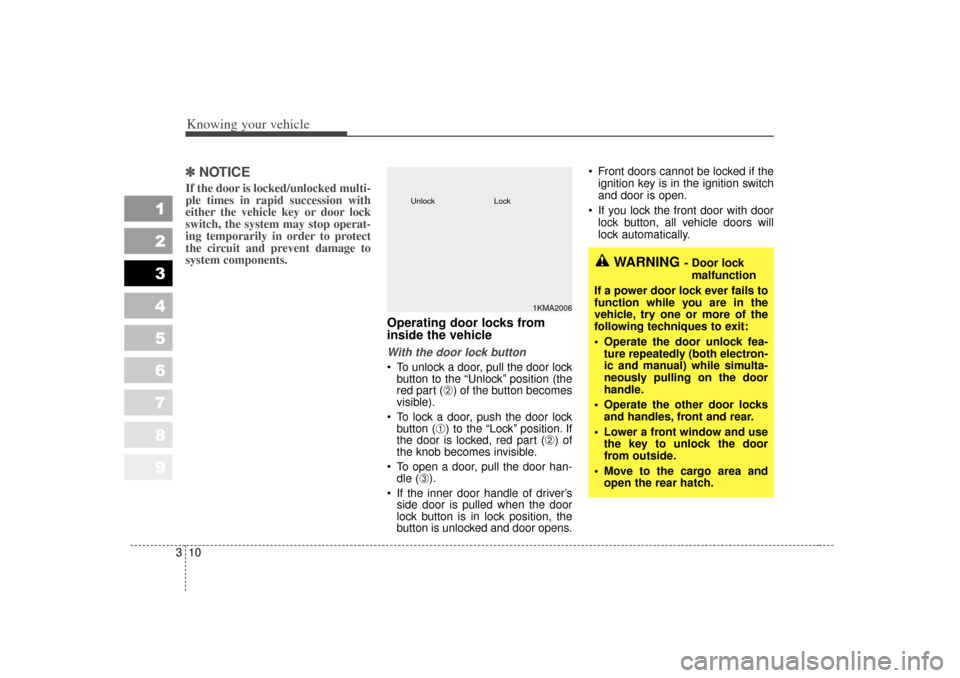
inside the vehicleWith the door lock button To unlock a door, pull the door lock
button to the “Unlock” position (the
red part (
➁) of the button becomes
visible).
To lock a door, push the door lock button (
➀) to the “Lock” position. If
the door is locked, red part (
➁) of
the knob becomes invisible.
To open a door, pull the door han- dle (
➂).
If the inner door handle of driver’s side door is pulled when the door
lock button is in lock position, the
button is unlocked and door opens. Front doors cannot be locked if the
ignition key is in the ignition switch
and door is open.
If you lock the front door with door lock button, all vehicle doors will
lock automatically.
1KMA2006
Lock
Unlock
WARNING
- Door lock
malfunction
If a power door lock ever fails to
function while you are in the
vehicle, try one or more of the
following techniques to exit:
Operate the door unlock fea- ture repeatedly (both electron-
ic and manual) while simulta-
neously pulling on the door
handle.
Operate the other door locks and handles, front and rear.
Lower a front window and use the key to unlock the door
from outside.
Move to the cargo area and open the rear hatch.
Page 21 of 350
Knowing your vehicle12
3
1
2
3
4
5
6
7
8
9
Impact sensing door unlock
system (if equipped)All doors will be automatically
unlocked when the Supplemental
Restraint System (SRS) detects a
collision while the ignition switch is
ON.
However, the doors may not be
unlocked, if electrical power in the
vehicle should fail.
WARNING
- Unlocked
vehicles
Leaving your vehicle unlocked
can invite theft or possible harm
to you or others from someone
hiding in your vehicle while you
are gone. Always remove the
ignition key, engage the parking
brake, close all windows and
lock all doors when leaving your
vehicle unattended.
WARNING
- Unattended children
An enclosed vehicle can
become extremely hot, causing
death or severe injury to unat-
tended children or animals who
cannot escape the vehicle.
Furthermore, children might
operate features of the vehicle
that could injure them, or they
could encounter other harm,
possibly from someone gaining
entry to the vehicle. Never leave
children or animals unattended
in your vehicle.
Page 25 of 350
Knowing your vehicle16
3
1
2
3
4
5
6
7
8
9
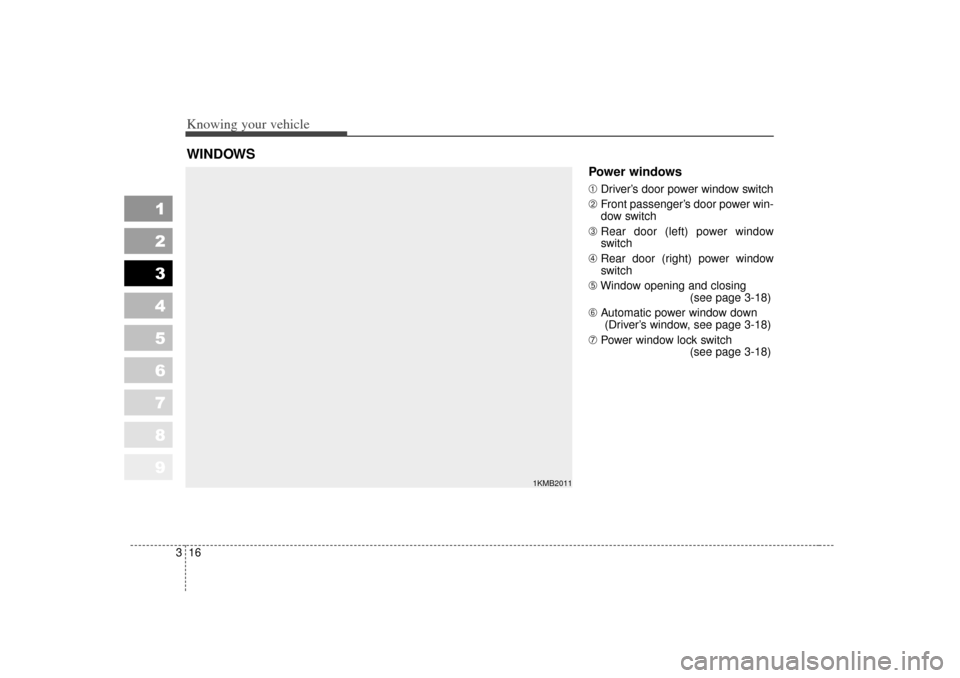
Power windows ➀ Driver’s door power window switch
➁ Front passenger’s door power win-
dow switch
➂ Rear door (left) power window
switch
➃ Rear door (right) power window
switch
➄ Window opening and closing
(see page 3-18)
\b Automatic power window down
(Driver’s window, see page 3-18)
➆ Power window lock switch
(see page 3-18)
WINDOWS
1KMB2011
Page 27 of 350
Knowing your vehicle18
3
1
2
3
4
5
6
7
8
9
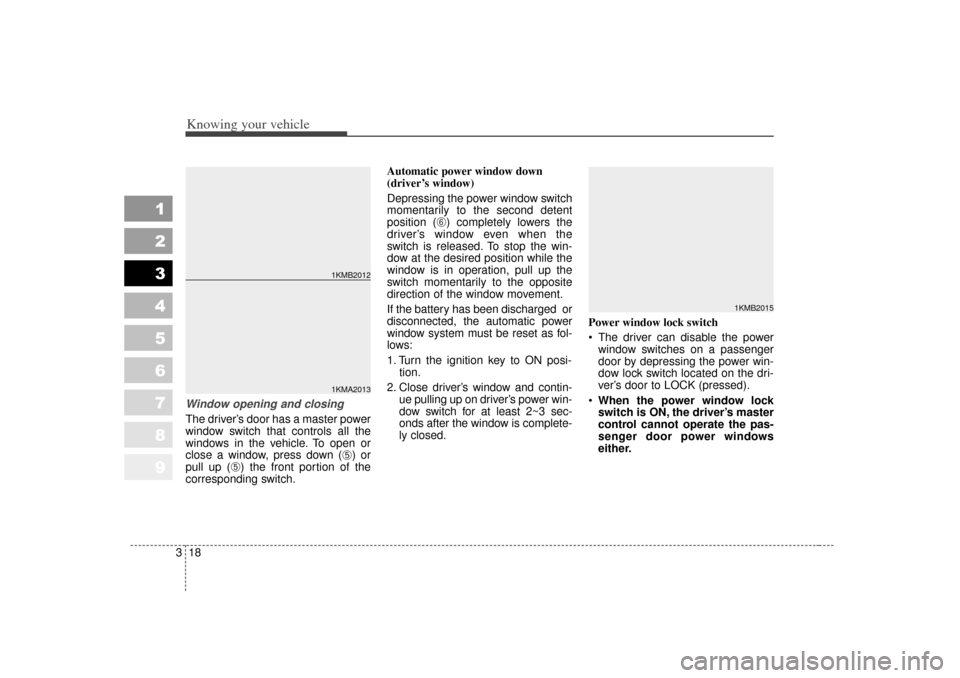
Window opening and closingThe driver’s door has a master power
window switch that controls all the
windows in the vehicle. To open or
close a window, press down (
➄) or
pull up (
➄) the front portion of the
corresponding switch. Automatic power window down
(driver’s window)
Depressing the power window switch
momentarily to the second detent
position (
\b) completely lowers the
driver’s window even when the
switch is released. To stop the win-
dow at the desired position while the
window is in operation, pull up the
switch momentarily to the opposite
direction of the window movement.
If the battery has been discharged or
disconnected, the automatic power
window system must be reset as fol-
lows:
1. Turn the ignition key to ON posi- tion.
2. Close driver’s window and contin- ue pulling up on driver’s power win-
dow switch for at least 2~3 sec-
onds after the window is complete-
ly closed. Power window lock switch
The driver can disable the power
window switches on a passenger
door by depressing the power win-
dow lock switch located on the dri-
ver’s door to LOCK (pressed).
When the power window lock
switch is ON, the driver’s master
control cannot operate the pas-
senger door power windows
either.
1KMA20131KMB2012
1KMB2015
Page 42 of 350
333
Knowing your vehicle
1
2
3
4
5
6
7
8
9
Safety belt restraint system
We strongly recommend that the dri-
ver and all passengers be properly
restrained at all times by using the
safety belts provided with the vehi-
cle. Proper use of the safety belts
decreases the risk of severe injury or
death in accidents or sudden stops.
In most states, and in Canada, the
law requires their use.
All seats have lap/shoulder belts.
Inertial locks in the safety belt retrac-
tors allow all of the lap/shoulder safe-
ty belts to remain unlocked during
normal vehicle operation. This allows
the occupants some freedom of
movement and increased comfort
while using the safety belts. If a force
is applied to the vehicle, such as a
strong stop, a sharp turn, or a colli-
sion, the safety belt retractors will
automatically lock the safety belts.Since the inertial locks do not require
a collision in order to lock up, you
may become aware of the safety
belts locking while braking or going
around sharp corners.
Always use the rear seat position(s)
to install your child restraint(s).
WARNING
- Safety belts
To minimize the risk of serious
or fatal injury in an accident, the
driver and all passengers
should use the appropriate
safety restraints for their age
and size. The presence of
airbags does not change the
need to be properly restrained
by a safety belt or size-appropri-
ate child restraint. In fact,
airbags are designed to work
the best when passengers are
correctly restrained in the vehi-
cle.
Be sure you are familiar with the information in this section,
including the information on
infant and child restraints.
Read the safety warnings on the sun visors of your vehicle
also.
WARNING
- Child
restraint in front seat
Never install a child restraint
system in the front passenger
position, as an inflating airbag
could cause serious or fatal
injury to a child in that position.
Page 49 of 350
Knowing your vehicle40
3
1
2
3
4
5
6
7
8
9
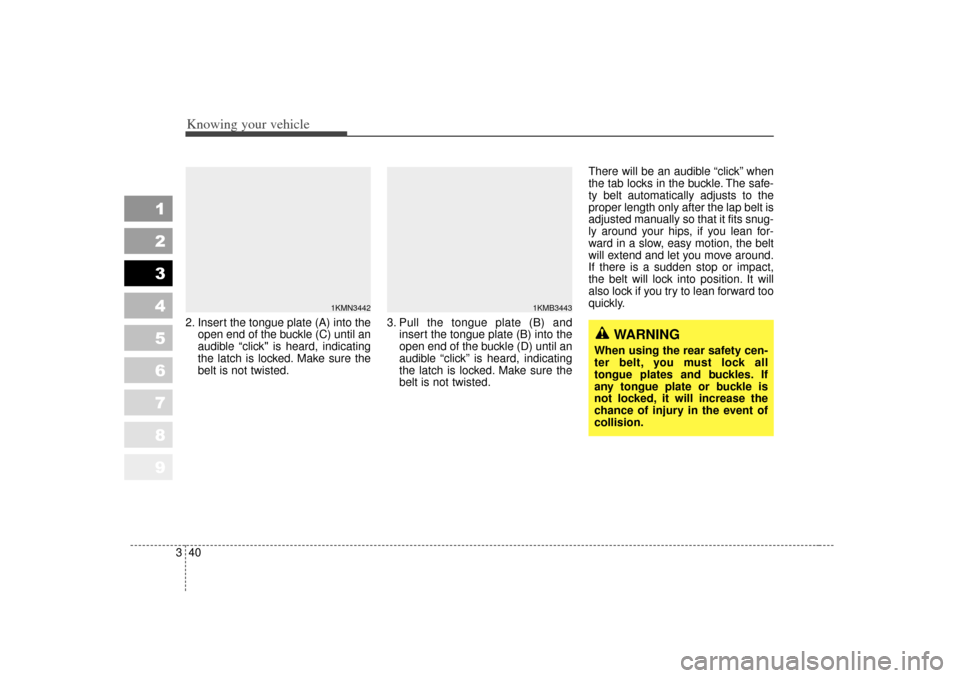
2. Insert the tongue plate (A) into the
open end of the buckle (C) until an
audible “click" is heard, indicating
the latch is locked. Make sure the
belt is not twisted. 3. Pull the tongue plate (B) and
insert the tongue plate (B) into the
open end of the buckle (D) until an
audible “click” is heard, indicating
the latch is locked. Make sure the
belt is not twisted. There will be an audible “click” when
the tab locks in the buckle. The safe-
ty belt automatically adjusts to the
proper length only after the lap belt is
adjusted manually so that it fits snug-
ly around your hips, if you lean for-
ward in a slow, easy motion, the belt
will extend and let you move around.
If there is a sudden stop or impact,
the belt will lock into position. It will
also lock if you try to lean forward too
quickly.
1KMN3442
1KMB3443
WARNING
When using the rear safety cen-
ter belt, you must lock all
tongue plates and buckles. If
any tongue plate or buckle is
not locked, it will increase the
chance of injury in the event of
collision.
Page 50 of 350
341
Knowing your vehicle
1
2
3
4
5
6
7
8
9
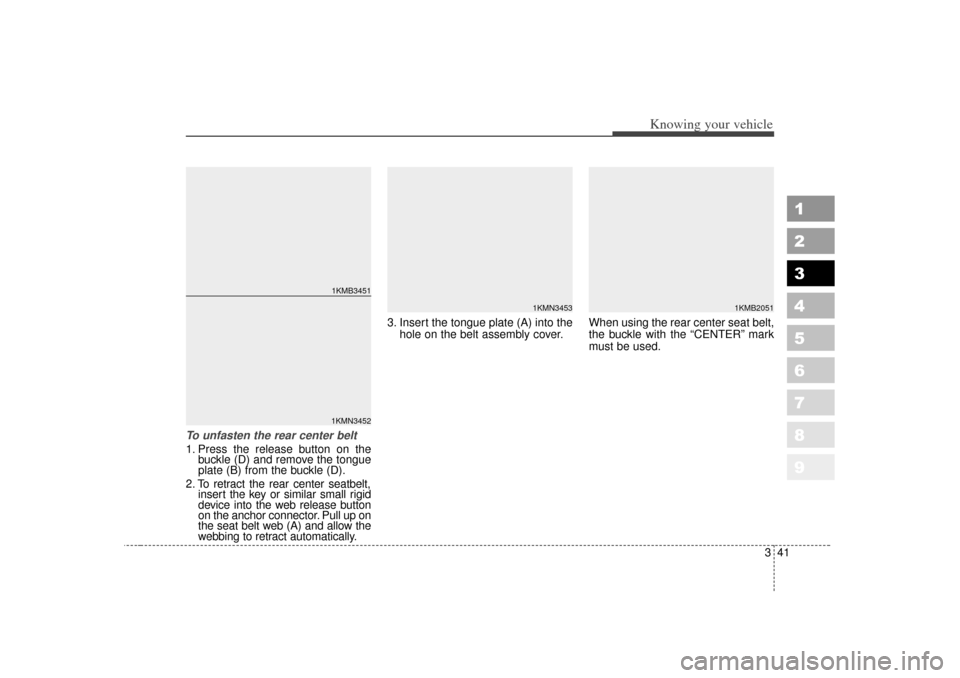
To unfasten the rear center belt 1. Press the release button on thebuckle (D) and remove the tongue
plate (B) from the buckle (D).
2. To retract the rear center seatbelt, insert the key or similar small rigid
device into the web release button
on the anchor connector. Pull up on
the seat belt web (A) and allow the
webbing to retract automatically. 3. Insert the tongue plate (A) into the
hole on the belt assembly cover. When using the rear center seat belt,
the buckle with the “CENTER” mark
must be used.
1KMB2051
1KMB34511KMN3452
1KMN3453
Page 59 of 350
Knowing your vehicle50
3
1
2
3
4
5
6
7
8
9
7. Double check that the retractor is
in the “Auto Lock” mode by
attempting to pull more of the safe-
ty belt out of the retractor. If you
cannot, the retractor is in the “Auto
Lock” mode.
To remove the child restraint, press
the release button on the buckle and
then pull the lap/shoulder belt out of
the restraint and allow the safety belt
to retract fully.
When the safety belt is allowed to
retract to its fully stowed position,
the retractor will automatically
switch from the “Auto Lock” mode
to the emergency lock mode for
normal adult usage.
Securing a child restraint seatwith “Tether Anchor” system Child restraint hook holders are
located on the floor behind the rear
seats.
1. Open the tether anchor cover on the floor behind the rear seats.
WARNING
- Auto lock
mode
The lap/shoulder belt automati-
cally returns to the “emergency
lock mode” whenever the belt is
allowed to retract fully.
Therefore, the preceding seven
steps must be followed each
time a child restraint is
installed.
If the safety belt is not placed in
the “Auto lock” mode, severe
injury or death could occur to
the child and/or other occupants
in the vehicle in a collision,
since the child restraint will not
be effectively held in place.
1KMB3533
Page 96 of 350
387
1
2
3
4
5
6
7
8
9
Knowing your vehicle
Outside rearview mirror heater (if equipped) The outside rearview mirror heater is
actuated in connection with the rear
window defroster. To heat the outside
rearview mirror glass, push the but-
ton for the rear window defroster.
The rearview mirror heater (and rear
window defroster) will not operate
unless the engine is running.
The outside rearview mirror glass will
be heated for defrosting or defogging
and will give you improved rear
vision in inclement weather condi-
tions. Push the button again to turn
the heater off. The outside rearview
mirror heater automatically turns off
after 20 minutes.
Day/night rearview mirror Adjust the rearview mirror to center
on the view through the rear window.
Make this adjustment before you
start driving.
Manual type Make this adjustment before you
start driving and while the day/night
lever is in the day position.
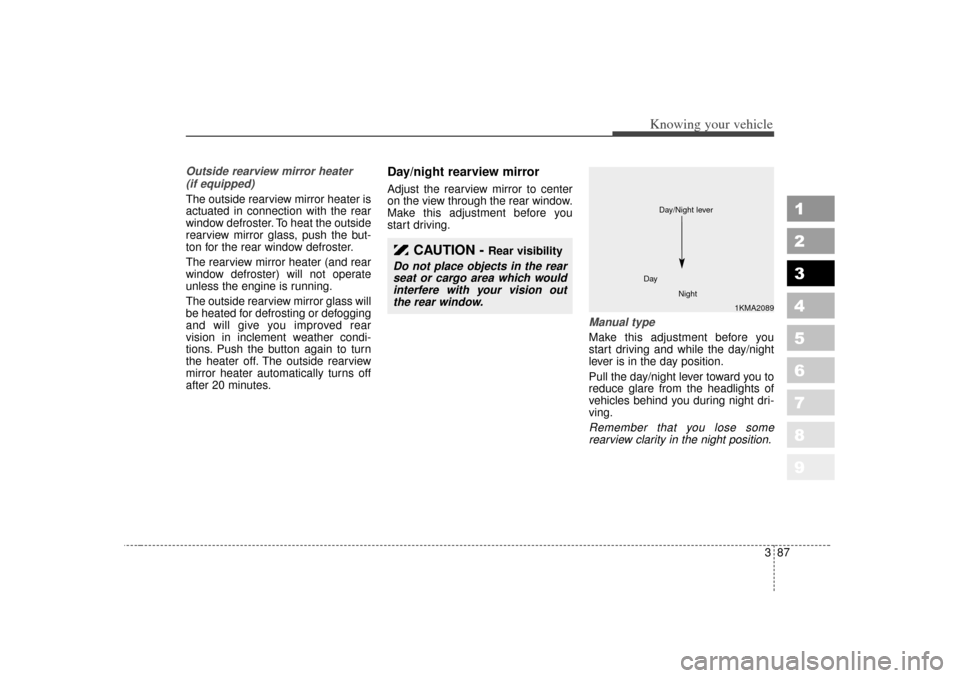
Pull the day/night lever toward you to
reduce glare from the headlights of
vehicles behind you during night dri-
ving.Remember that you lose somerearview clarity in the night position.
CAUTION -
Rear visibility
Do not place objects in the rearseat or cargo area which wouldinterfere with your vision outthe rear window.
1KMA2089
Day
Night
Day/Night lever