height KIA Sportage 2010 SL / 3.G Owner's Manual
[x] Cancel search | Manufacturer: KIA, Model Year: 2010, Model line: Sportage, Model: KIA Sportage 2010 SL / 3.GPages: 371, PDF Size: 5.23 MB
Page 28 of 371
319
Knowing your vehicle
1
2
3
4
5
6
7
8
9
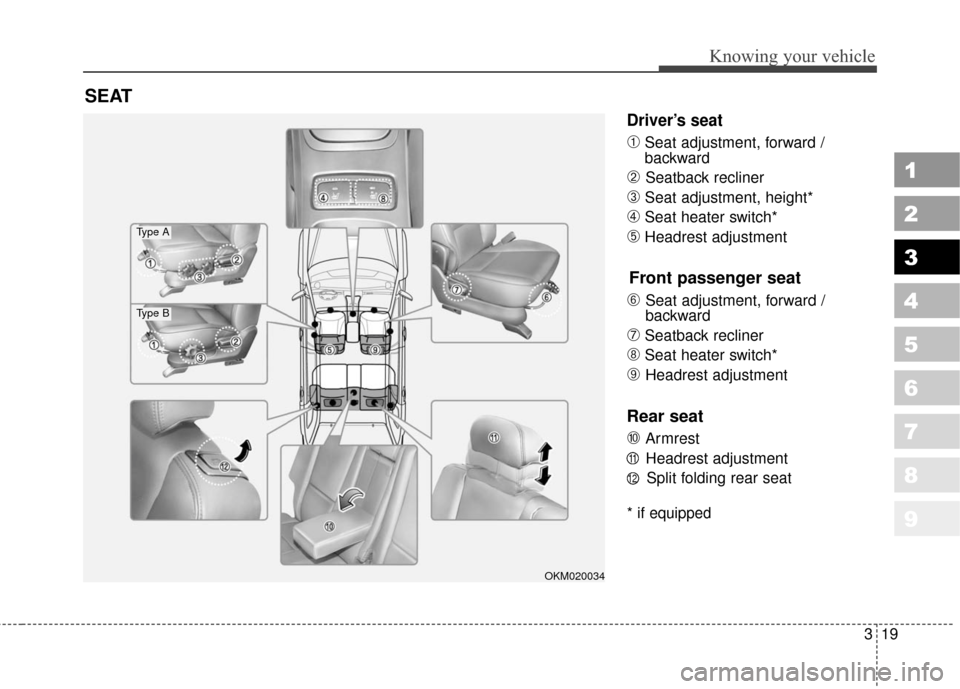
Driver’s seat
➀Seat adjustment, forward /
backward
➁ Seatback recliner
➂Seat adjustment, height*
➃Seat heater switch*
➄Headrest adjustment
Front passenger seat
\b
Seat adjustment, forward /
backward
➆Seatback recliner
➇Seat heater switch*
➈ Headrest adjustment
Rear seat
\f
Armrest Headrest adjustment Split folding rear seat
* if equipped
SEAT
11
12
OKM020034
Type A
Type B
Page 31 of 371
Knowing your vehicle
22
3
1
2
3
4
5
6
7
8
9
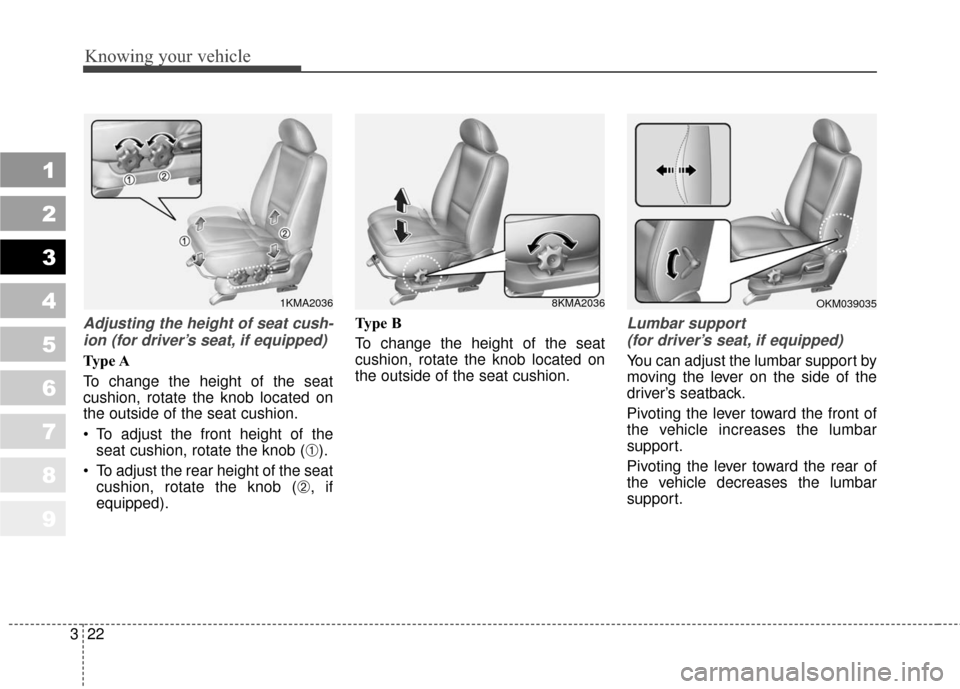
Adjusting the height of seat cush-
ion (for driver’s seat, if equipped)
Type A
To change the height of the seat
cushion, rotate the knob located on
the outside of the seat cushion.
To adjust the front height of the seat cushion, rotate the knob (
➀).
To adjust the rear height of the seat cushion, rotate the knob (
➁, if
equipped). Type B
To change the height of the seat
cushion, rotate the knob located on
the outside of the seat cushion.
Lumbar support
(for driver’s seat, if equipped)
You can adjust the lumbar support by
moving the lever on the side of the
driver’s seatback.
Pivoting the lever toward the front of
the vehicle increases the lumbar
support.
Pivoting the lever toward the rear of
the vehicle decreases the lumbar
support.
8KMA2036OKM0390351KMA2036
Page 33 of 371
Knowing your vehicle
24
3
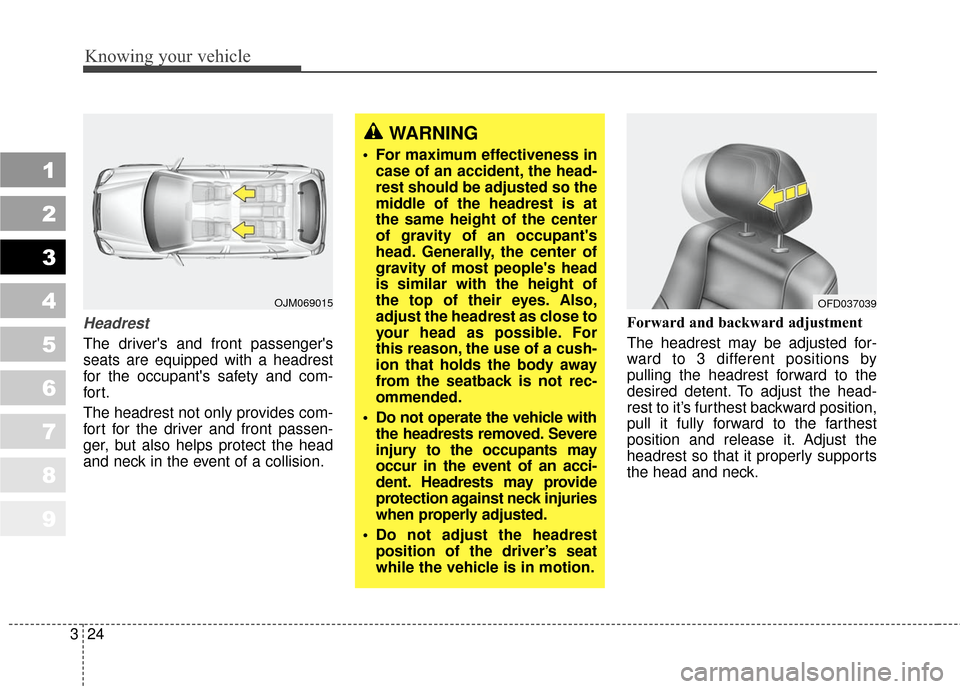
Headrest
The driver's and front passenger's
seats are equipped with a headrest
for the occupant's safety and com-
for t.
The headrest not only provides com-
fort for the driver and front passen-
ger, but also helps protect the head
and neck in the event of a collision. Forward and backward adjustment
The headrest may be adjusted for-
ward to 3 different positions by
pulling the headrest forward to the
desired detent. To adjust the head-
rest to it’s furthest backward position,
pull it fully forward to the farthest
position and release it. Adjust the
headrest so that it properly supports
the head and neck.
1
2
3
4
5
6
7
8
9
OJM069015
WARNING
For maximum effectiveness in
case of an accident, the head-
rest should be adjusted so the
middle of the headrest is at
the same height of the center
of gravity of an occupant's
head. Generally, the center of
gravity of most people's head
is similar with the height of
the top of their eyes. Also,
adjust the headrest as close to
your head as possible. For
this reason, the use of a cush-
ion that holds the body away
from the seatback is not rec-
ommended.
Do not operate the vehicle with the headrests removed. Severe
injury to the occupants may
occur in the event of an acci-
dent. Headrests may provide
protection against neck injuries
when properly adjusted.
Do not adjust the headrest position of the driver’s seat
while the vehicle is in motion.
OFD037039
Page 34 of 371
325
Knowing your vehicle
1
2
3
4
5
6
7
8
9
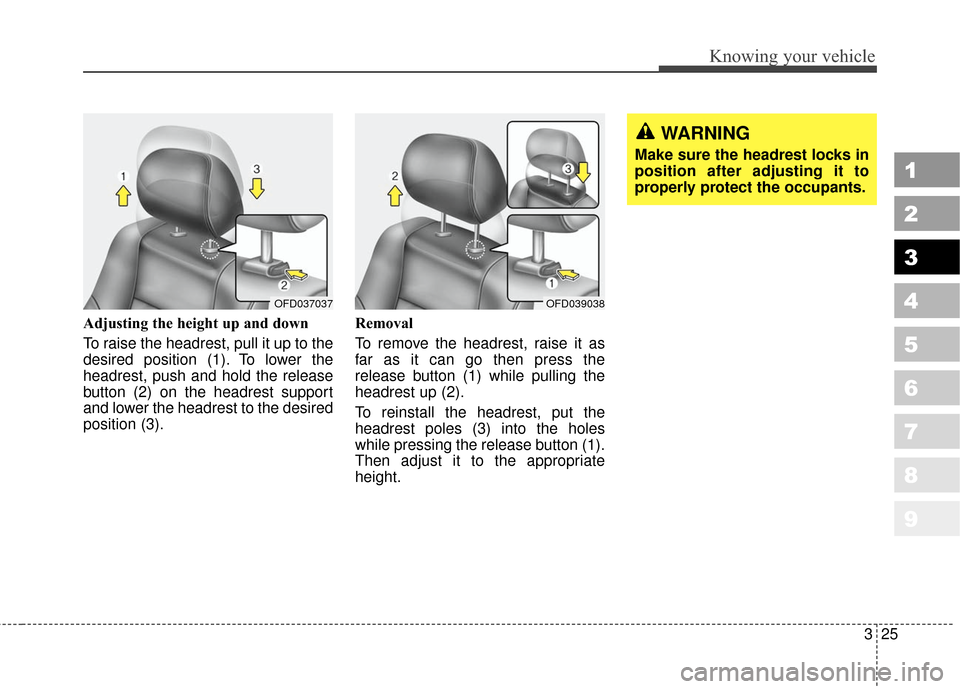
Adjusting the height up and down
To raise the headrest, pull it up to the
desired position (1). To lower the
headrest, push and hold the release
button (2) on the headrest support
and lower the headrest to the desired
position (3).Removal
To remove the headrest, raise it as
far as it can go then press the
release button (1) while pulling the
headrest up (2).
To reinstall the headrest, put the
headrest poles (3) into the holes
while pressing the release button (1).
Then adjust it to the appropriate
height.
WARNING
Make sure the headrest locks in
position after adjusting it to
properly protect the occupants.
OFD037037OFD039038
Page 39 of 371
Knowing your vehicle
30
3
1
2
3
4
5
6
7
8
9
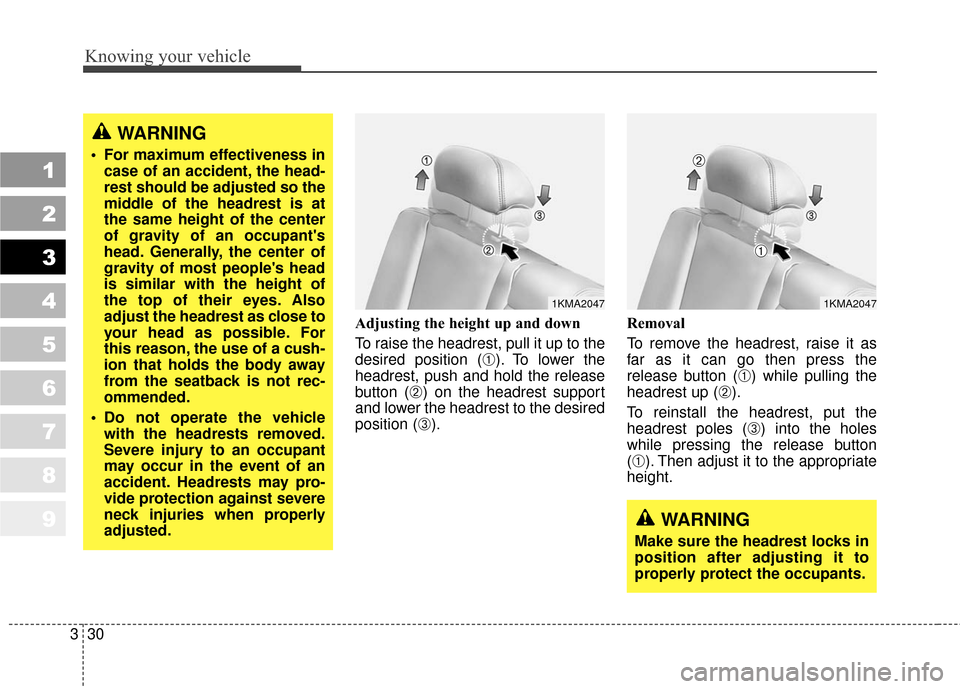
Adjusting the height up and down
To raise the headrest, pull it up to the
desired position (
➀). To lower the
headrest, push and hold the release
button (
➁) on the headrest support
and lower the headrest to the desired
position (
➂). Removal
To remove the headrest, raise it as
far as it can go then press the
release button (
➀) while pulling the
headrest up (
➁).
To reinstall the headrest, put the
headrest poles (
➂) into the holes
while pressing the release button
(
➀). Then adjust it to the appropriate
height.
WARNING
For maximum effectiveness in case of an accident, the head-
rest should be adjusted so the
middle of the headrest is at
the same height of the center
of gravity of an occupant's
head. Generally, the center of
gravity of most people's head
is similar with the height of
the top of their eyes. Also
adjust the headrest as close to
your head as possible. For
this reason, the use of a cush-
ion that holds the body away
from the seatback is not rec-
ommended.
Do not operate the vehicle with the headrests removed.
Severe injury to an occupant
may occur in the event of an
accident. Headrests may pro-
vide protection against severe
neck injuries when properly
adjusted.
1KMA20471KMA2047
WARNING
Make sure the headrest locks in
position after adjusting it to
properly protect the occupants.
➀
➁
Page 47 of 371
Knowing your vehicle
38
3
1
2
3
4
5
6
7
8
9
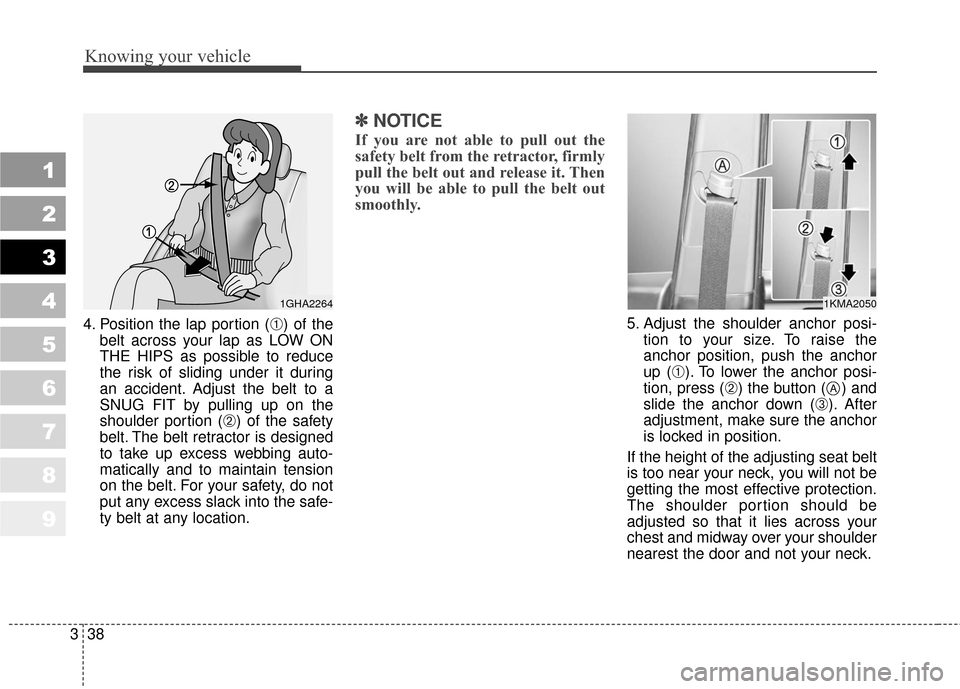
4. Position the lap portion (➀) of the
belt across your lap as LOW ON
THE HIPS as possible to reduce
the risk of sliding under it during
an accident. Adjust the belt to a
SNUG FIT by pulling up on the
shoulder portion (
➁) of the safety
belt. The belt retractor is designed
to take up excess webbing auto-
matically and to maintain tension
on the belt. For your safety, do not
put any excess slack into the safe-
ty belt at any location.
✽ ✽ NOTICE
If you are not able to pull out the
safety belt from the retractor, firmly
pull the belt out and release it. Then
you will be able to pull the belt out
smoothly.
5. Adjust the shoulder anchor posi-
tion to your size. To raise the
anchor position, push the anchor
up (
➀). To lower the anchor posi-
tion, press (
➁) the button ( ) and
slide the anchor down (
➂). After
adjustment, make sure the anchor
is locked in position.
If the height of the adjusting seat belt
is too near your neck, you will not be
getting the most effective protection.
The shoulder portion should be
adjusted so that it lies across your
chest and midway over your shoulder
nearest the door and not your neck.
1GHA22641KMA2050
A
Page 48 of 371
339
Knowing your vehicle
1
2
3
4
5
6
7
8
9
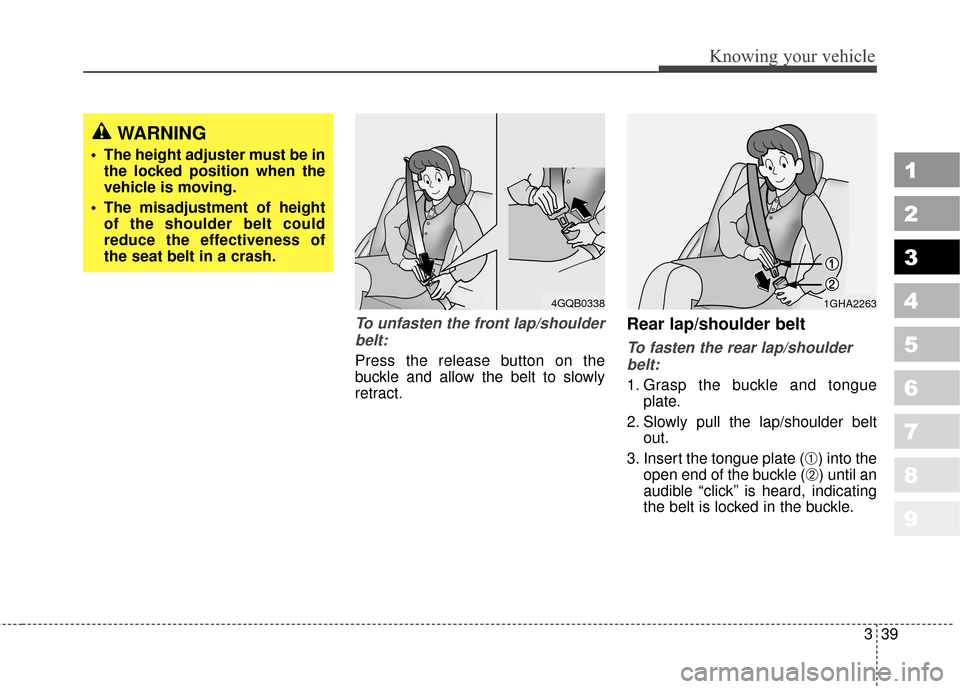
To unfasten the front lap/shoulderbelt:
Press the release button on the
buckle and allow the belt to slowly
retract.
Rear lap/shoulder belt
To fasten the rear lap/shoulderbelt:
1. Grasp the buckle and tongue plate.
2. Slowly pull the lap/shoulder belt out.
3. Insert the tongue plate (
➀) into the
open end of the buckle (
➁) until an
audible “click’’ is heard, indicating
the belt is locked in the buckle.
4GQB03381GHA2263
WARNING
The height adjuster must be in the locked position when the
vehicle is moving.
The misadjustment of height of the shoulder belt could
reduce the effectiveness of
the seat belt in a crash.
Page 90 of 371
381
1
2
3
4
5
6
7
8
9
Knowing your vehicle
Closing the hood
1. Before closing the hood, check thefollowing:
ment must be correctly installed.
bustible material must be
removed from the engine com-
partment.
2. Secure the support rod in its clip.
3. Lower the hood to about 30 cm (12 inches) height and then let it
drop to properly lock in place.
Make sure the hood is properly
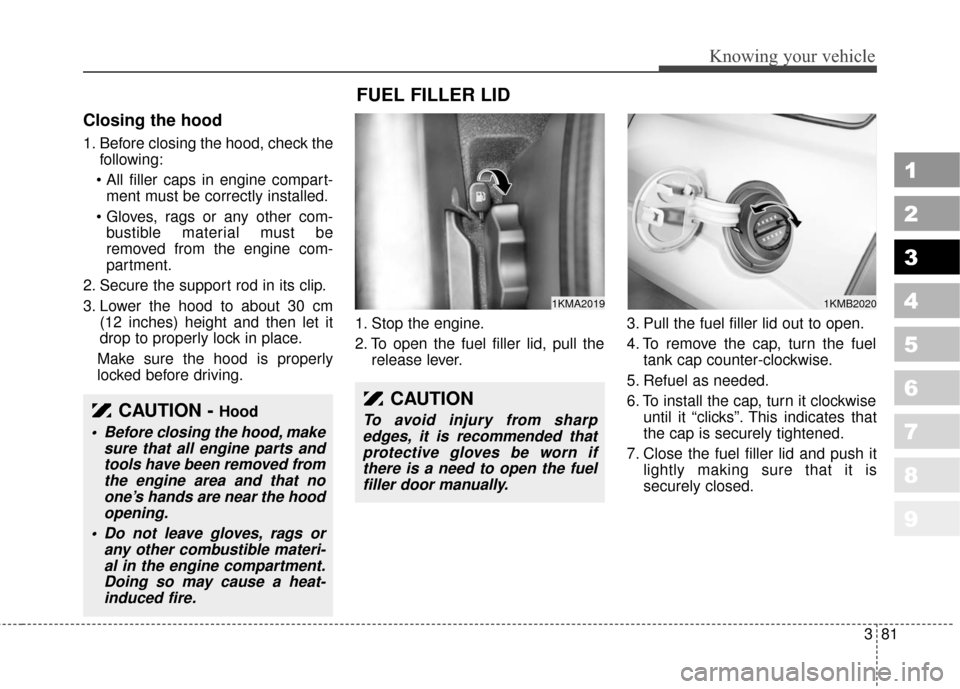
locked before driving. 1. Stop the engine.
2. To open the fuel filler lid, pull the
release lever. 3. Pull the fuel filler lid out to open.
4. To remove the cap, turn the fuel
tank cap counter-clockwise.
5. Refuel as needed.
6. To install the cap, turn it clockwise until it “clicks”. This indicates that
the cap is securely tightened.
7. Close the fuel filler lid and push it lightly making sure that it is
securely closed.
CAUTION - Hood
Before closing the hood, makesure that all engine parts andtools have been removed fromthe engine area and that noone’s hands are near the hoodopening.
Do not leave gloves, rags or any other combustible materi-al in the engine compartment.Doing so may cause a heat-induced fire.
FUEL FILLER LID
1KMA20191KMB2020
CAUTION
To avoid injury from sharpedges, it is recommended thatprotective gloves be worn ifthere is a need to open the fuelfiller door manually.
Page 196 of 371
449
Driving your vehicle
Non-operational conditions of
rear parking assist system
The rear parking assist system
may not operate properly when:
1. Moisture is frozen to the sensor. (Itwill operate normally when the
moisture has been cleared.)
2. The sensor is covered with foreign matter, such as snow or water, or
the sensor cover is blocked. (It will
operate normally when the mater-
ial is removed or the sensor is no
longer blocked.)
3. Driving on uneven road surfaces (unpaved roads, gravel, bumps,
gradient).
4. Objects generating excessive noise (vehicle horns, loud motor-
cycle engines, or truck air brakes)
are within range of the sensor.
5. Heavy rain or water spray exists.
6. Wireless transmitters or mobile phones are within range of the
sensor.
7. The sensor is covered with snow.
8. Trailer towing The detecting range may decrease
when:
1. The sensor is stained with foreign
matter such as snow or water.
(The sensing range will return to
normal when removed.)
2. Outside air temperature is extremely hot or cold.
The following objects may not be
recognized by the sensor:
1. Sharp or slim objects such as ropes, chains or small poles.
2. Objects which tend to absorb the sensor frequency such as clothes,
spongy material or snow.
3. Undetectable objects smaller than 1 m (40 in.) in height and narrower
than 14 cm (6 in.) in diameter.
Rear parking assist system
precautions
The rear parking assist systemmay not sound sequentially
depending on the speed and
shapes of the objects detected.
The rear parking assist system may malfunction if the vehicle
bumper height or sensor installa-
tion has been modified or dam-
aged. Any non-factory installed
equipment or accessories may
also interfere with the sensor per-
formance.
The sensor may not recognize objects less than 40 cm (15 in.)
from the sensor, or it may sense an
incorrect distance. Use caution.
When the sensor is frozen or stained with snow, dirt, or water,
the sensor may be inoperative until
the stains are removed using a soft
cloth.
Do not push, scratch or strike the sensor. Sensor damage could
occur.1
2
3
4
5
6
7
8
9
Page 249 of 371
517
Driving tips
1
2
3
4
5
6
7
8
9
Traveling to remote areas
It makes sense to plan your trip,
especially when going to a remote
area. Know the terrain and plan your
route. You are much less likely to
encounter unwanted surprises. Get
accurate maps of trails.
It’s also a good idea to travel with at
least one other vehicle. If something
happens to one of them, the other
can quickly help.WARNING - Cargo
Cargo piled close to the height of (or higher than) the seat
backs can be thrown forward
during a sudden stop or on
downhill slopes. You or your
passengers could be severely
injured. Keep cargo below the
top of the seat backs and, if
possible, do not pile separate
items.
Unsecured cargo in the cargo area can be tossed about
when driving on the highways
or over rough terrain. You or
your passengers can be
struck by flying objects and
severely injured. Secure the
cargo properly.
(Continued)(Continued)
Cargo should not be carriedon the roof without a proper
roof rack installed. The roof
rack will hold a maximum of
45 kg (100 lbs.). Heavy loads
in a roof rack raise the vehi-
cle’s center of gravity, making
it more likely to roll over. You
can be seriously or fatally
injured if the vehicle rolls
over. Do not load cargo on the
roof while driving off-road, if
at all possible. Put heavy
loads inside the cargo area,
not on the roof or in a roof
rack. Keep cargo in the cargo
area as far forward and low as
possible.