outside rearview mirror KIA Sportage 2010 SL / 3.G Owner's Manual
[x] Cancel search | Manufacturer: KIA, Model Year: 2010, Model line: Sportage, Model: KIA Sportage 2010 SL / 3.GPages: 371, PDF Size: 5.23 MB
Page 8 of 371
Your vehicle at a glance
22
1
2
3
4
5
6
7
8
9
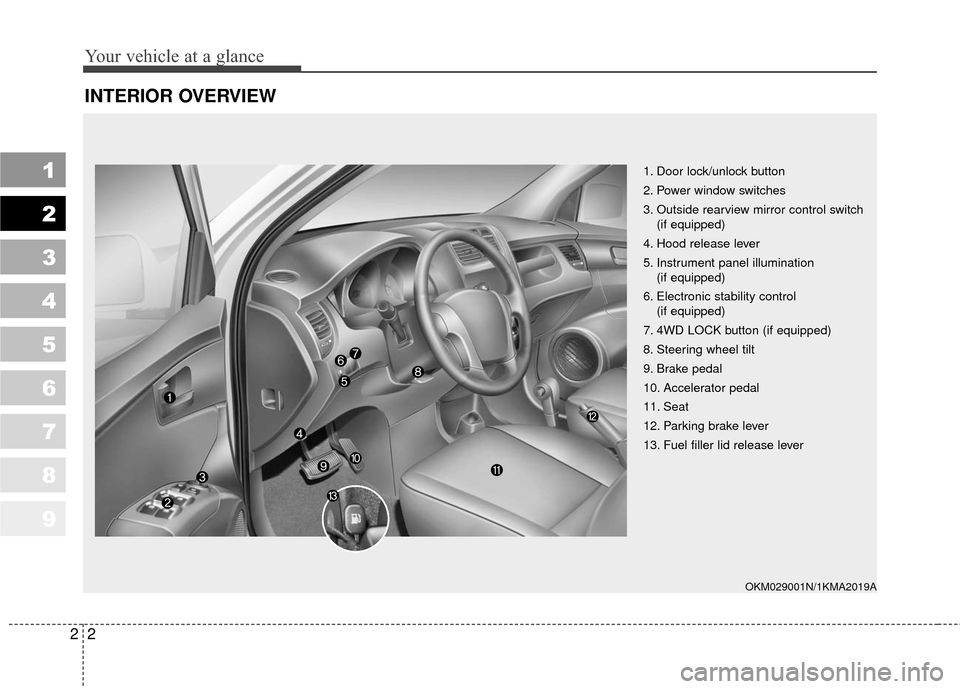
INTERIOR OVERVIEW
1. Door lock/unlock button
2. Power window switches
3. Outside rearview mirror control switch(if equipped)
4. Hood release lever
5. Instrument panel illumination (if equipped)
6. Electronic stability control (if equipped)
7. 4WD LOCK button (if equipped)
8. Steering wheel tilt
9. Brake pedal
10. Accelerator pedal
11. Seat
12. Parking brake lever
13. Fuel filler lid release lever
OKM029001N/1KMA2019A
Page 93 of 371
Knowing your vehicle
84
3
1
2
3
4
5
6
7
8
9
Outside rearview mirror
Be sure to adjust mirror angles
before driving.
Your vehicle is equipped with both
left-hand and right-hand outside
rearview mirrors. The mirrors can be
adjusted remotely with the control
levers or remote switch, depending
on the type of mirror control installed.
The mirror heads can be folded back
to prevent damage during an auto-
matic car wash or when passing in a
narrow street.
✽ ✽
NOTICE
Do not scrape ice off the mirror
face; this may damage the surface of
the glass. If ice should restrict move-
ment of the mirror, do not force the
mirror for adjustment. To remove
ice, use a deicer spray, or a sponge
or soft cloth with very warm water.
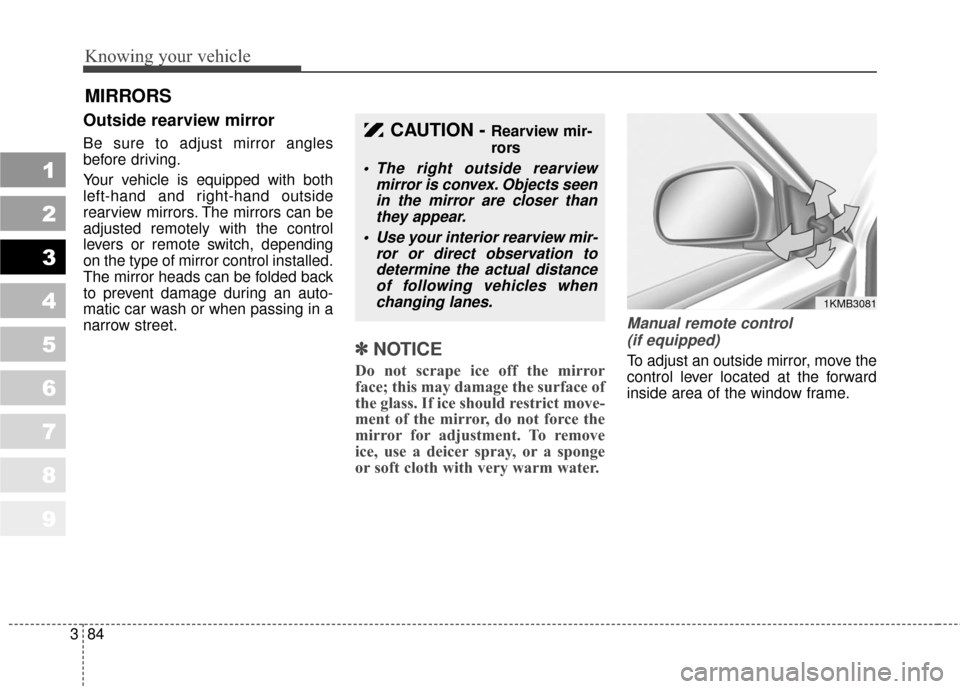
Manual remote control
(if equipped)
To adjust an outside mirror, move the
control lever located at the forward
inside area of the window frame.
MIRRORS
CAUTION - Rearview mir-
rors
The right outside rearview mirror is convex. Objects seenin the mirror are closer thanthey appear.
Use your interior rearview mir- ror or direct observation todetermine the actual distanceof following vehicles whenchanging lanes.
1KMB3081
Page 94 of 371
385
1
2
3
4
5
6
7
8
9
Knowing your vehicle
Electric remote control (if equipped)
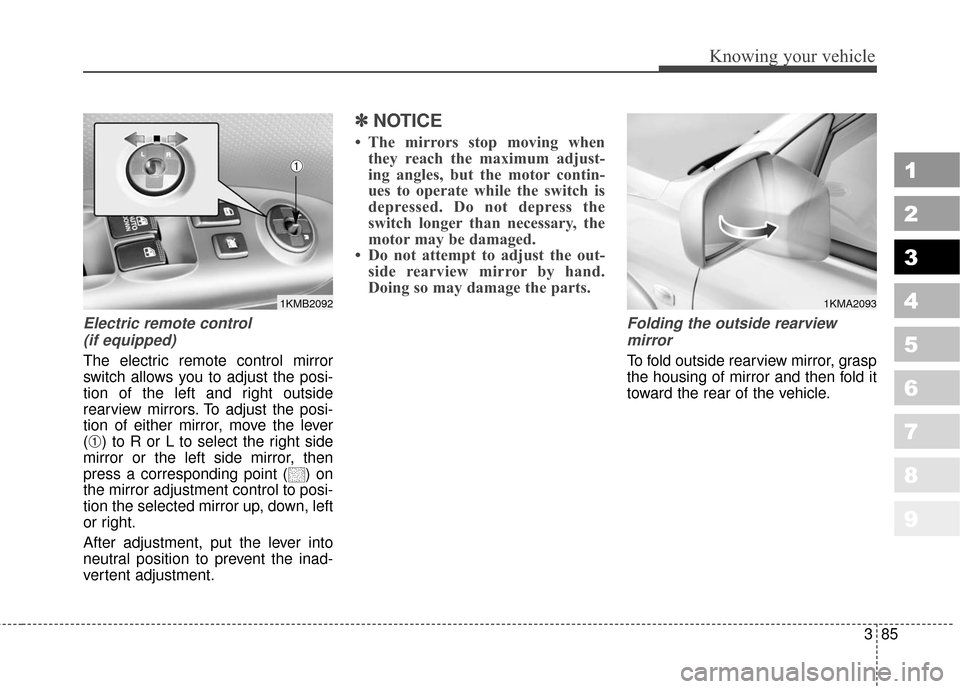
The electric remote control mirror
switch allows you to adjust the posi-
tion of the left and right outside
rearview mirrors. To adjust the posi-
tion of either mirror, move the lever
(
➀) to R or L to select the right side
mirror or the left side mirror, then
press a corresponding point ( ) on
the mirror adjustment control to posi-
tion the selected mirror up, down, left
or right.
After adjustment, put the lever into
neutral position to prevent the inad-
vertent adjustment.
✽ ✽ NOTICE
• The mirrors stop moving when
they reach the maximum adjust-
ing angles, but the motor contin-
ues to operate while the switch is
depressed. Do not depress the
switch longer than necessary, the
motor may be damaged.
• Do not attempt to adjust the out- side rearview mirror by hand.
Doing so may damage the parts.
Folding the outside rearview
mirror
To fold outside rearview mirror, grasp
the housing of mirror and then fold it
toward the rear of the vehicle.
1KMB2092
➀
1KMA2093
Page 95 of 371
Knowing your vehicle
86
3
1
2
3
4
5
6
7
8
9
Outside rearview mirror heater
(if equipped)
The outside rearview mirror heater is
actuated in connection with the rear
window defroster. To heat the outside
rearview mirror glass, push the but-
ton for the rear window defroster.
The rearview mirror heater (and rear
window defroster) will not operate
unless the engine is running.
The outside rearview mirror glass will
be heated for defrosting or defogging
and will give you improved rear
vision in inclement weather condi-
tions. Push the button again to turn
the heater off. The outside rearview
mirror heater automatically turns off
after 20 minutes.
Inside rearview mirror
Adjust the rearview mirror to center
on the view through the rear window.
Make this adjustment before you
start driving.
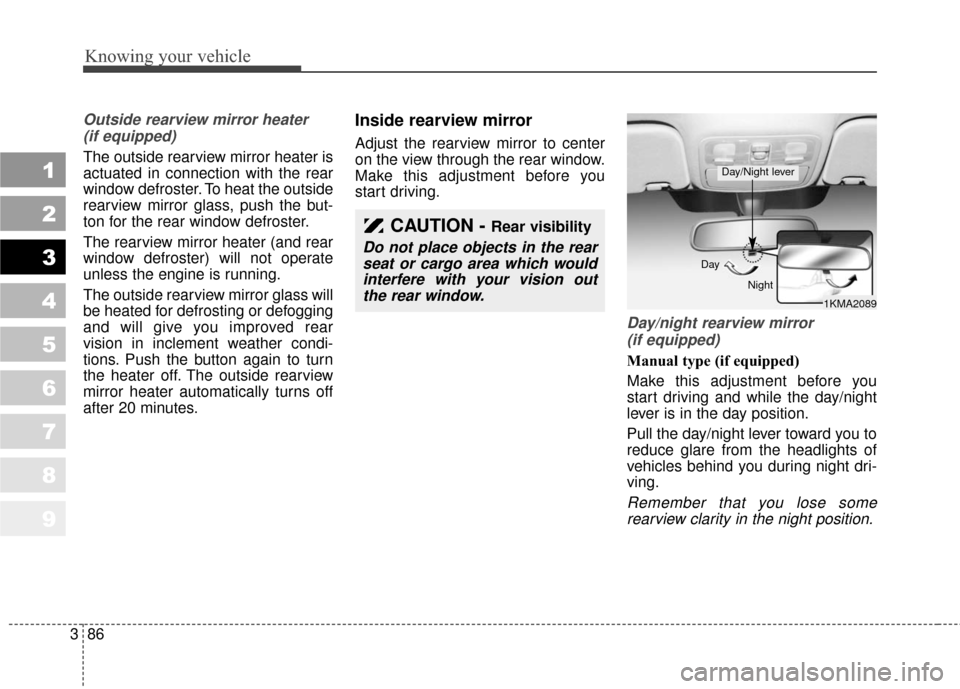
Day/night rearview mirror (if equipped)
Manual type (if equipped)
Make this adjustment before you
start driving and while the day/night
lever is in the day position.
Pull the day/night lever toward you to
reduce glare from the headlights of
vehicles behind you during night dri-
ving.
Remember that you lose somerearview clarity in the night position.
CAUTION - Rear visibility
Do not place objects in the rearseat or cargo area which wouldinterfere with your vision outthe rear window.
1KMA2089
Day
Night
Day/Night lever
Page 237 of 371
55
Driving tips
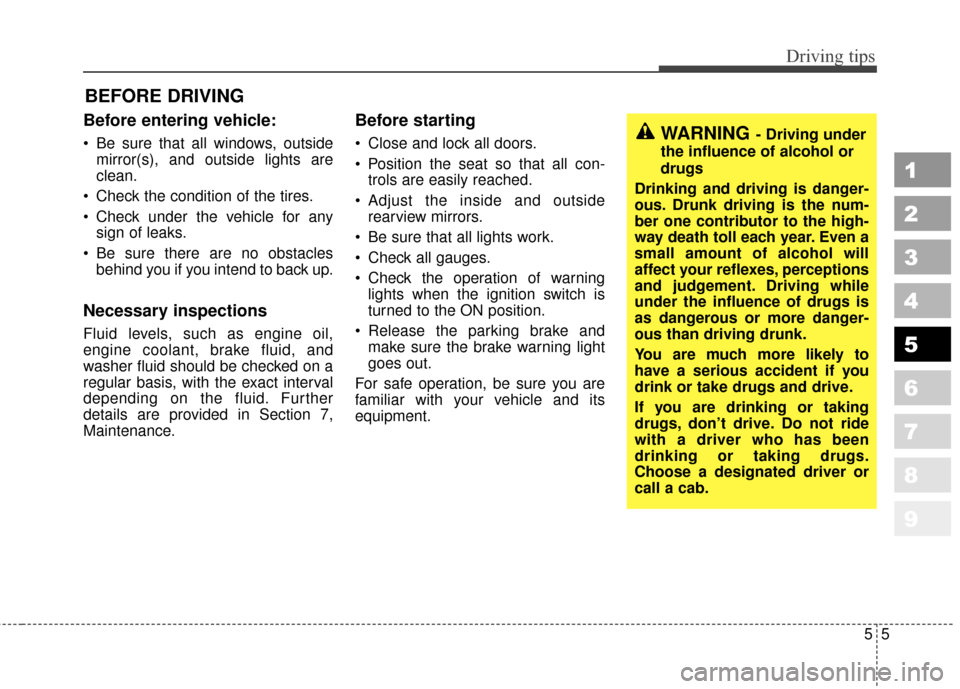
BEFORE DRIVING
Before entering vehicle:
Be sure that all windows, outsidemirror(s), and outside lights are
clean.
Check the condition of the tires.
Check under the vehicle for any sign of leaks.
Be sure there are no obstacles behind you if you intend to back up.
Necessary inspections
Fluid levels, such as engine oil,
engine coolant, brake fluid, and
washer fluid should be checked on a
regular basis, with the exact interval
depending on the fluid. Further
details are provided in Section 7,
Maintenance.
Before starting
Close and lock all doors.
Position the seat so that all con-trols are easily reached.
Adjust the inside and outside rearview mirrors.
Be sure that all lights work.
Check all gauges.
Check the operation of warning lights when the ignition switch is
turned to the ON position.
Release the parking brake and make sure the brake warning light
goes out.
For safe operation, be sure you are
familiar with your vehicle and its
equipment.
1
2
3
4
5
6
7
8
9
WARNING- Driving under
the influence of alcohol or
drugs
Drinking and driving is danger-
ous. Drunk driving is the num-
ber one contributor to the high-
way death toll each year. Even a
small amount of alcohol will
affect your reflexes, perceptions
and judgement. Driving while
under the influence of drugs is
as dangerous or more danger-
ous than driving drunk.
You are much more likely to
have a serious accident if you
drink or take drugs and drive.
If you are drinking or taking
drugs, don’t drive. Do not ride
with a driver who has been
drinking or taking drugs.
Choose a designated driver or
call a cab.
Page 295 of 371
611
In case of an emergency
1
2
3
4
5
6
7
8
9
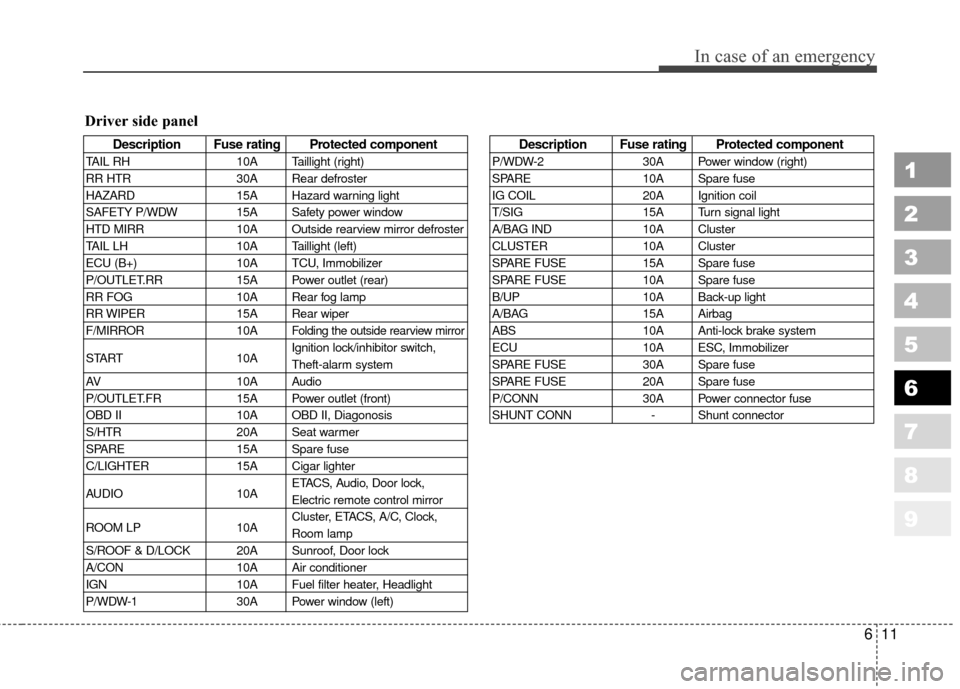
Description Fuse rating Protected component
TAIL RH10A Taillight (right)
RR HTR 30A Rear defroster
HAZARD 15A Hazard warning light
SAFETY P/WDW 15A Safety power window
HTD MIRR 10A Outside rearview mirror defroster
TAIL LH 10A Taillight (left)
ECU (B+) 10A TCU, Immobilizer
P/OUTLET.RR 15A Power outlet (rear)
RR FOG 10A Rear fog lamp
RR WIPER 15A Rear wiper
F/MIRROR 10A
Folding the outside rearview mirror
START10AIgnition lock/inhibitor switch,
Theft-alarm system
AV 10A Audio
P/OUTLET.FR 15A Power outlet (front)
OBD II 10A OBD II, Diagonosis
S/HTR 20A Seat warmer
SPARE 15A Spare fuse
C/LIGHTER 15A Cigar lighter
AUDIO 10AETACS, Audio, Door lock,
Electric remote control mirror
ROOM LP 10ACluster, ETACS, A/C, Clock,
Room lamp
S/ROOF & D/LOCK 20A Sunroof, Door lock
A/CON 10A Air conditioner
IGN 10A Fuel filter heater, Headlight
P/WDW-1 30A Power window (left)
Description Fuse rating Protected component
P/WDW-230A Power window (right)
SPARE 10A Spare fuse
IG COIL 20A Ignition coil
T/SIG 15A Turn signal light
A/BAG IND 10A Cluster
CLUSTER 10A Cluster
SPARE FUSE 15A Spare fuse
SPARE FUSE 10A Spare fuse
B/UP 10A Back-up light
A/BAG 15A Airbag
ABS 10A Anti-lock brake system
ECU 10A ESC, Immobilizer
SPARE FUSE 30A Spare fuse
SPARE FUSE 20A Spare fuse
P/CONN 30A Power connector fuse
SHUNT CONN - Shunt connector
Driver side panel