KIA Sportage 2012 SL / 3.G Owner's Manual
Manufacturer: KIA, Model Year: 2012, Model line: Sportage, Model: KIA Sportage 2012 SL / 3.GPages: 387, PDF Size: 8.44 MB
Page 121 of 387
431
Features of your vehicle
✽
✽NOTICE
• In cold and wet climates, the sunroof
may not work properly due to freez-
ing conditions.
• After a vehicle is washed or in a rain- storm be sure to wipe off any water
that is on the sunroof before operating
it.
✽ ✽ NOTICE
The sunroof cannot tilt when it is in the
slide position but can be slid while in a
tilt position.
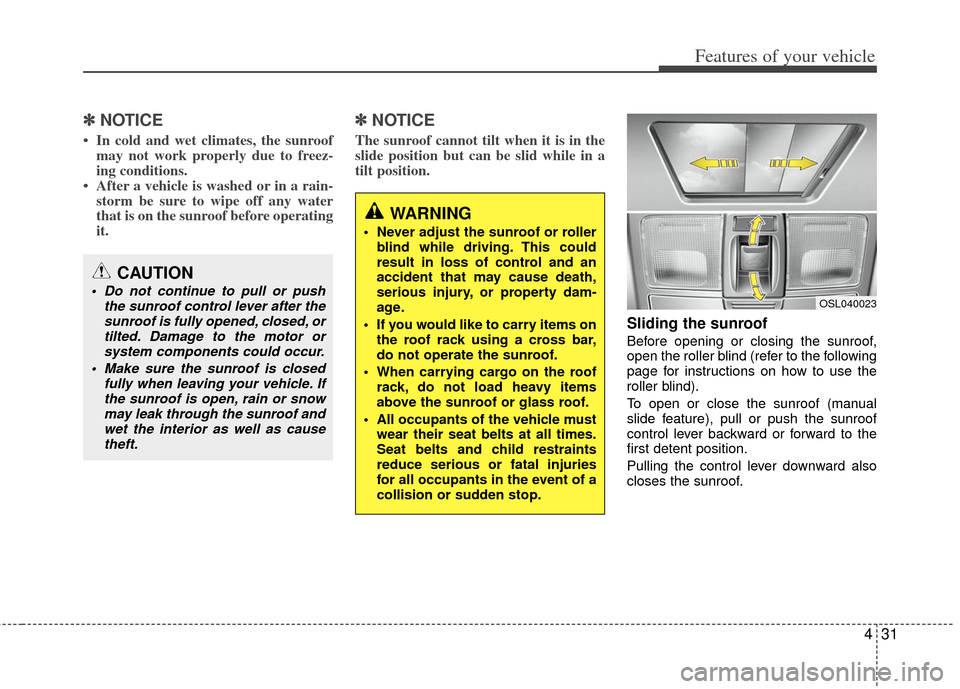
Sliding the sunroof
Before opening or closing the sunroof,
open the roller blind (refer to the following
page for instructions on how to use the
roller blind).
To open or close the sunroof (manual
slide feature), pull or push the sunroof
control lever backward or forward to the
first detent position.
Pulling the control lever downward also
closes the sunroof.
CAUTION
Do not continue to pull or push
the sunroof control lever after thesunroof is fully opened, closed, ortilted. Damage to the motor or system components could occur.
Make sure the sunroof is closed fully when leaving your vehicle. Ifthe sunroof is open, rain or snowmay leak through the sunroof andwet the interior as well as causetheft.
WARNING
Never adjust the sunroof or roller blind while driving. This could
result in loss of control and an
accident that may cause death,
serious injury, or property dam-
age.
If you would like to carry items on the roof rack using a cross bar,
do not operate the sunroof.
When carrying cargo on the roof rack, do not load heavy items
above the sunroof or glass roof.
All occupants of the vehicle must wear their seat belts at all times.
Seat belts and child restraints
reduce serious or fatal injuries
for all occupants in the event of a
collision or sudden stop.
OSL040023
Page 122 of 387
Features of your vehicle
32
4
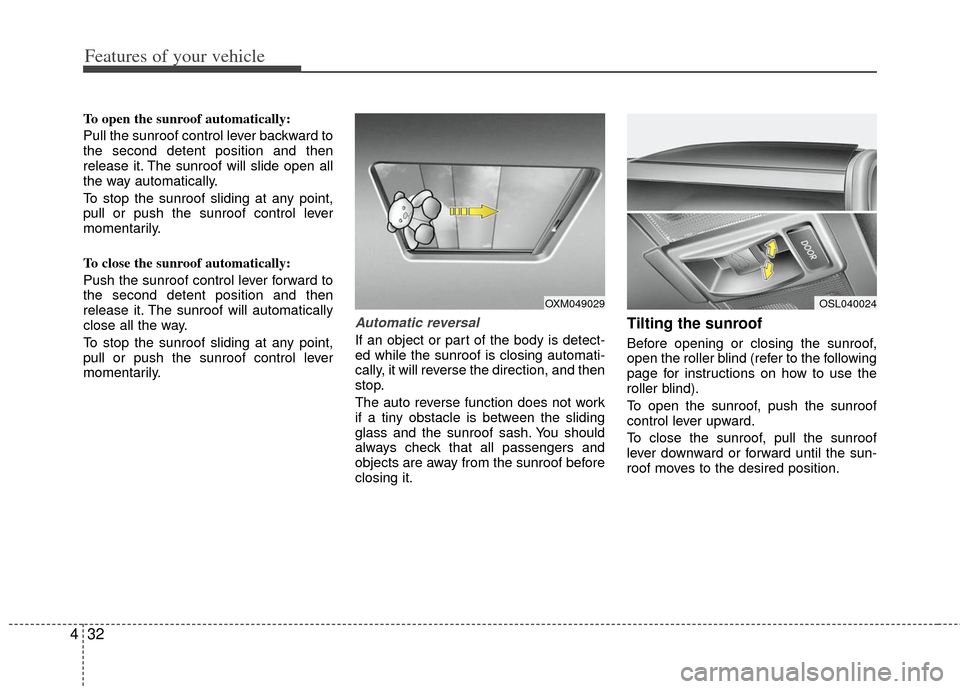
To open the sunroof automatically:
Pull the sunroof control lever backward to
the second detent position and then
release it. The sunroof will slide open all
the way automatically.
To stop the sunroof sliding at any point,
pull or push the sunroof control lever
momentarily.
To close the sunroof automatically:
Push the sunroof control lever forward to
the second detent position and then
release it. The sunroof will automatically
close all the way.
To stop the sunroof sliding at any point,
pull or push the sunroof control lever
momentarily.
Automatic reversal
If an object or part of the body is detect-
ed while the sunroof is closing automati-
cally, it will reverse the direction, and then
stop.
The auto reverse function does not work
if a tiny obstacle is between the sliding
glass and the sunroof sash. You should
always check that all passengers and
objects are away from the sunroof before
closing it.
Tilting the sunroof
Before opening or closing the sunroof,
open the roller blind (refer to the following
page for instructions on how to use the
roller blind).
To open the sunroof, push the sunroof
control lever upward.
To close the sunroof, pull the sunroof
lever downward or forward until the sun-
roof moves to the desired position.
OXM049029OSL040024
Page 123 of 387
433
Features of your vehicle
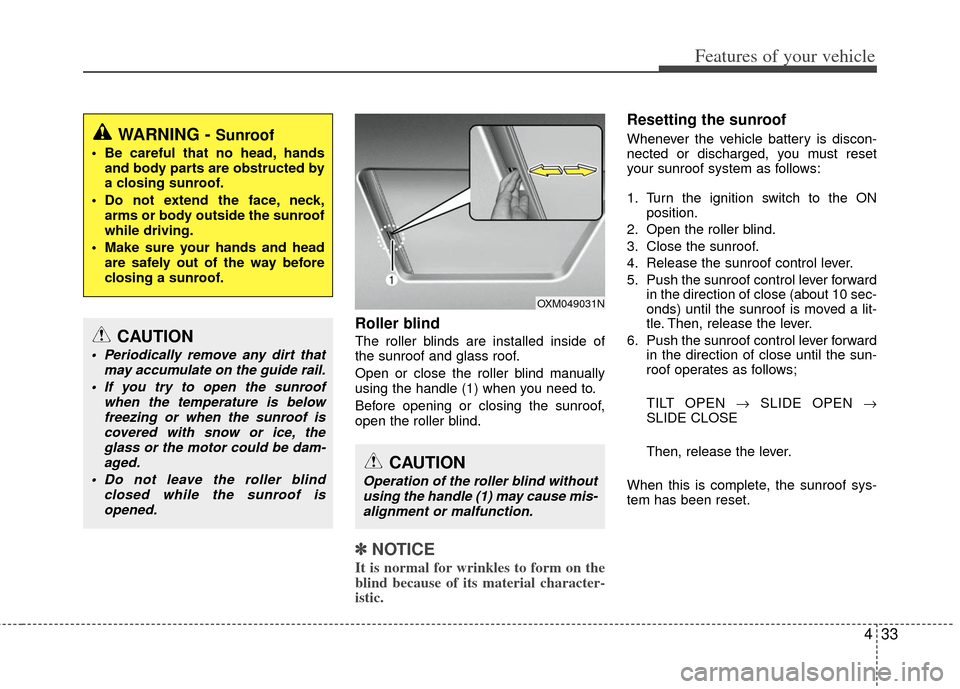
Roller blind
The roller blinds are installed inside of
the sunroof and glass roof.
Open or close the roller blind manually
using the handle (1) when you need to.
Before opening or closing the sunroof,
open the roller blind.
✽ ✽NOTICE
It is normal for wrinkles to form on the
blind because of its material character-
istic.
Resetting the sunroof
Whenever the vehicle battery is discon-
nected or discharged, you must reset
your sunroof system as follows:
1. Turn the ignition switch to the ON
position.
2. Open the roller blind.
3. Close the sunroof.
4. Release the sunroof control lever.
5. Push the sunroof control lever forward in the direction of close (about 10 sec-
onds) until the sunroof is moved a lit-
tle. Then, release the lever.
6. Push the sunroof control lever forward in the direction of close until the sun-
roof operates as follows;
TILT OPEN → SLIDE OPEN →
SLIDE CLOSE
Then, release the lever.
When this is complete, the sunroof sys-
tem has been reset.WARNING - Sunroof
Be careful that no head, hands and body parts are obstructed by
a closing sunroof.
Do not extend the face, neck, arms or body outside the sunroof
while driving.
Make sure your hands and head are safely out of the way before
closing a sunroof.
CAUTION
Periodically remove any dirt that may accumulate on the guide rail.
If you try to open the sunroof when the temperature is belowfreezing or when the sunroof is covered with snow or ice, theglass or the motor could be dam-aged.
Do not leave the roller blind closed while the sunroof isopened.
OXM049031N
CAUTION
Operation of the roller blind withoutusing the handle (1) may cause mis-alignment or malfunction.
Page 124 of 387
Features of your vehicle
34
4
Electric power steering
Power steering uses the motor to assist
you in steering the vehicle. If the engine
is off or if the power steering system
becomes inoperative, the vehicle may
still be steered, but it will require
increased steering effort.
The motor driven power steering is con-
trolled by the power steering control unit
which senses the steering wheel torque
and vehicle speed to command the
motor.
The steering wheel becomes heavier as
the vehicle’s speed increases and
becomes lighter as the vehicle’s speed
decreases for better control of the steer-
ing wheel.
Should you notice any change in the
effort required to steer during normal
vehicle operation, have the power steer-
ing checked by an authorized Kia dealer.
✽ ✽
NOTICE
The following symptoms may occur dur-
ing normal vehicle operation:
• The EPS warning light does not illu-
minate.
• The steering effort is high immediate- ly after turning the ignition switch on.
This happens as the system performs
the EPS system diagnostics. When the
diagnostics is completed, the steering
wheel will return to its normal condi-
tion.
• A click noise may be heard from the EPS relay after the ignition switch is
turned to the ON or LOCK position.
• Motor noise may be heard when the vehicle is at a stop or at a low driving
speed.
• The steering effort can suddenly increase, if the operation of the EPS
system is stopped to prevent serious
accidents when it detects malfunction
of the EPS system by self-diagnosis.
• The steering effort increases if the steering wheel is rotated continuously
when the vehicle is not in motion.
However, after a few minutes, it will
return to its normal conditions.
• When you operate the steering wheel in low temperature, abnormal noise
could occur. If temperature rises, the
noise will disappear. This is a normal
condition.
STEERING WHEEL
CAUTION
If the EPS system does not operate
normally, the warning light will illu-minate on the instrument cluster. The steering wheel may becomedifficult to control or operate abnor-mally. Take your vehicle to an authorized Kia dealer and have thevehicle checked as soon as possi- ble.
Page 125 of 387
435
Features of your vehicle
D130300AUN
Tilt steering/
Telescope steering (if equipped)
Tilt steering allows you to adjust the
steering wheel before you drive.
You can also raise the steering wheel to
give your legs more room when you exit
and enter the vehicle (if equipped).
The steering wheel should be positioned
so that it is comfortable for you to drive,
while permitting you to see the instru-
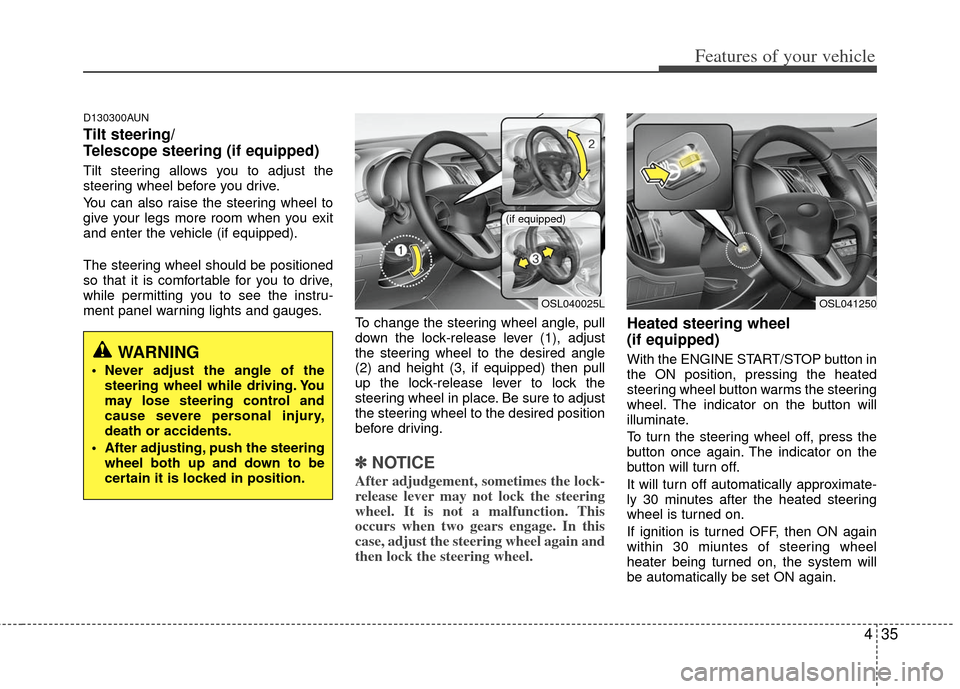
ment panel warning lights and gauges.To change the steering wheel angle, pull
down the lock-release lever (1), adjust
the steering wheel to the desired angle
(2) and height (3, if equipped) then pull
up the lock-release lever to lock the
steering wheel in place. Be sure to adjust
the steering wheel to the desired position
before driving.
✽ ✽NOTICE
After adjudgement, sometimes the lock-
release lever may not lock the steering
wheel. It is not a malfunction. This
occurs when two gears engage. In this
case, adjust the steering wheel again and
then lock the steering wheel.
Heated steering wheel
(if equipped)
With the ENGINE START/STOP button in
the ON position, pressing the heated
steering wheel button warms the steering
wheel. The indicator on the button will
illuminate.
To turn the steering wheel off, press the
button once again. The indicator on the
button will turn off.
It will turn off automatically approximate-
ly 30 minutes after the heated steering
wheel is turned on.
If ignition is turned OFF, then ON again
within 30 miuntes of steering wheel
heater being turned on, the system will
be automatically be set ON again.WARNING
Never adjust the angle of the
steering wheel while driving. You
may lose steering control and
cause severe personal injury,
death or accidents.
After adjusting, push the steering wheel both up and down to be
certain it is locked in position.
OSL040025L
(if equipped)
OSL041250
Page 126 of 387
Features of your vehicle
36
4
D130500AUN
Horn
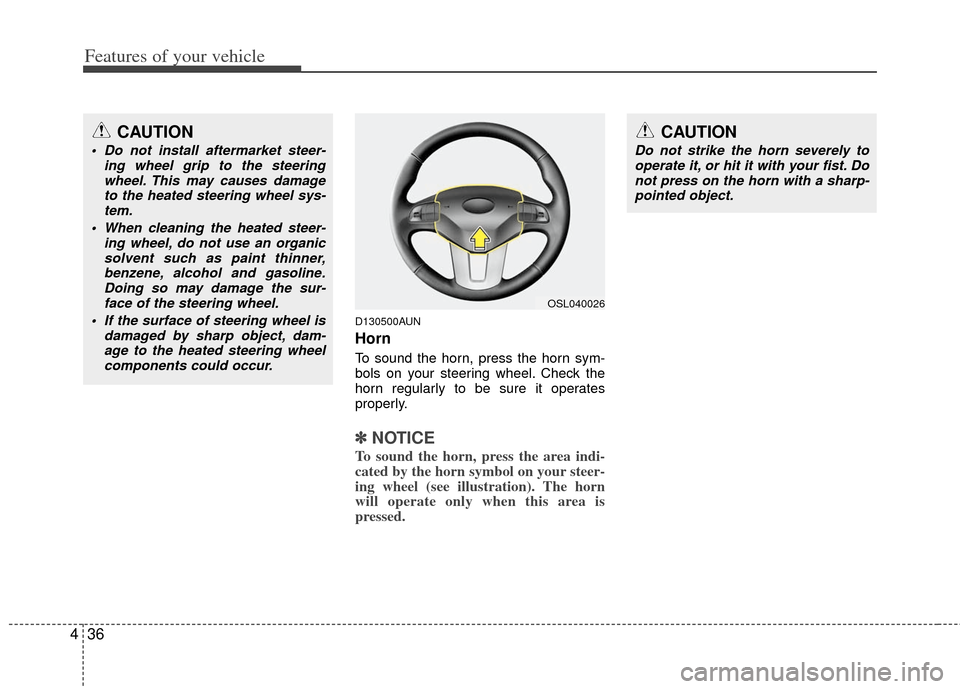
To sound the horn, press the horn sym-
bols on your steering wheel. Check the
horn regularly to be sure it operates
properly.
✽ ✽
NOTICE
To sound the horn, press the area indi-
cated by the horn symbol on your steer-
ing wheel (see illustration). The horn
will operate only when this area is
pressed.
CAUTION
Do not strike the horn severely to
operate it, or hit it with your fist. Donot press on the horn with a sharp- pointed object.
OSL040026
CAUTION
Do not install aftermarket steer- ing wheel grip to the steeringwheel. This may causes damageto the heated steering wheel sys-tem.
When cleaning the heated steer- ing wheel, do not use an organicsolvent such as paint thinner,benzene, alcohol and gasoline.Doing so may damage the sur-face of the steering wheel.
If the surface of steering wheel is damaged by sharp object, dam-age to the heated steering wheelcomponents could occur.
Page 127 of 387
437
Features of your vehicle
D140100AHM
Inside rearview mirror
Adjust the rearview mirror so that the
center view through the rear window is
seen. Make this adjustment before you
start driving.
D140101AHM
Day/night rearview mirror (if equipped)
Make this adjustment before you start
driving and while the day/night lever is in
the day position.
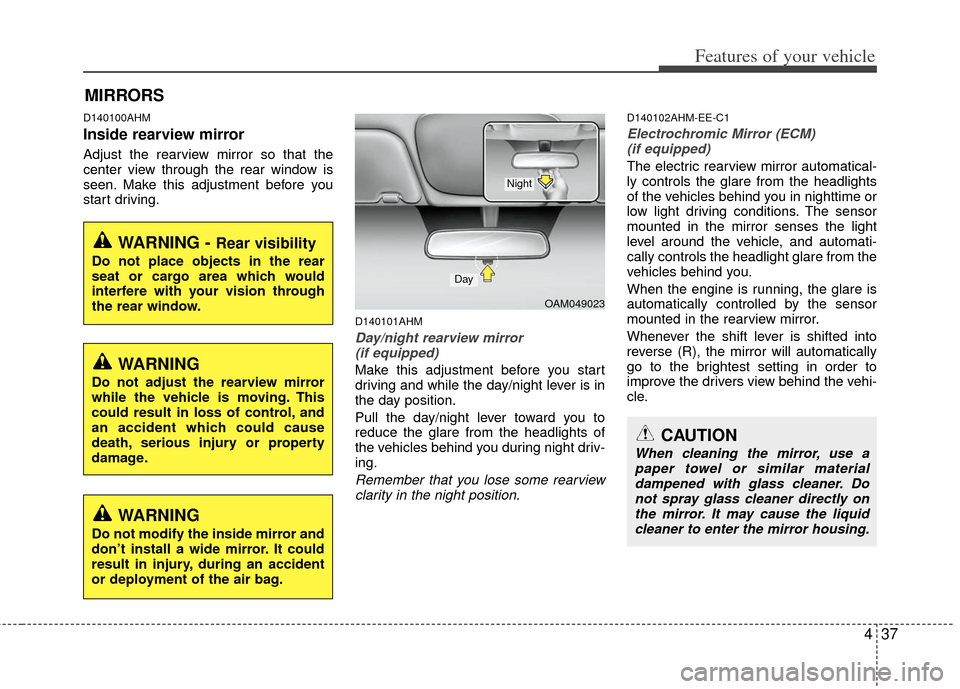
Pull the day/night lever toward you to
reduce the glare from the headlights of
the vehicles behind you during night driv-
ing.
Remember that you lose some rearviewclarity in the night position.
D140102AHM-EE-C1
Electrochromic Mirror (ECM) (if equipped)
The electric rearview mirror automatical-
ly controls the glare from the headlights
of the vehicles behind you in nighttime or
low light driving conditions. The sensor
mounted in the mirror senses the light
level around the vehicle, and automati-
cally controls the headlight glare from the
vehicles behind you.
When the engine is running, the glare is
automatically controlled by the sensor
mounted in the rearview mirror.
Whenever the shift lever is shifted into
reverse (R), the mirror will automatically
go to the brightest setting in order to
improve the drivers view behind the vehi-
cle.
MIRRORS
WARNING - Rear visibility
Do not place objects in the rear
seat or cargo area which would
interfere with your vision through
the rear window.
CAUTION
When cleaning the mirror, use apaper towel or similar materialdampened with glass cleaner. Donot spray glass cleaner directly on the mirror. It may cause the liquidcleaner to enter the mirror housing.
WARNING
Do not adjust the rearview mirror
while the vehicle is moving. This
could result in loss of control, and
an accident which could cause
death, serious injury or property
damage.
WARNING
Do not modify the inside mirror and
don’t install a wide mirror. It could
result in injury, during an accident
or deployment of the air bag.
OAM049023
Day
Night
Page 128 of 387
Features of your vehicle
38
4
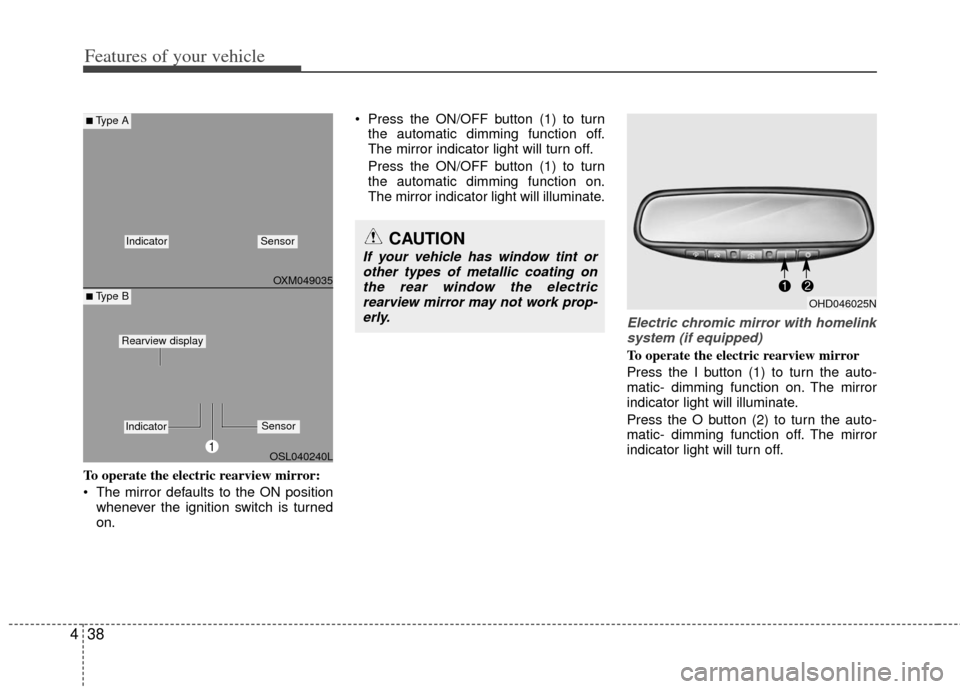
To operate the electric rearview mirror:
The mirror defaults to the ON position
whenever the ignition switch is turned
on. Press the ON/OFF button (1) to turn
the automatic dimming function off.
The mirror indicator light will turn off.
Press the ON/OFF button (1) to turn
the automatic dimming function on.
The mirror indicator light will illuminate.
Electric chromic mirror with homelinksystem (if equipped)
To operate the electric rearview mirror
Press the I button (1) to turn the auto-
matic- dimming function on. The mirror
indicator light will illuminate.
Press the O button (2) to turn the auto-
matic- dimming function off. The mirror
indicator light will turn off.
CAUTION
If your vehicle has window tint or other types of metallic coating onthe rear window the electricrearview mirror may not work prop-erly.
OHD046025N
OXM049035
OSL040240L
■Type A
■ Type B
IndicatorSensor
1
IndicatorSensor
Rearview display
Page 129 of 387
439
Features of your vehicle
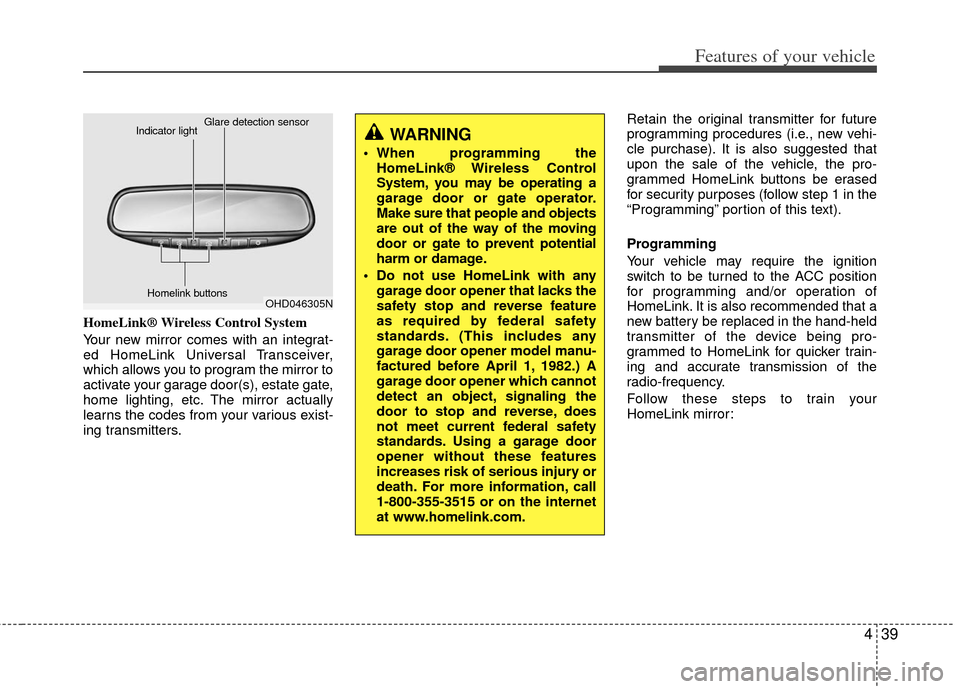
HomeLink® Wireless Control System
Your new mirror comes with an integrat-
ed HomeLink Universal Transceiver,
which allows you to program the mirror to
activate your garage door(s), estate gate,
home lighting, etc. The mirror actually
learns the codes from your various exist-
ing transmitters.Retain the original transmitter for future
programming procedures (i.e., new vehi-
cle purchase). It is also suggested that
upon the sale of the vehicle, the pro-
grammed HomeLink buttons be erased
for security purposes (follow step 1 in the
“Programming” portion of this text).
Programming
Your vehicle may require the ignition
switch to be turned to the ACC position
for programming and/or operation of
HomeLink. It is also recommended that a
new battery be replaced in the hand-held
transmitter of the device being pro-
grammed to HomeLink for quicker train-
ing and accurate transmission of the
radio-frequency.
Follow these steps to train your
HomeLink mirror:
OHD046305N
Glare detection sensor
Indicator light
Homelink buttons
WARNING
When programming theHomeLink® Wireless Control
System, you may be operating a
garage door or gate operator.
Make sure that people and objects
are out of the way of the moving
door or gate to prevent potential
harm or damage.
Do not use HomeLink with any garage door opener that lacks the
safety stop and reverse feature
as required by federal safety
standards. (This includes any
garage door opener model manu-
factured before April 1, 1982.) A
garage door opener which cannot
detect an object, signaling the
door to stop and reverse, does
not meet current federal safety
standards. Using a garage door
opener without these features
increases risk of serious injury or
death. For more information, call
1-800-355-3515 or on the internet
at www.homelink.com.
Page 130 of 387
Features of your vehicle
40
4
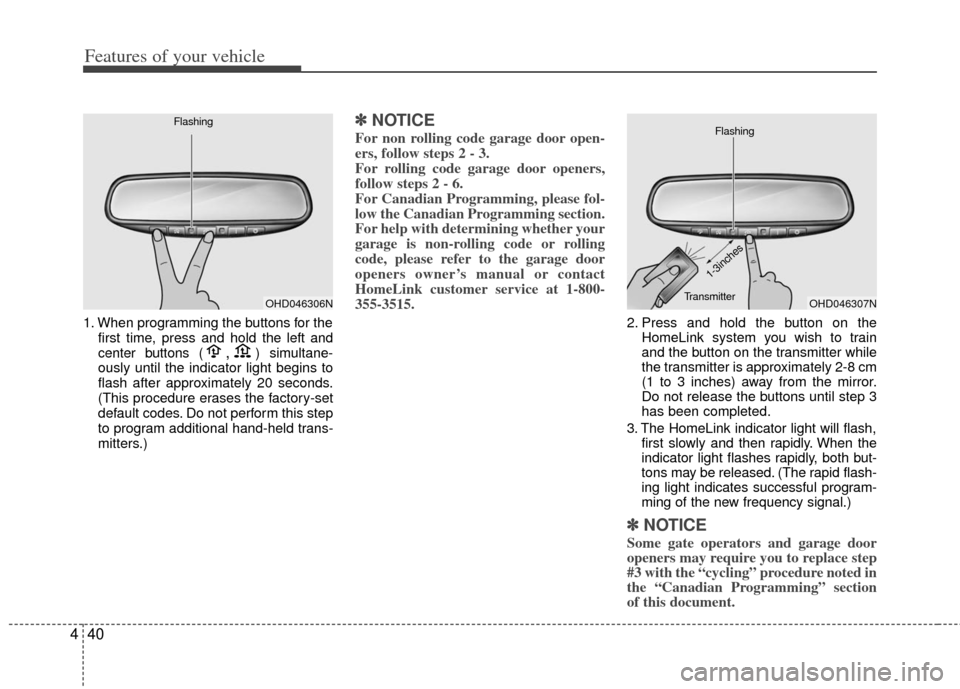
1. When programming the buttons for the
first time, press and hold the left and
center buttons (,)simultane-
ously until the indicator light begins to
flash after approximately 20 seconds.
(This procedure erases the factory-set
default codes. Do not perform this step
to program additional hand-held trans-
mitters.)
✽ ✽ NOTICE
For non rolling code garage door open-
ers, follow steps 2 - 3.
For rolling code garage door openers,
follow steps 2 - 6.
For Canadian Programming, please fol-
low the Canadian Programming section.
For help with determining whether your
garage is non-rolling code or rolling
code, please refer to the garage door
openers owner’s manual or contact
HomeLink customer service at 1-800-
355-3515.
2. Press and hold the button on the
HomeLink system you wish to train
and the button on the transmitter while
the transmitter is approximately 2-8 cm
(1 to 3 inches) away from the mirror.
Do not release the buttons until step 3
has been completed.
3. The HomeLink indicator light will flash, first slowly and then rapidly. When the
indicator light flashes rapidly, both but-
tons may be released. (The rapid flash-
ing light indicates successful program-
ming of the new frequency signal.)
✽ ✽NOTICE
Some gate operators and garage door
openers may require you to replace step
#3 with the “cycling” procedure noted in
the “Canadian Programming” section
of this document.
OHD046306N
FlashingOHD046307N
Flashing
1-3inches
Transmitter