instrument panel KIA Sportage 2013 SL / 3.G Owner's Guide
[x] Cancel search | Manufacturer: KIA, Model Year: 2013, Model line: Sportage, Model: KIA Sportage 2013 SL / 3.GPages: 387, PDF Size: 8.44 MB
Page 172 of 387
Features of your vehicle
82
4
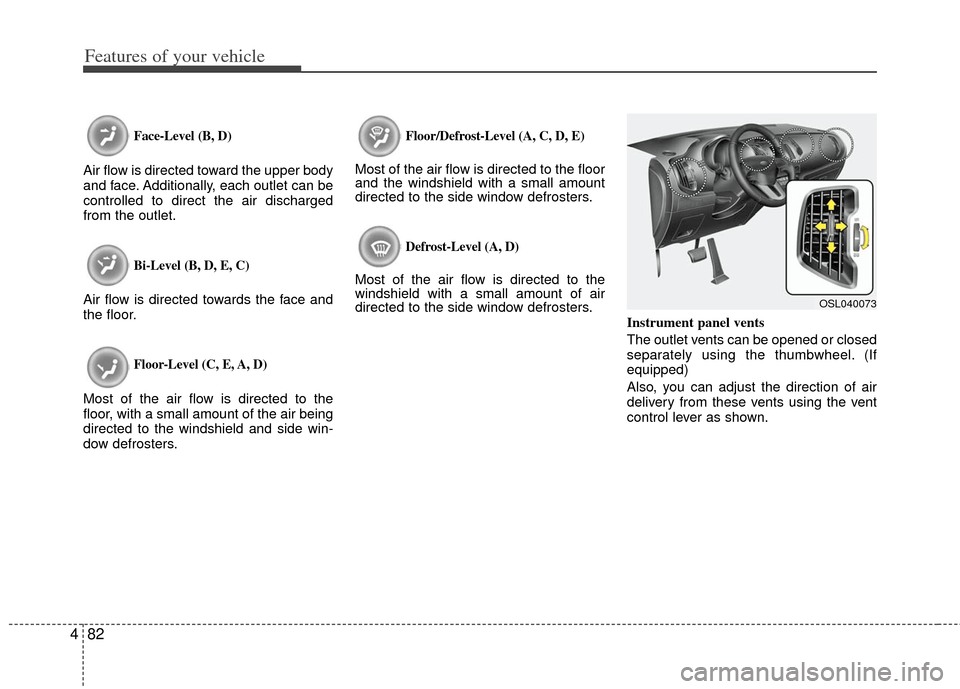
Face-Level (B, D)
Air flow is directed toward the upper body
and face. Additionally, each outlet can be
controlled to direct the air discharged
from the outlet.
Bi-Level (B, D, E, C)
Air flow is directed towards the face and
the floor.
Floor-Level (C, E, A, D)
Most of the air flow is directed to the
floor, with a small amount of the air being
directed to the windshield and side win-
dow defrosters.
Floor/Defrost-Level (A, C, D, E)
Most of the air flow is directed to the floor
and the windshield with a small amount
directed to the side window defrosters.
Defrost-Level (A, D)
Most of the air flow is directed to the
windshield with a small amount of air
directed to the side window defrosters.
Instrument panel vents
The outlet vents can be opened or closed
separately using the thumbwheel. (If
equipped)
Also, you can adjust the direction of air
delivery from these vents using the vent
control lever as shown.
OSL040073
Page 179 of 387
489
Features of your vehicle
Automatic heating and air condi-
tioning
The automatic climate control system is
controlled by simply setting the desired
temperature.
The Full Automatic Temperature Control
(FATC) system automatically controls the
heating and cooling system as follows;
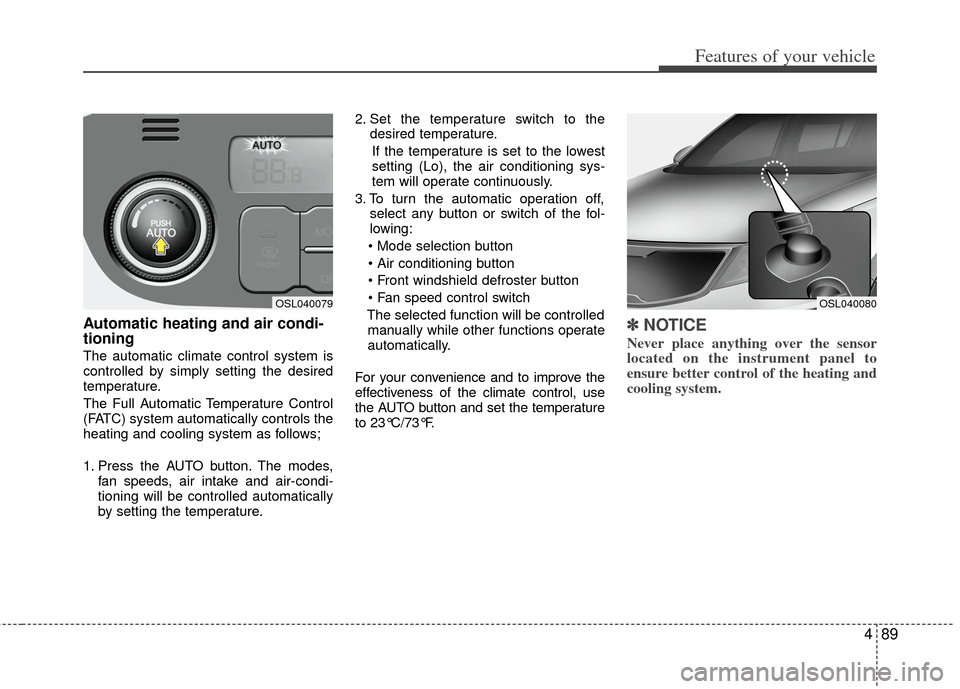
1. Press the AUTO button. The modes,fan speeds, air intake and air-condi-
tioning will be controlled automatically
by setting the temperature. 2. Set the temperature switch to the
desired temperature.
If the temperature is set to the lowest
setting (Lo), the air conditioning sys-
tem will operate continuously.
3. To turn the automatic operation off, select any button or switch of the fol-
lowing:
The selected function will be controlled manually while other functions operate
automatically.
For your convenience and to improve the
effectiveness of the climate control, use
the AUTO button and set the temperature
to 23°C/73°F.
✽ ✽ NOTICE
Never place anything over the sensor
located on the instrument panel to
ensure better control of the heating and
cooling system.
OSL040080OSL040079
Page 181 of 387
491
Features of your vehicle
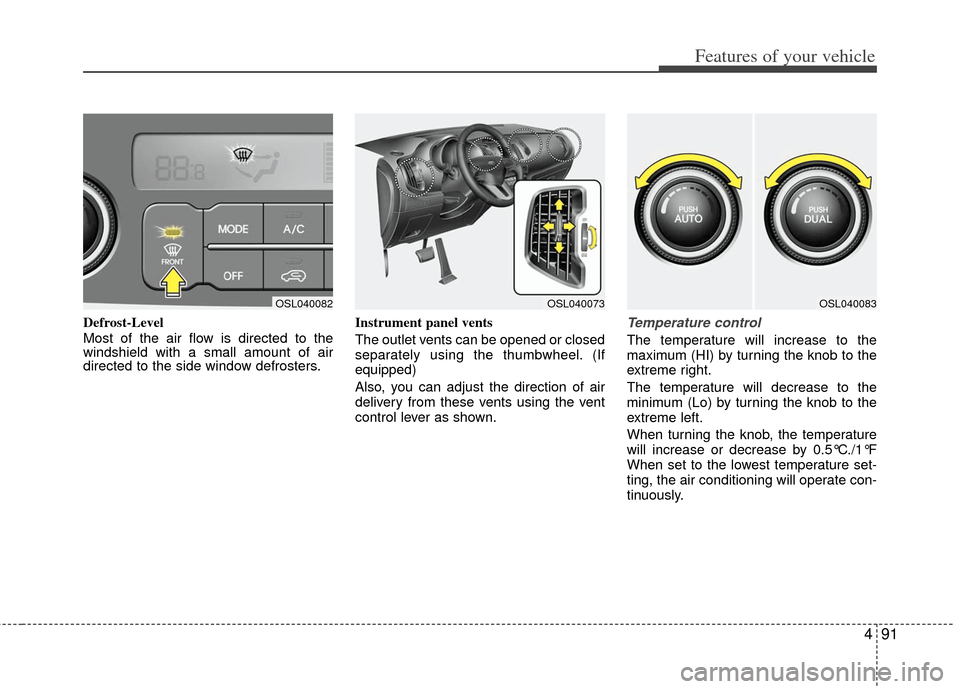
Defrost-Level
Most of the air flow is directed to the
windshield with a small amount of air
directed to the side window defrosters.Instrument panel vents
The outlet vents can be opened or closed
separately using the thumbwheel. (If
equipped)
Also, you can adjust the direction of air
delivery from these vents using the vent
control lever as shown.Temperature control
The temperature will increase to the
maximum (HI) by turning the knob to the
extreme right.
The temperature will decrease to the
minimum (Lo) by turning the knob to the
extreme left.
When turning the knob, the temperature
will increase or decrease by 0.5°C./1°F
When set to the lowest temperature set-
ting, the air conditioning will operate con-
tinuously.
OSL040082OSL040073OSL040083
Page 288 of 387
557
Driving your vehicle
E140405AFD
Turn signals when towing a trailer
When you tow a trailer, your vehicle has
to have a different turn signal flasher and
extra wiring. The green arrows on your
instrument panel will flash whenever you
signal a turn or lane change. Properly
connected, the trailer lights will also flash
to alert other drivers you’re about to turn,
change lanes, or stop.
When towing a trailer, the green arrows
on your instrument panel will flash for
turns even if the bulbs on the trailer are
burned out. Thus, you may think drivers
behind you are seeing your signals
when, in fact, they are not. It’s important
to check occasionally to be sure the trail-
er bulbs are still working. You must also
check the lights every time you discon-
nect and then reconnect the wires.
Do not connect a trailer lighting system
directly to your vehicle’s lighting system.
Use only an approved trailer wiring har-
ness.
An authorized Kia dealer can assist you
in installing the wiring harness.
E140406AFD
Driving on grades
Reduce speed and shift to a lower gear
before you start down a long or steep
downgrade. If you don’t shift down, you
might have to use your brakes so much
that they would get hot and no longer
operate efficiently.
On a long uphill grade, shift down and
reduce your speed to around 70 km/h (45
mph) to reduce the possibility of engine
and transaxle overheating.
If your trailer weighs more than the max-
imum trailer weight without trailer brakes
and you have an automatic transaxle,
you should drive in D (Drive) when tow-
ing a trailer.
Operating your vehicle in D (Drive) when
towing a trailer will minimize heat build up
and extend the life of your transaxle.
WARNING
Failure to use an approved trailer
wiring harness could result in dam-
age to the vehicle electrical system
and/or personal injury.
Page 367 of 387
749
Maintenance
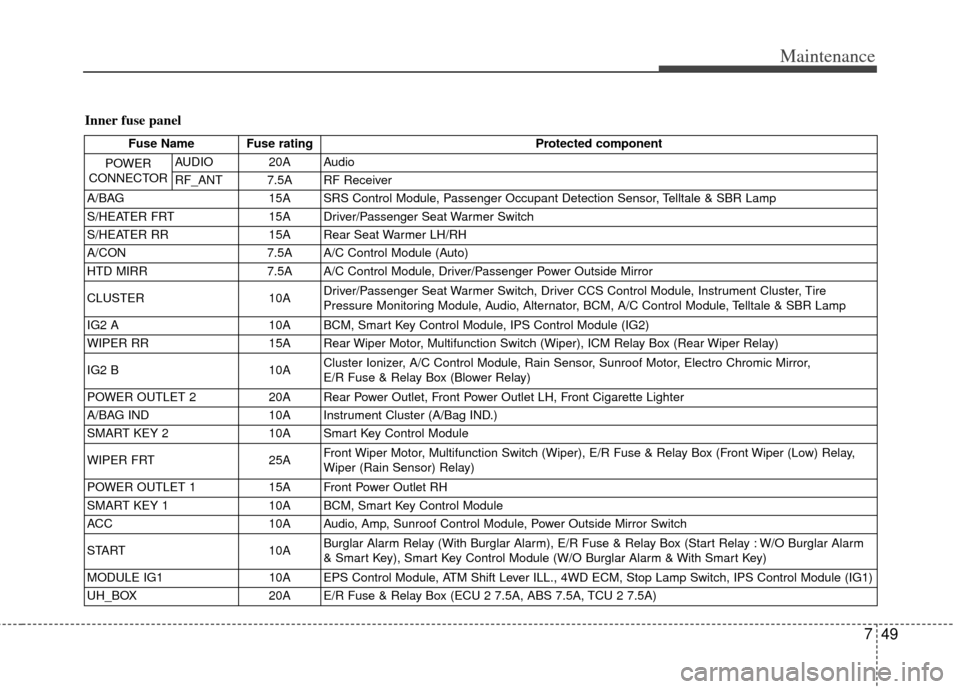
Inner fuse panel
Fuse Name Fuse ratingProtected component
POWER
CONNECTOR
AUDIO 20A Audio
RF_ANT 7.5A RF Receiver
A/BAG 15A SRS Control Module, Passenger Occupant Detection Sensor, Telltale & SBR Lamp
S/HEATER FRT 15A Driver/Passenger Seat Warmer Switch
S/HEATER RR 15A Rear Seat Warmer LH/RH
A/CON 7.5A A/C Control Module (Auto)
HTD MIRR 7.5A A/C Control Module, Driver/Passenger Power Outside Mirror
CLUSTER 10A Driver/Passenger Seat Warmer Switch, Driver CCS Control Module, Instrument Cluster, Tire
Pressure Monitoring Module, Audio, Alternator, BCM, A/C Control Module, Telltale & SBR Lamp
IG2 A 10A BCM, Smart Key Control Module, IPS Control Module (IG2)
WIPER RR 15A Rear Wiper Motor, Multifunction Switch (Wiper), ICM Relay Box (Rear Wiper Relay)
IG2 B 10A Cluster Ionizer, A/C Control Module, Rain Sensor, Sunroof Motor, Electro Chromic Mirror,
E/R Fuse & Relay Box (Blower Relay)
POWER OUTLET 2 20A Rear Power Outlet, Front Power Outlet LH, Front Cigarette Lighter
A/BAG IND 10A Instrument Cluster (A/Bag IND.)
SMART KEY 2 10A Smart Key Control Module
WIPER FRT 25A Front Wiper Motor, Multifunction Switch (Wiper), E/R Fuse & Relay Box (Front Wiper (Low) Relay,
Wiper (Rain Sensor) Relay)
POWER OUTLET 1 15A Front Power Outlet RH
SMART KEY 1 10A BCM, Smart Key Control Module
ACC 10A Audio, Amp, Sunroof Control Module, Power Outside Mirror Switch
START 10A Burglar Alarm Relay (With Burglar Alarm), E/R Fuse & Relay Box (Start Relay : W/O Burglar Alarm
& Smart Key), Smart Key Control Module (W/O Burglar Alarm & With Smart Key)
MODULE IG1 10A EPS Control Module, ATM Shift Lever ILL., 4WD ECM, Stop Lamp Switch, IPS Control Module (IG1)
UH_BOX 20A E/R Fuse & Relay Box (ECU 2 7.5A, ABS 7.5A, TCU 2 7.5A)