EPS KIA Sportage 2013 SL / 3.G Owner's Manual
[x] Cancel search | Manufacturer: KIA, Model Year: 2013, Model line: Sportage, Model: KIA Sportage 2013 SL / 3.GPages: 387, PDF Size: 8.44 MB
Page 18 of 387
Introduction
61
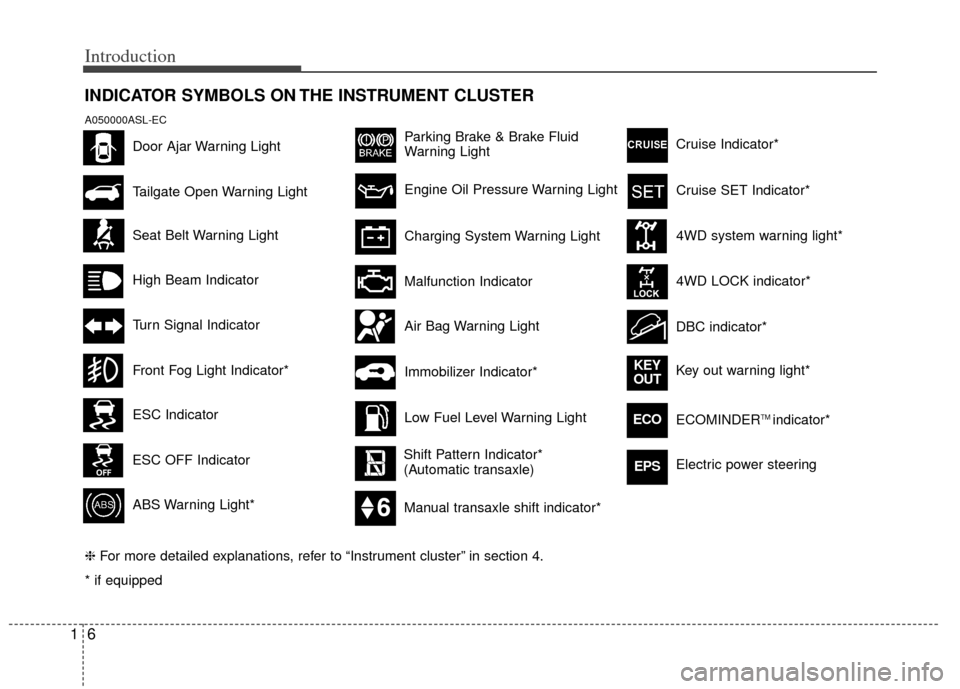
INDICATOR SYMBOLS ON THE INSTRUMENT CLUSTER
Seat Belt Warning Light
Turn Signal Indicator
ABS Warning Light*
Parking Brake & Brake Fluid
Warning Light
Malfunction Indicator
Low Fuel Level Warning Light
* if equipped Tailgate Open Warning Light
❈ For more detailed explanations, refer to “Instrument cluster” in section 4.
Charging System Warning Light
Door Ajar Warning Light
A050000ASL-EC
Front Fog Light Indicator*
Engine Oil Pressure Warning Light
Air Bag Warning Light
Shift Pattern Indicator*
(Automatic transaxle)
ESC Indicator
ESC OFF Indicator Cruise Indicator*
4WD system warning light*
4WD LOCK indicator*
DBC indicator*
Key out warning light*
KEY
OUT
ECOECOMINDERTM indicator*
Cruise SET Indicator*
High Beam Indicator
Manual transaxle shift indicator*
Electric power steeringEPS
Immobilizer Indicator*
Page 36 of 387
Safety features of your vehicle
14
3
CAUTION- Rear seat belts
When returning the rear seatbacks
to the upright position, remember to return the rear shoulder belts totheir proper position. Routing the seat belt webbing through the rearseat belt guides will help keep thebelts from being trapped behind orunder the seats.
CAUTION - Damaging rear
seat belt buckles
When you fold the rear seatback,
insert the buckle in the pocketbetween the rear seatback andcushion. Doing so can prevent thebuckle from being damaged by the rear seatback.
WARNING - Cargo loading
Make sure the engine is off, the
automatic transaxle is in P (Park) or
the manual transaxle is in 1st, and
the parking brake is securely
applied whenever loading or
unloading cargo. Failure to take
these steps may allow the vehicle
to move if the shift lever is inadver-
tently moved to another position.
WARNING- Cargo
Cargo should always be secured to
prevent it from being thrown about
the vehicle in a collision and caus-
ing injury to the vehicle occupants.
Do not place objects on the rear
seats, since they cannot be proper-
ly secured and may hit the front
seat occupants in a collision.
WARNING - Uprighting
seat
When you return the seatback to its
upright position, hold the seatback
and return it slowly and be sure
there are no other occupants
around the seat. If the seatback is
returned without being held and
controlled, the back of the seat
could move forward or backward
resulting in accidental injury to a
person struck by the seatback.
Page 59 of 387
337
Safety features of your vehicle
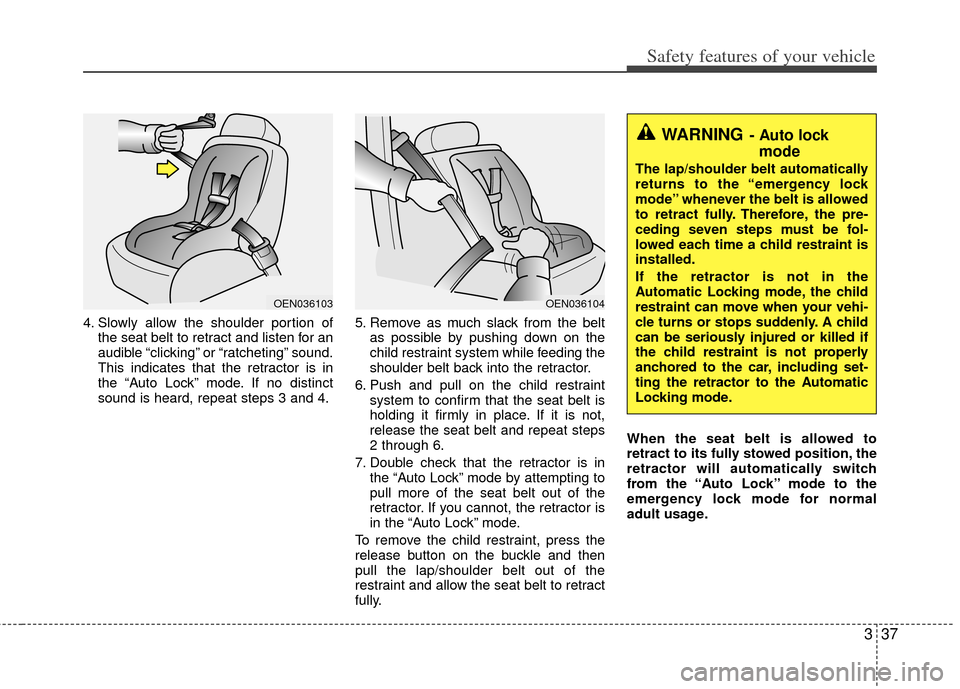
4. Slowly allow the shoulder portion ofthe seat belt to retract and listen for an
audible “clicking” or “ratcheting” sound.
This indicates that the retractor is in
the “Auto Lock” mode. If no distinct
sound is heard, repeat steps 3 and 4. 5. Remove as much slack from the belt
as possible by pushing down on the
child restraint system while feeding the
shoulder belt back into the retractor.
6. Push and pull on the child restraint system to confirm that the seat belt is
holding it firmly in place. If it is not,
release the seat belt and repeat steps
2 through 6.
7. Double check that the retractor is in the “Auto Lock” mode by attempting to
pull more of the seat belt out of the
retractor. If you cannot, the retractor is
in the “Auto Lock” mode.
To remove the child restraint, press the
release button on the buckle and then
pull the lap/shoulder belt out of the
restraint and allow the seat belt to retract
fully. When the seat belt is allowed to
retract to its fully stowed position, the
retractor will automatically switch
from the “Auto Lock” mode to the
emergency lock mode for normal
adult usage.
OEN036104OEN036103
WARNING- Auto lock
mode
The lap/shoulder belt automatically
returns to the “emergency lock
mode” whenever the belt is allowed
to retract fully. Therefore, the pre-
ceding seven steps must be fol-
lowed each time a child restraint is
installed.
If the retractor is not in the
Automatic Locking mode, the child
restraint can move when your vehi-
cle turns or stops suddenly. A child
can be seriously injured or killed if
the child restraint is not properly
anchored to the car, including set-
ting the retractor to the Automatic
Locking mode.
Page 103 of 387
413
Features of your vehicle
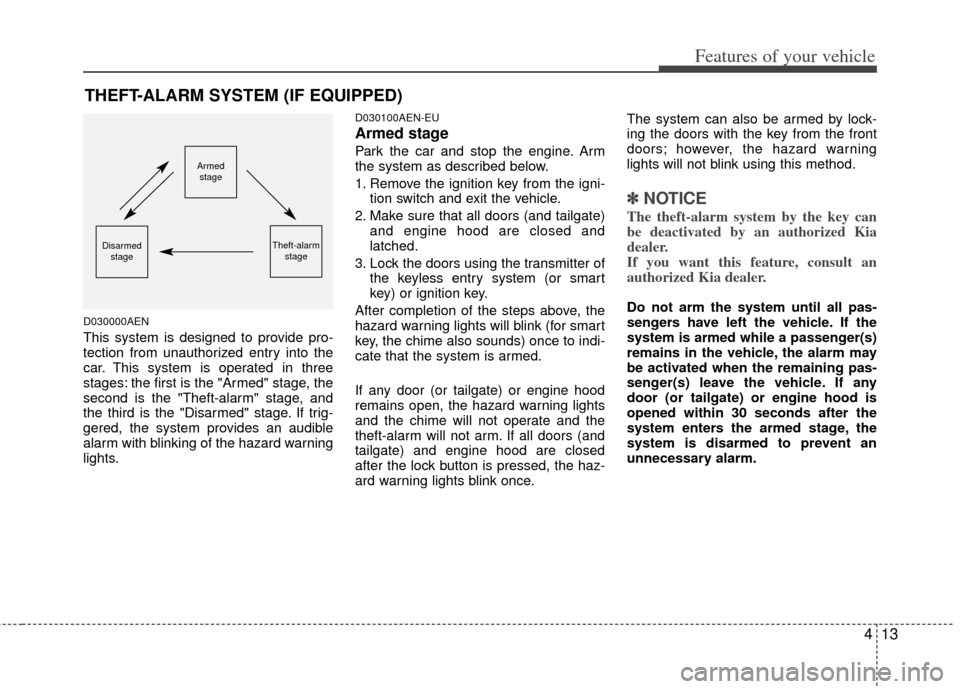
D030000AEN
This system is designed to provide pro-
tection from unauthorized entry into the
car. This system is operated in three
stages: the first is the "Armed" stage, the
second is the "Theft-alarm" stage, and
the third is the "Disarmed" stage. If trig-
gered, the system provides an audible
alarm with blinking of the hazard warning
lights.
D030100AEN-EU
Armed stage
Park the car and stop the engine. Arm
the system as described below.
1. Remove the ignition key from the igni-tion switch and exit the vehicle.
2. Make sure that all doors (and tailgate) and engine hood are closed and
latched.
3. Lock the doors using the transmitter of the keyless entry system (or smart
key) or ignition key.
After completion of the steps above, the
hazard warning lights will blink (for smart
key, the chime also sounds) once to indi-
cate that the system is armed.
If any door (or tailgate) or engine hood
remains open, the hazard warning lights
and the chime will not operate and the
theft-alarm will not arm. If all doors (and
tailgate) and engine hood are closed
after the lock button is pressed, the haz-
ard warning lights blink once. The system can also be armed by lock-
ing the doors with the key from the front
doors; however, the hazard warning
lights will not blink using this method.
✽ ✽
NOTICE
The theft-alarm system by the key can
be deactivated by an authorized Kia
dealer.
If you want this feature, consult an
authorized Kia dealer.
Do not arm the system until all pas-
sengers have left the vehicle. If the
system is armed while a passenger(s)
remains in the vehicle, the alarm may
be activated when the remaining pas-
senger(s) leave the vehicle. If any
door (or tailgate) or engine hood is
opened within 30 seconds after the
system enters the armed stage, the
system is disarmed to prevent an
unnecessary alarm.
THEFT-ALARM SYSTEM (IF EQUIPPED)
Armed
stage
Theft-alarm stageDisarmedstage
Page 124 of 387
Features of your vehicle
34
4
Electric power steering
Power steering uses the motor to assist
you in steering the vehicle. If the engine
is off or if the power steering system
becomes inoperative, the vehicle may
still be steered, but it will require
increased steering effort.
The motor driven power steering is con-
trolled by the power steering control unit
which senses the steering wheel torque
and vehicle speed to command the
motor.
The steering wheel becomes heavier as
the vehicle’s speed increases and
becomes lighter as the vehicle’s speed
decreases for better control of the steer-
ing wheel.
Should you notice any change in the
effort required to steer during normal
vehicle operation, have the power steer-
ing checked by an authorized Kia dealer.
✽ ✽
NOTICE
The following symptoms may occur dur-
ing normal vehicle operation:
• The EPS warning light does not illu-
minate.
• The steering effort is high immediate- ly after turning the ignition switch on.
This happens as the system performs
the EPS system diagnostics. When the
diagnostics is completed, the steering
wheel will return to its normal condi-
tion.
• A click noise may be heard from the EPS relay after the ignition switch is
turned to the ON or LOCK position.
• Motor noise may be heard when the vehicle is at a stop or at a low driving
speed.
• The steering effort can suddenly increase, if the operation of the EPS
system is stopped to prevent serious
accidents when it detects malfunction
of the EPS system by self-diagnosis.
• The steering effort increases if the steering wheel is rotated continuously
when the vehicle is not in motion.
However, after a few minutes, it will
return to its normal conditions.
• When you operate the steering wheel in low temperature, abnormal noise
could occur. If temperature rises, the
noise will disappear. This is a normal
condition.
STEERING WHEEL
CAUTION
If the EPS system does not operate
normally, the warning light will illu-minate on the instrument cluster. The steering wheel may becomedifficult to control or operate abnor-mally. Take your vehicle to an authorized Kia dealer and have thevehicle checked as soon as possi- ble.
Page 129 of 387
439
Features of your vehicle
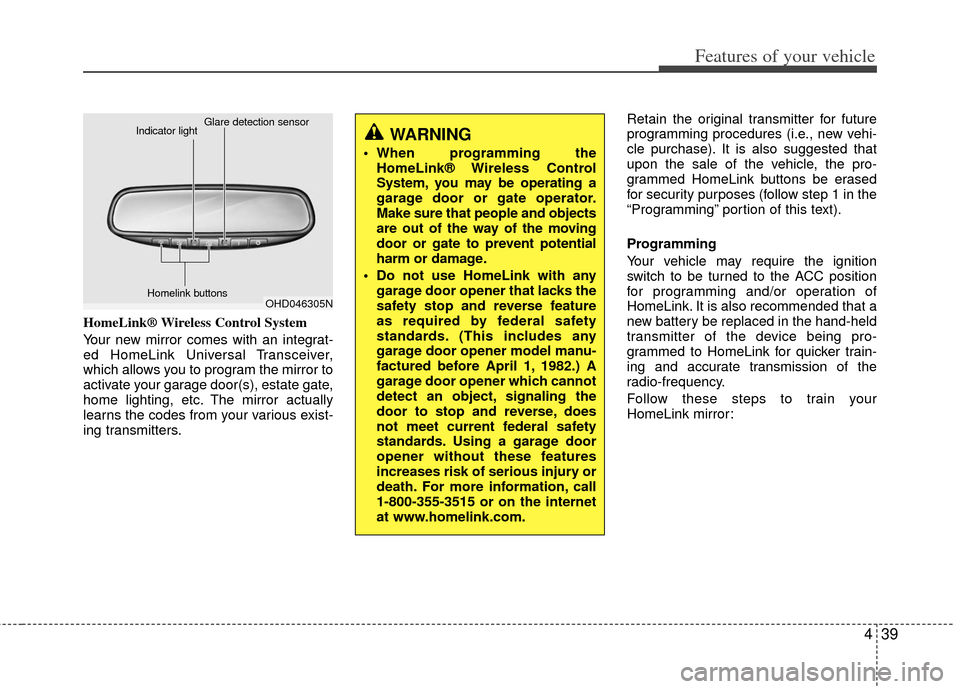
HomeLink® Wireless Control System
Your new mirror comes with an integrat-
ed HomeLink Universal Transceiver,
which allows you to program the mirror to
activate your garage door(s), estate gate,
home lighting, etc. The mirror actually
learns the codes from your various exist-
ing transmitters.Retain the original transmitter for future
programming procedures (i.e., new vehi-
cle purchase). It is also suggested that
upon the sale of the vehicle, the pro-
grammed HomeLink buttons be erased
for security purposes (follow step 1 in the
“Programming” portion of this text).
Programming
Your vehicle may require the ignition
switch to be turned to the ACC position
for programming and/or operation of
HomeLink. It is also recommended that a
new battery be replaced in the hand-held
transmitter of the device being pro-
grammed to HomeLink for quicker train-
ing and accurate transmission of the
radio-frequency.
Follow these steps to train your
HomeLink mirror:
OHD046305N
Glare detection sensor
Indicator light
Homelink buttons
WARNING
When programming theHomeLink® Wireless Control
System, you may be operating a
garage door or gate operator.
Make sure that people and objects
are out of the way of the moving
door or gate to prevent potential
harm or damage.
Do not use HomeLink with any garage door opener that lacks the
safety stop and reverse feature
as required by federal safety
standards. (This includes any
garage door opener model manu-
factured before April 1, 1982.) A
garage door opener which cannot
detect an object, signaling the
door to stop and reverse, does
not meet current federal safety
standards. Using a garage door
opener without these features
increases risk of serious injury or
death. For more information, call
1-800-355-3515 or on the internet
at www.homelink.com.
Page 130 of 387
Features of your vehicle
40
4
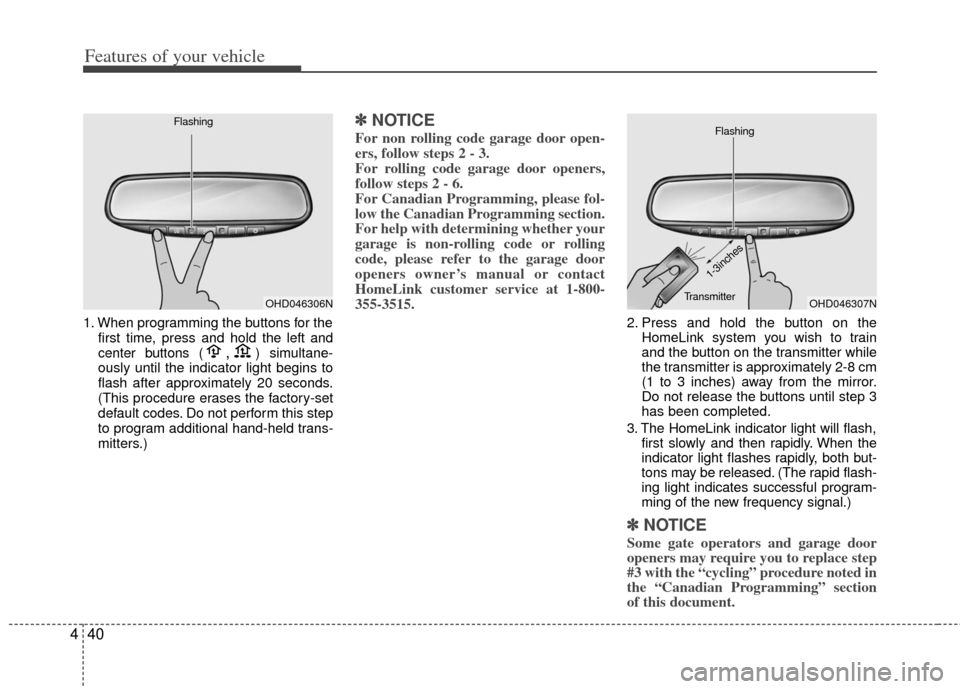
1. When programming the buttons for the
first time, press and hold the left and
center buttons (,)simultane-
ously until the indicator light begins to
flash after approximately 20 seconds.
(This procedure erases the factory-set
default codes. Do not perform this step
to program additional hand-held trans-
mitters.)
✽ ✽ NOTICE
For non rolling code garage door open-
ers, follow steps 2 - 3.
For rolling code garage door openers,
follow steps 2 - 6.
For Canadian Programming, please fol-
low the Canadian Programming section.
For help with determining whether your
garage is non-rolling code or rolling
code, please refer to the garage door
openers owner’s manual or contact
HomeLink customer service at 1-800-
355-3515.
2. Press and hold the button on the
HomeLink system you wish to train
and the button on the transmitter while
the transmitter is approximately 2-8 cm
(1 to 3 inches) away from the mirror.
Do not release the buttons until step 3
has been completed.
3. The HomeLink indicator light will flash, first slowly and then rapidly. When the
indicator light flashes rapidly, both but-
tons may be released. (The rapid flash-
ing light indicates successful program-
ming of the new frequency signal.)
✽ ✽NOTICE
Some gate operators and garage door
openers may require you to replace step
#3 with the “cycling” procedure noted in
the “Canadian Programming” section
of this document.
OHD046306N
FlashingOHD046307N
Flashing
1-3inches
Transmitter
Page 132 of 387
Features of your vehicle
42
4
Reprogramming a single HomeLink
button
To program a device to HomeLink using
a HomeLink button previously trained,
follow these steps:
1. Press and hold the desired HomeLink
button. Do NOT release until step 4
has been completed.
2. When the indicator light begins to flash slowly (after 20 seconds), position the
hand-held transmitter 2-8 cm (1 to 3
inches) away from the HomeLink sur-
face.
3. Press and hold the hand-held trans- mitter button (or press and “cycle” - as
described in “Canadian Programming”
above).
4. The HomeLink indicator light will flash, first slowly and then rapidly. When the
indicator light begins to flash rapidly,
release both buttons.
The previous device has now been
erased and the new device can be acti-
vated by pushing the HomeLink button
that has just been programmed. This pro-
cedure will not affect any other pro-
grammed HomeLink buttons. Gate operator programming & canadi-
an programming
During programming, your hand-held
transmitter may automatically stop trans-
mitting. Continue to press and hold the
HomeLink button (note steps 2 through 4
in the “Programming” portion of this text)
while you press and re-press (“cycle”)
your handheld transmitter every two sec-
onds until the frequency signal has been
learned. The indicator light will flash
slowly and then rapidly after several sec-
onds upon successful training.
Accessories
If you would like additional information on
the HomeLink Wireless Control System,
HomeLink compatible products, or to
purchase other accessories such as the
HomeLink® Lighting Package, please
contact HomeLink at 1-800-355-3515 or
on the internet at www.homelink.com.
This device complies with Industry
Canada Standard RSS-210.
Operation is subject to the following two
conditions:
1. This device may not cause harmful
interference, and
2. This device must accept any interfer- ence received, including interference
that may cause undesired operation.
CAUTION
If programming a garage dooropener or gate, it is advised tounplug the device during the“cycling” process to prevent possi-ble motor burn-up.
WARNING
The HomeLink transmitter has
been tested and complies with FCC
and industry Canada rules.
Changes or modifications not
expressly approved by the party
responsible for compliance could
void the user’s authority to operate
the equipment.
IC: 4112104541A Gentex
MODEL/FCC ID: NZLSTDHL3
Page 141 of 387
451
Features of your vehicle
✽
✽NOTICE
• If the vehicle is not on level ground or
the battery power has been interrupt-
ed, the “Distance to empty” function
may not operate correctly.
The trip computer may not register
additional fuel if less than 6 liters (1.6
gallons) of fuel are added to the vehi-
cle.
• The fuel consumption and distance to empty values may vary significantly
based on driving conditions, driving
habits, and condition of the vehicle.
• The distance to empty value is an esti- mate of the available driving distance.
This value may differ from the actual
driving distance available.
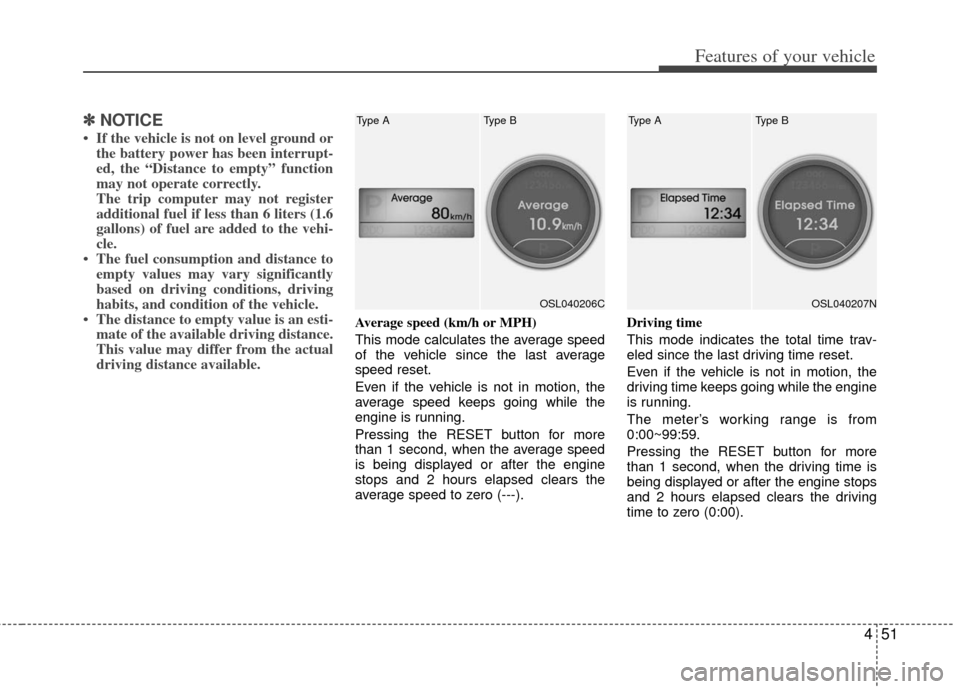
Average speed (km/h or MPH)
This mode calculates the average speed
of the vehicle since the last average
speed reset.
Even if the vehicle is not in motion, the
average speed keeps going while the
engine is running.
Pressing the RESET button for more
than 1 second, when the average speed
is being displayed or after the engine
stops and 2 hours elapsed clears the
average speed to zero (---). Driving time
This mode indicates the total time trav-
eled since the last driving time reset.
Even if the vehicle is not in motion, the
driving time keeps going while the engine
is running.
The meter’s working range is from
0:00~99:59.
Pressing the RESET button for more
than 1 second, when the driving time is
being displayed or after the engine stops
and 2 hours elapsed clears the driving
time to zero (0:00).
OSL040206C
Type B
Type AOSL040207N
Type B
Type A
Page 144 of 387
Features of your vehicle
54
4
D150303AHM-U1
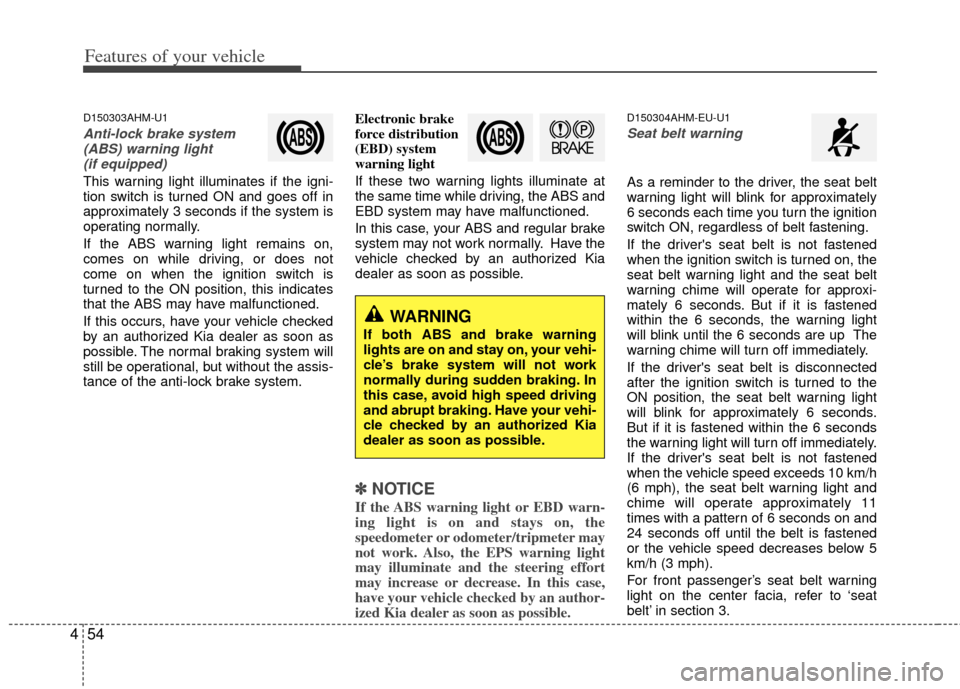
Anti-lock brake system
(ABS) warning light (if equipped)
This warning light illuminates if the igni-
tion switch is turned ON and goes off in
approximately 3 seconds if the system is
operating normally.
If the ABS warning light remains on,
comes on while driving, or does not
come on when the ignition switch is
turned to the ON position, this indicates
that the ABS may have malfunctioned.
If this occurs, have your vehicle checked
by an authorized Kia dealer as soon as
possible. The normal braking system will
still be operational, but without the assis-
tance of the anti-lock brake system. Electronic brake
force distribution
(EBD) system
warning light
If these two warning lights illuminate at
the same time while driving, the ABS and
EBD system may have malfunctioned.
In this case, your ABS and regular brake
system may not work normally. Have the
vehicle checked by an authorized Kia
dealer as soon as possible.
✽ ✽
NOTICE
If the ABS warning light or EBD warn-
ing light is on and stays on, the
speedometer or odometer/tripmeter may
not work. Also, the EPS warning light
may illuminate and the steering effort
may increase or decrease. In this case,
have your vehicle checked by an author-
ized Kia dealer as soon as possible.
D150304AHM-EU-U1
Seat belt warning
As a reminder to the driver, the seat belt
warning light will blink for approximately
6 seconds each time you turn the ignition
switch ON, regardless of belt fastening.
If the driver's seat belt is not fastened
when the ignition switch is turned on, the
seat belt warning light and the seat belt
warning chime will operate for approxi-
mately 6 seconds. But if it is fastened
within the 6 seconds, the warning light
will blink until the 6 seconds are up The
warning chime will turn off immediately.
If the driver's seat belt is disconnected
after the ignition switch is turned to the
ON position, the seat belt warning light
will blink for approximately 6 seconds.
But if it is fastened within the 6 seconds
the warning light will turn off immediately.
If the driver's seat belt is not fastened
when the vehicle speed exceeds 10 km/h
(6 mph), the seat belt warning light and
chime will operate approximately 11
times with a pattern of 6 seconds on and
24 seconds off until the belt is fastened
or the vehicle speed decreases below 5
km/h (3 mph).
For front passenger’s seat belt warning
light on the center facia, refer to ‘seat
belt’ in section 3.
WARNING
If both ABS and brake warning
lights are on and stay on, your vehi-
cle’s brake system will not work
normally during sudden braking. In
this case, avoid high speed driving
and abrupt braking. Have your vehi-
cle checked by an authorized Kia
dealer as soon as possible.