warning KIA Sportage 2015 QL / 4.G Owner's Manual
[x] Cancel search | Manufacturer: KIA, Model Year: 2015, Model line: Sportage, Model: KIA Sportage 2015 QL / 4.GPages: 499, PDF Size: 16.07 MB
Page 407 of 499

What to do in an emergency
12
6
Wheels may have sharp edges.
Handle them carefully to avoid possi-
ble severe injury. Before putting the
wheel into place, be sure that there
is nothing on the hub or wheel (such
as mud, tar, gravel, etc.) that pre-
vents with the wheel from fitting
solidly against the hub. 10. To install the wheel, hold it on the
studs, put the wheel nuts on the
studs and tighten them finger
tight. Jiggle the tire to be sure it is
completely seated, then tighten
the nuts as much as possible
with your fingers again.
11. Lower the vehicle to the ground by turning the wheel nut wrench
counterclockwise.
Then position the wrench as shown
in the drawing and tighten the wheel
nuts. Be sure the socket is seated
completely over the nut. Do not stand
on the wrench handle or use an
extension pipe over the wrench han-
dle. Go around the wheel tightening
every nut following the numerical
sequence shown in the image until
they are all tight. Then double-check
each nut for tightness. After changing
wheels, have an authorized Kia deal-
er tighten the wheel nuts to their
proper torque as soon as possible.
Wheel nut tightening torque:
9~11 kg·m (65~79 lb·ft)
OLM069007
WARNING- Installing awheel
Make sure the wheel makes
good contact with the hub when
installed. If the contact of the
mounting surface between the
wheel and hub is not good, the
wheel nuts could come loose
and cause the loss of a wheel.
Loss of a wheel may result in
loss of control of the vehicle.
Page 408 of 499

613
What to do in an emergency
If you have a tire gauge, remove the
valve cap and check the air pressure.
If the pressure is lower than recom-
mended, drive slowly to the nearest
service station and inflate to the cor-
rect pressure. If it is too high, adjust
it until it is correct. Always reinstall
the valve cap after checking or
adjusting the tire pressure. If the cap
is not replaced, dust and dirt may get
into the tire valve and air may leak
from the tire. If you lose a valve cap,
buy another and install it as soon as
possible.
After you have changed the wheels,
always secure the flat tire in its place
and return the jack and tools to their
proper storage locations.Note that most lug nuts do not have
metric threads. Be sure to use
extreme care in checking for thread
style before installing aftermarket lug
nuts or wheels. If in doubt, consult an
authorized Kia dealer.To prevent the jack, jack handle,
wheel lug nut wrench and spare tire
from rattling while the vehicle is in
motion, store them properly.
Check the inflation pressures as
soon as possible after installing the
spare tire. Adjust it to the specified
pressure, if necessary. Refer to
“Tires and wheels” in section 8.CAUTION - Reusing lug
nuts
Make certain during wheelremoval that the same nuts thatwere removed are reinstalled -or, if replaced, that nuts withmetric threads and the samechamfer configuration are used.Your vehicle has metric threadson the wheel studs and nuts.Installation of a non-metricthread nut on a metric stud willnot secure the wheel to the hubproperly and will damage thestud so that it must be replaced.
WARNING- Wheel studs
If the studs are damaged, they
may lose their ability to retain
the wheel. This could lead to the
loss of the wheel and a colli-
sion.
Page 409 of 499

What to do in an emergency
14
6
F070301AUN-EU
Important - use of compact spare
tire
Your vehicle is equipped with a com-
pact spare tire. This compact spare
tire takes up less space than a regu-
lar-size tire. This tire is smaller than a
conventional tire and is designed for
temporary use only.
You should drive carefully when the compact spare is in use. The
compact spare should be replaced
by the proper conventional tire and
rim at the first opportunity.
The operation of this vehicle is not recommended with more than one
compact spare tire in use at the
same time. The compact spare should be inflat-
ed to 420 kPa (60 psi).
✽ ✽
NOTICE
Check the inflation pressure after
installing the spare tire. Adjust it to
the specified pressure, as necessary.
When using a compact spare tire,
observe the following precautions:
Under no circumstances should
you exceed 80 km/h (50 mph); a
higher speed could damage the
tire.
Ensure that you drive slowly enough for the road conditions to
avoid all hazards. Any road hazard,
such as a pothole or debris, could
seriously damage the compact
spare.
Any continuous road use of this tire could result in tire failure, loss of
vehicle control, and possible per-
sonal injury.
Do not exceed the vehicle’s maxi- mum load rating or the load-carry-
ing capacity shown on the sidewall
of the compact spare tire.
WARNING
The compact spare tire is for
emergency use only. Do not
operate your vehicle on this
compact spare at speeds over
80 km/h (50 mph). The original
tire should be repaired or
replaced as soon as is possible
to avoid failure of the spare
possibly leading to personal
injury or death.
Page 412 of 499
617
What to do in an emergency
TOWING
F080100AAM-EU
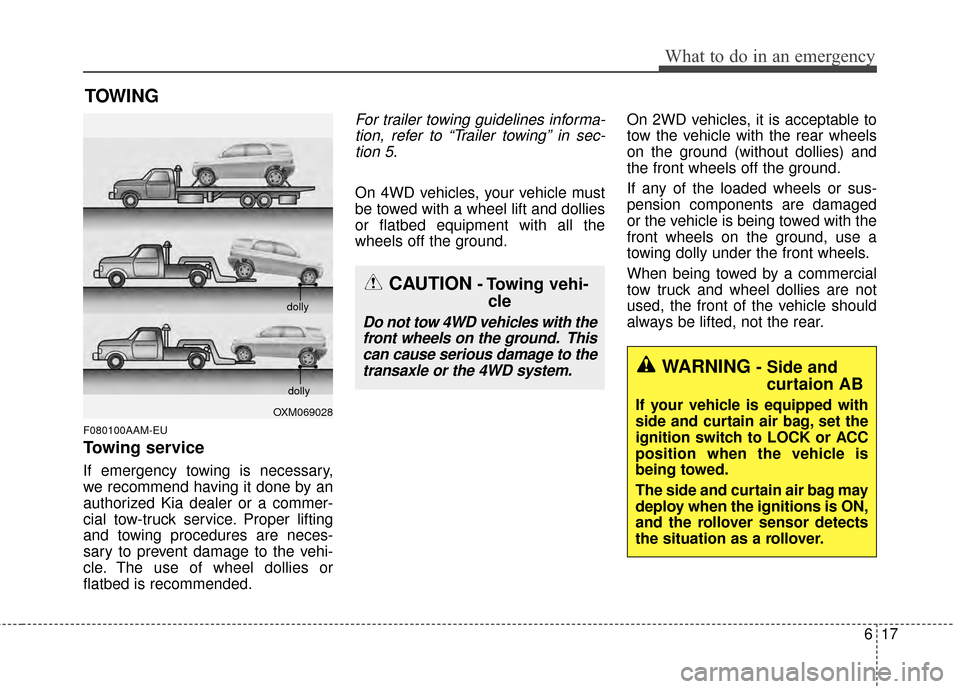
Towing service
If emergency towing is necessary,
we recommend having it done by an
authorized Kia dealer or a commer-
cial tow-truck service. Proper lifting
and towing procedures are neces-
sary to prevent damage to the vehi-
cle. The use of wheel dollies or
flatbed is recommended.
For trailer towing guidelines informa-tion, refer to “Trailer towing” in sec-tion 5.
On 4WD vehicles, your vehicle must
be towed with a wheel lift and dollies
or flatbed equipment with all the
wheels off the ground. On 2WD vehicles, it is acceptable to
tow the vehicle with the rear wheels
on the ground (without dollies) and
the front wheels off the ground.
If any of the loaded wheels or sus-
pension components are damaged
or the vehicle is being towed with the
front wheels on the ground, use a
towing dolly under the front wheels.
When being towed by a commercial
tow truck and wheel dollies are not
used, the front of the vehicle should
always be lifted, not the rear.
OXM069028dolly
dolly
WARNING- Side and
curtaion AB
If your vehicle is equipped with
side and curtain air bag, set the
ignition switch to LOCK or ACC
position when the vehicle is
being towed.
The side and curtain air bag may
deploy when the ignitions is ON,
and the rollover sensor detects
the situation as a rollover.
CAUTION- Towing vehi- cle
Do not tow 4WD vehicles with the
front wheels on the ground. Thiscan cause serious damage to thetransaxle or the 4WD system.
Page 413 of 499

What to do in an emergency
18
6
When towing your vehicle in an
emergency without wheel dollies :
1.Set the ignition switch in the ACC
position.
2.Place the transaxle shift lever in N (Neutral).
3.Release the parking brake.
✽ ✽ NOTICE
Towing requires additional equip-
ment. See Owner's Manual for tow-
ing capacity, additional instructions
and warnings. Always use caution
while towing.
Removable towing hook
(if equipped)
1.Open the tailgate, and remove the
towing hook from the tool case.
2.Remove the hole cover pressing the lower part of the cover on the
bumper.
CAUTION- Towing gearposition
Failure to place the transaxle
shift lever in N (Neutral) maycause internal damage to thetransaxle.
CAUTION- Towing
• Do not tow the vehicle back- wards with the front wheels onthe ground as this may causedamage to the vehicle.
Do not tow with sling-type equipment. Use wheel lift orflatbed equipment.
OUN046030
OCM054034
OSL060010
OSL060011
■Front
■Rear
Page 416 of 499
621
What to do in an emergency
F080301AAM-EU
Emergency towing precautions
Turn the ignition switch to ACC sothe steering wheel isn’t locked.
Place the transaxle shift lever in N (Neutral).
Release the parking bake.
Press the brake pedal with more force than usual since you will have
reduced brake performance.
More steering effort will be required because the power steer-
ing system will be disabled.
If you are driving down a long hill, the brakes may overheat and brake
performance will be reduced. Stop
often and let the brakes cool off.
If the car is being towed with all four wheels on the ground, it can
be towed only from the front. Be
sure that the transaxle is in neutral.
Be sure the steering is unlocked by
placing the ignition switch in the
ACC position. A driver must be in
the towed vehicle to operate the
steering and brakes.
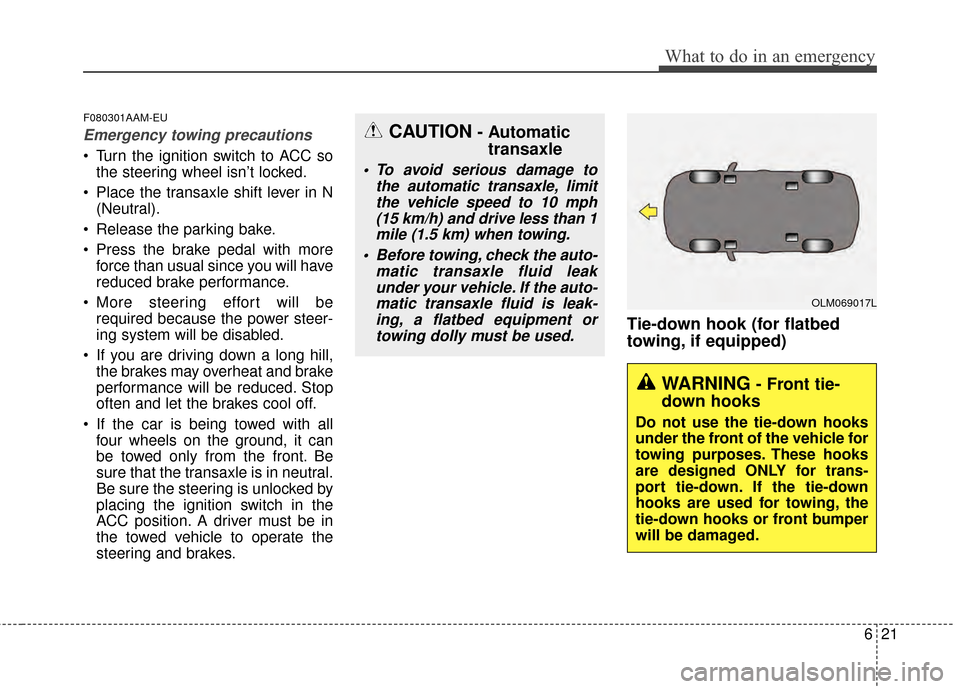
Tie-down hook (for flatbed
towing, if equipped)
WARNING- Front tie-
down hooks
Do not use the tie-down hooks
under the front of the vehicle for
towing purposes. These hooks
are designed ONLY for trans-
port tie-down. If the tie-down
hooks are used for towing, the
tie-down hooks or front bumper
will be damaged.
OLM069017L
CAUTION- Automatic transaxle
To avoid serious damage to
the automatic transaxle, limitthe vehicle speed to 10 mph(15 km/h) and drive less than 1mile (1.5 km) when towing.
Before towing, check the auto- matic transaxle fluid leakunder your vehicle. If the auto-matic transaxle fluid is leak-ing, a flatbed equipment ortowing dolly must be used.
Page 420 of 499

Maintenance
47
G020200AUN-EU
Owner maintenance precau-
tions
Improper or incomplete service may
result in problems. This section gives
instructions only for the maintenance
items that are easy to perform.
As explained earlier in this section,
several procedures can be done only
by an authorized Kia dealer with spe-
cial tools.
✽ ✽NOTICE
Improper owner maintenance dur-
ing the warranty period may affect
warranty coverage. For details, read
the separate Warranty & Consumer
Information manual provided with
the vehicle. If you're unsure about
any servicing or maintenance proce-
dure, have it done by an authorized
Kia dealer.
WARNING- Maintenance
work
Do not wear jewelry or loose
clothing while working under
the hood of your vehicle with
the engine running. These can
become entangled in moving
parts, if you must run the
engine while working under the
hood, make certain that you
remove all jewelry (especially
rings, bracelets, watches, and
necklaces) and all neckties,
scarves, and similar loose
clothing before getting near the
engine or cooling fans.
Page 421 of 499
75
Maintenance
OWNER MAINTENANCE
G030000AUN
The following lists are vehicle checks
and inspections that should be per-
formed by the owner or an author-
ized Kia dealer at the frequencies
indicated to help ensure safe,
dependable operation of your vehi-
cle.
Any adverse conditions should be
brought to the attention of your deal-
er as soon as possible.
These Owner Maintenance Checks
are generally not covered by war-
ranties and you may be charged for
labor, parts and lubricants used.Owner maintenance schedule
G030101AHM
When you stop for fuel:
Check the engine oil level.
Check the coolant level in thecoolant reservoir.
Check the windshield washer fluid level.
Look for low or under-inflated tires.
G030102AAM
While operating your vehicle:
Note any changes in the sound of the exhaust or any smell of
exhaust fumes in the vehicle.
Check for vibrations in the steering wheel. Notice any increased steer-
ing effort or looseness in the steer-
ing wheel, or change in its straight-
ahead position.
Notice if your vehicle constantly turns slightly or “pulls” to one side
when traveling on smooth, level
road.
When stopping, listen and check for unusual sounds, pulling to one
side, increased brake pedal travel
or “hard-to-push” brake pedal.
If any slipping or changes in the operation of your transaxle occurs,
check the transaxle fluid level.
Check the automatic transaxle P (Park) function.
Check the parking brake.
Check for fluid leaks under your vehicle (water dripping from the air
conditioning system during or after
use is normal).
WARNING- Hot coolant
Be careful when checking your
engine coolant level when the
engine is hot. Scalding hot
coolant and steam may blow
out under pressure.
Page 422 of 499
Maintenance
67
G030103AHM
At least monthly:
Check the coolant level in theengine coolant reservoir.
Check the operation of all exterior lights, including the stoplights, turn
signals and hazard warning flash-
ers.
Check the inflation pressures of all tires including the spare.
G030104AHM
At least twice a year
(i.e., every Spring and Fall):
Check the radiator, heater and air conditioning hoses for leaks or
damage.
Check the windshield washer spray and wiper operation. Clean
the wiper blades with clean cloth
dampened with washer fluid.
Check the headlight alignment.
Check the muffler, exhaust pipes, shields and clamps.
Check the lap/shoulder belts for wear and function.
Check for worn tires and loose wheel lug nuts.
G030105AHM-C1
At least once a year:
Clean the body and door drainholes.
Lubricate the door hinges and checks, and hood hinges.
Lubricate the door and hood locks and latches.
Lubricate the door rubber weather- strips.
Check the air conditioning system.
Check the power steering fluid level.
Inspect and lubricate the automat- ic transaxle linkage and controls.
Clean the battery and terminals.
Check the brake/clutch fluid level.
Page 433 of 499

717
Maintenance
ENGINE OIL
❈The actual feature may differ from the
illustration.
G060100AHM-EU
Checking the engine oil level
1.Be sure the vehicle is on level ground.
2.Start the engine and allow it to reach normal operating tempera-
ture.
3.Turn the engine off and wait for a few minutes (about 5 minutes) for
the oil to return to the oil pan.
4.Pull the dipstick out, wipe it clean, and re-insert it fully. 5.Pull the dipstick out again and
check the level. The level should be
between F and L.
WARNING- Radiatorhose
Be very careful not to touch the
radiator hose when checking or
adding the engine oil as it may
be hot enough to burn you.
CAUTION- Replacing engine oil
Do not overfill the engine oil. It
may damage the engine.
Do not spill engine oil, when adding or changing engineoil. If you drop the engine oilon the engine room, wipe it offimmediately.
OSL074102N
OSL071003N
GDI engine
T-GDI engine