instrument cluster KIA SPORTAGE 2022 Features and Functions Guide
[x] Cancel search | Manufacturer: KIA, Model Year: 2022, Model line: SPORTAGE, Model: KIA SPORTAGE 2022Pages: 58, PDF Size: 4.49 MB
Page 13 of 58
11ALWAYS CHECK THE OWNER’S MANUAL FOR COMPLETE OPER ATING INFORMATION AND SAFET Y WARNINGS. *IF EQUIPPED †LEGAL DISCL AIMERS ON BACK INSIDE COVER
BCW is a supplemental system. Do not solely rely on this system and always pay attention to the road and its conditions.
Images are for illustrative purposes only and may not reflect actual operation.
Refer to section 5 in the Owner’s Manual for more information.
Blind-Spot Collision Warning (BCW)†6
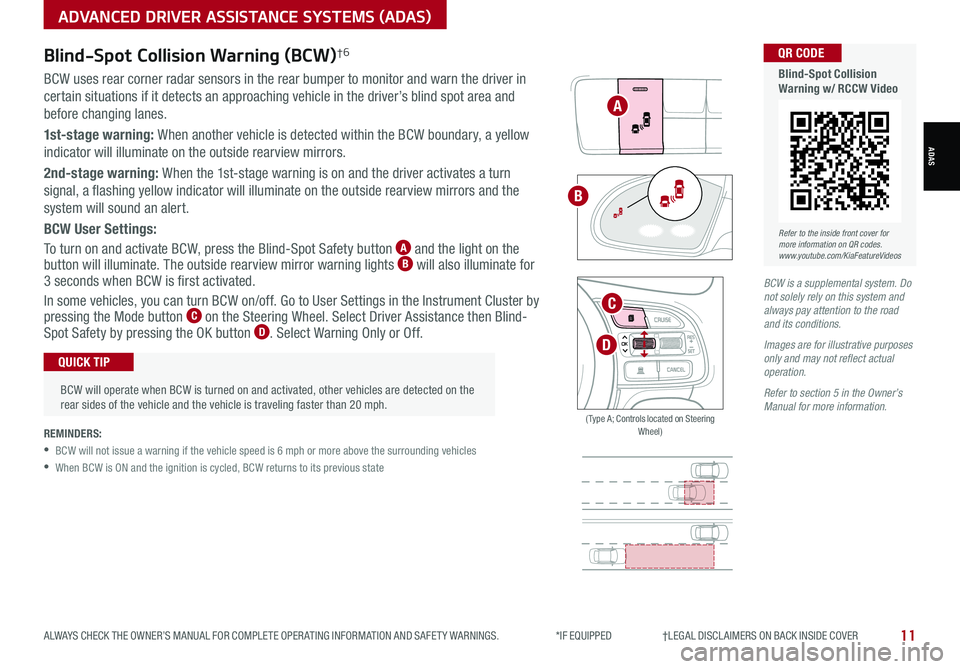
BCW uses rear corner radar sensors in the rear bumper to monitor and warn the driver in
certain situations if it detects an approaching vehicle in the driver’s blind spot area and
before changing lanes.
1st-stage warning: When another vehicle is detected within the BCW boundary, a yellow
indicator will illuminate on the outside rearview mirrors.
2nd-stage warning: When the 1st-stage warning is on and the driver activates a turn
signal, a flashing yellow indicator will illuminate on the outside rearview mirrors and the
system will sound an alert.
BCW User Settings:
To turn on and activate BCW, press the Blind-Spot Safety button A and the light on the button will illuminate. The outside rearview mirror warning lights B will also illuminate for 3 seconds when BCW is first activated.
In some vehicles, you can turn BCW on/off. Go to User Settings in the Instrument Cluster by pressing the Mode button C on the Steering Wheel. Select Driver Assistance then Blind- Spot Safety by pressing the OK button D . Select Warning Only or Off.
REMINDERS:
•
BCW will not issue a warning if the vehicle speed is 6 mph or more above the surrounding vehicles
•When BCW is ON and the ignition is cycled, BCW returns to its previous state
A
B
ADVANCED DRIVER ASSISTANCE SYSTEMS (ADAS)
ADAS
OK
C
D
( Type A; Controls located on Steering Wheel)
Refer to the inside front cover for more information on QR codes.www.youtube.com/KiaFeatureVideos
QR CODE
Blind-Spot Collision Warning w/ RCCW Video
•
BCW will operate when BCW is turned on and activated, other vehicles are detected on the rear sides of the vehicle and the vehicle is traveling faster than 20 mph.
QUICK TIP
Page 14 of 58
12SPORTAGE FEATURES & FUNCTIONS GUIDE*IF EQUIPPED †LEGAL DISCL AIMERS ON BACK INSIDE COVER
ADVANCED DRIVER ASSISTANCE SYSTEMS (ADAS)
ADAS
Driver Attention Warning (DAW)*†7
DAW is designed to alert the driver if it detects inattentive driving practices and, in certain situations, can give a warning
signal to take a break from driving.
Driver Attention Warning modes:
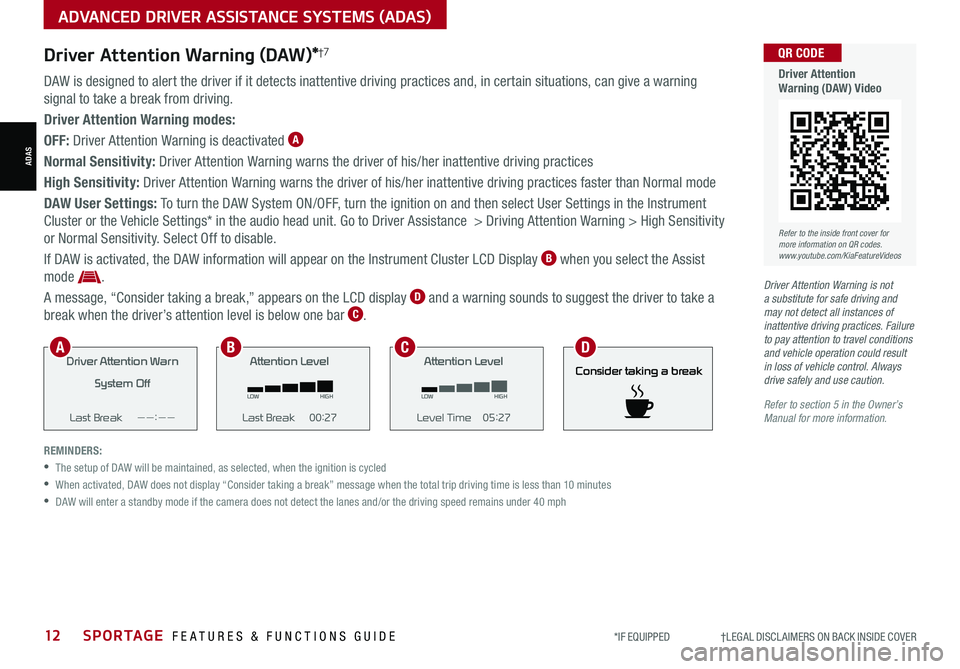
OFF: Driver Attention Warning is deactivated A
Normal Sensitivity: Driver Attention Warning warns the driver of his/her inattentive driving practices
High Sensitivity: Driver Attention Warning warns the driver of his/her inattentive driving practices faster than Normal mode
DAW User Settings: To turn the DAW System ON/OFF, turn the ignition on and then select User Settings in the Instrument
Cluster or the Vehicle Settings* in the audio head unit. Go to Driver Assistance > Driving Attention Warning > High Sensitivity
or Normal Sensitivity. Select Off to disable.
If DAW is activated, the DAW information will appear on the Instrument Cluster LCD Display B when you select the Assist
mode .
A message, “Consider taking a break,” appears on the LCD display D and a warning sounds to suggest the driver to take a
break when the driver’s attention level is below one bar C.
REMINDERS:
•The setup of DAW will be maintained, as selected, when the ignition is cycled
•
When activated, DAW does not display “Consider taking a break” message when the total trip driving time is less than 10 minutes
•DAW will enter a standby mode if the camera does not detect the lanes and/or the driving speed remains under 40 mph
Driver Attention Warn
System Off
Last Break ——:——Attention Level
LOW HIGH
Last Break 00:27 Attention Level
LOW
HIGH
Level Time 05:27
Consider taking a break
22.4
°C4025km
Driver Attention War n
System Off
Last Break ——:——Attention Level
LOW HIGH
Last Break 00:27
Attention Level
LOWHIGH
Level Time 05:27
Consider taking a break
22.4
°C4025km
Driver Attention War n
System Off
Last Break ——:—— Attention Level
LOW
HIGH
Last Break 00:27
Attention Level
LOWHIGH
Level Time 05:27
Consider taking a break
22.4
°C4025km
Consider taking a break
Driver Attention Warning is not a substitute for safe driving and may not detect all instances of inattentive driving practices. Failure to pay attention to travel conditions and vehicle operation could result in loss of vehicle control. Always drive safely and use caution.
Refer to section 5 in the Owner’s Manual for more information.
ABCD
Refer to the inside front cover for more information on QR codes.www.youtube.com/KiaFeatureVideos
QR CODE
Driver Attention Warning (DAW) Video
Page 16 of 58
14SPORTAGE FEATURES & FUNCTIONS GUIDE*IF EQUIPPED †LEGAL DISCL AIMERS ON BACK INSIDE COVER
ADVANCED DRIVER ASSISTANCE SYSTEMS (ADAS)
ADAS
Smart Cruise Control (SCC)*†6
Smart Cruise Control is designed to maintain a predetermined distance from vehicles detected ahead
by automatically adjusting the driving speed as needed. When traffic is detected, the vehicle will slow
down to maintain a set distance behind traffic without depressing the accelerator or brake pedal.
With the SCC on and activated, the vehicle distance set, and the system detects a vehicle slowing or
stopping, the system can bring the vehicle to a complete stop. When the vehicle ahead starts to move
forward, SCC system re-engages. If the vehicle ahead stops for more than 3 seconds, the accelerator
pedal or the RES+ button must be pressed to start moving the vehicle.
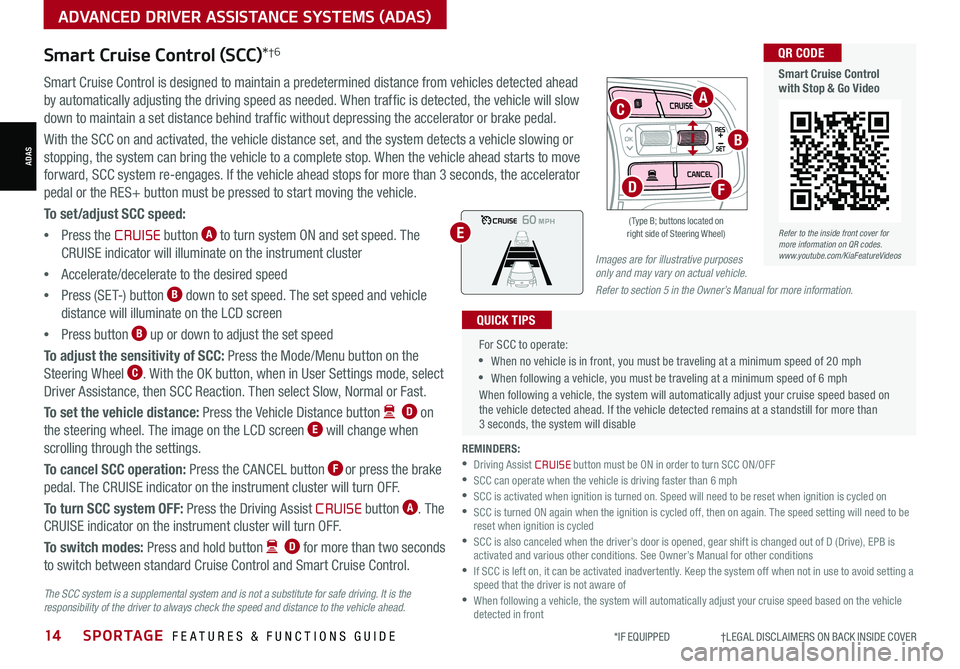
To set/adjust SCC speed:
•Press the CRUISE button A to turn system ON and set speed. The
CRUISE indicator will illuminate on the instrument cluster
•Accelerate/decelerate to the desired speed
•Press (SET-) button B down to set speed. The set speed and vehicle
distance will illuminate on the LCD screen
•Press button B up or down to adjust the set speed
To adjust the sensitivity of SCC: Press the Mode/Menu button on the
Steering Wheel C. With the OK button, when in User Settings mode, select
Driver Assistance, then SCC Reaction. Then select Slow, Normal or Fast.
To set the vehicle distance: Press the Vehicle Distance button D on
the steering wheel. The image on the LCD screen E will change when
scrolling through the settings.
To cancel SCC operation: Press the CANCEL button F or press the brake
pedal. The CRUISE indicator on the instrument cluster will turn OFF.
To turn SCC system OFF: Press the Driving Assist CRUISE button A. The
CRUISE indicator on the instrument cluster will turn OFF.
To switch modes: Press and hold button D for more than two seconds
to switch between standard Cruise Control and Smart Cruise Control.
Images are for illustrative purposes only and may vary on actual vehicle.
Refer to section 5 in the Owner’s Manual for more information.
60
60
60
60
( Type B; buttons located on right side of Steering Wheel)
OK
D
C
E
A
B
F
REMINDERS: •Driving Assist CRUISE button must be ON in order to turn SCC ON/OFF •SCC can operate when the vehicle is driving faster than 6 mph •
SCC is activated when ignition is turned on. Speed will need to be reset when ignition is cycled on •
SCC is turned ON again when the ignition is cycled off, then on again. The speed setting will need to be reset when ignition is cycled •
SCC is also canceled when the driver’s door is opened, gear shift is changed out of D (Drive), EPB is activated and various other conditions. See Owner’s Manual for other conditions •
If SCC is left on, it can be activated inadvertently. Keep the system off when not in use to avoid setting a speed that the driver is not aware of •
When following a vehicle, the system will automatically adjust your cruise speed based on the vehicle detected in front
For SCC to operate:
•When no vehicle is in front, you must be traveling at a minimum speed of 20 mph
•When following a vehicle, you must be traveling at a minimum speed of 6 mph
When following a vehicle, the system will automatically adjust your cruise speed based on the vehicle detected ahead. If the vehicle detected remains at a standstill for more than 3 seconds, the system will disable
QUICK TIPS
Refer to the inside front cover for more information on QR codes.www.youtube.com/KiaFeatureVideos
QR CODE
Smart Cruise Control with Stop & Go Video
The SCC system is a supplemental system and is not a substitute for safe driving. It is the responsibility of the driver to always check the speed and distance to the vehicle ahead.
Page 17 of 58
15ALWAYS CHECK THE OWNER’S MANUAL FOR COMPLETE OPER ATING INFORMATION AND SAFET Y WARNINGS. *IF EQUIPPED †LEGAL DISCL AIMERS ON BACK INSIDE COVER
ADVANCED DRIVER ASSISTANCE SYSTEMS (ADAS)
RCCW is a supplemental system. Do not solely rely on this system and always pay attention to the road and its conditions.
Images are for illustrative purposes only and may not reflect actual operation.
Refer to section 5 in the Owner’s Manual for more information.
Rear Cross-Traffic Collision Warning
(RCCW)*†6
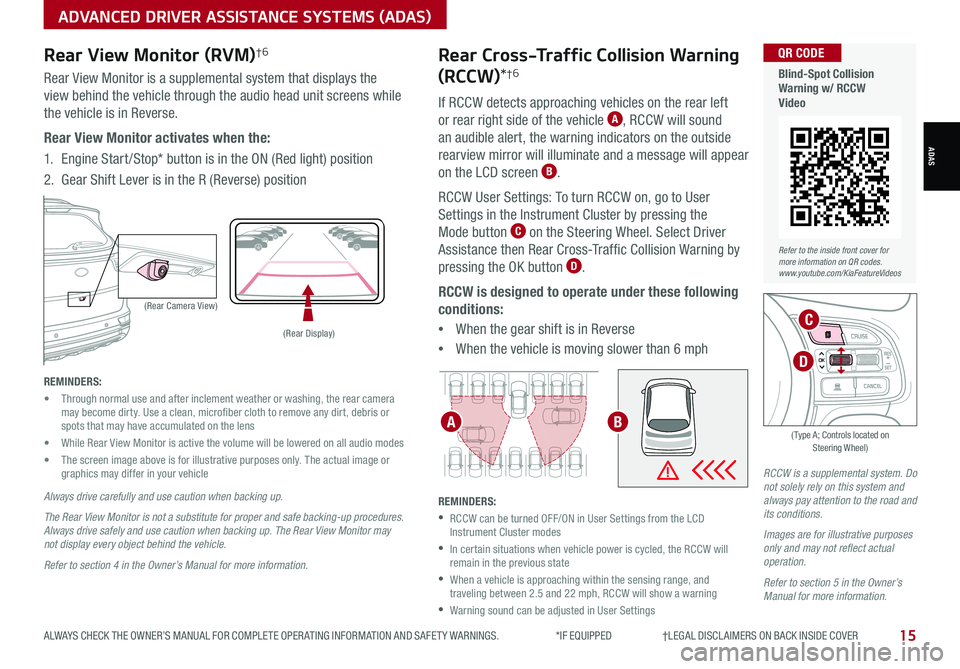
If RCCW detects approaching vehicles on the rear left
or rear right side of the vehicle A, RCCW will sound
an audible alert, the warning indicators on the outside
rearview mirror will illuminate and a message will appear
on the LCD screen B.
RCCW User Settings: To turn RCCW on, go to User
Settings in the Instrument Cluster by pressing the
Mode button C on the Steering Wheel. Select Driver
Assistance then Rear Cross-Traffic Collision Warning by
pressing the OK button D.
RCCW is designed to operate under these following
conditions:
•When the gear shift is in Reverse
•When the vehicle is moving slower than 6 mph
REMINDERS:
•
RCCW can be turned OFF/ON in User Settings from the LCD Instrument Cluster modes
•
In certain situations when vehicle power is cycled, the RCCW will remain in the previous state
•
When a vehicle is approaching within the sensing range, and traveling between 2.5 and 22 mph, RCCW will show a warning
•Warning sound can be adjusted in User Settings
ADAS
Refer to the inside front cover for more information on QR codes.www.youtube.com/KiaFeatureVideos
QR CODE
Blind-Spot Collision Warning w/ RCCW Video
REMINDERS:
• Through normal use and after inclement weather or washing, the rear camera may become dirty. Use a clean, microfiber cloth to remove any dirt, debris or spots that may have accumulated on the lens
• While Rear View Monitor is active the volume will be lowered on all audio modes
• The screen image above is for illustrative purposes only. The actual image or graphics may differ in your vehicle
(Rear Camera View)
(Rear Display)
P
R
N
DSHIFTL OCK
RELEASE
Rear View Monitor (RVM)†6
Rear View Monitor is a supplemental system that displays the
view behind the vehicle through the audio head unit screens while
the vehicle is in Reverse.
Rear View Monitor activates when the:
1. Engine Start /Stop* button is in the ON (Red light) position
2.
Gear Shift Lever is in the R (Reverse) position
Always drive carefully and use caution when backing up.
The Rear View Monitor is not a substitute for proper and safe backing-up procedures. Always drive safely and use caution when backing up. The Rear View Monitor may not display every object behind the vehicle.
Refer to section 4 in the Owner’s Manual for more information.
OK
C
A
D
( Type A; Controls located on Steering Wheel)
B
Page 19 of 58
17ALWAYS CHECK THE OWNER’S MANUAL FOR COMPLETE OPER ATING INFORMATION AND SAFET Y WARNINGS. *IF EQUIPPED †LEGAL DISCL AIMERS ON BACK INSIDE COVER
DRIVER'S PANEL
Hill-Start Assist Control (HAC)†8
Power Liftgate Open/Close Button*
HAC is designed to help prevent the vehicle from rolling backward when
accelerating from a stop while on a steep incline.
The HAC automatically activates whether the ESC is OFF or ON but does
NOT activate when the ESC has malfunctioned.
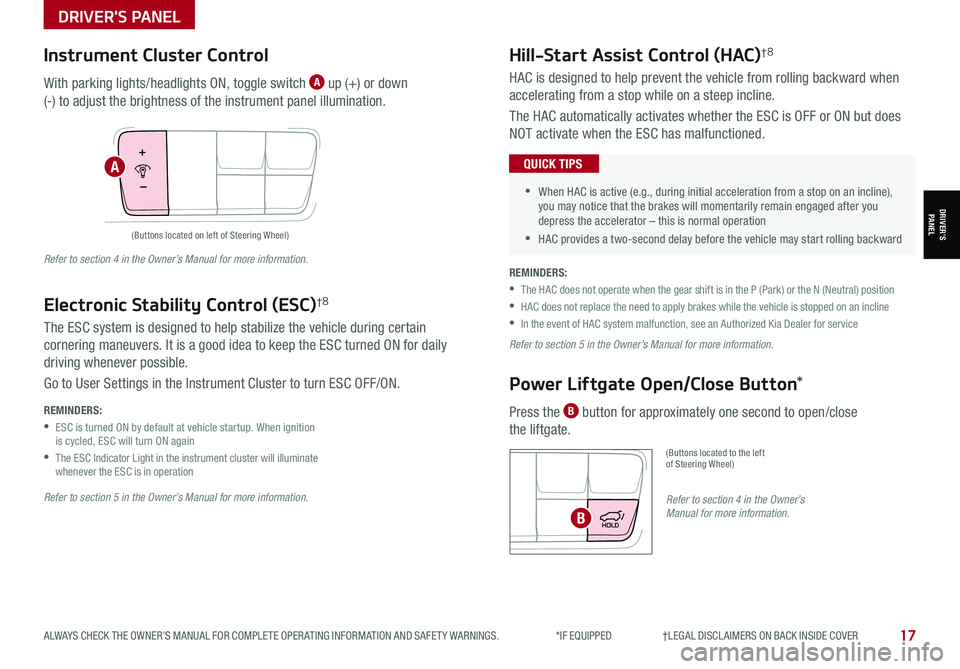
Press the B button for approximately one second to open/close
the liftgate.
(Buttons located to the left of Steering Wheel)
•
•When HAC is active (e.g., during initial acceleration from a stop on an incline), you may notice that the brakes will momentarily remain engaged after you depress the accelerator – this is normal operation
•HAC provides a two-second delay before the vehicle may start rolling backward
QUICK TIPS
REMINDERS:
•
The HAC does not operate when the gear shift is in the P (Park) or the N (Neutral) position
•
HAC does not replace the need to apply brakes while the vehicle is stopped on an incline
•In the event of HAC system malfunction, see an Authorized Kia Dealer for service
Refer to section 5 in the Owner’s Manual for more information.
Refer to section 4 in the Owner’s Manual for more information.B
(Buttons located on left of Steering Wheel)
Instrument Cluster Control
With parking lights/headlights ON, toggle switch A up (+) or down
(-) to adjust the brightness of the instrument panel illumination.
Refer to section 5 in the Owner’s Manual for more information.
Refer to section 4 in the Owner’s Manual for more information.
REMINDERS:
•
ESC is turned ON by default at vehicle startup. When ignition is cycled, ESC will turn ON again
•
The ESC Indicator Light in the instrument cluster will illuminate whenever the ESC is in operation
The ESC system is designed to help stabilize the vehicle during certain
cornering maneuvers. It is a good idea to keep the ESC turned ON for daily
driving whenever possible.
Go to User Settings in the Instrument Cluster to turn ESC OFF/ON.
Electronic Stability Control (ESC)†8
A
DRIVER’SPANEL
Page 20 of 58
DRIVER'S PANEL
18*IF EQUIPPED SPORTAGE FEATURES & FUNCTIONS GUIDE
DRIVER’SPANEL
Auto Door Lock /Unlock will engage when the gear shift is moved into
or out of the P (Park) position. Refer to the User Settings in the LCD
Instrument Cluster modes on how to turn Auto Door Lock /Unlock ON/OFF.
Refer to section 4 in the Owner’s Manual for more information.
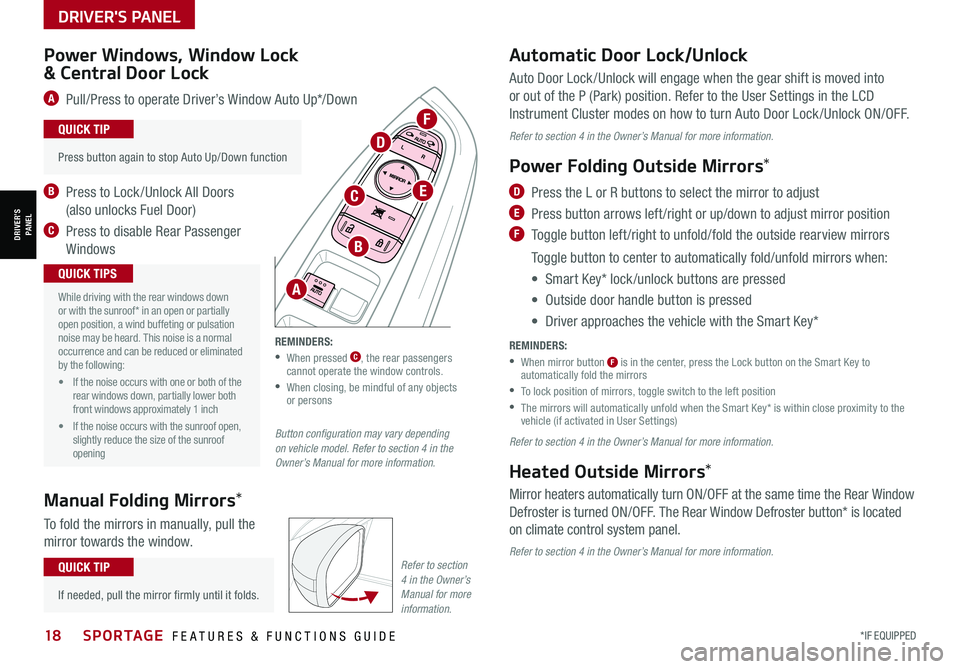
Power Folding Outside Mirrors*
D Press the L or R buttons to select the mirror to adjust
E Press button arrows left /right or up/down to adjust mirror position
F Toggle button left /right to unfold/fold the outside rearview mirrors
Toggle button to center to automatically fold/unfold mirrors when:
• Smart Key* lock /unlock buttons are pressed
• Outside door handle button is pressed
• Driver approaches the vehicle with the Smart Key*
REMINDERS:
•
When mirror button F is in the center, press the Lock button on the Smart Key to automatically fold the mirrors
•To lock position of mirrors, toggle switch to the left position
•
The mirrors will automatically unfold when the Smart Key* is within close proximity to the vehicle (if activated in User Settings)
Refer to section 4 in the Owner’s Manual for more information.
Heated Outside Mirrors*
Mirror heaters automatically turn ON/OFF at the same time the Rear Window
Defroster is turned ON/OFF. The Rear Window Defroster button* is located
on climate control system panel.
Refer to section 4 in the Owner’s Manual for more information.
•
Press button again to stop Auto Up/Down function
QUICK TIP
Button configuration may vary depending on vehicle model. Refer to section 4 in the Owner’s Manual for more information.
Power Windows, Window Lock
& Central Door Lock
A Pull/Press to operate Driver’s Window Auto Up*/Down
B Press to Lock /Unlock All Doors
(also unlocks Fuel Door)
C Press to disable Rear Passenger
Windows
Automatic Door Lock/Unlock
A
B
C
D
E
F
•
While driving with the rear windows down or with the sunroof* in an open or partially open position, a wind buffeting or pulsation noise may be heard. This noise is a normal occurrence and can be reduced or eliminated by the following:
• If the noise occurs with one or both of the rear windows down, partially lower both front windows approximately 1 inch
• If the noise occurs with the sunroof open, slightly reduce the size of the sunroof opening
QUICK TIPS
REMINDERS:
• When pressed C, the rear passengers cannot operate the window controls.
•
When closing, be mindful of any objects or persons
Manual Folding Mirrors*
To fold the mirrors in manually, pull the
mirror towards the window.
•
If needed, pull the mirror firmly until it folds.
QUICK TIPRefer to section 4 in the Owner’s Manual for more information.
Page 23 of 58
STEERING WHEEL CONTROLS
STEERING WHEEL CONTROLS
*IF EQUIPPED 21ALWAYS CHECK THE OWNER’S MANUAL FOR COMPLETE OPER ATING INFORMATION AND SAFET Y WARNINGS.
LO and HI sets wiper speed. No intermittent wipe function is available on rear wipers
QUICK TIP
Windshield Wipers & Washers
Front Wiper & Washer
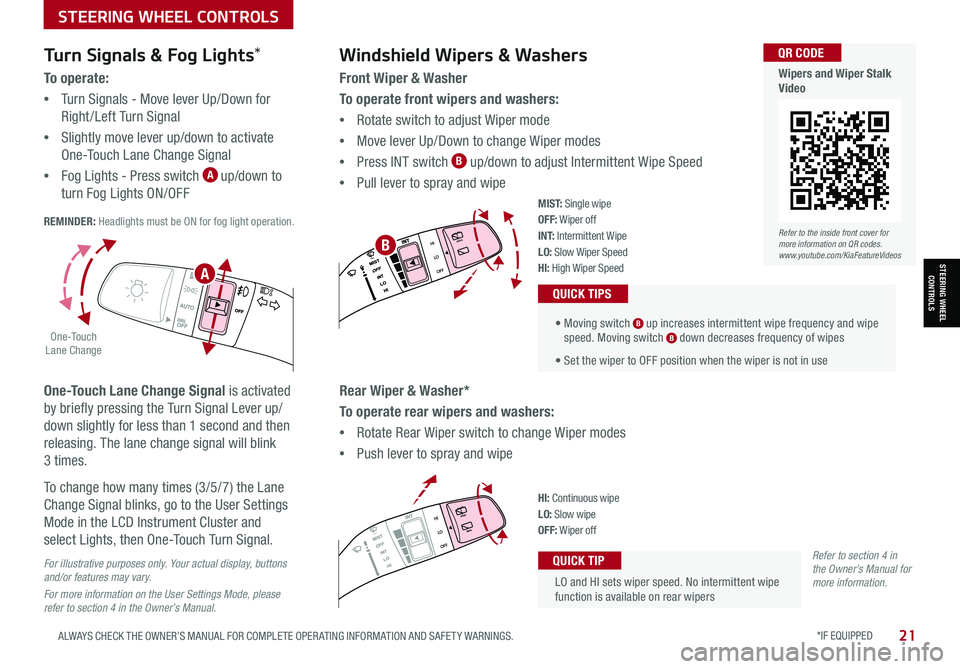
To operate front wipers and washers:
•Rotate switch to adjust Wiper mode
•Move lever Up/Down to change Wiper modes
•Press INT switch B up/down to adjust Intermittent Wipe Speed
•Pull lever to spray and wipe
• Moving switch B up increases intermittent wipe frequency and wipe speed. Moving switch B down decreases frequency of wipes
• Set the wiper to OFF position when the wiper is not in use
QUICK TIPS
Rear Wiper & Washer*
To operate rear wipers and washers:
•Rotate Rear Wiper switch to change Wiper modes
•Push lever to spray and wipe
PUSH
PULL
PUSH
PULL
QUIC K T IP
M I S T: Single wipeOFF: Wiper offI N T: Intermittent Wipe
LO: Slow Wiper SpeedHI: High Wiper Speed
PUSH
PULL
PUSH
PULL
QUIC K T IPHI: Continuous wipeLO: Slow wipeOFF: Wiper off
Turn Signals & Fog Lights*
To o p e r a t e :
•Turn Signals - Move lever Up/Down for
Right /Left Turn Signal
•Slightly move lever up/down to activate
One-Touch Lane Change Signal
•Fog Lights - Press switch A up/down to
turn Fog Lights ON/OFF REMINDER: Headlights must be ON for fog light operation.
One-Touch Lane Change Signal is activated
by briefly pressing the Turn Signal Lever up/
down slightly for less than 1 second and then
releasing. The lane change signal will blink
3 times.
To change how many times (3/5/7) the Lane
Change Signal blinks, go to the User Settings
Mode in the LCD Instrument Cluster and
select Lights, then One-Touch Turn Signal.
For illustrative purposes only. Your actual display, buttons and/or features may vary.
For more information on the User Settings Mode, please refer to section 4 in the Owner’s Manual.
Refer to section 4 in the Owner’s Manual for more information.
.
O ne -To u ch Lane Change
A
BRefer to the inside front cover for more information on QR codes.www.youtube.com/KiaFeatureVideos
QR CODE
Wipers and Wiper Stalk Video
Page 35 of 58
33ALWAYS CHECK THE OWNER’S MANUAL FOR COMPLETE OPER ATING INFORMATION AND SAFET Y WARNINGS. *IF EQUIPPED
CENTER PANEL
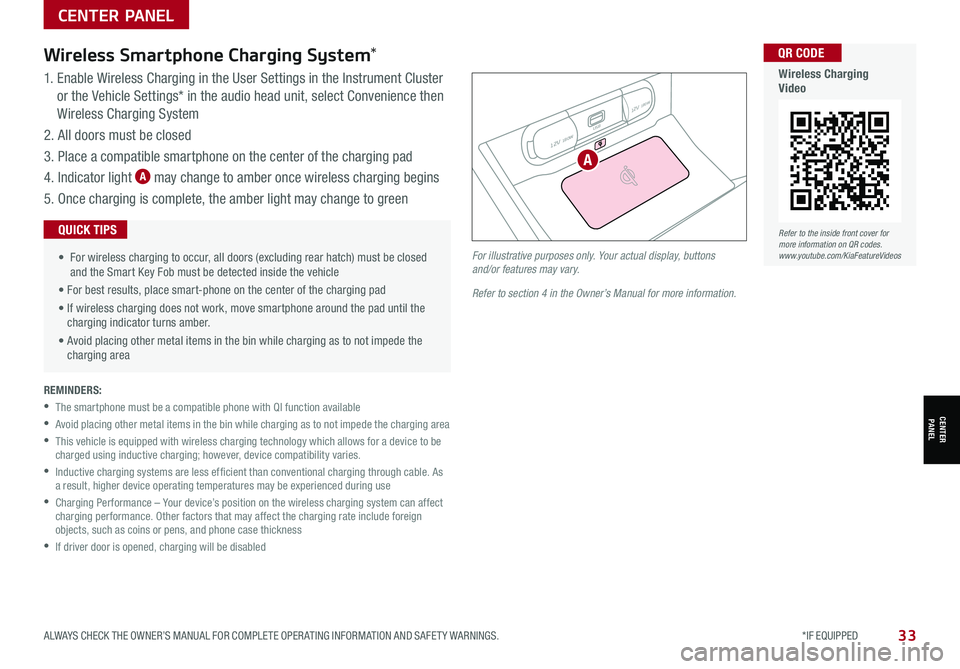
1. Enable Wireless Charging in the User Settings in the Instrument Cluster
or the Vehicle Settings* in the audio head unit, select Convenience then
Wireless Charging System
2. All doors must be closed
3. Place a compatible smartphone on the center of the charging pad
4. Indicator light A may change to amber once wireless charging begins
5. Once charging is complete, the amber light may change to green
Wireless Smartphone Charging System*
• For wireless charging to occur, all doors (excluding rear hatch) must be closed and the Smart Key Fob must be detected inside the vehicle
• For best results, place smart-phone on the center of the charging pad
• If wireless charging does not work, move smartphone around the pad until the charging indicator turns amber.
• Avoid placing other metal items in the bin while charging as to not impede the charging area
QUICK TIPS
REMINDERS:
•The smartphone must be a compatible phone with QI function available
•Avoid placing other metal items in the bin while charging as to not impede the charging area
•
This vehicle is equipped with wireless charging technology which allows for a device to be charged using inductive charging; however, device compatibility varies.
•
Inductive charging systems are less ef ficient than conventional charging through cable. As a result, higher device operating temperatures may be experienced during use
•
Charging Performance – Your device’s position on the wireless charging system can affect charging performance. Other factors that may affect the charging rate include foreign objects, such as coins or pens, and phone case thickness
•If driver door is opened, charging will be disabled
12V 180W
12V 180W
USB
For illustrative purposes only. Your actual display, buttons and/or features may vary.
Refer to section 4 in the Owner’s Manual for more information.
CENTER PANEL
A
Refer to the inside front cover for more information on QR codes.www.youtube.com/KiaFeatureVideos
QR CODE
Wireless Charging Video
Page 39 of 58
37ALWAYS CHECK THE OWNER’S MANUAL FOR COMPLETE OPER ATING INFORMATION AND SAFET Y WARNINGS. *IF EQUIPPED
CENTER PANEL
CENTER PANEL
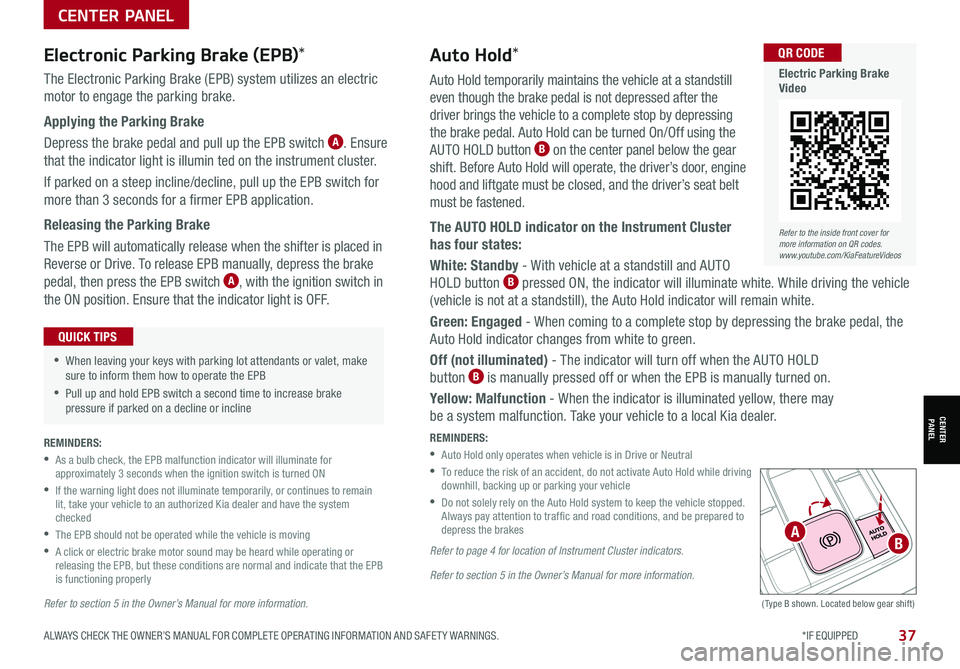
Auto Hold temporarily maintains the vehicle at a standstill
even though the brake pedal is not depressed after the
driver brings the vehicle to a complete stop by depressing
the brake pedal. Auto Hold can be turned On/Off using the
AUTO HOLD button B on the center panel below the gear
shift. Before Auto Hold will operate, the driver’s door, engine
hood and liftgate must be closed, and the driver’s seat belt
must be fastened.
The AUTO HOLD indicator on the Instrument Cluster
has four states:
White: Standby - With vehicle at a standstill and AUTO
HOLD button B pressed ON, the indicator will illuminate white. While driving the vehicle
(vehicle is not at a standstill), the Auto Hold indicator will remain white.
Green: Engaged - When coming to a complete stop by depressing the brake pedal, the
Auto Hold indicator changes from white to green.
Off (not illuminated) - The indicator will turn off when the AUTO HOLD
button B is manually pressed off or when the EPB is manually turned on.
Yellow: Malfunction - When the indicator is illuminated yellow, there may
be a system malfunction. Take your vehicle to a local Kia dealer.
REMINDERS:
•
Auto Hold only operates when vehicle is in Drive or Neutral
•
To reduce the risk of an accident, do not activate Auto Hold while driving downhill, backing up or parking your vehicle
•
Do not solely rely on the Auto Hold system to keep the vehicle stopped. Always pay attention to traf fic and road conditions, and be prepared to depress the brakes
Refer to page 4 for location of Instrument Cluster indicators.
Refer to section 5 in the Owner’s Manual for more information.
(Type B shown. Located below gear shift)
Electronic Parking Brake (EPB)*
The Electronic Parking Brake (EPB) system utilizes an electric
motor to engage the parking brake.
Applying the Parking Brake
Depress the brake pedal and pull up the EPB switch A. Ensure
that the indicator light is illumin ted on the instrument cluster.
If parked on a steep incline/decline, pull up the EPB switch for
more than 3 seconds for a firmer EPB application.
Releasing the Parking Brake
The EPB will automatically release when the shifter is placed in
Reverse or Drive. To release EPB manually, depress the brake
pedal, then press the EPB switch A, with the ignition switch in
the ON position. Ensure that the indicator light is O F F.
•When leaving your keys with parking lot attendants or valet, make sure to inform them how to operate the EPB
•Pull up and hold EPB switch a second time to increase brake pressure if parked on a decline or incline
QUICK TIPS
Auto Hold*
REMINDERS:
•
As a bulb check, the EPB malfunction indicator will illuminate for approximately 3 seconds when the ignition switch is turned ON
•
If the warning light does not illuminate temporarily, or continues to remain lit, take your vehicle to an authorized Kia dealer and have the system checked
•The EPB should not be operated while the vehicle is moving
•
A click or electric brake motor sound may be heard while operating or releasing the EPB, but these conditions are normal and indicate that the EPB is functioning properly
Refer to section 5 in the Owner’s Manual for more information.
AB
Refer to the inside front cover for more information on QR codes.www.youtube.com/KiaFeatureVideos
QR CODE
Electric Parking Brake Video
Page 50 of 58

48SPORTAGE FEATURES & FUNCTIONS GUIDE
OTHER KEY FEATURES
*IF EQUIPPED †LEGAL DISCL AIMERS ON BACK INSIDE COVER
OTHER KEY FEATURES
When the Smart Key fob is on your person and you are near the
back of the vehicle, within close proximity, the hazard lights will
blink and a chime will sound for about 3 seconds as an alert
that the Smart Power Liftgate is about to open. Then the alert
system will blink and chime
two additional times before
opening the Smart Power
Liftgate.
The Smart Power Liftgate
feature is off by default. To
enable the Smart Power
Liftgate, go to User Settings
in the LCD Instrument
Cluster modes.
REMINDERS:
•All doors are closed and locked after about 15 seconds for the system to operate
•The Smart Power Liftgate feature will not operate when:
- The doors are recently closed and locked, and the Smart Key is still detected after 15 seconds near the vehicle or within 60 inches of the door handles
- A door is not locked or closed
- The Smart Key is in the vehicle
•
Press any button on the Smart Key fob during the Detect and Alert stage to deactivate the Smart Power Liftgate function
•Ensure obstacles and people are out of the way of the liftgate
• During the Smart Power Liftgate alert, the Smart Power Liftgate can be deactivated with the Smart Key by pressing any button on the key fob
• The open height can be adjusted. For information on how to set open height, see your Owner's Manual
QUICK TIPS
HOLD
Liftgate Release Button
(for manual liftgate)
Smart Power Liftgate*†1 6
Located underneath the rear liftgate hatch. With
liftgate unlocked, press the Liftgate Release Button B and pull the liftgate up by the handle to open.
• The liftgate must be unlocked before it can be opened by the Liftgate Release Button
• The liftgate unlocks automatically and can then be opened, when the Smart Key fob* is within close proximity to the vehicle
QUICK TIPS
HOLD
(Liftgate release button)
Refer to section 4 in the Owner’s Manual for more information.
ABRefer to the inside front cover for more information on QR codes.www.youtube.com/KiaFeatureVideos
QR CODE
Smart Power Liftgate Video