buttons KIA SPORTAGE 2022 Features and Functions Guide
[x] Cancel search | Manufacturer: KIA, Model Year: 2022, Model line: SPORTAGE, Model: KIA SPORTAGE 2022Pages: 58, PDF Size: 4.49 MB
Page 42 of 58

40SPORTAGE FEATURES & FUNCTIONS GUIDE*IF EQUIPPED †LEGAL DISCL AIMERS ON BACK INSIDE COVER
SEATING
SEATING
.
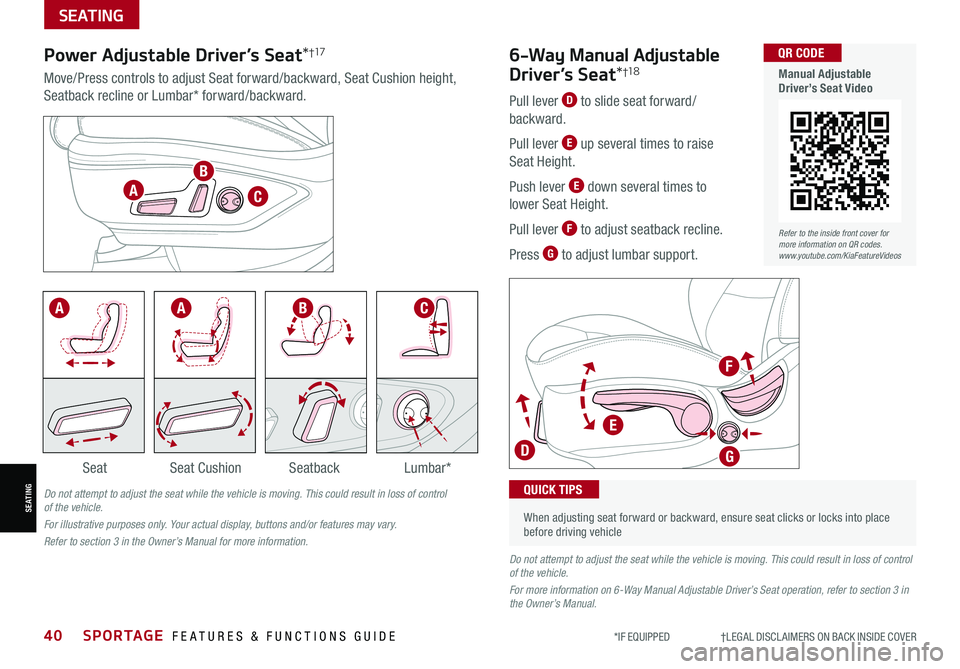
SeatbackLumbar*SeatSeat Cushion
Power Adjustable Driver’s Seat*†176-Way Manual Adjustable
Driver’s Seat*†1 8Move/Press controls to adjust Seat forward/backward, Seat Cushion height,
Seatback recline or Lumbar* forward/backward.Pull lever D to slide seat forward/
backward.
Pull lever E up several times to raise
Seat Height.
Push lever E down several times to
lower Seat Height.
Pull lever F to adjust seatback recline.
Press G to adjust lumbar support.
•
When adjusting seat forward or backward, ensure seat clicks or locks into place before driving vehicle
QUICK TIPS
.
Do not attempt to adjust the seat while the vehicle is moving. This could result in loss of control of the vehicle.
For more information on 6-Way Manual Adjustable Driver’s Seat operation, refer to section 3 in the Owner’s Manual.
Do not attempt to adjust the seat while the vehicle is moving. This could result in loss of control of the vehicle.
For illustrative purposes only. Your actual display, buttons and/or features may vary.
Refer to section 3 in the Owner’s Manual for more information.
.
A
F
GD
E
C
C
AAB
B
Refer to the inside front cover for more information on QR codes.www.youtube.com/KiaFeatureVideos
QR CODE
Manual Adjustable Driver’s Seat Video
Page 47 of 58

45ALWAYS CHECK THE OWNER’S MANUAL FOR COMPLETE OPER ATING INFORMATION AND SAFET Y WARNINGS. *IF EQUIPPED †LEGAL DISCL AIMERS ON BACK INSIDE COVER
OTHER KEY FEATURES
OTHER KEY FEATURES
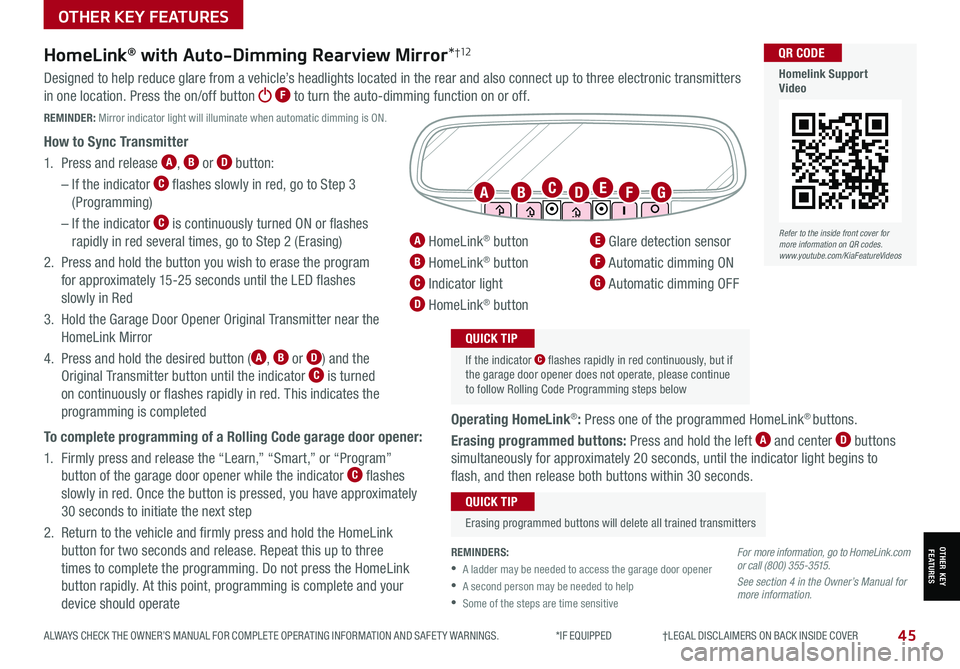
HomeLink® with Auto-Dimming Rearview Mirror*†12
A HomeLink® button
B HomeLink® button
C Indicator light
D HomeLink® button
E Glare detection sensor
F Automatic dimming ON
G Automatic dimming OFF
ABFGCED
REMINDERS:
•A ladder may be needed to access the garage door opener
•A second person may be needed to help
•Some of the steps are time sensitive
If the indicator C flashes rapidly in red continuously, but if the garage door opener does not operate, please continue to follow Rolling Code Programming steps below
QUICK TIP
Erasing programmed buttons will delete all trained transmitters
QUICK TIP
For more information, go to HomeLink.com or call (800) 355-3515.
See section 4 in the Owner’s Manual for more information.
Designed to help reduce glare from a vehicle’s headlights located in the rear and also connect up to three electronic transmitters
in one location. Press the on/off button F to turn the auto-dimming function on or off.
REMINDER: Mirror indicator light will illuminate when automatic dimming is ON.
How to Sync Transmitter
1. Press and release A, B or D button:
– If the indicator C flashes slowly in red, go to Step 3
(Programming)
– If the indicator C is continuously turned ON or flashes
rapidly in red several times, go to Step 2 (Erasing)
2. Press and hold the button you wish to erase the program
for approximately 15-25 seconds until the LED flashes
slowly in Red
3. Hold the Garage Door Opener Original Transmitter near the
HomeLink Mirror
4.
Press and hold the desired button (A, B or D) and the
Original Transmitter button until the indicator C is turned
on continuously or flashes rapidly in red. This indicates the
programming is completed
To complete programming of a Rolling Code garage door opener:
1. Firmly press and release the “Learn,” “Smart,” or “Program”
button of the garage door opener while the indicator C flashes
slowly in red. Once the button is pressed, you have approximately
30 seconds to initiate the next step
2. Return to the vehicle and firmly press and hold the HomeLink
button for two seconds and release. Repeat this up to three
times to complete the programming. Do not press the HomeLink
button rapidly. At this point, programming is complete and your
device should operate
Operating HomeLink®: Press one of the programmed HomeLink® buttons.
Erasing programmed buttons: Press and hold the left A and center D buttons
simultaneously for approximately 20 seconds, until the indicator light begins to
flash, and then release both buttons within 30 seconds.
Refer to the inside front cover for more information on QR codes.www.youtube.com/KiaFeatureVideos
QR CODE
Homelink Support Video
Page 49 of 58

47
OTHER KEY FEATURES
ALWAYS CHECK THE OWNER’S MANUAL FOR COMPLETE OPER ATING INFORMATION AND SAFET Y WARNINGS. *IF EQUIPPED †LEGAL DISCL AIMERS ON BACK INSIDE COVER
OTHER KEY FEATURES
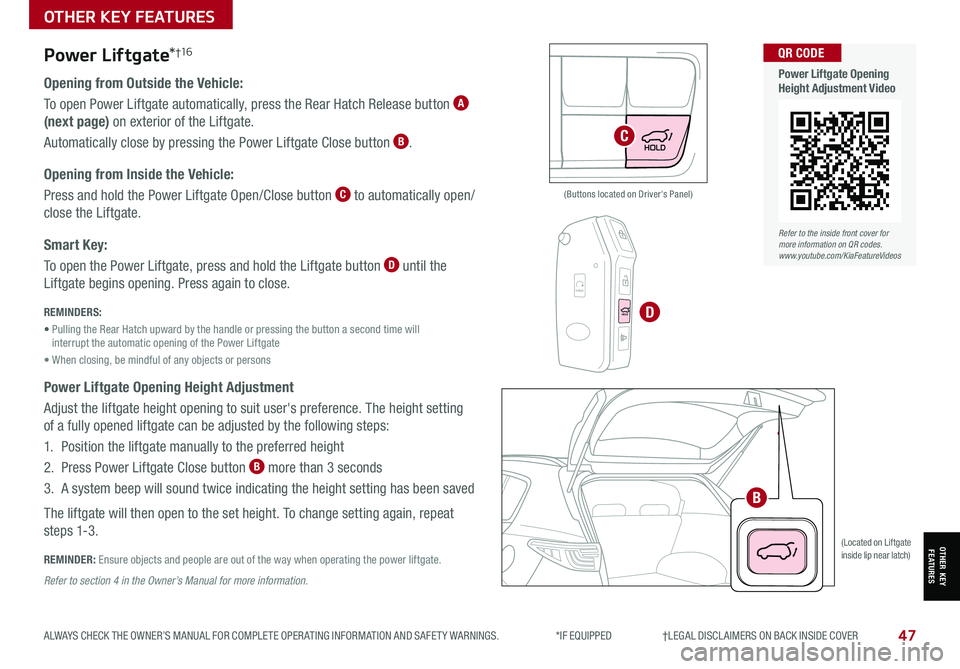
Opening from Outside the Vehicle:
To open Power Liftgate automatically, press the Rear Hatch Release button A
(next page) on exterior of the Liftgate.
Automatically close by pressing the Power Liftgate Close button B.
Opening from Inside the Vehicle:
Press and hold the Power Liftgate Open/Close button C to automatically open/
close the Liftgate.
Smart Key:
To open the Power Liftgate, press and hold the Liftgate button D until the
Liftgate begins opening. Press again to close.
REMINDERS:
• Pulling the Rear Hatch upward by the handle or pressing the button a second time will interrupt the automatic opening of the Power Liftgate
• When closing, be mindful of any objects or persons
Power Liftgate Opening Height Adjustment
Adjust the liftgate height opening to suit user's preference. The height setting
of a fully opened liftgate can be adjusted by the following steps:
1. Position the liftgate manually to the preferred height
2. Press Power Liftgate Close button B more than 3 seconds
3. A system beep will sound twice indicating the height setting has been saved
The liftgate will then open to the set height. To change setting again, repeat
steps 1-3.
REMINDER: Ensure objects and people are out of the way when operating the power liftgate.
Power Liftgate*†1 6
(Located on Liftgate inside lip near latch)
(Buttons located on Driver's Panel)
Refer to section 4 in the Owner’s Manual for more information.
B
C
D
HOLD
HOLD
HOLDHOLD
HOLD
Refer to the inside front cover for more information on QR codes.www.youtube.com/KiaFeatureVideos
QR CODE
Power Liftgate Opening Height Adjustment Video